

1.Overview
- Native Payment Form Builder.
- HubSpot payment forms, integrated with your desired payment gateways.
- HubSpot Payment links for specific contacts or deals.
- Enable payments in HubSpot Quotes.
2.Setup
Open the FormPay app.
Click on the Get Started button, located at the top left of the FormPay home page.

Register yourself and log in using your HubSpot credentials.
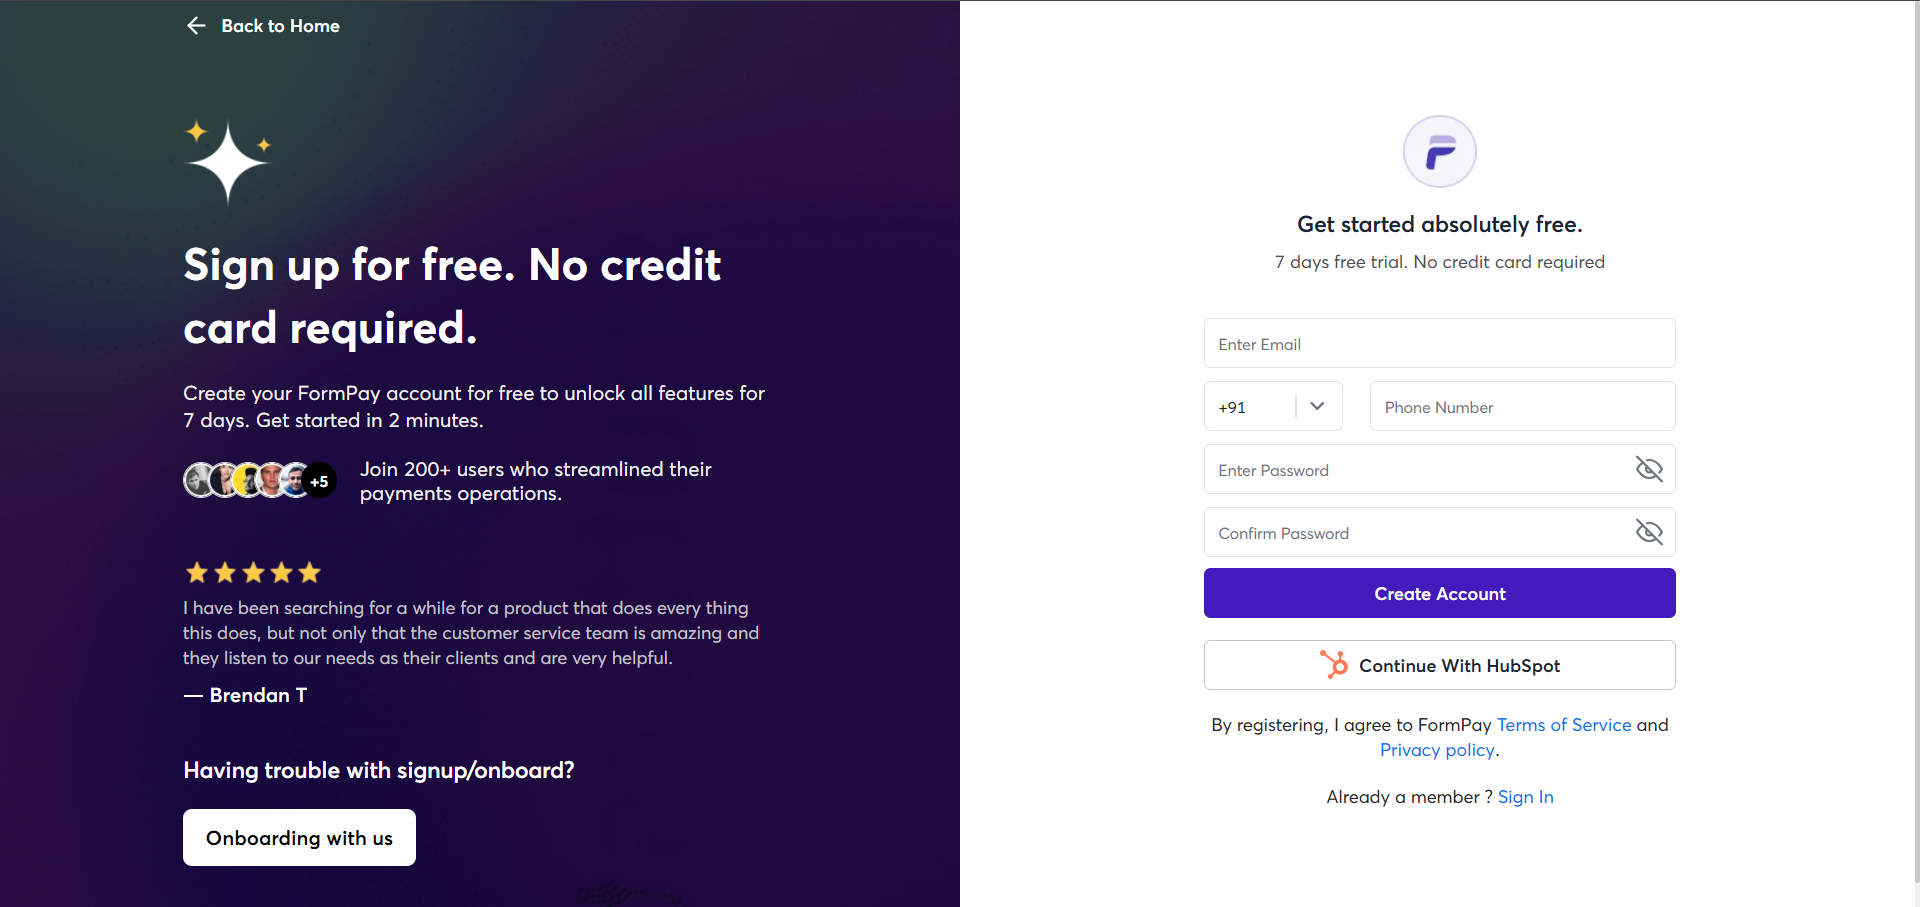
Next, you’re required to confirm your email address through an email sent to the email address you used to log in.
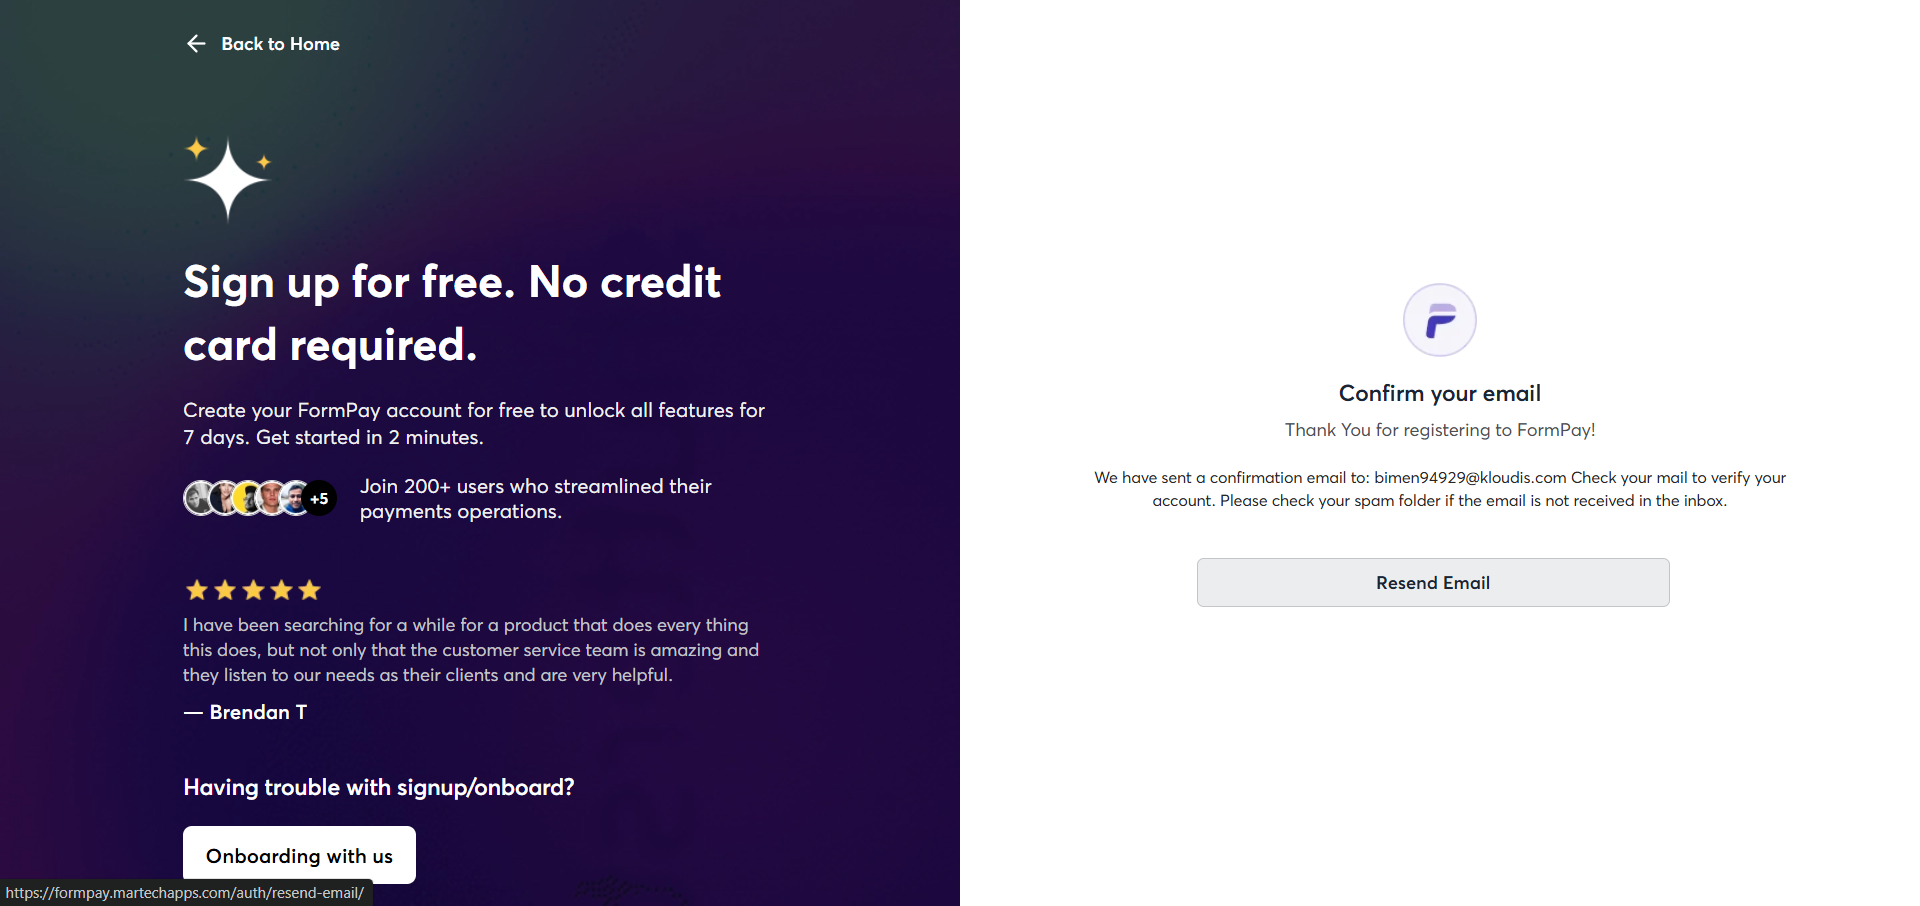
After email verification, you will be required to sign in and then add a HubSpot portal to the app:
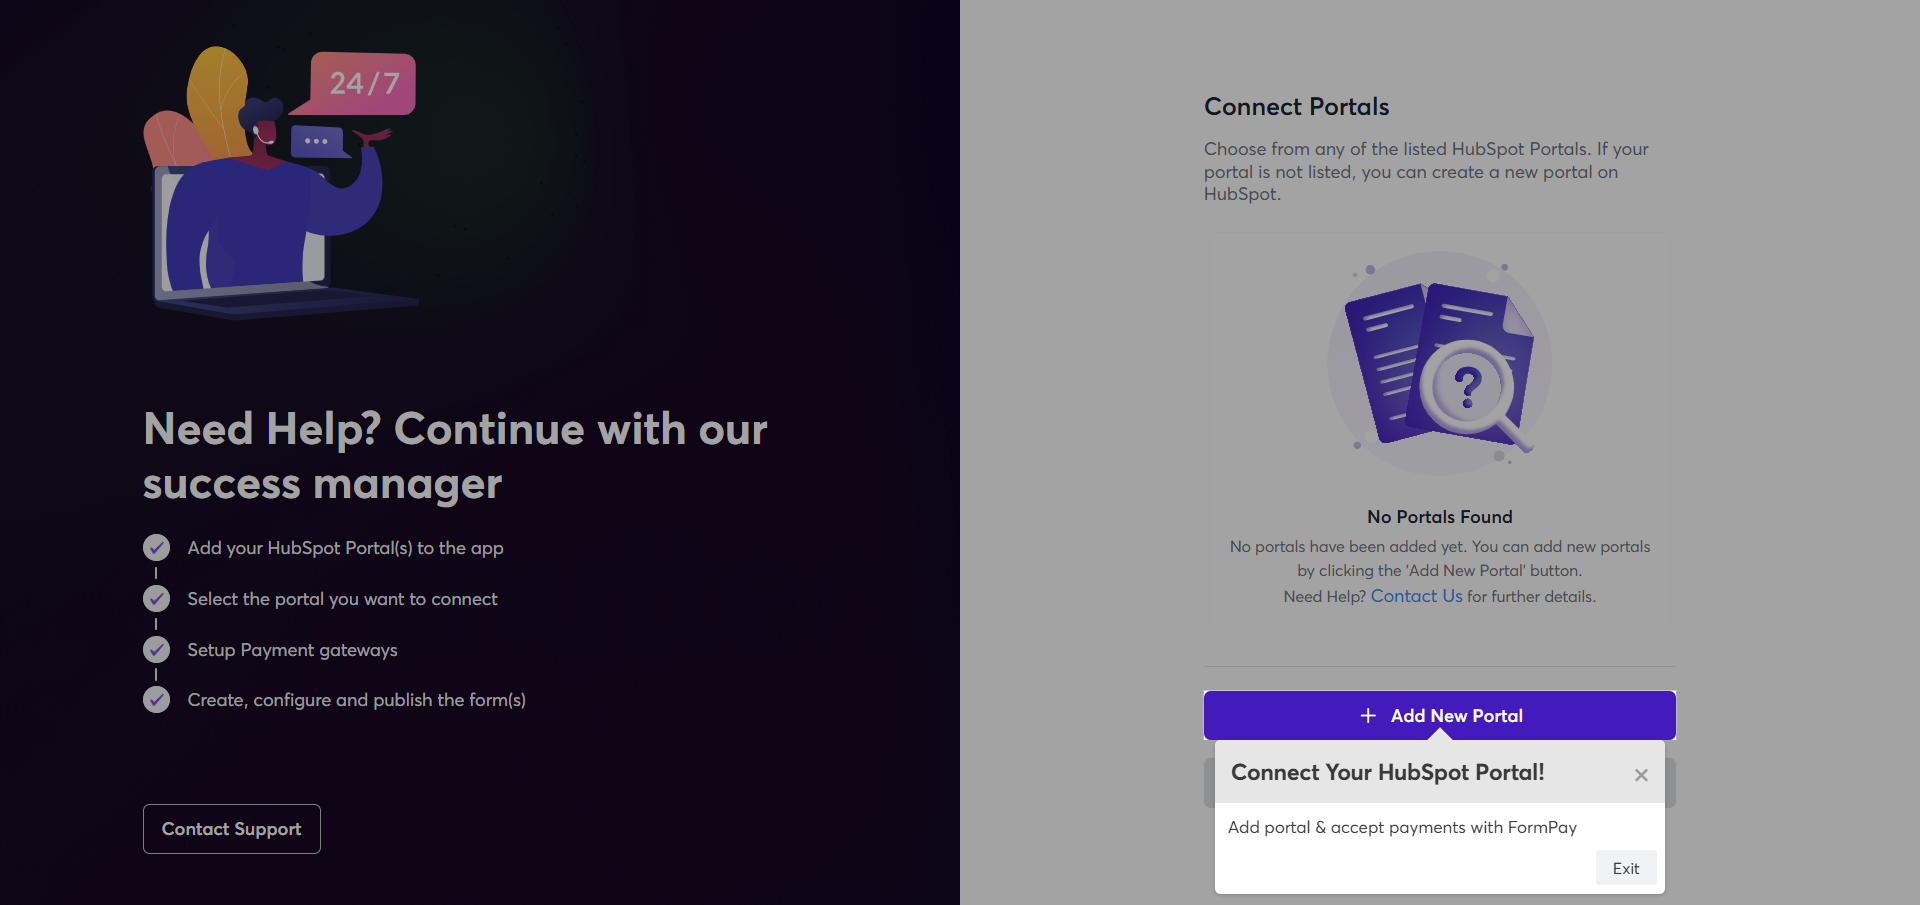
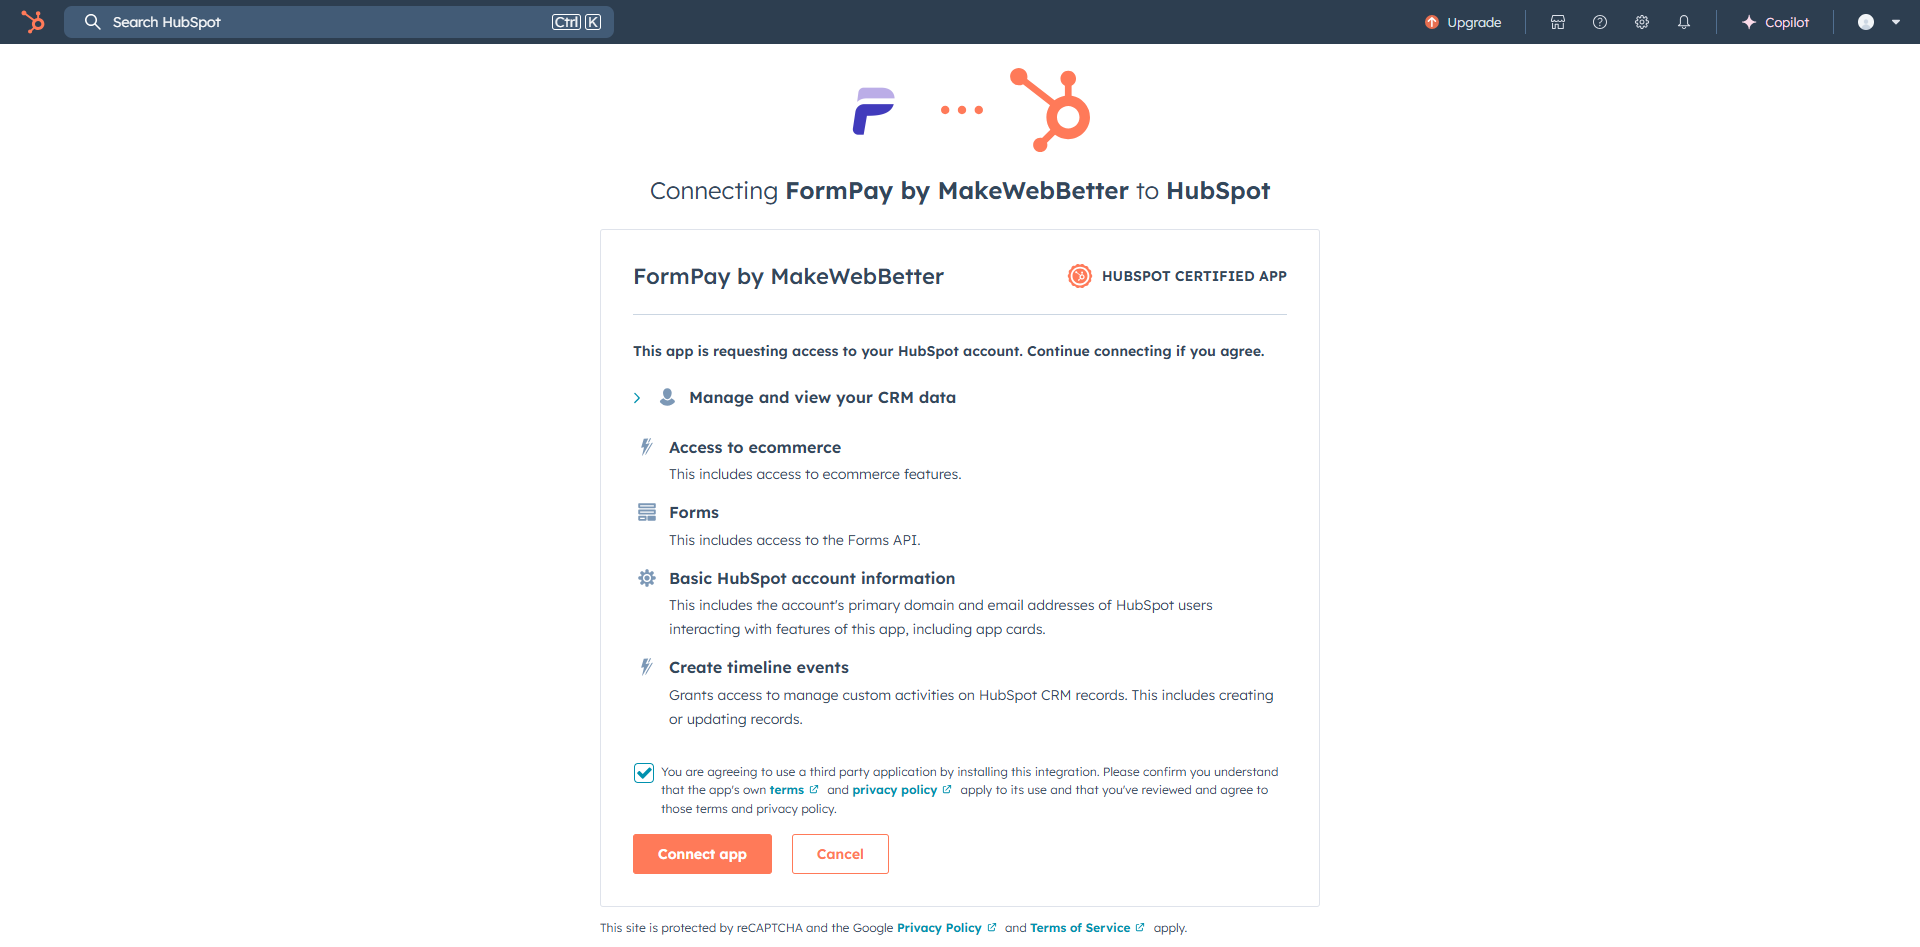
Click on Add New Portal to connect your portal with the app.
Select the HubSpot portal you want to connect with the app on the selection page. Click on Choose Account to select the HubSpot account, and it will be displayed in the app.
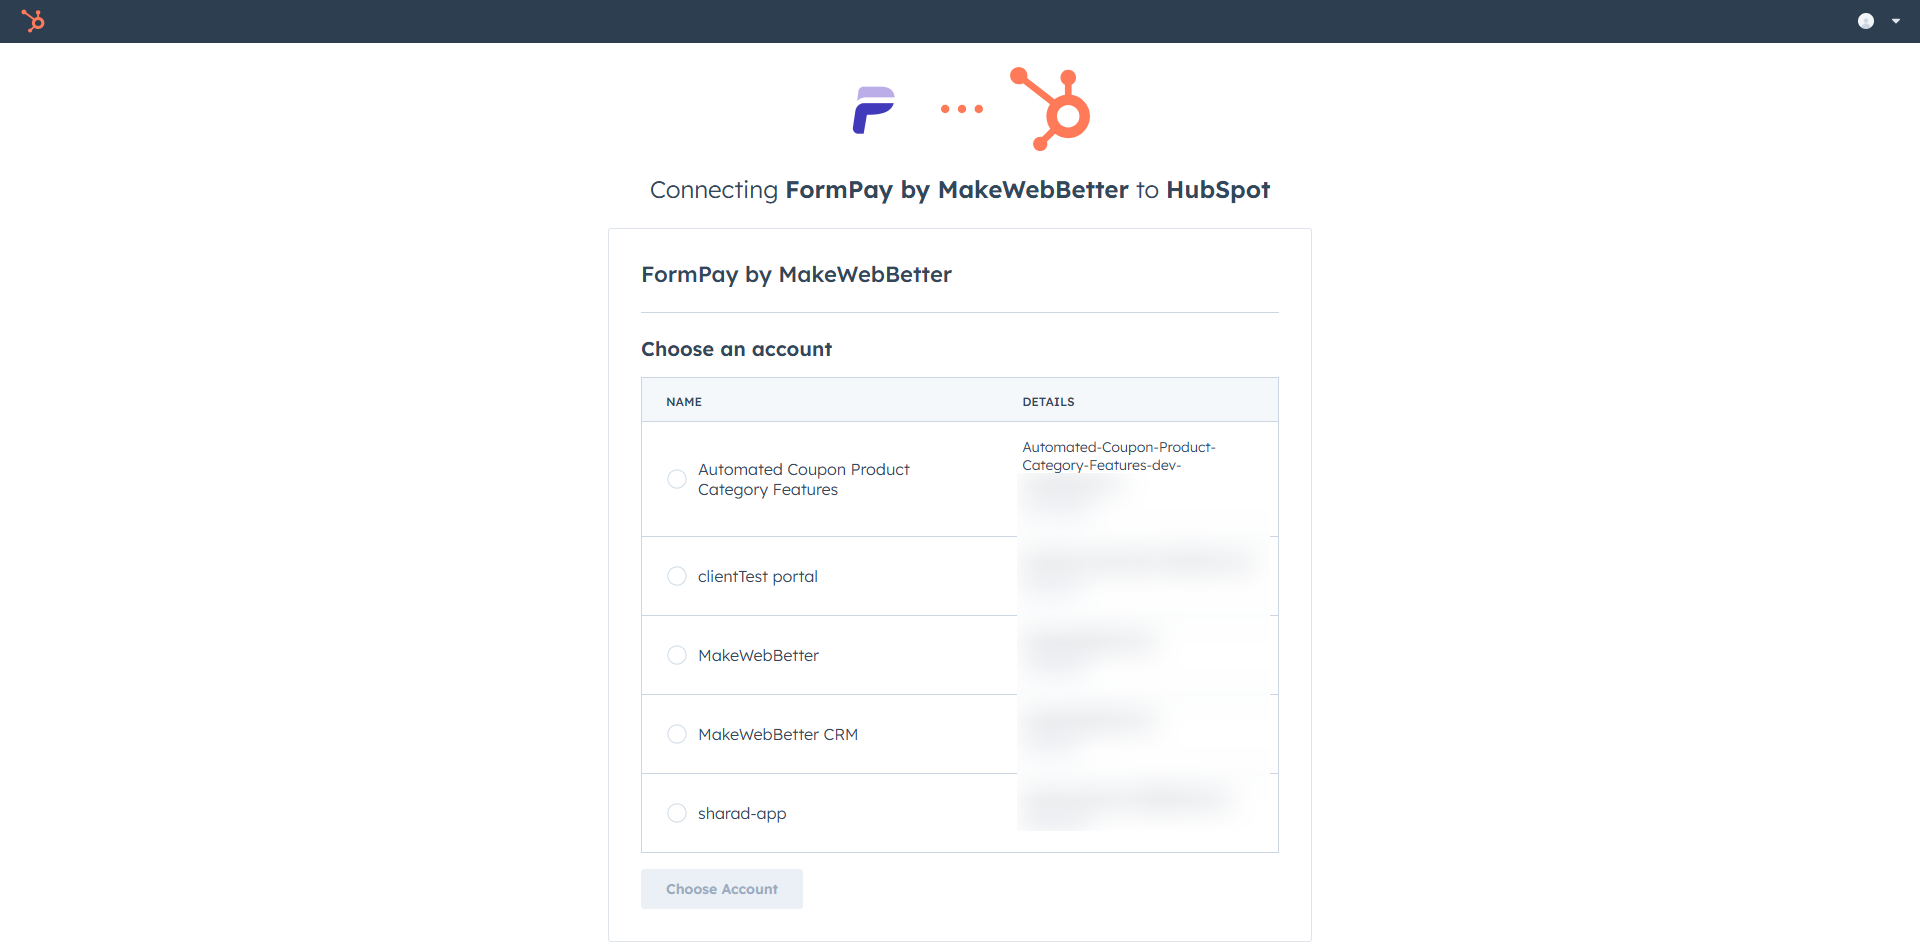
If you want to add more portals, repeat the above process. If you want to go ahead with the added portal, simply click on the respective HubSpot portal, and you will see a different dashboard for the respective portal.
The plugin setup is now complete. Let us move further and talk about other features of this app.
3.General
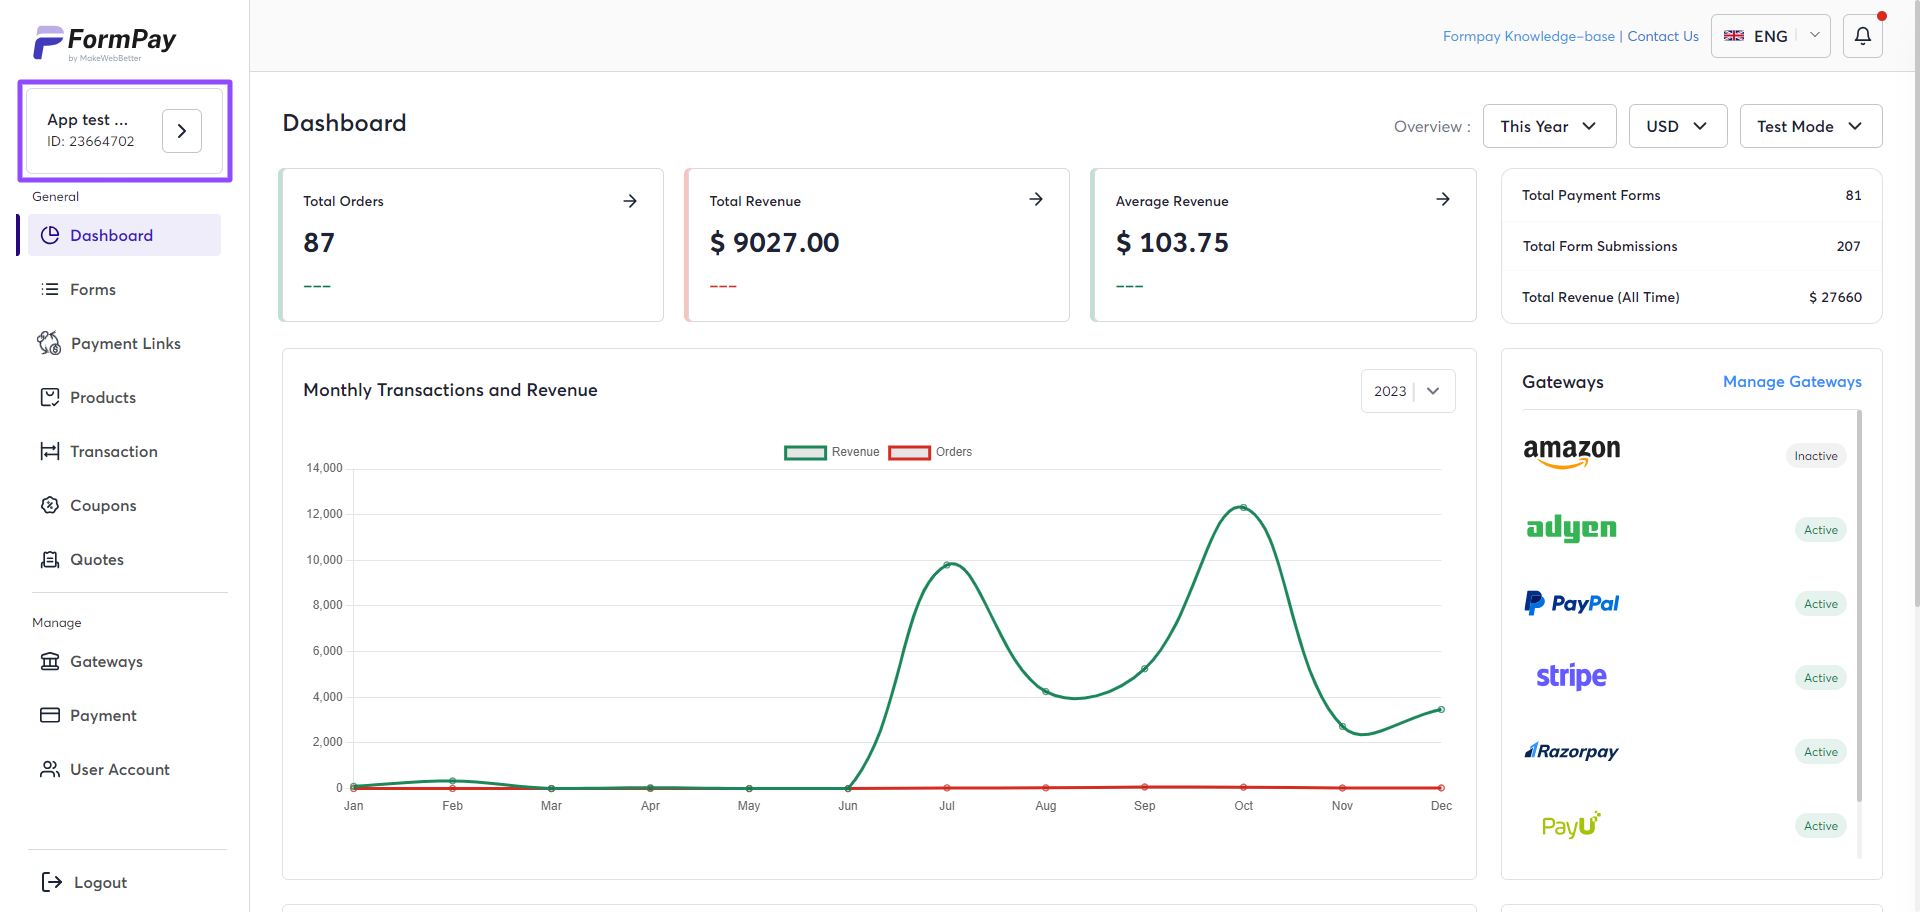
a. Home

This is the fold section that displays a dashboard where you can see all the information related to your recent & overall transactions. The information displayed can be filtered by date range & payment gateways that are available to use. If you scroll down, you will find the guidance for FormPay through FAQs, Video Guides, and Documentation.
b. Forms
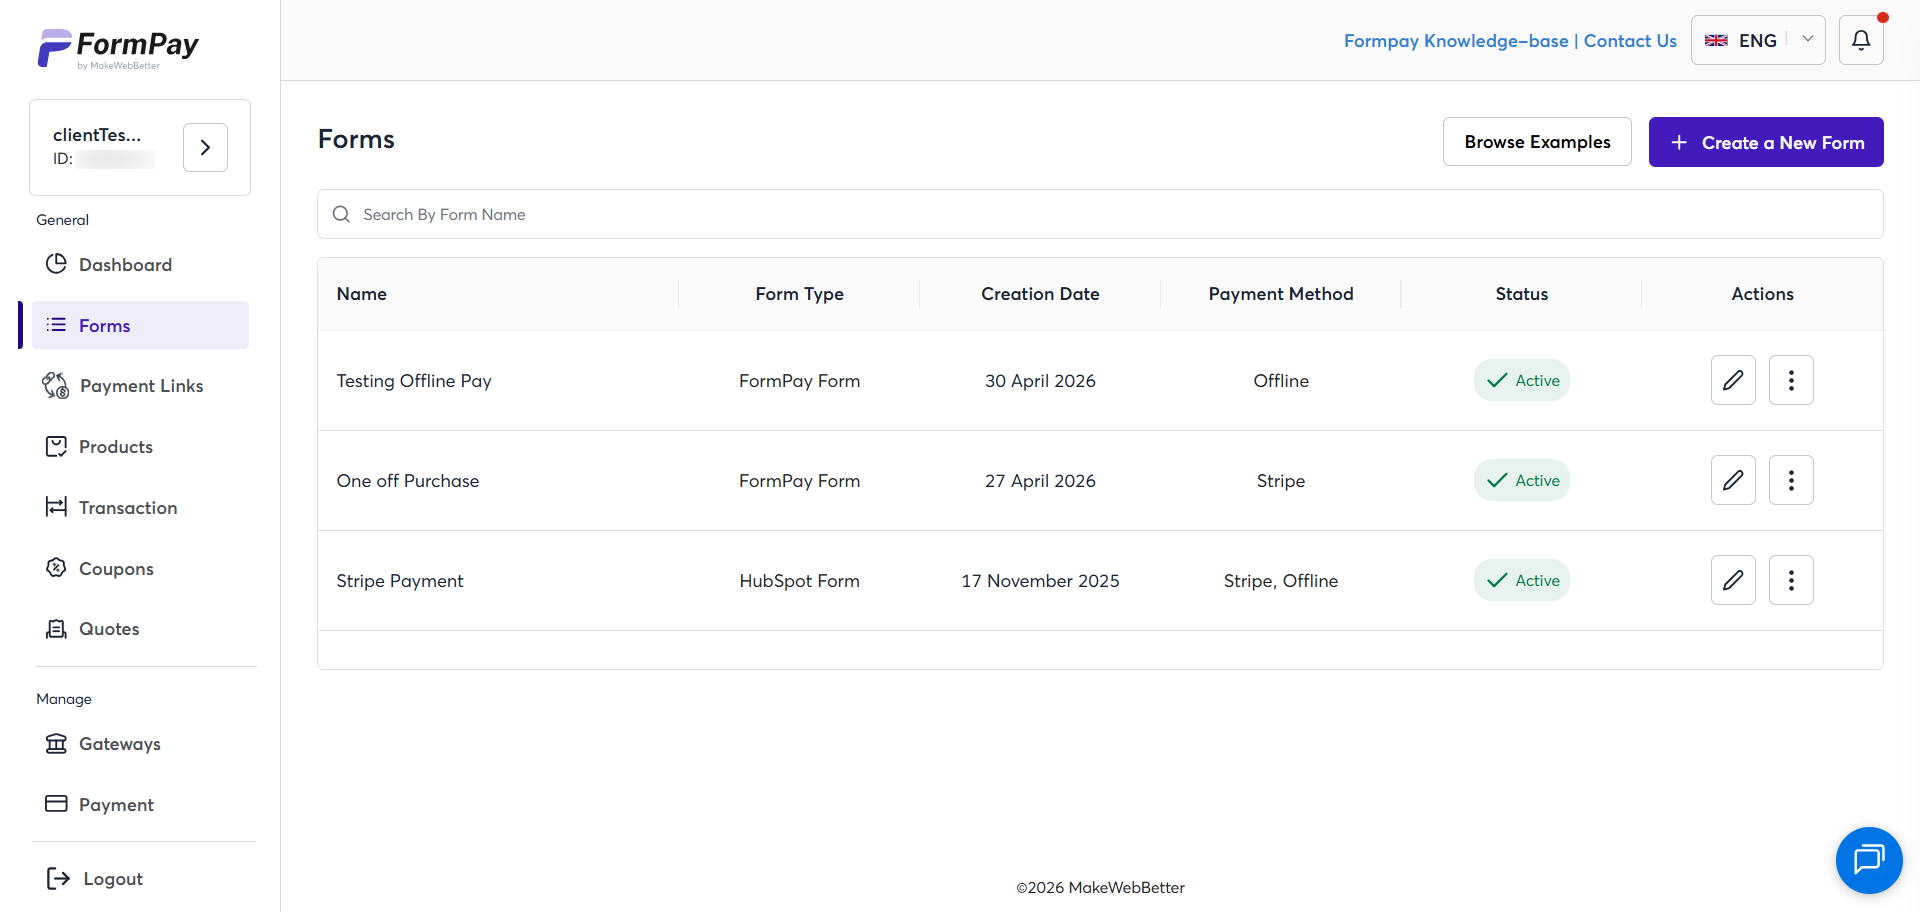
The forms section enables you to create and manage payment forms within this app.
The payment form builder lets you create native forms and convert your existing HubSpot forms into payment forms. You can also create payment forms in HubSpot by using the app card feature available for contact and deal records.
By clicking the ‘Browse Examples’ at the top right, you can access the form examples that seem ideal for your case.
Note: We recommend that new users connect with us directly so we can help set up the form and gateways, all from experts and for free.
c. Payment Links
FormPay activates a payment link functionality in your HubSpot using App Card, allowing you to generate direct payment links with extensive customization.
It requires a quick setup to activate the Formpay App Card functionality in HubSpot. After that, the payment links can be generated in two ways:
- Contacts
- Deals
Note: We’ll learn more about this later in the section ‘How to create a Payment Link in HubSpot?’.
The payment link generation can also be automated using HubSpot workflows. This automation and payment link distribution can be triggered by employing the dedicated payment properties and subscription properties created by FormPay.
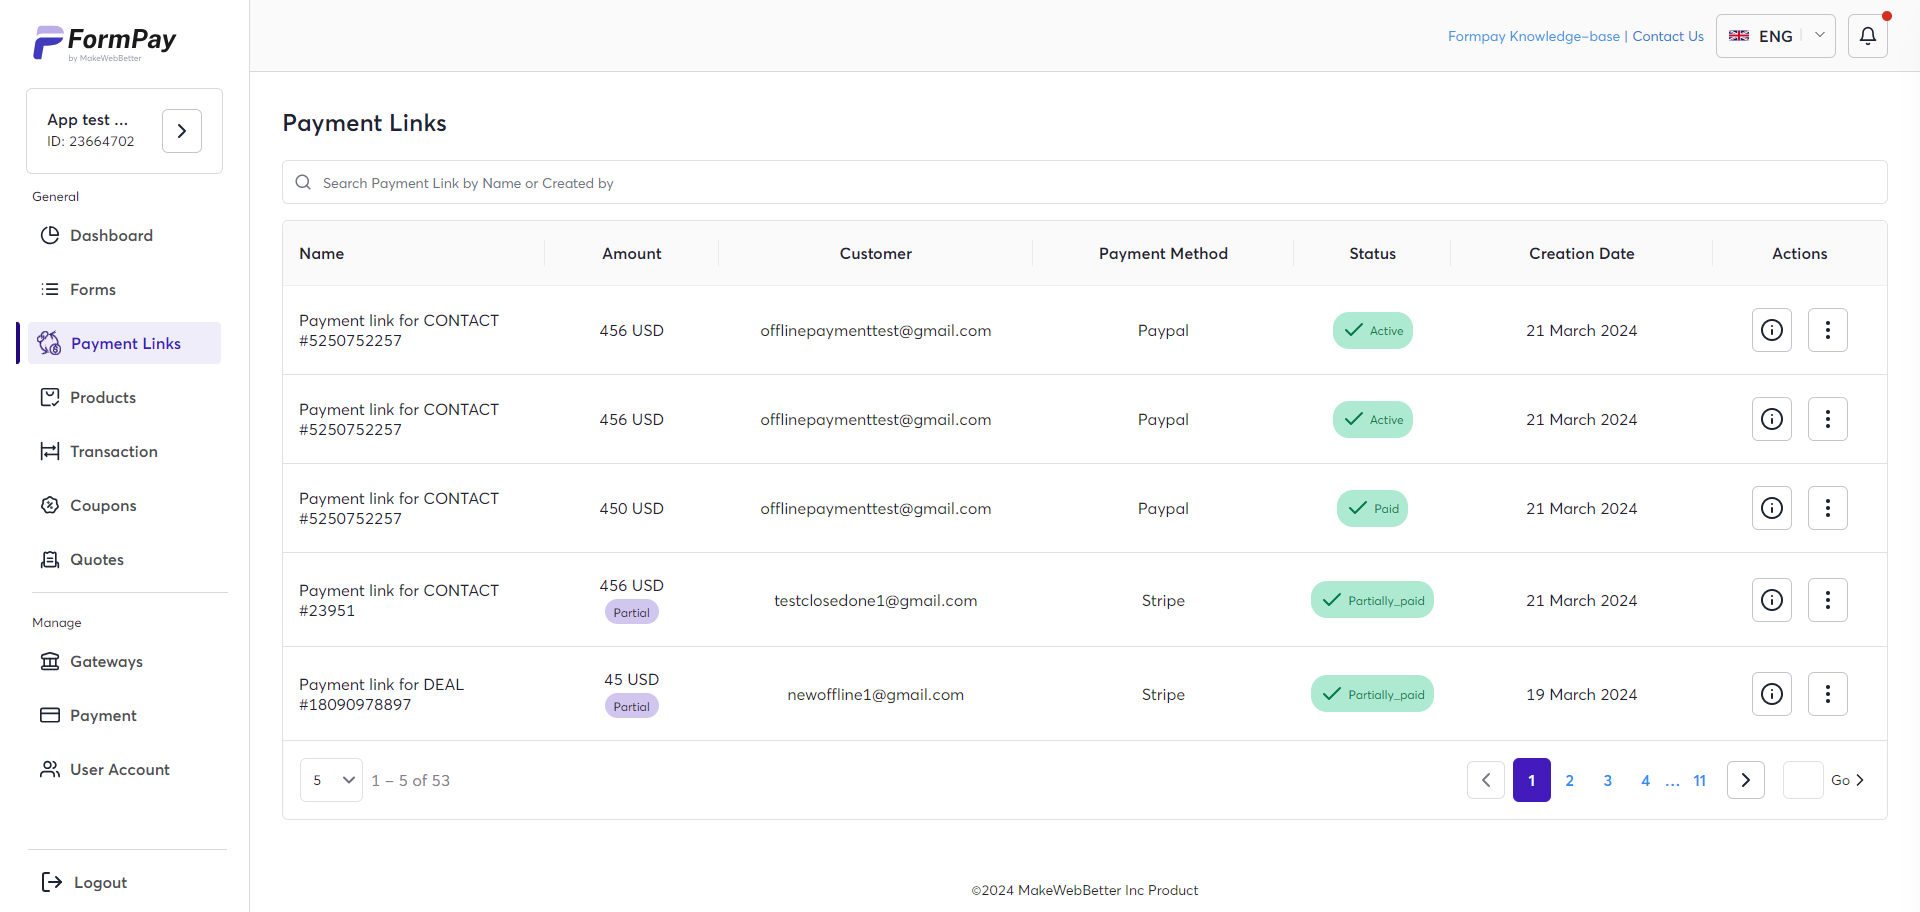
Furthermore, all the payment links generated can be monitored in FormPay itself and in the App Card under the timeline overview section of the deals & contacts record in HubSpot.
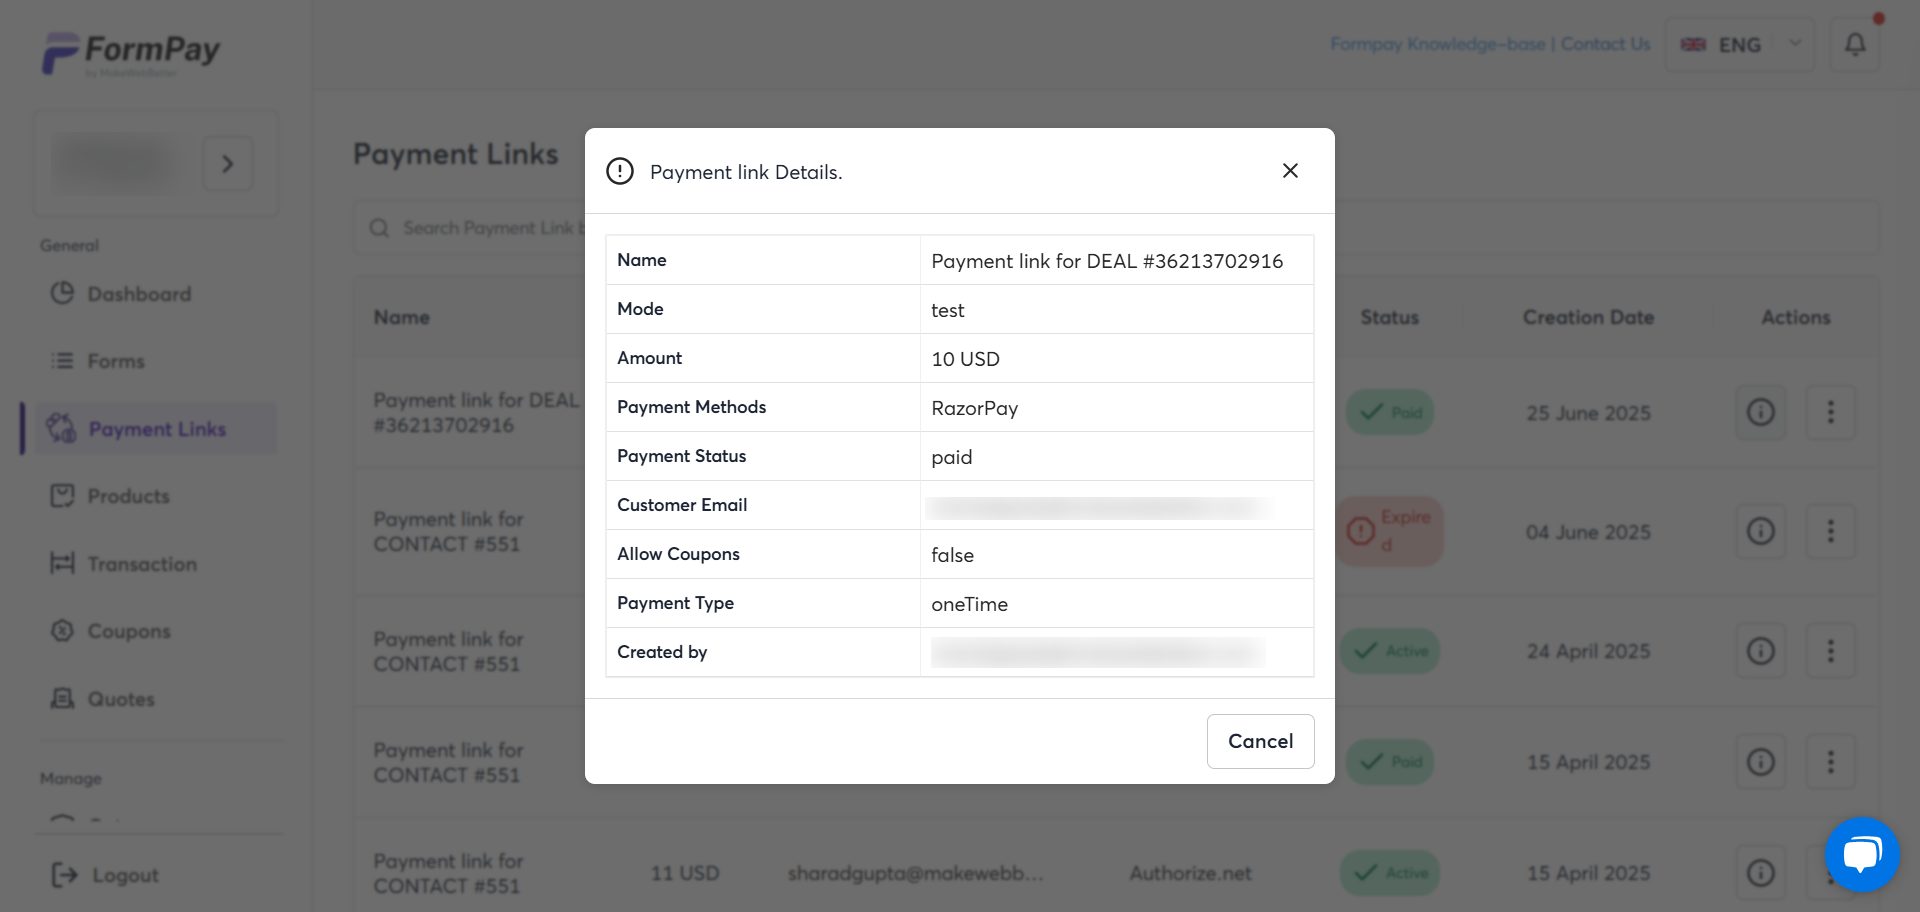
Click on the tooltip icon under the ‘Actions’ tab, on the left of the payment link.
To copy the payment link or delete it, click on the three dots (ellipsis) button.

d. Products
The app facilitates product creation and also serves as a product library. All the products that you have mapped will be added to this directory. You can search for them by product name.
There are two types of products that you can create in FormPay. It is determined on the basis of billing frequency:
- One-Time
- Recurring – Monthly, Quarterly, Semi-Annually, & Annually.
Follow these steps to create a product that is a one-time purchase:
- Navigate to the Products tab and click Create Product.
- Upload the Product Image.
- Fill the below-mentioned fields:
- Product Name: Create a product name.
- Product Price: Decide the price of the product.
- Product Description: Describe the product.
- HubSpot Product ID: Products created in HubSpot will be in the options.
- Portal ID: Your Portal ID will be displayed here.
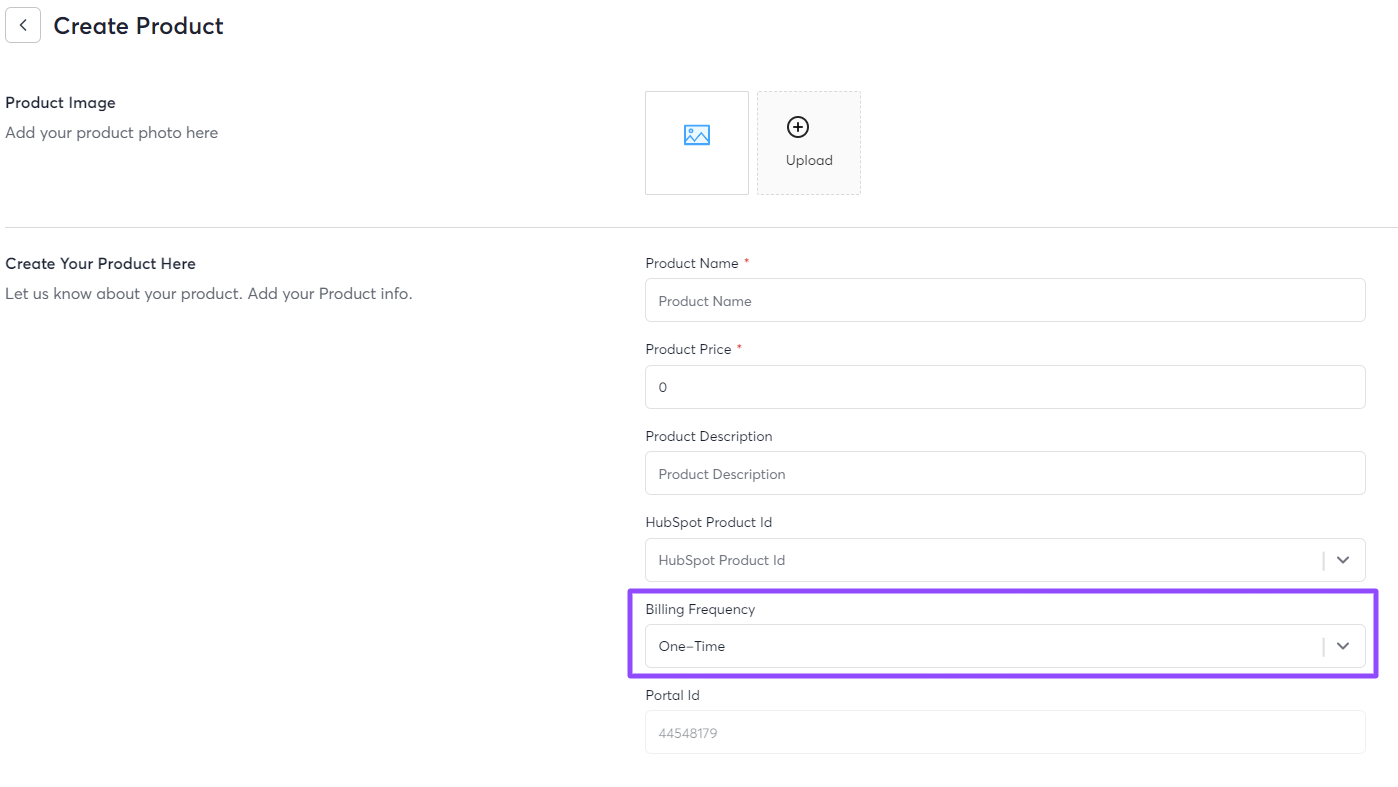
- Choose One-Time from the drop-down under the Billing Frequency column.
- Once done, click the Create Product button on the top right.
To set up a subscription product, select a billing frequency – Monthly, Quarterly, Semi-Annually, or Annually. These choices will activate additional fields.
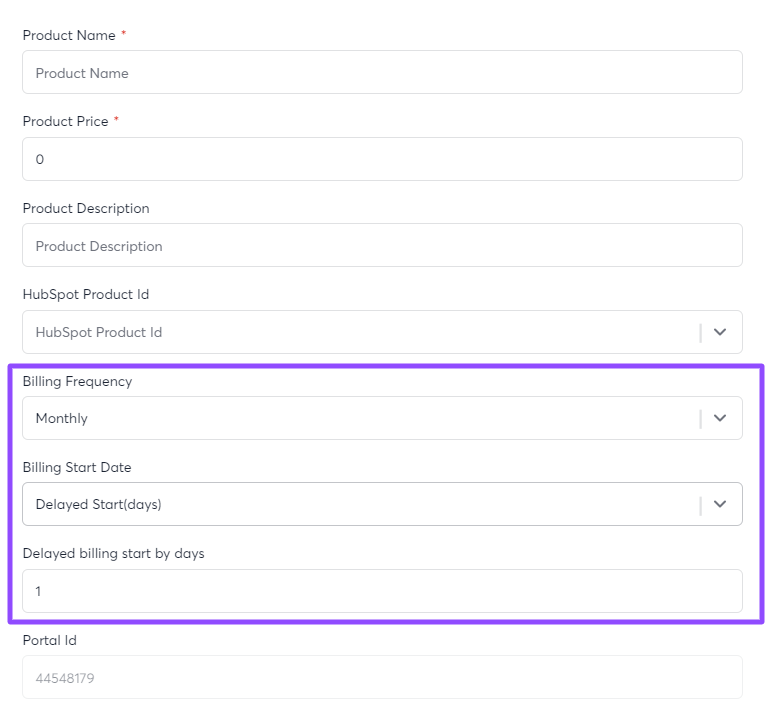
If you pick “Monthly, Quarterly, Semi-Annually, or Annually” in the Billing Frequency column, you’ll have two options for Billing Start Date.
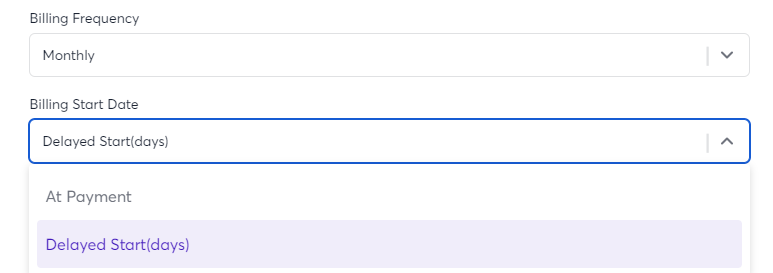
- Opt for “At Payment” to have the billing date consistent with the first payment received in each cycle.
- Choose “Delayed Start (days)” if you prefer to specify the delay in Billing Start Days.
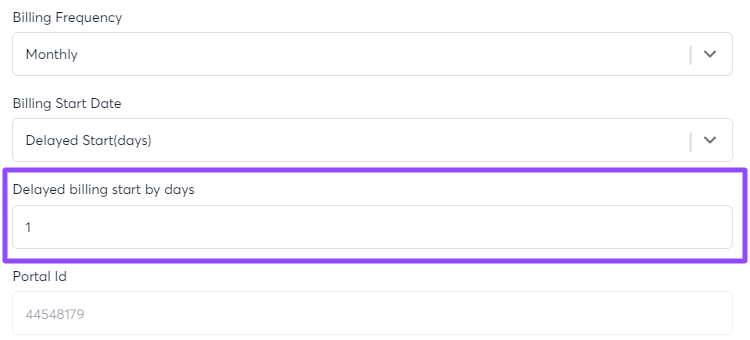
Use the column to indicate the number of days for the initial billing delay. Once done, click the Create Product button in the top-right corner.

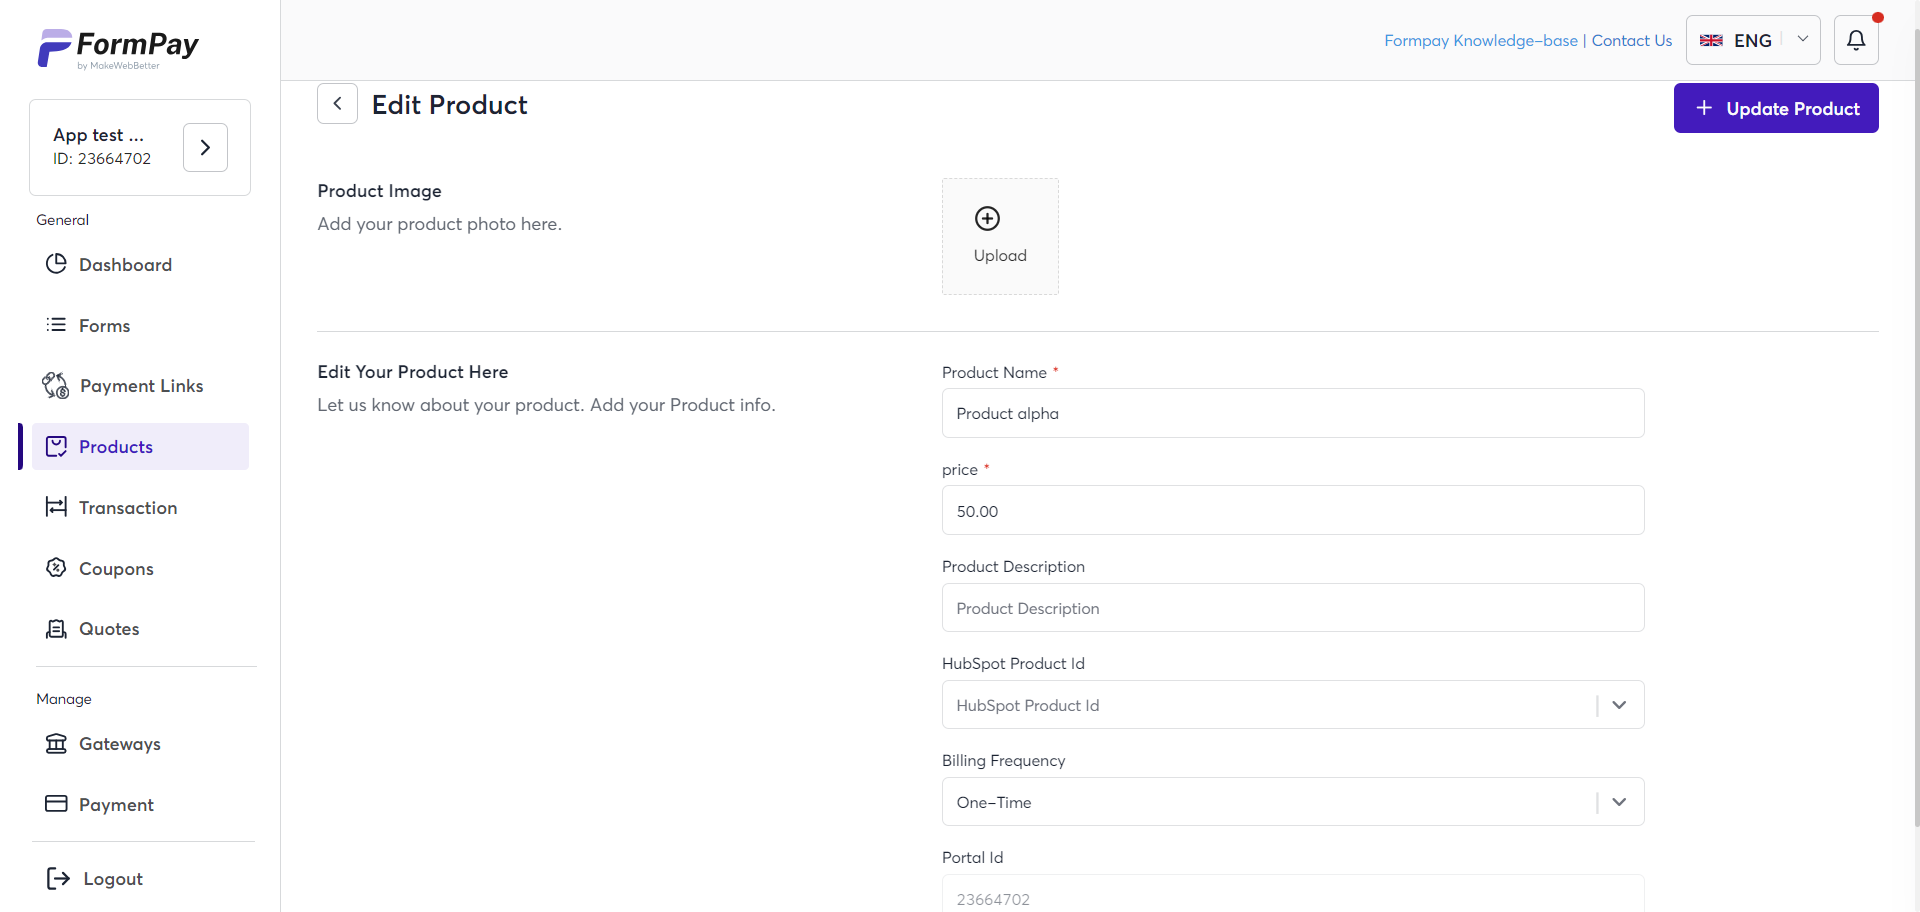
You can always edit the product you have created later. Go to the Products tab and find all the existing products. Simply click the pencil icon next to the product name, and it will open the product editor. From there, you can manage and change the product name, price & description.
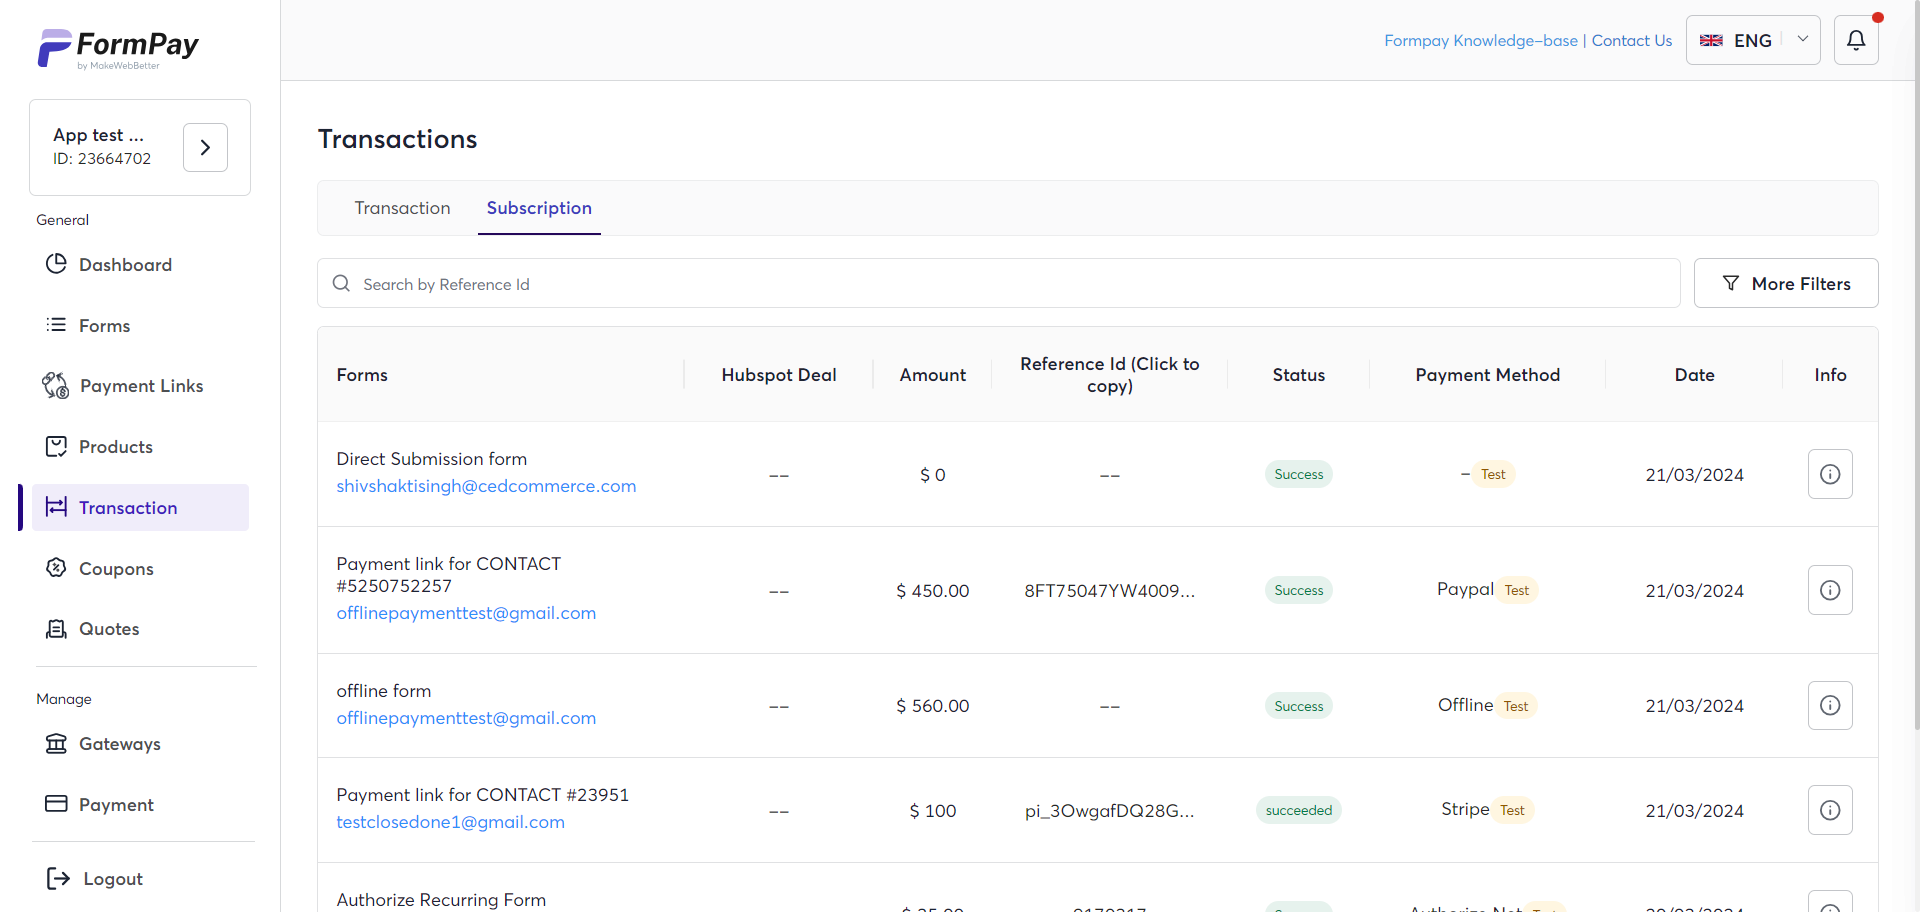
e. Transaction & Subscription
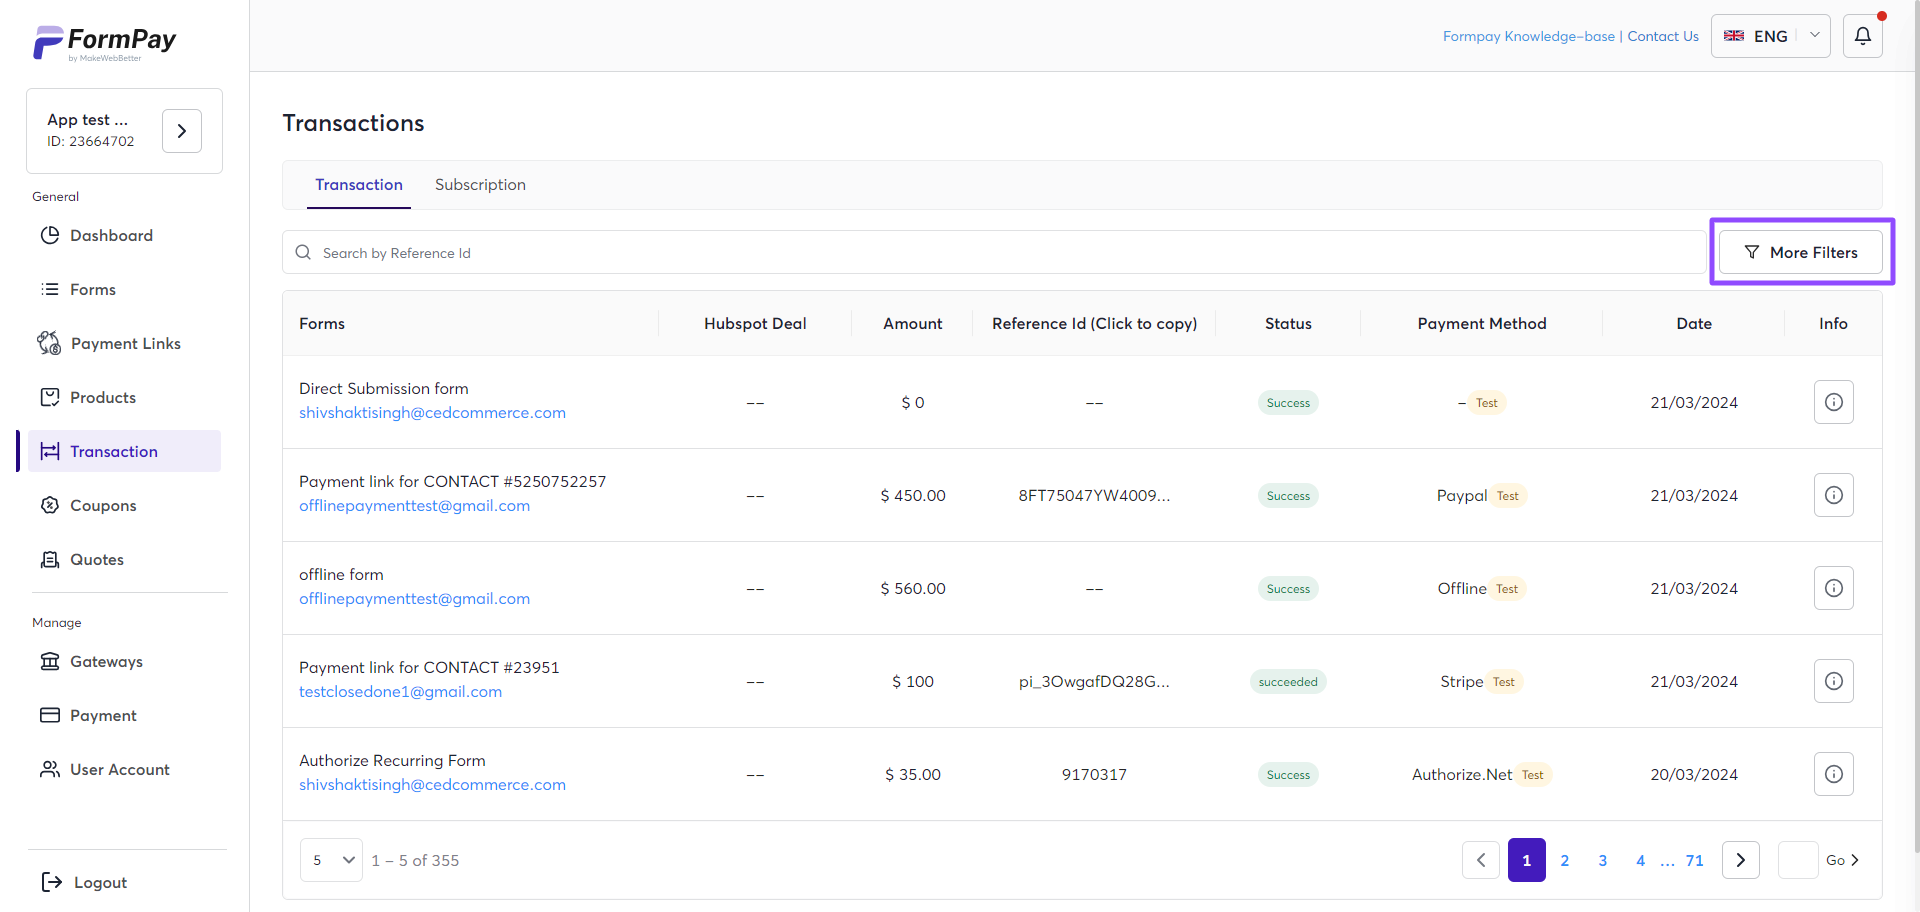
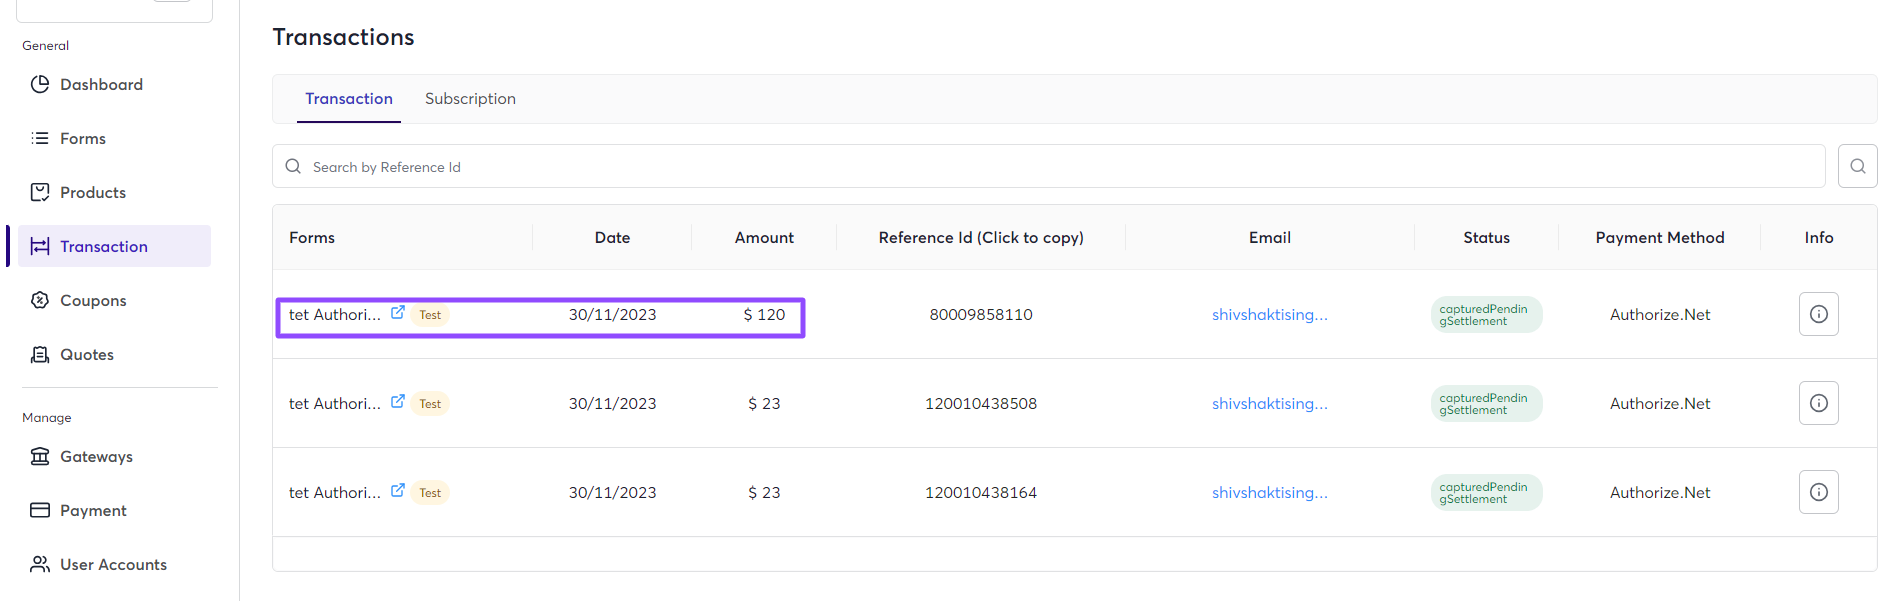
All the transactions made through your HubSpot forms and links will be listed here. You will be able to view all the details of each transaction performed.
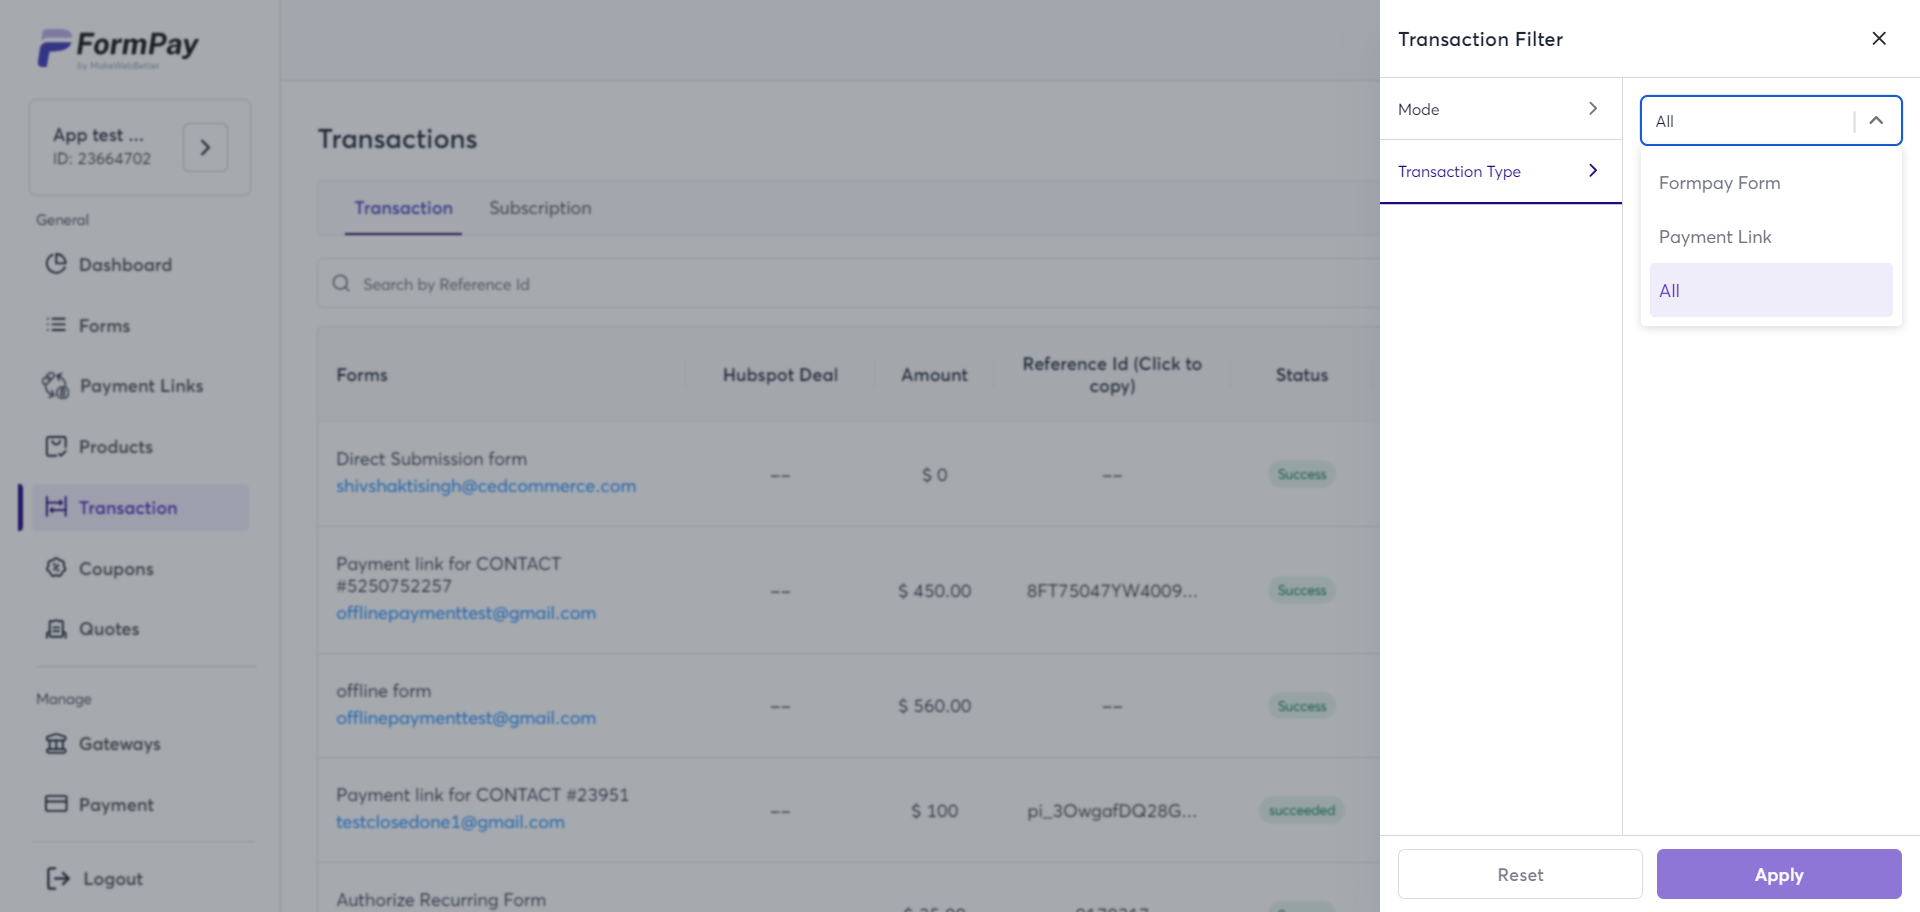
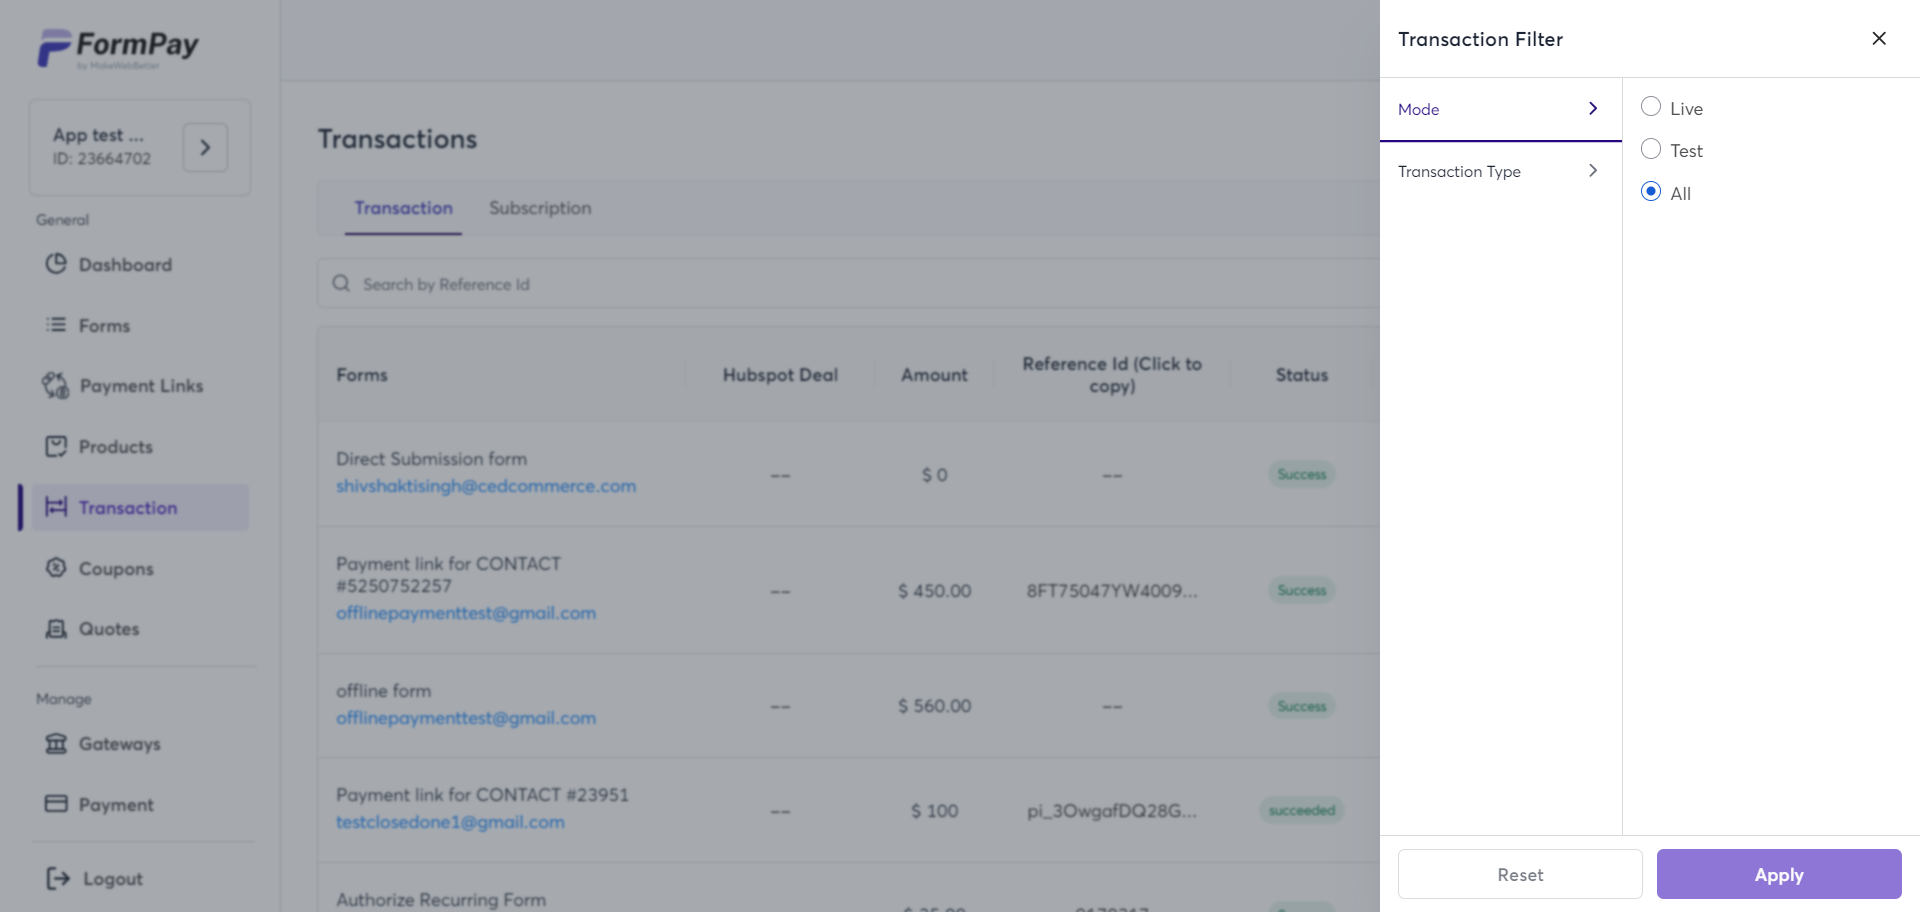
The details regarding each transaction — date, amount, payment reference ID, buyer’s email address, payment method, and transaction status can be monitored here. Furthermore, you can filter this data and find out the test & live payment links.
If you switch to the Subscription tab, you will find all the details about your subscription. These details include the subscriber’s email, subscription status, billing cycle, date, amount, payment mode and further detailed information about the subscription. Click the Tooltip button (ℹ️) to access the raw details.
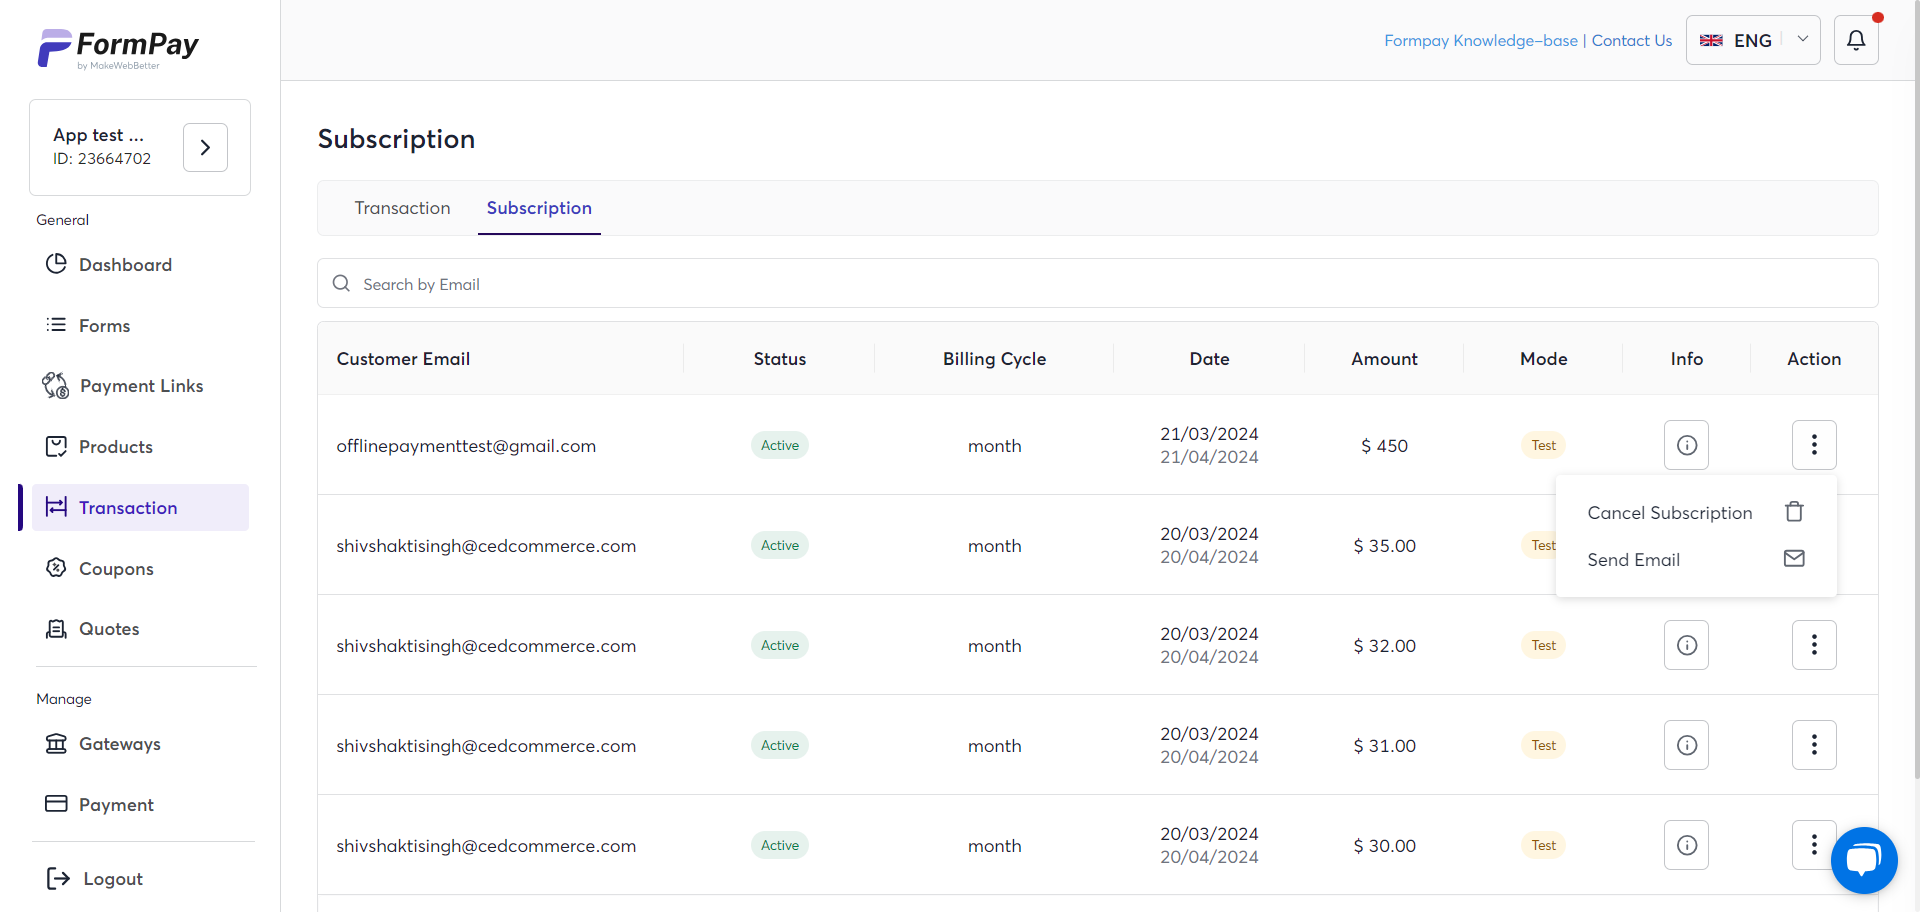
In addition to this, you can manage the subscriptions.
- You have the option to Cancel Subscription.
- Using the Send Email option, you can communicate regarding the subscription.
f. Coupons
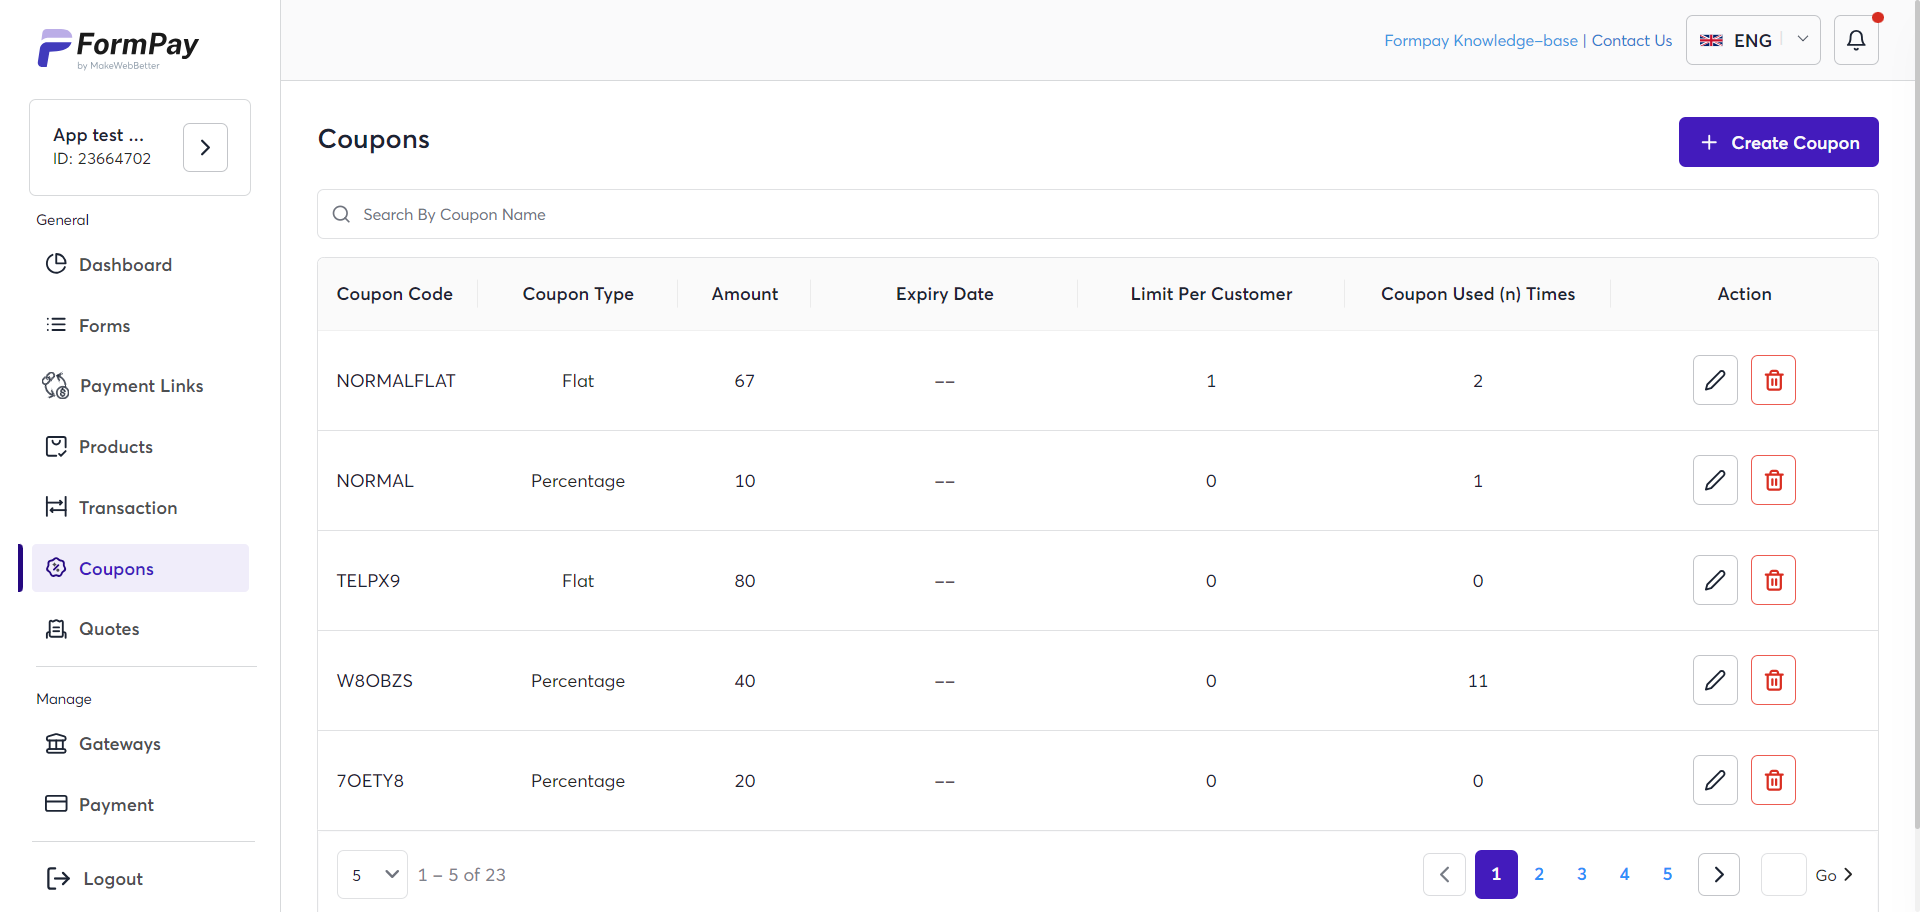
This section lets you generate discount coupon codes applicable as you define them through the coupon settings.
The following are the steps to create a coupon in FormPay:
- Navigate to Coupons and click + Create Coupon in the top right corner.
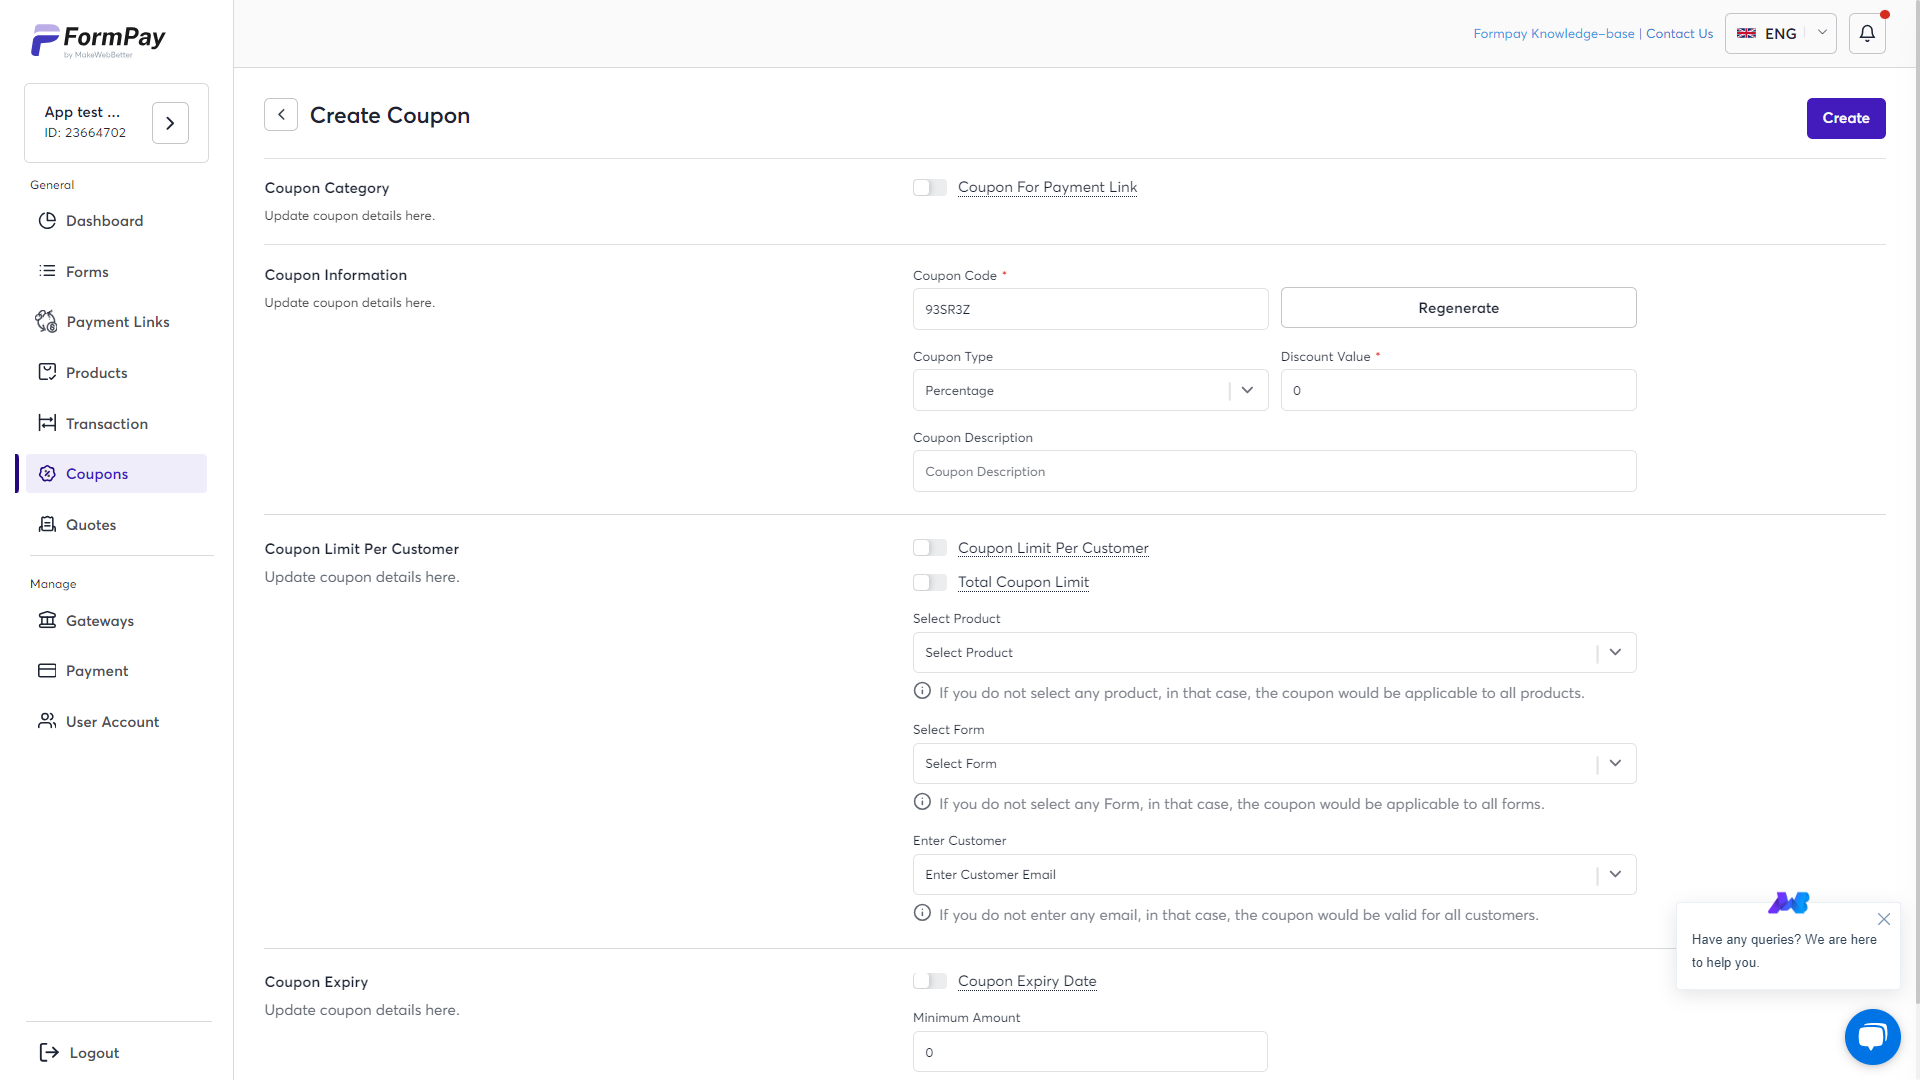
- Then, on the next page, decide on and fill in the following fields.
-
- Click Regenerate if you’d like to get a fresh coupon.
- Coupon Type: Decide if you want a percentage or a fixed discount.
- Discount Value: Enter the amount in digits. You can offer up to a 100% discount and even 100% of the total value.
- Coupon Description: Define the discount coupon (eligibility & conditions).
- Coupon Limit per Customer: Restrict the number of times each customer can use a coupon.
- Toggle Coupon Limit: Click this to limit the number of times the coupon can be used. Also, you can decide which products you want to use this coupon on. Enter a number in the desired fields.
- Product Limitation: Select from the list of already created products. Choosing this will allow discount applicability only on the product selected. Otherwise, the coupon applies to all products.
- Form Limitation: Choose the Form for which you want to create this discount. Otherwise, the coupon applies to all forms.
- Customer Restriction: Enter the email addresses of the customers for whom you wish to allow this coupon. Not entering any email address will allow all your customers to claim the coupon.
- Toggle Expiry: Decide the expiration date of the coupon.
- Minimum Amount: Lastly, you can decide on the minimum purchase amount required to claim the coupon.
Finally, click Submit, and your coupon will be created successfully.
g.Quotes
Quotes payments by FormPay can be enabled within HubSpot itself.
To enable quote payments using FormPay, you’ll get a ‘custom quote module’ which has to be uploaded to your HubSpot.
Here’s how you can proceed with this:
- First, make sure you have set up your desired payment gateway within FormPay.
- Then, create a FormPay form and select the gateway.
- Obtain your FormPay custom quote module from us (if you haven’t received it yet).
- Upload the module to your HubSpot.
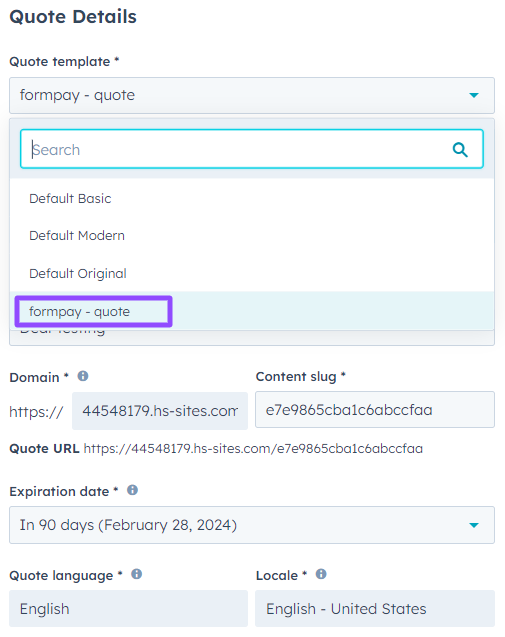
- After this, navigate to the particular CRM record (contact, company, or deal) that you want to create the quote for.
- In the right sidebar, in the Quotes section, click + Add.
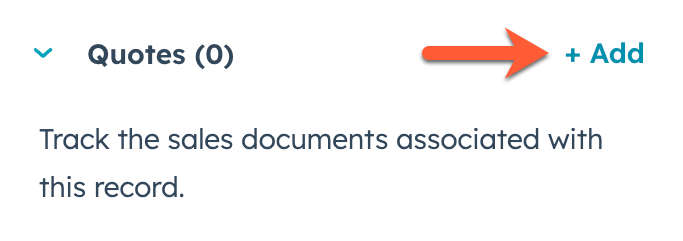
- After clicking + Add.
- Select Deal.
- Select the Quote Template that is published using the FormPay module.
- Select Contact.
- Enter your information.
- Add line items.
- Select the ‘no payments’ option in the Payment section.
- Review & Publish Quote.
Connect with us if you find it troublesome. We will upload the module to your portal on your behalf and make a customized quote template. After that, you can create quotes yourself using this customized quote template.
4.Manage
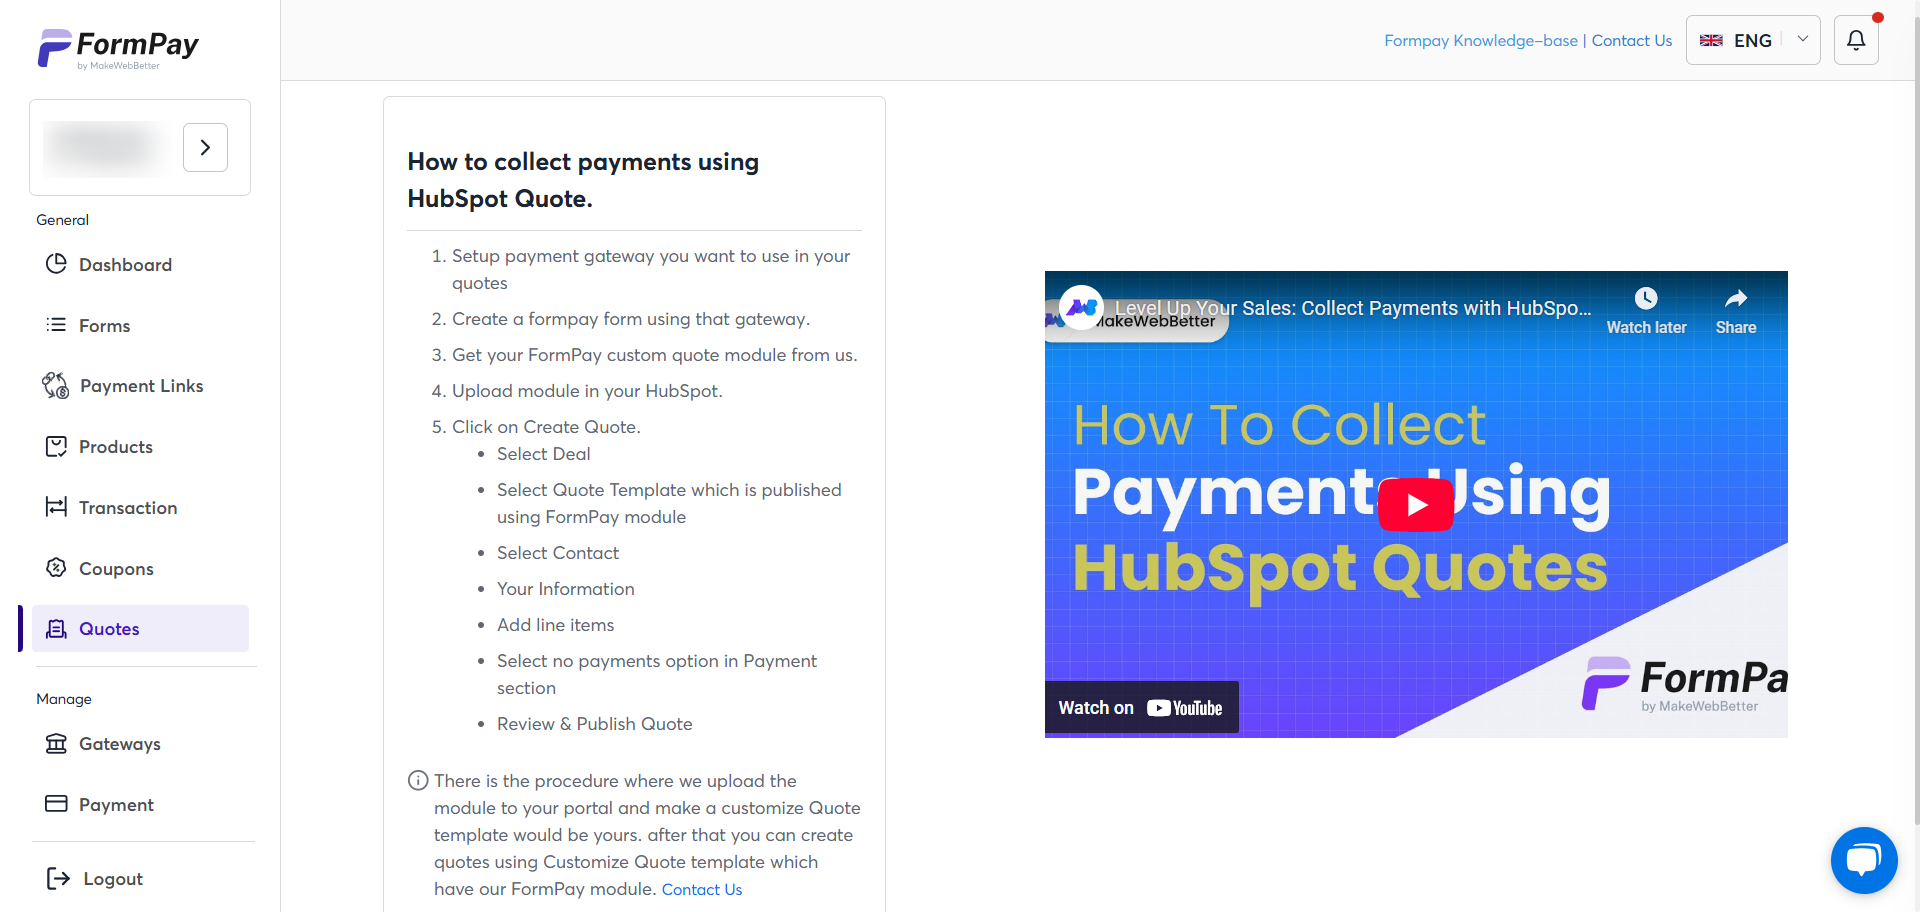
a. Gateways
This section shows all the payment gateways this app supports. If your desired gateway is not listed, please connect with us. The gateway will be added to the app by our team.
Currently, FormPay facilitates the following payment gateways:
- Amazon Pay
- Paypal
- Adyen
- Stripe
- RazorPay
- PayU
- Authorize.net
You also get an option to accept offline payments and enable your customer to pay later after the actual checkout process.
Additionally, enabling the Stripe payment gateway allows you to accept payments through Apple Pay, Google Pay, Line Pay, Klarna BNPL, and other payment modes (wherever applicable).
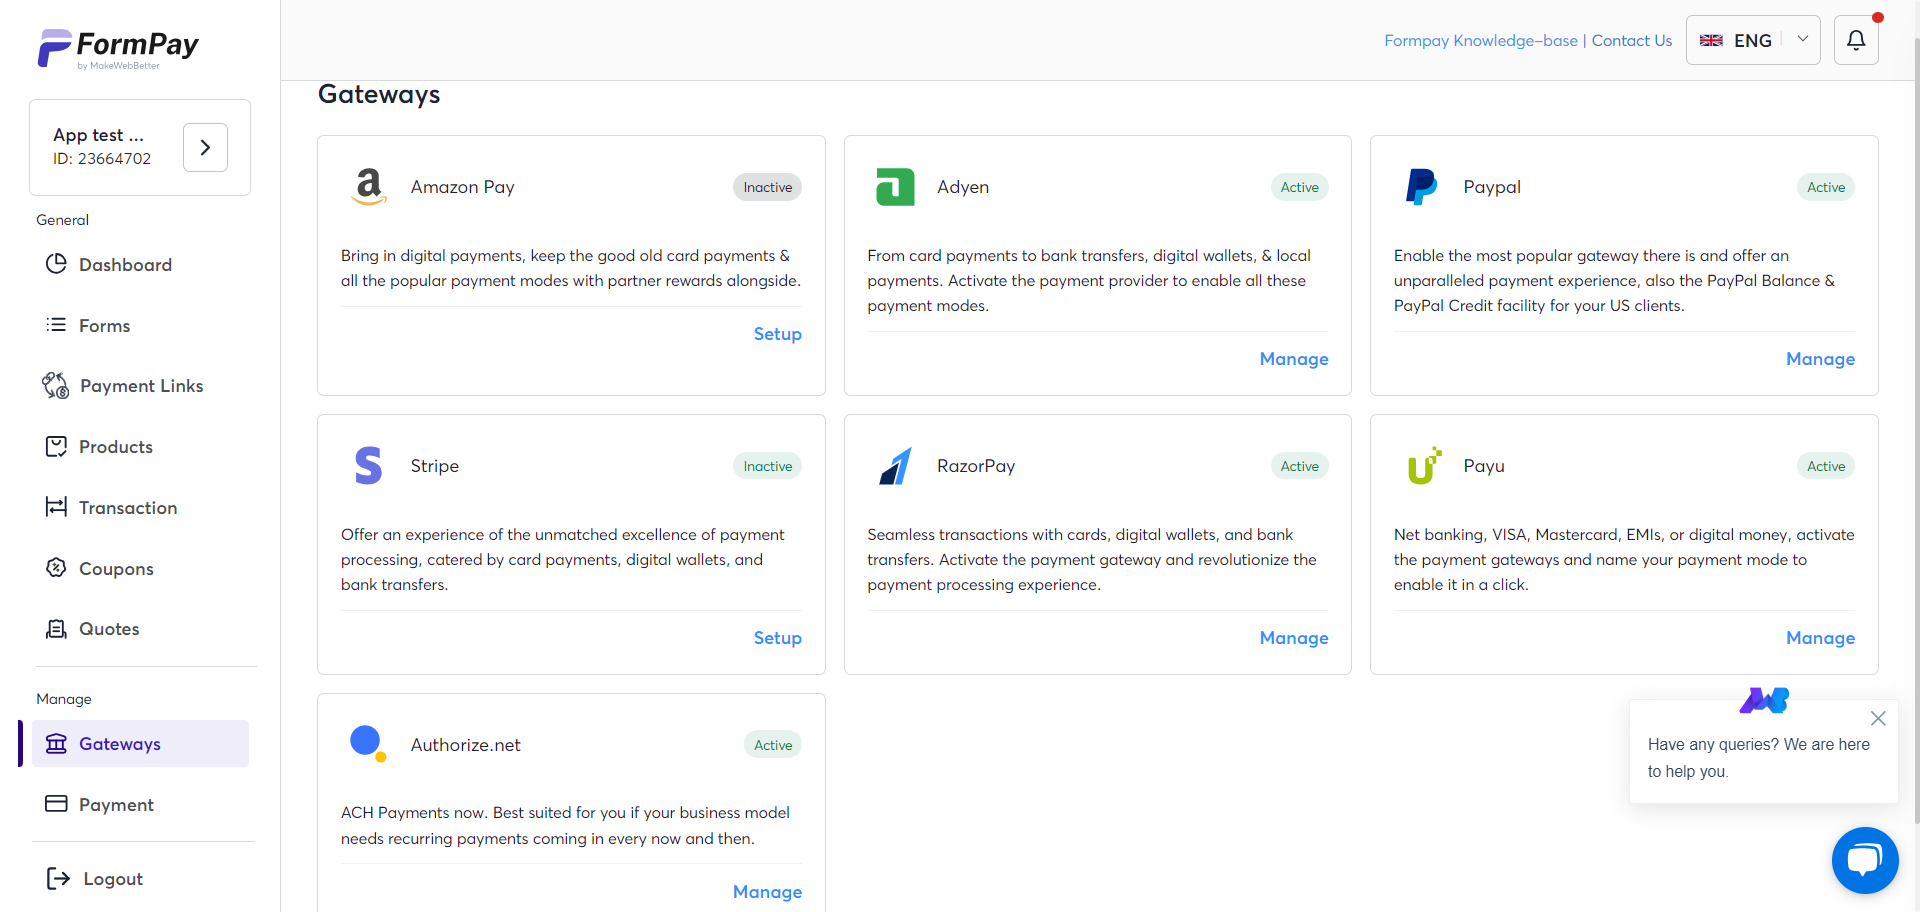
To activate a payment gateway:
- Navigate to the Gateways tab.
- Click the Setup button under the payment gateway of your choice.
- This action will take you to the Payment Gateway setup page, and you can fill in the required details there.
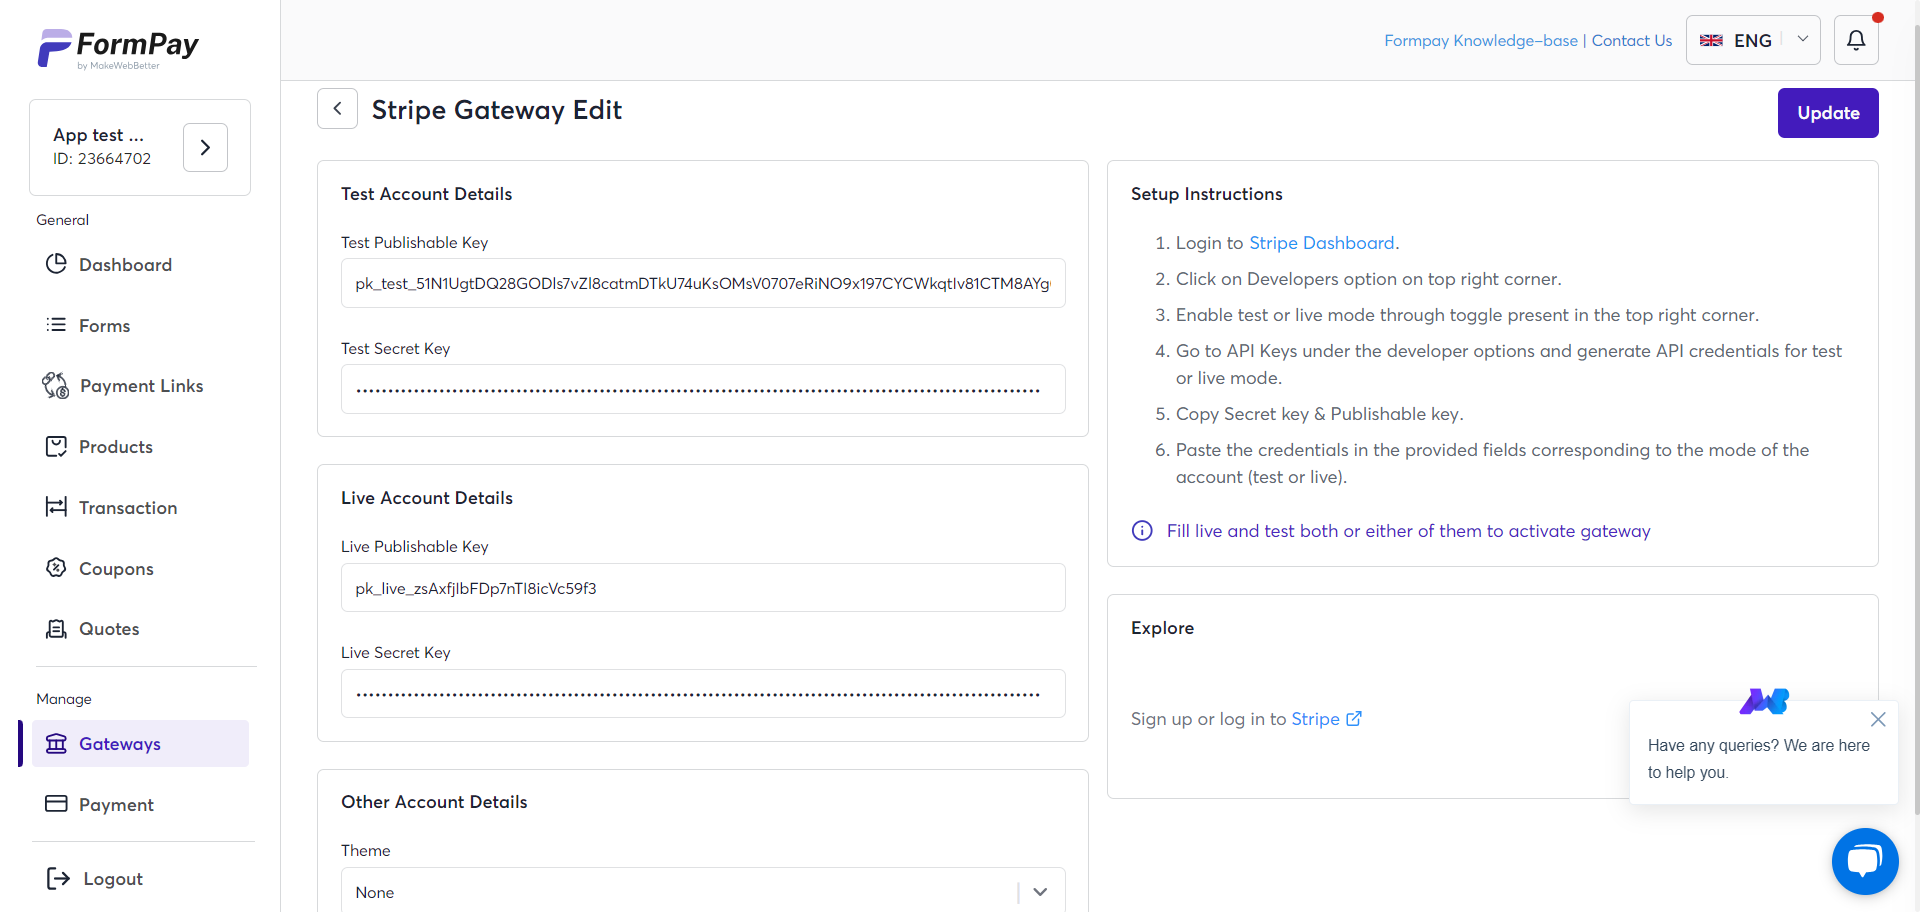
Note: The process to obtain the account key details is mentioned on the right side for every gateway.
- Choose the Test Account or Live Account Details.
- Merchant ID
- Store ID
- Public Key ID
- Test/Live Private Key File
- You can add a few more account details in some gateways.
- Payment Region
- Payment Currency
- Button Language
- Button Color
- Product Type
b. Payments
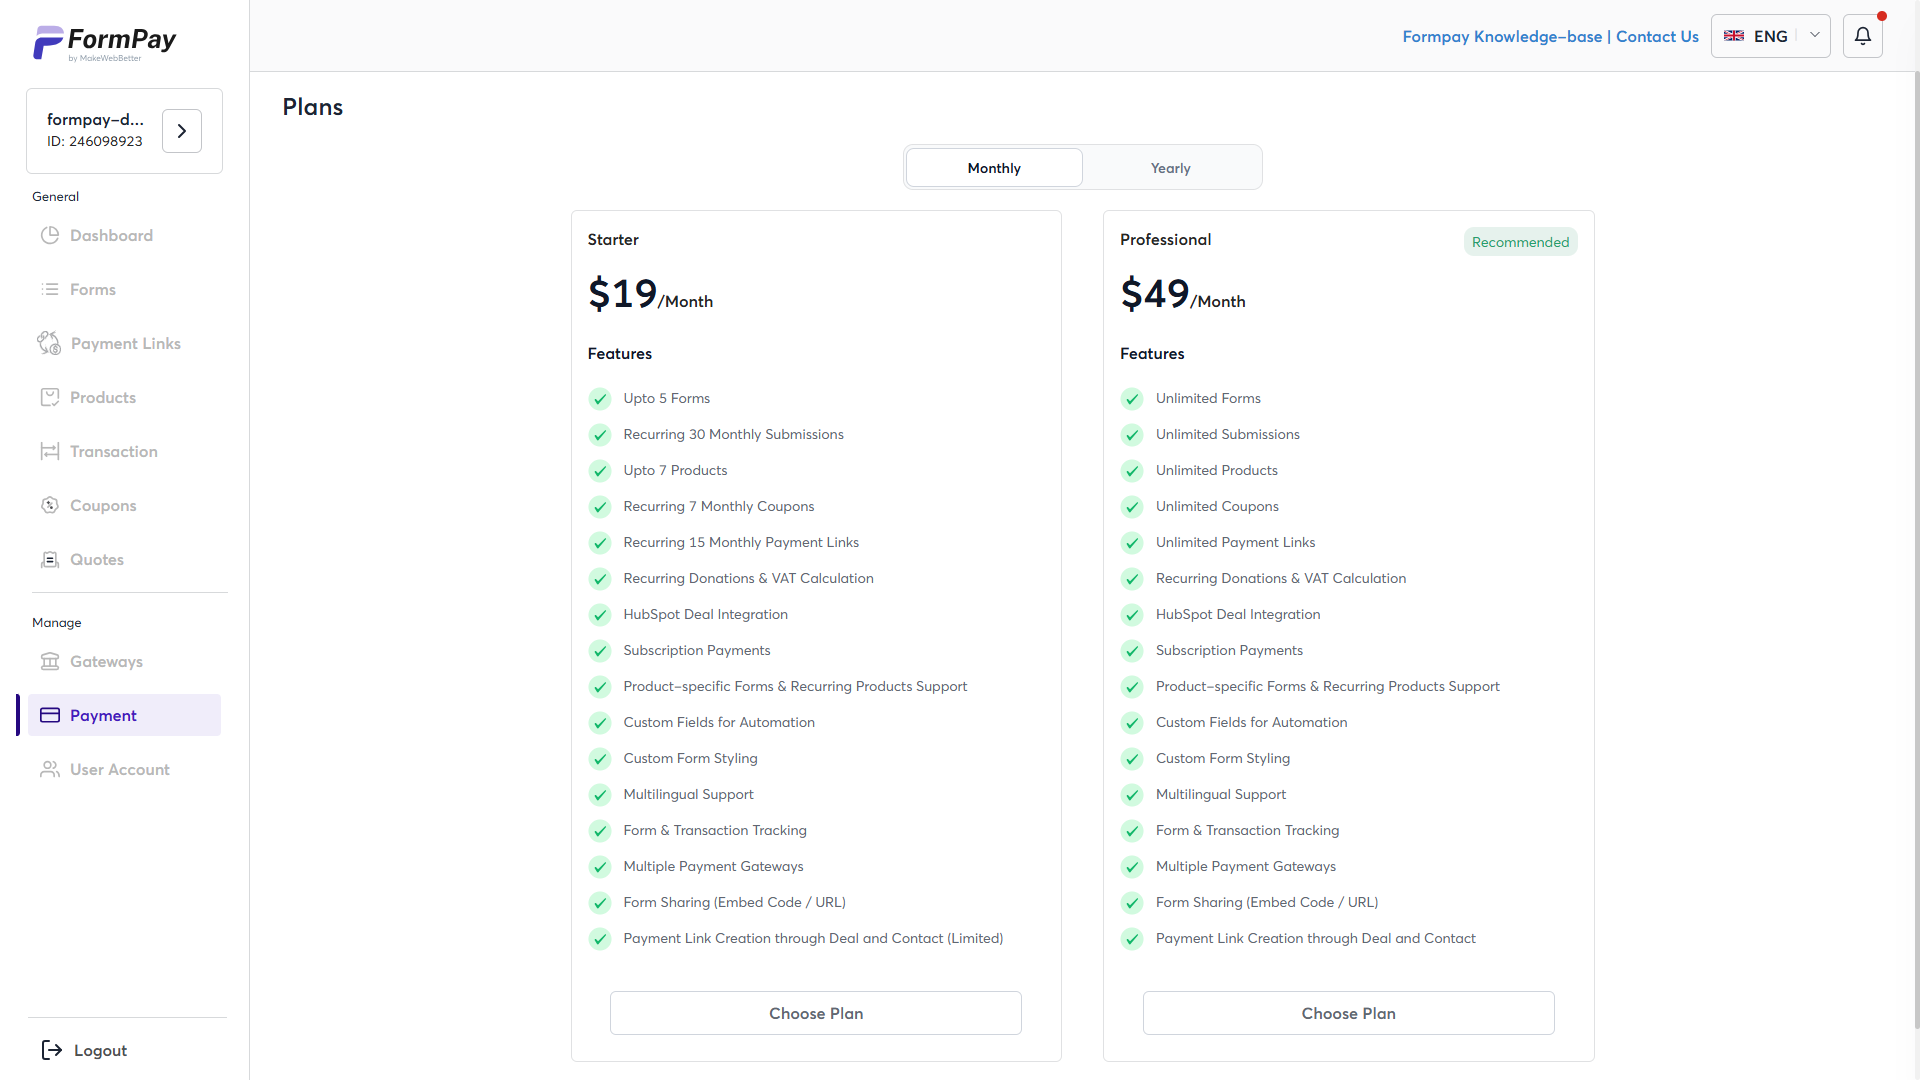
From the payment section, you can view or switch to another pricing plan. FormPay has two pricing tiers, starting at $19/month. Both plans allow you to access all the FormPay features, and you get a 7-day free trial to try them out before finalizing the purchase.
Pro: $49 monthly & $499 yearly (discounted by $89)
It is recommended to purchase the Pro plan, which unlocks all the functionalities offered by FormPay.
Starter: $19 monthly & $199 yearly (discounted by $29)
What changes in this plan:
- Start with 5 forms monthly (60 yearly) and receive up to 30 form submissions (donations or payments) in a month (360 yearly).
- Create up to 15 payment links in HubSpot for Contacts & Deals (180 yearly).
- Generate up to 7 coupons per month (84 yearly) and add up to 7 products (84 yearly).
Schedule a free session to talk to the FormPay team and discuss your requirements.
c. User Accounts
This section lets you modify your account details. You get four tabs here.
- General
- Change Password
- Billing
- Integrations
1) General
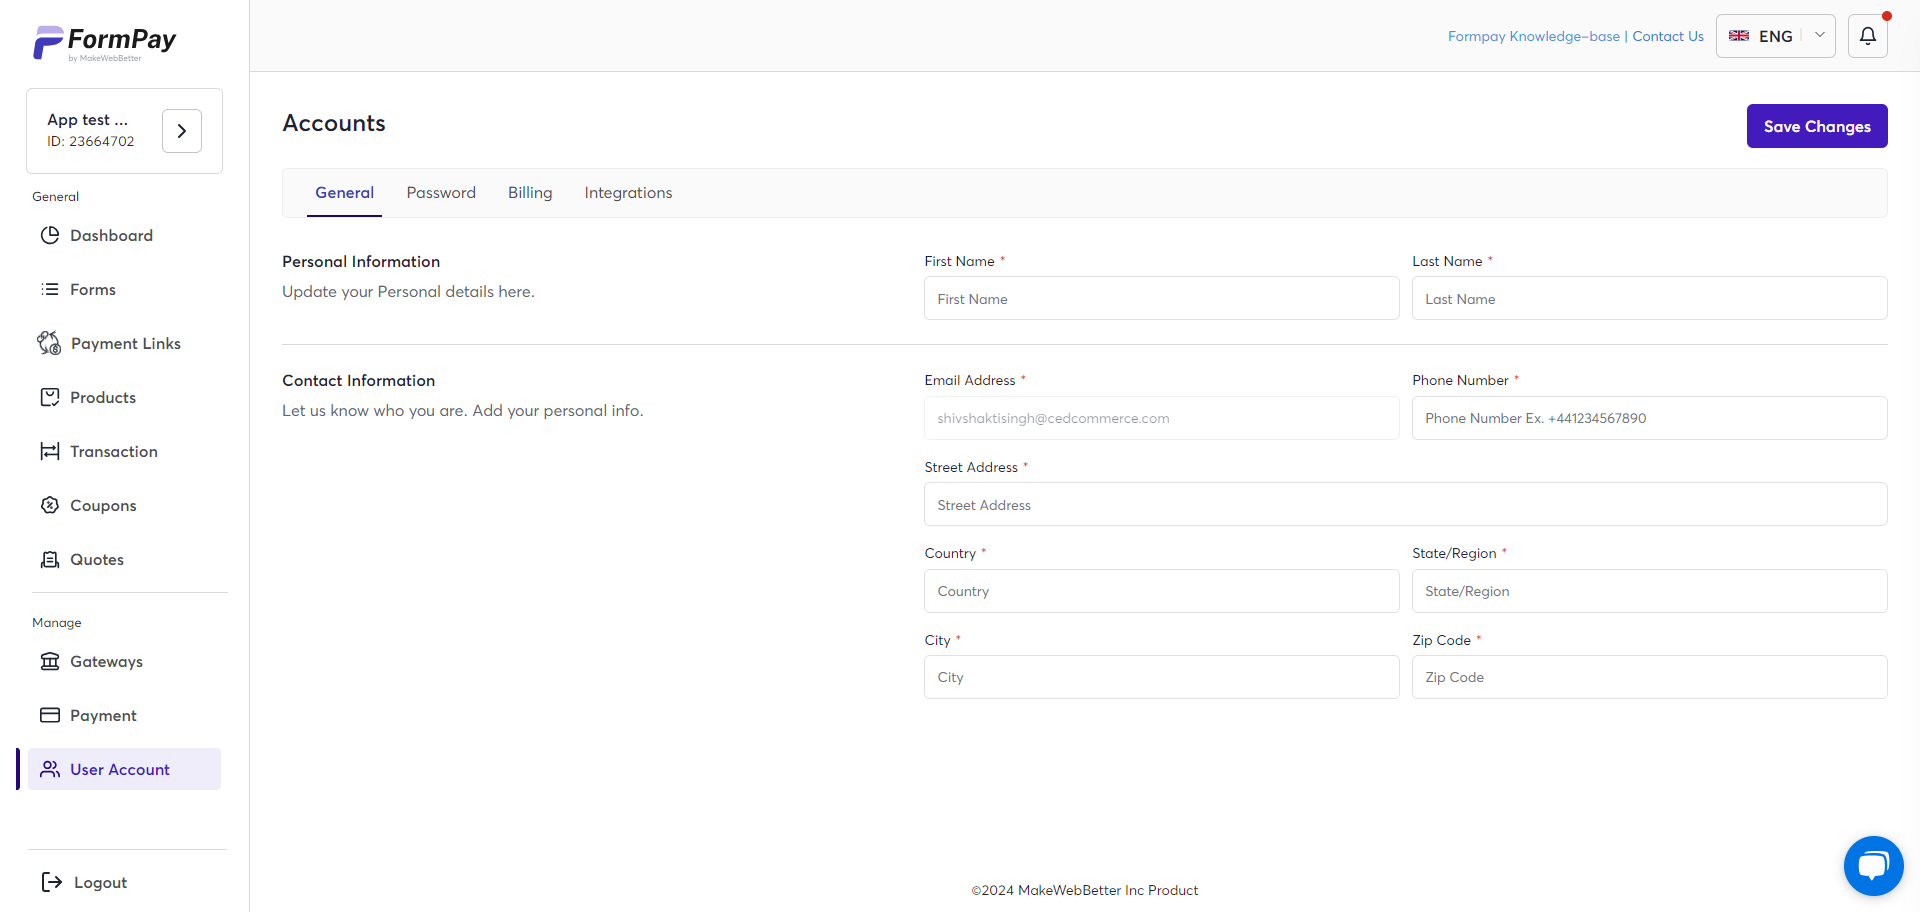
In this section, you can change the basic details of your account like First Name, Last Name, Email, Phone Number, and Street Address.
2) Change Password
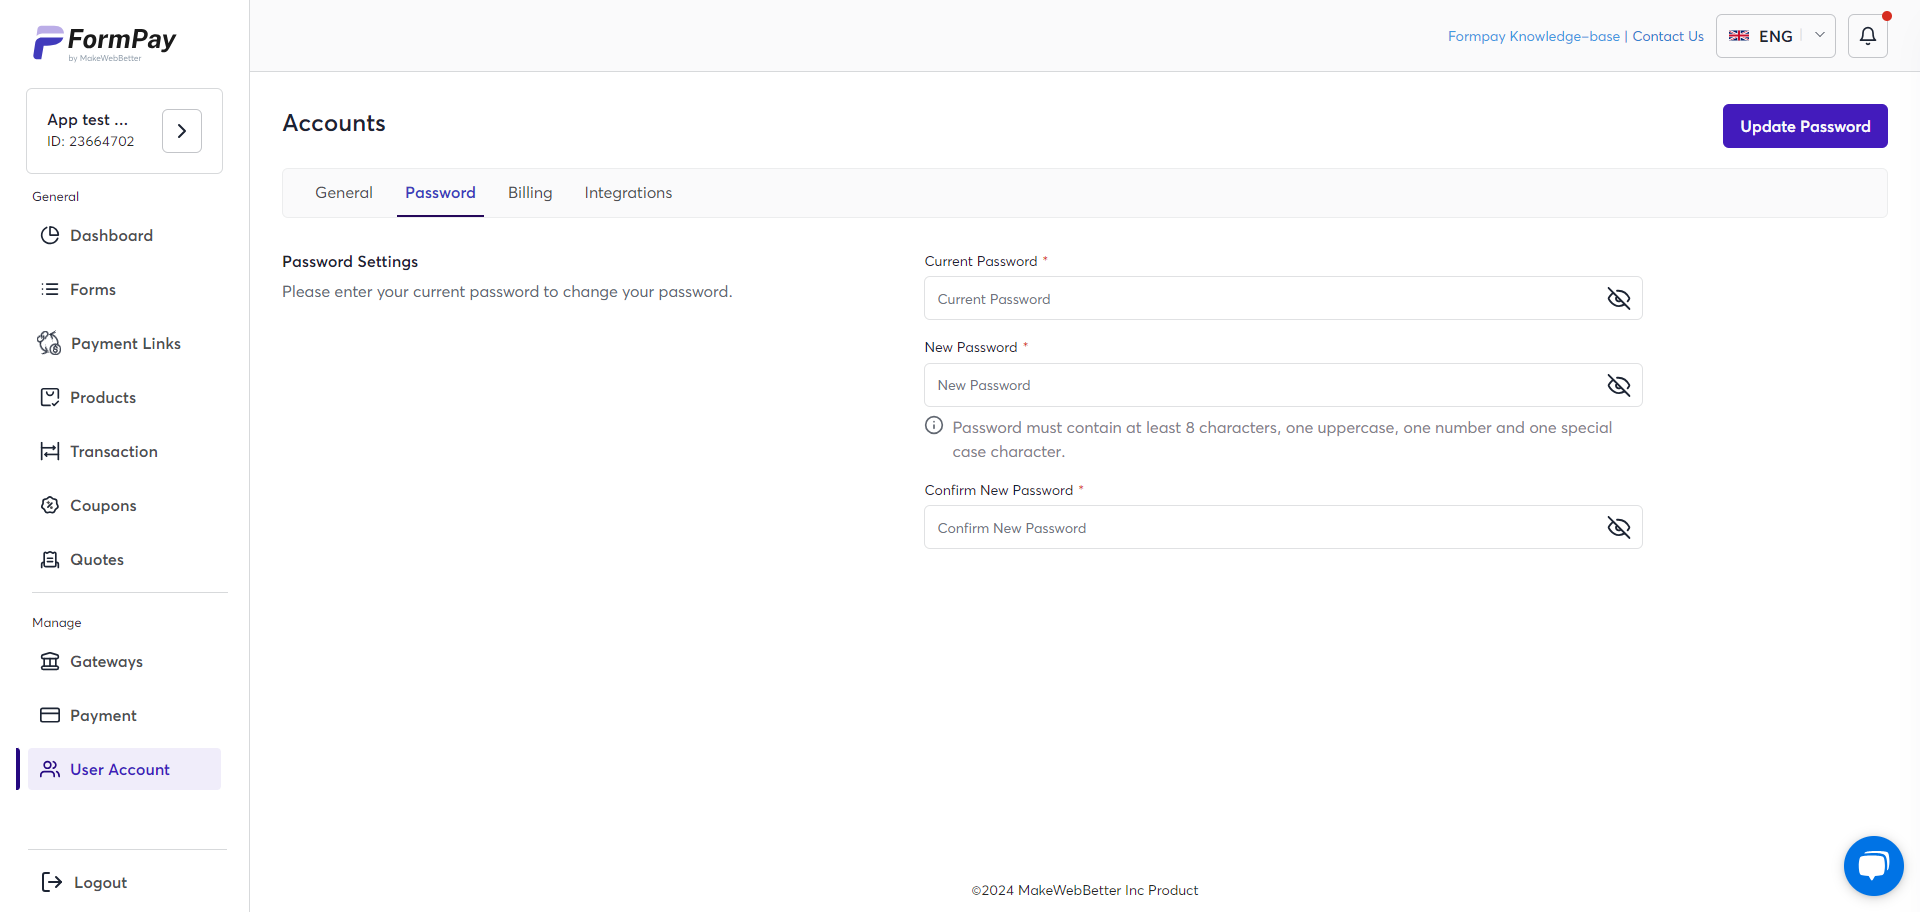
As the name suggests, you can change the password of your account. Simply, enter your old password and provide the new one & confirm.
3) Billing
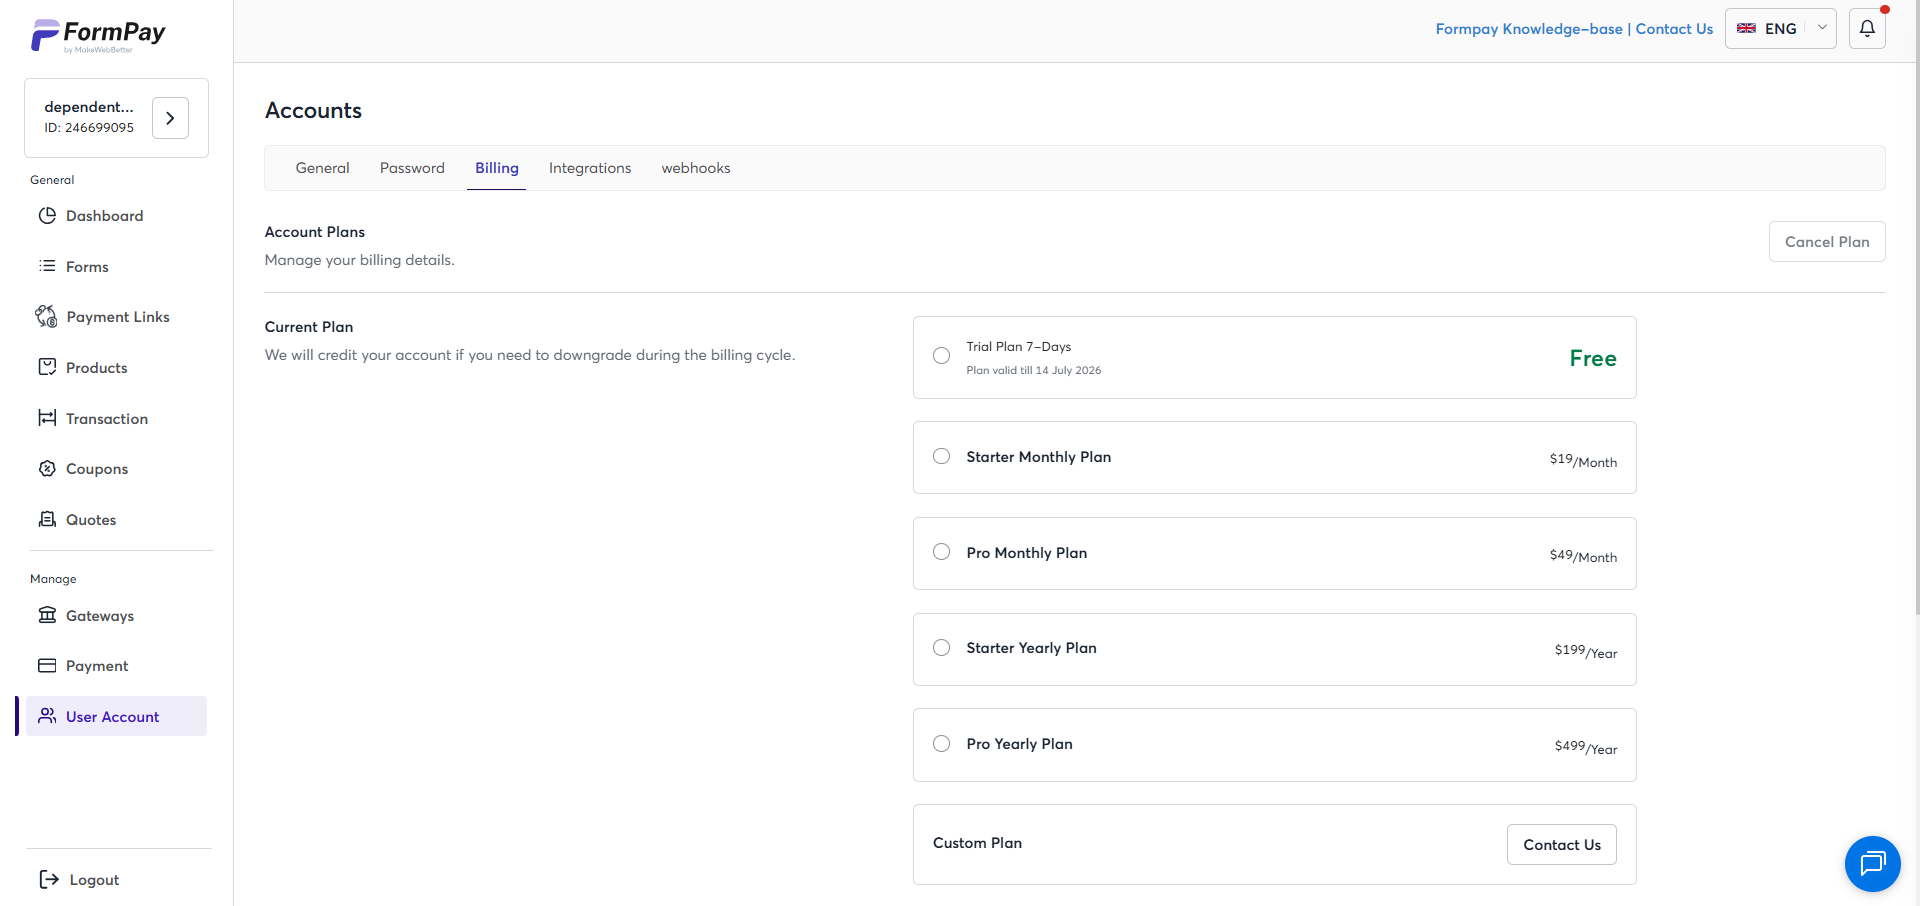
From this section, you can upgrade your plan.
- Click Starter Plan or Pro Plan, and then click Explore Plan on the top right.
- If you need a custom plan, then click Contact Us.
If you’re an existing FormPay user, then you can access your Billing History here.
4) Integrations
FormPay offers integration options for you to sync the payment data with your desired platform.
The FormPay Xero integration facilitates data sync between the two and eases accounting processes. To set up this integration:
- Go to the FormPay app.
- Then, navigate to User Accounts from the sidebar.
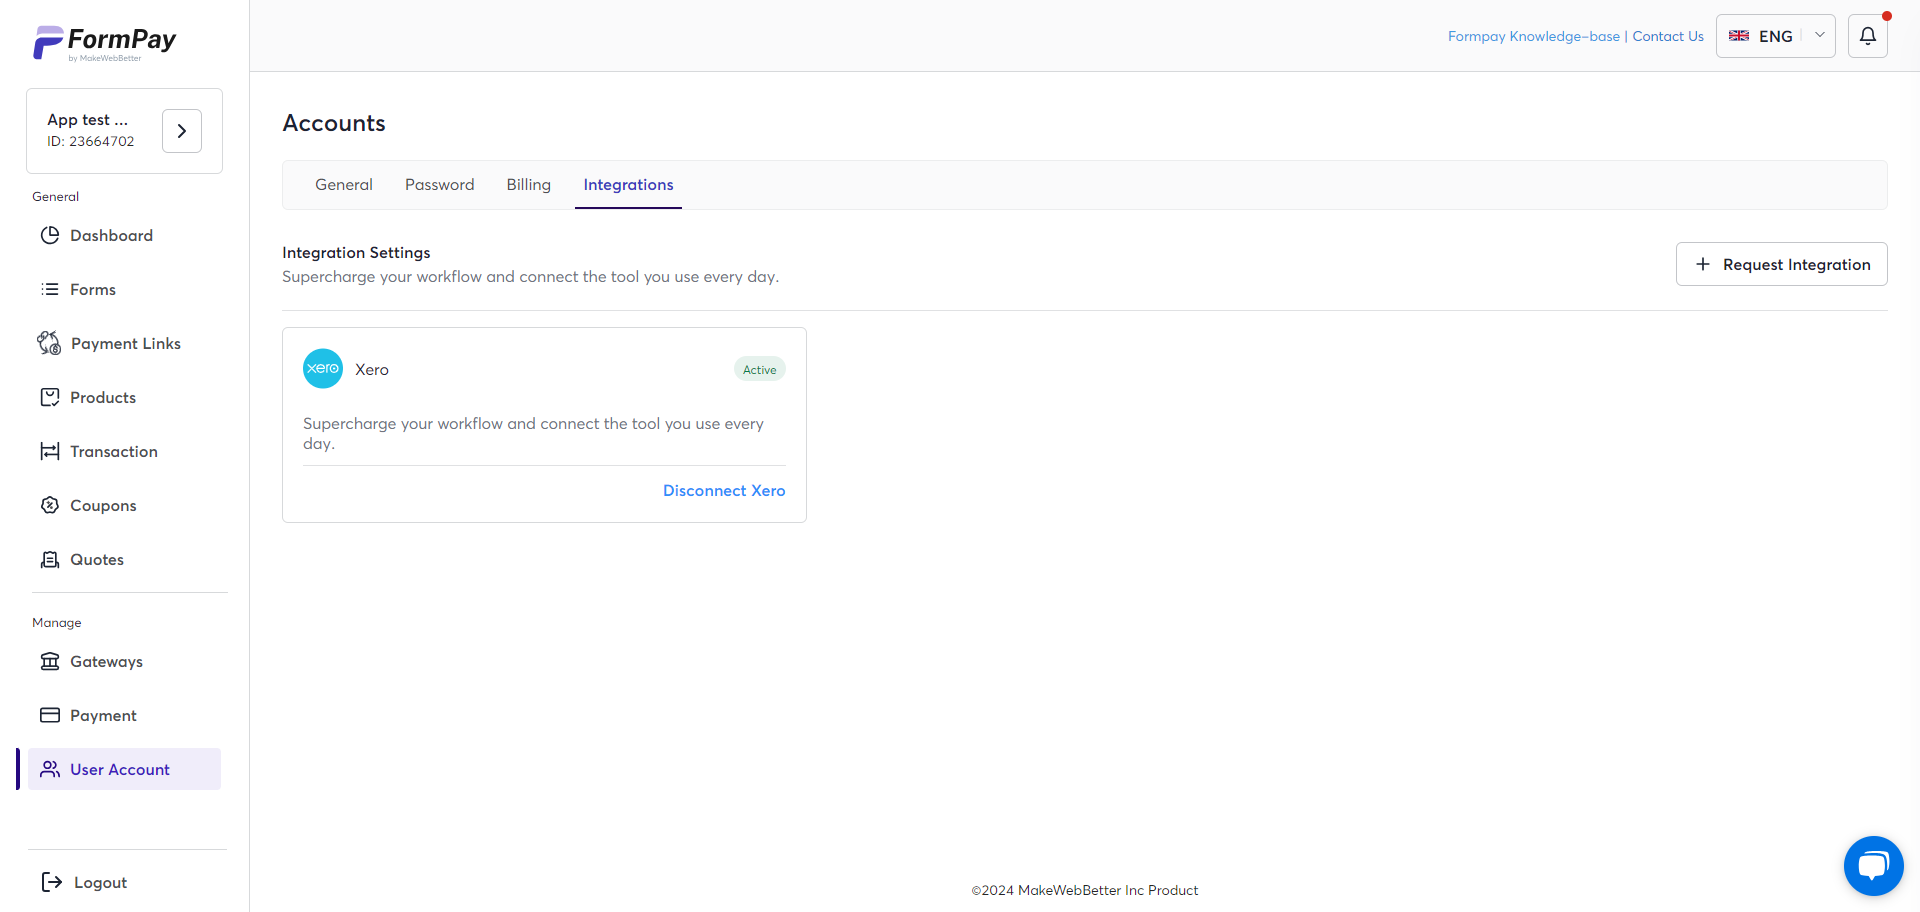
- Then, go to the Integrations tab.
- Now, click the Authorize Now button. Then, you will be redirected to Xero’s webpage.
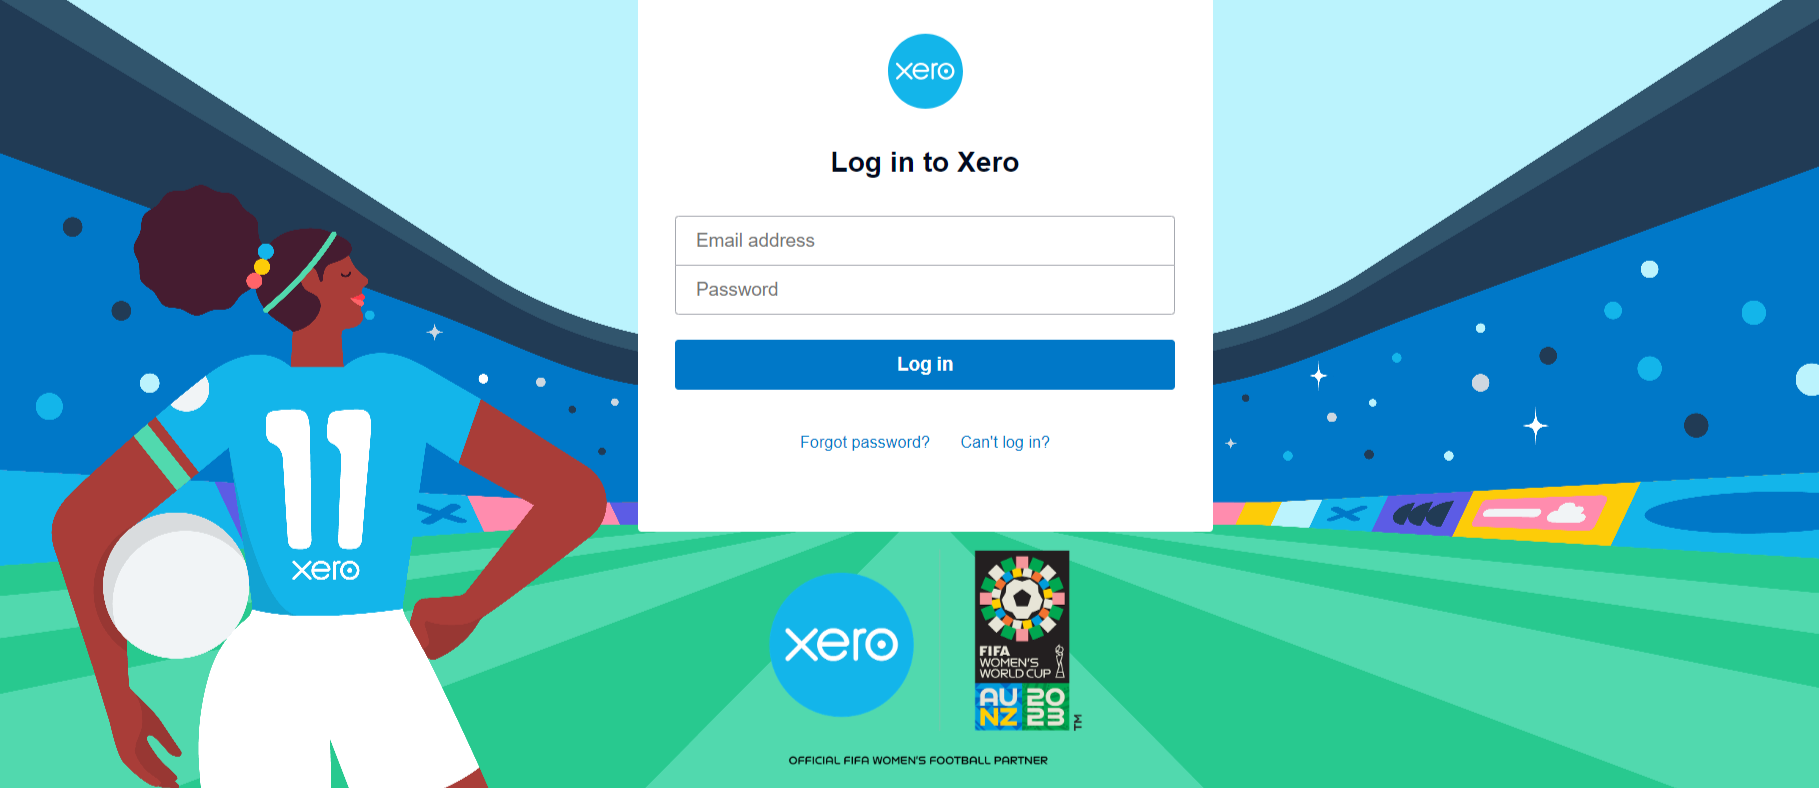
- On the next page, enter your Xero credentials and click Log In.
- That’s it! Your Xero account will now be successfully integrated into FormPay.
If you need any other custom integration within FormPay, then click the ‘+ Request Integration’ button in the right corner.
5.How to Create a HubSpot Payment Form?
The comprehensive payment form builder offers a range of functionalities and configurations.
When creating a payment form, make sure you have your desired gateway integration configured. Otherwise, you can also use the offline payment mode to receive. Moreover, you also have the option to enable the Direct Submission toggle.
Here’s how to create a form in FormPay.
- Navigate to the Forms Tab from the sidebar.
- Click on the + Create a New Form button in the top-right corner.
- Next, you will be inside the Payment Form builder.
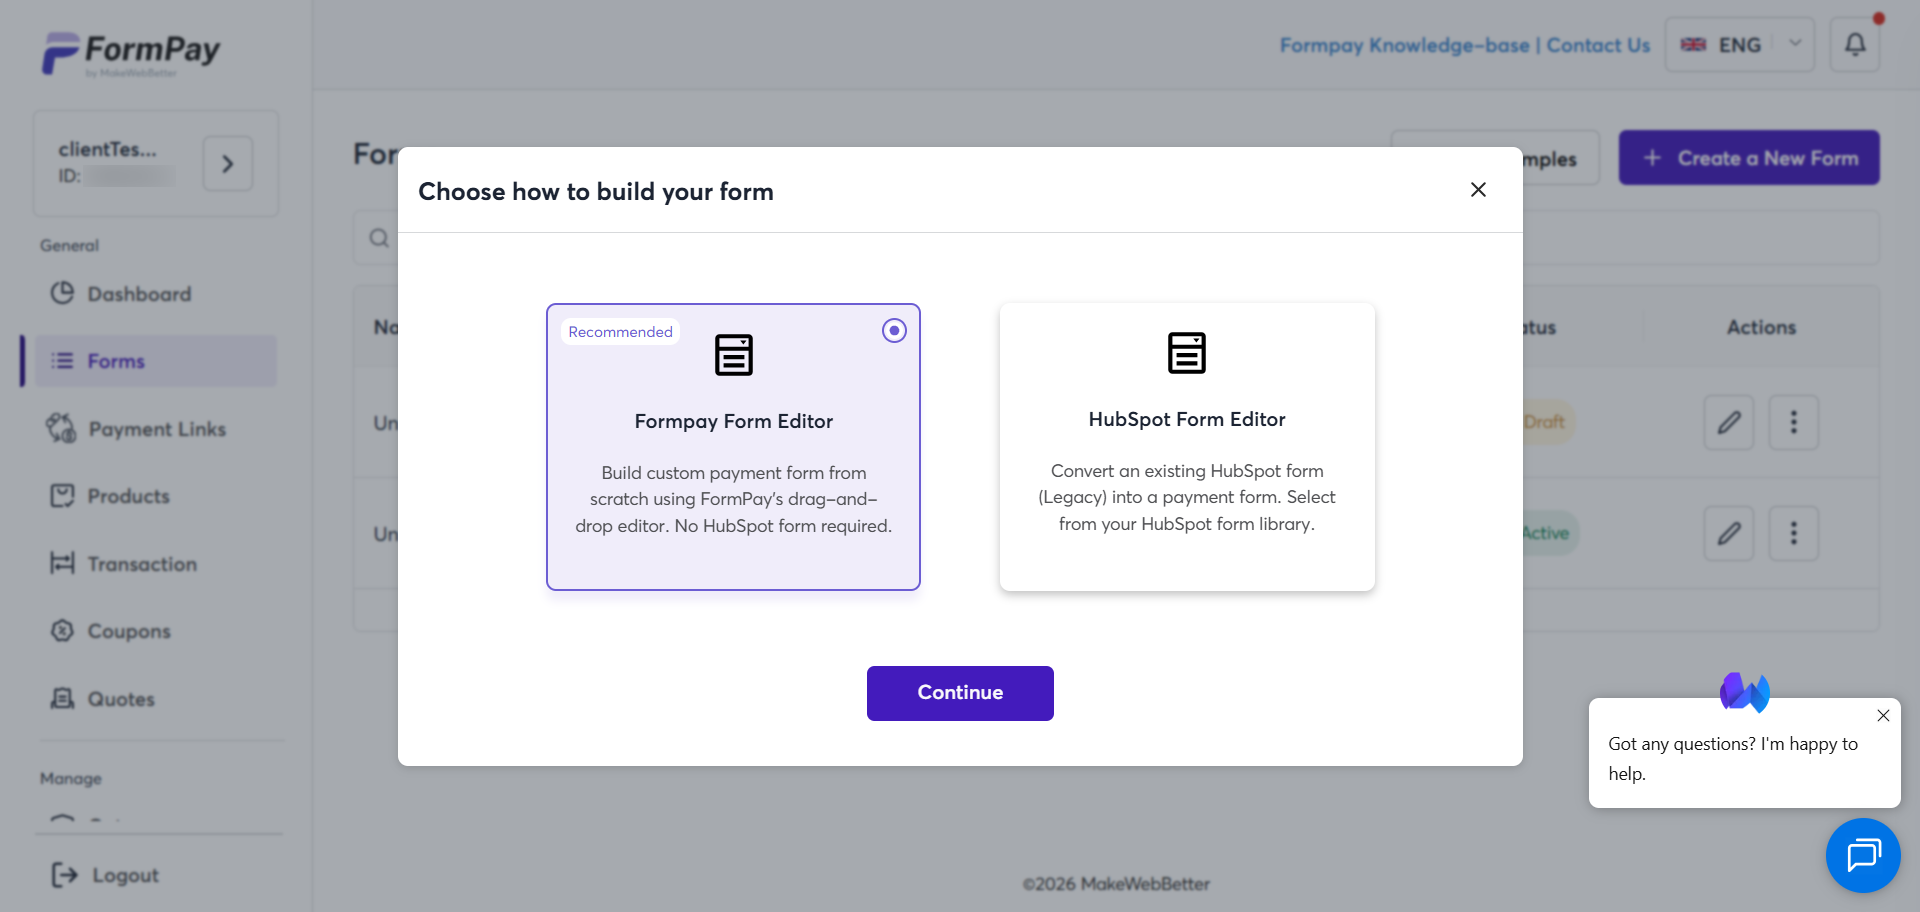
Creating a Payment Form
Choose one of the two options to proceed:
- FormPay Form Editor: Build a new payment form.
- HubSpot Form Editor: Convert your existing HubSpot form into a payment form.
The interface of the payment form builder for both options (FormPay Form Editor & HubSpot Form Editor) is different from the other one.
FormPay Form Editor
FormPay Form Editor let’s your build a form from scratch, where you can include custom fields to capture details of your customers/donors.
- Once inside Form Builder, start building your form by adding and editing your form fields.
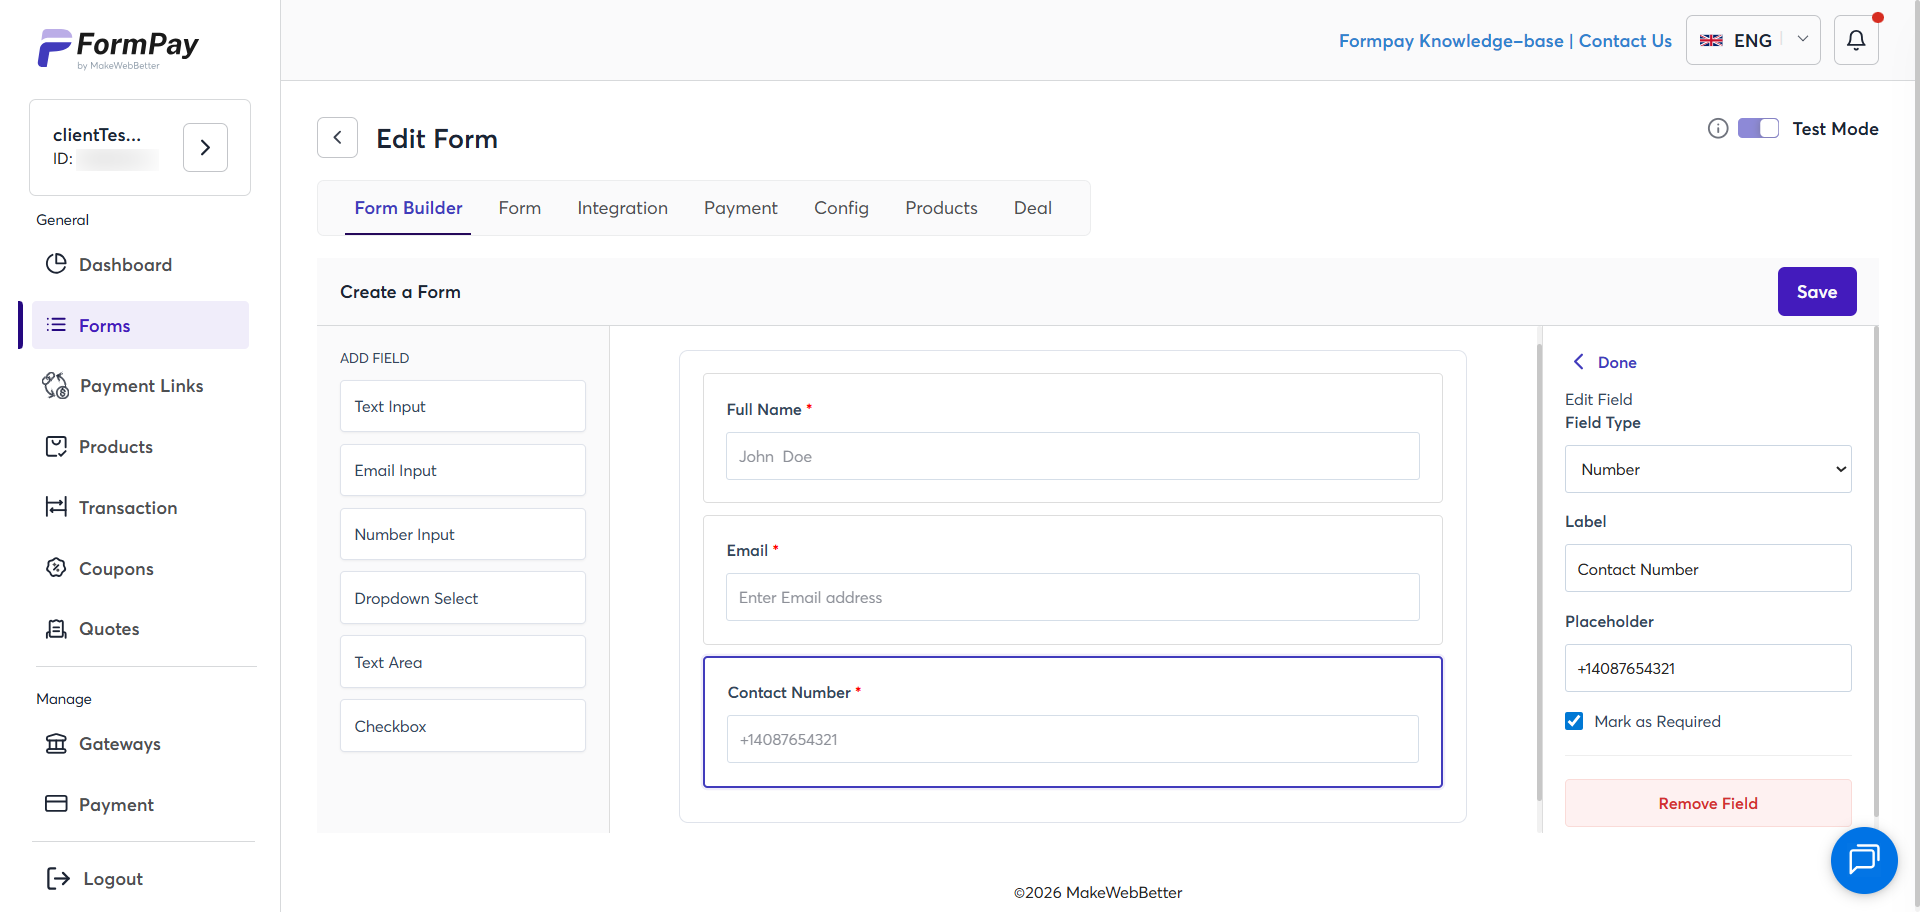
To add fields, simply click on the specific field (on the left, under the ‘ADD FIELD’ section) — Text Input, Email, Input, Number Input, Dropdown Select, Text Area, and Checkbox. After selecting the desired form fields, you change the Label of the field (name it, e.g., Full Name, Contact Number) and add a Placeholder (suggest input).
You can simply use drag-and-drop functionality if you want to rearrange or change the position of the field in your form. Find the ‘Remove Field’ button at the bottom of the ‘Edit Field’ section if you want to remove the field.
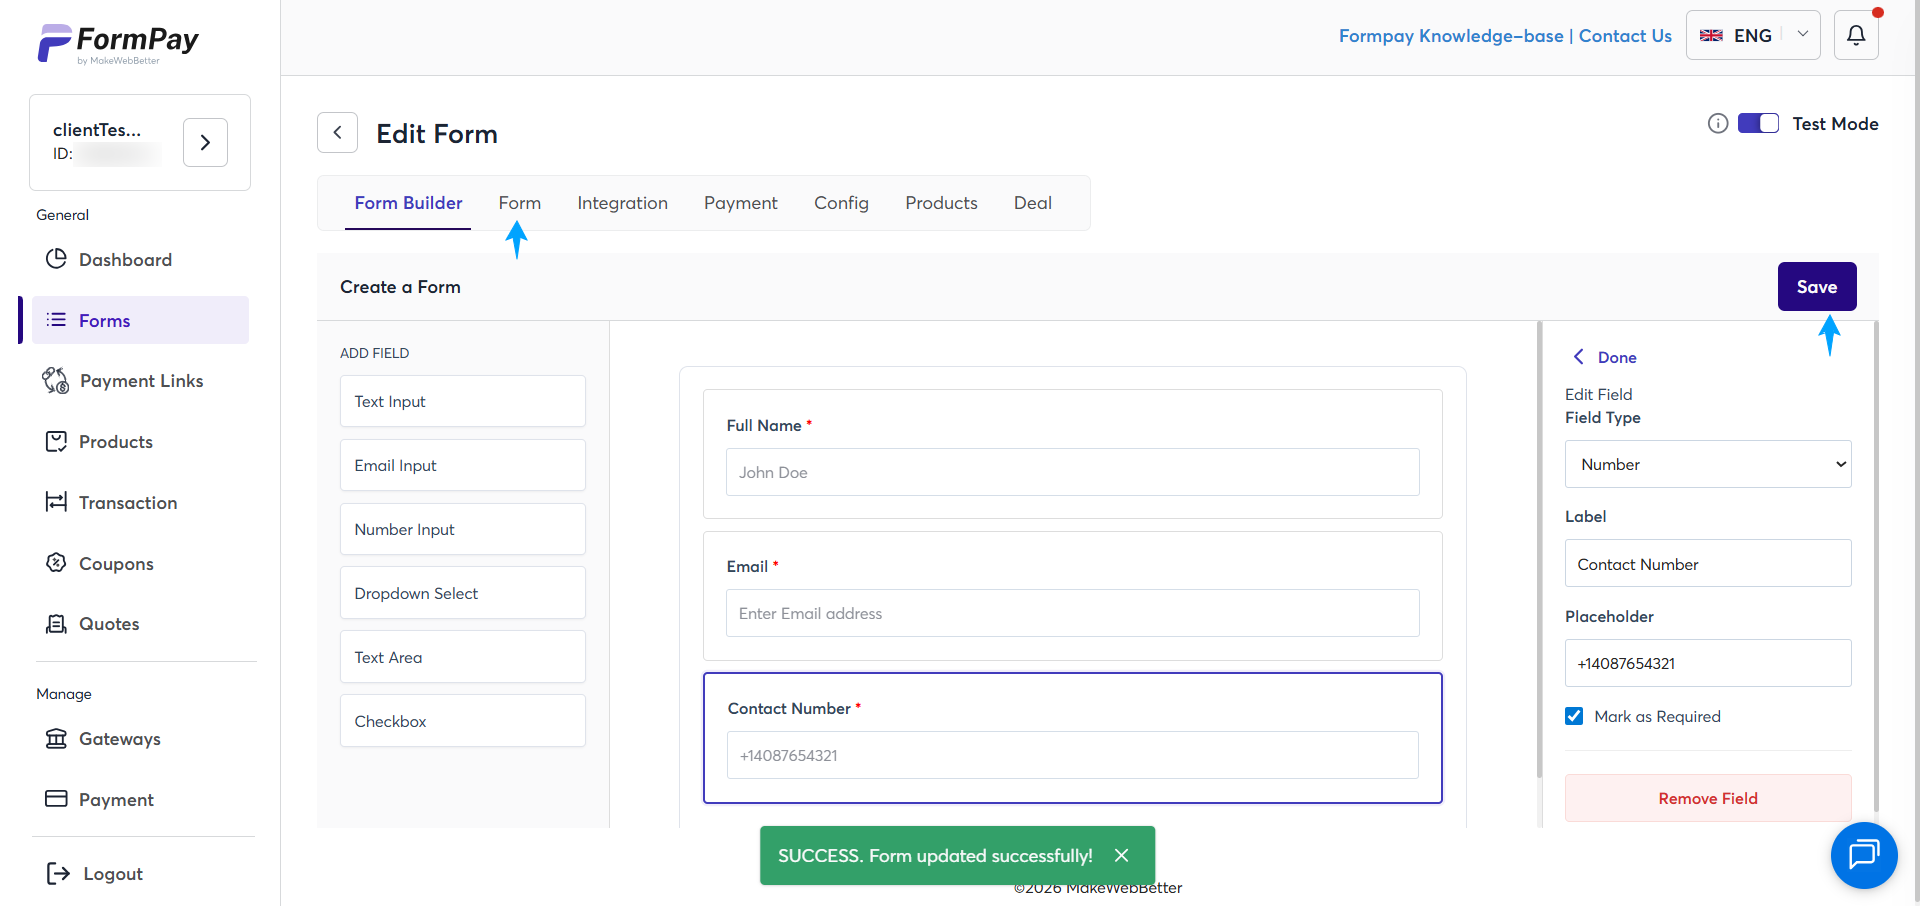
- Once done, click on the ‘Save’ button at the top right of the page to move to the next step of the payment form setup.
- Next, click on the Form tab and start setting up the rest of the payment and form configurations.
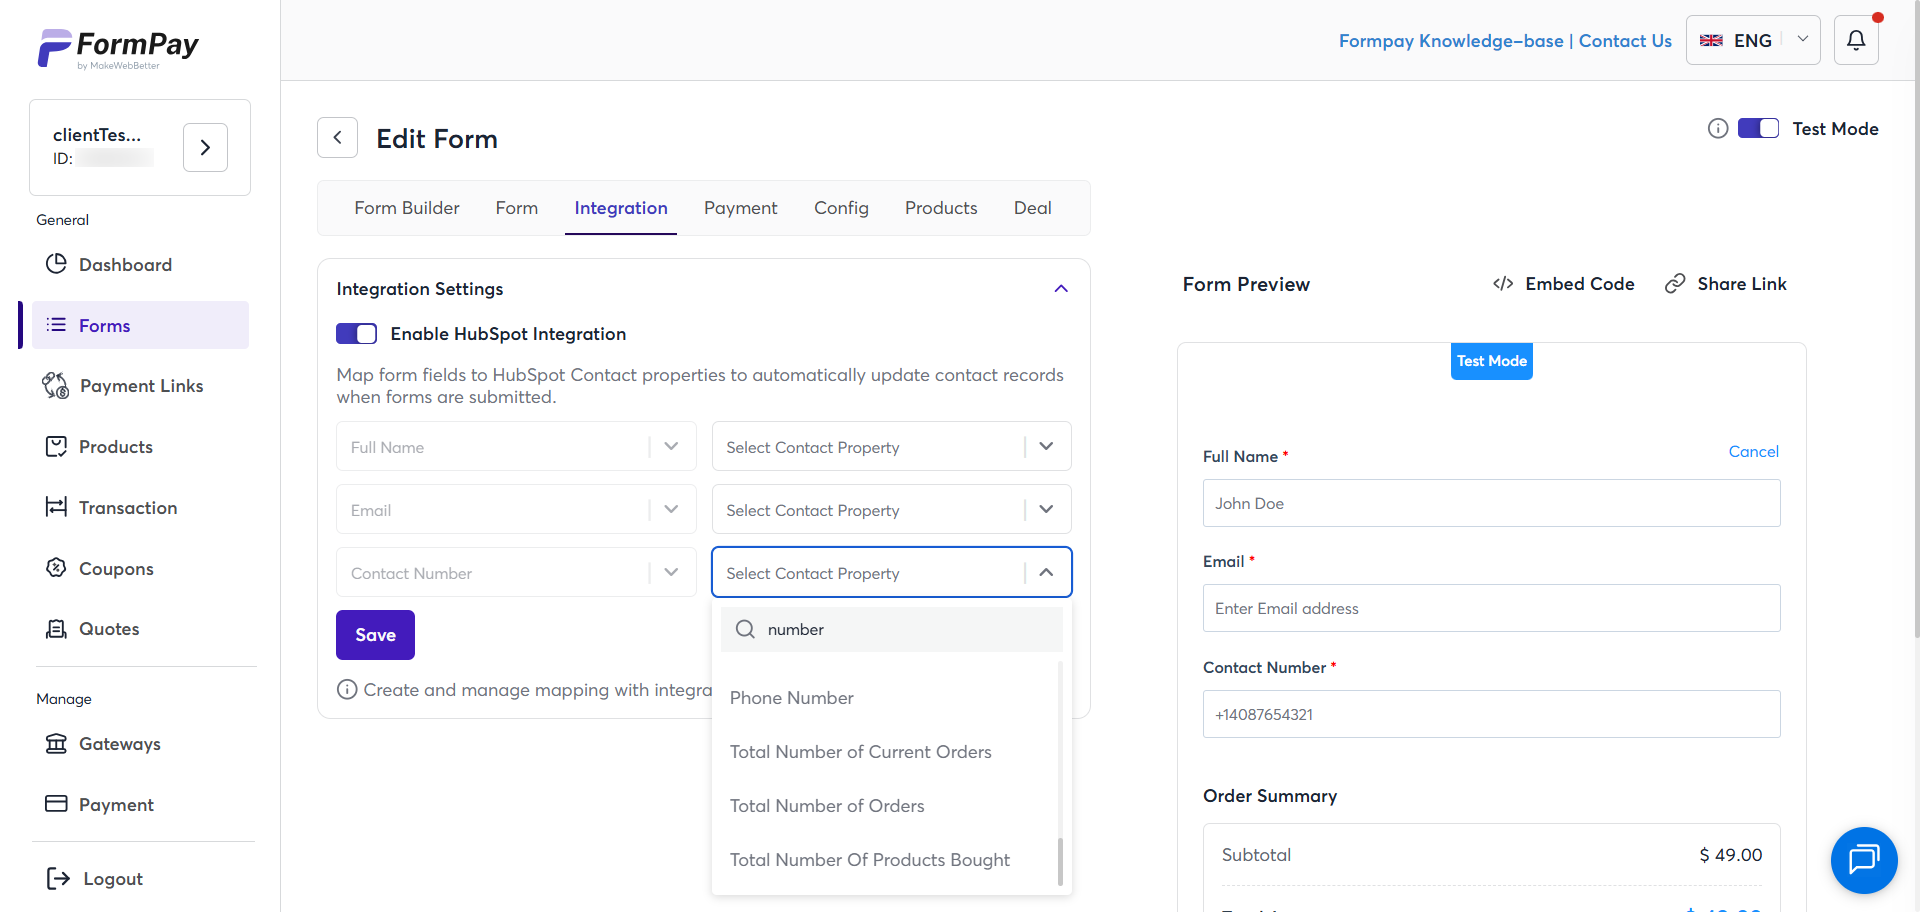
- After this, switch to the Integration tab. Here, you can map the form fields with the connected HubSpot account (for which the information will be stored within the specific HubSpot contact records). Click Save and move to the next tab.
The rest of the setup is the same for both the Form Editor (FormPay Form Editor & HubSpot Form Editor) and is discussed further in the documentation.
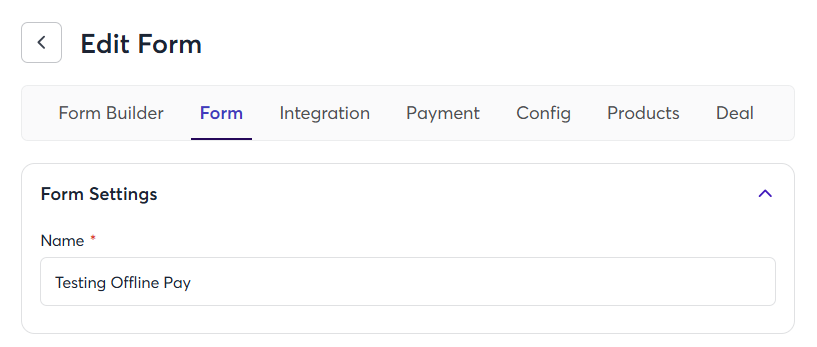
HubSpot Form Editor
HubSpot Form Editor allows you to edit the existing forms that you have created in your HubSpot account (integrated with FormPay).
Here, you just have to select a HubSpot Form from the dropdown and proceed with the form setup.
Payment Form Setup
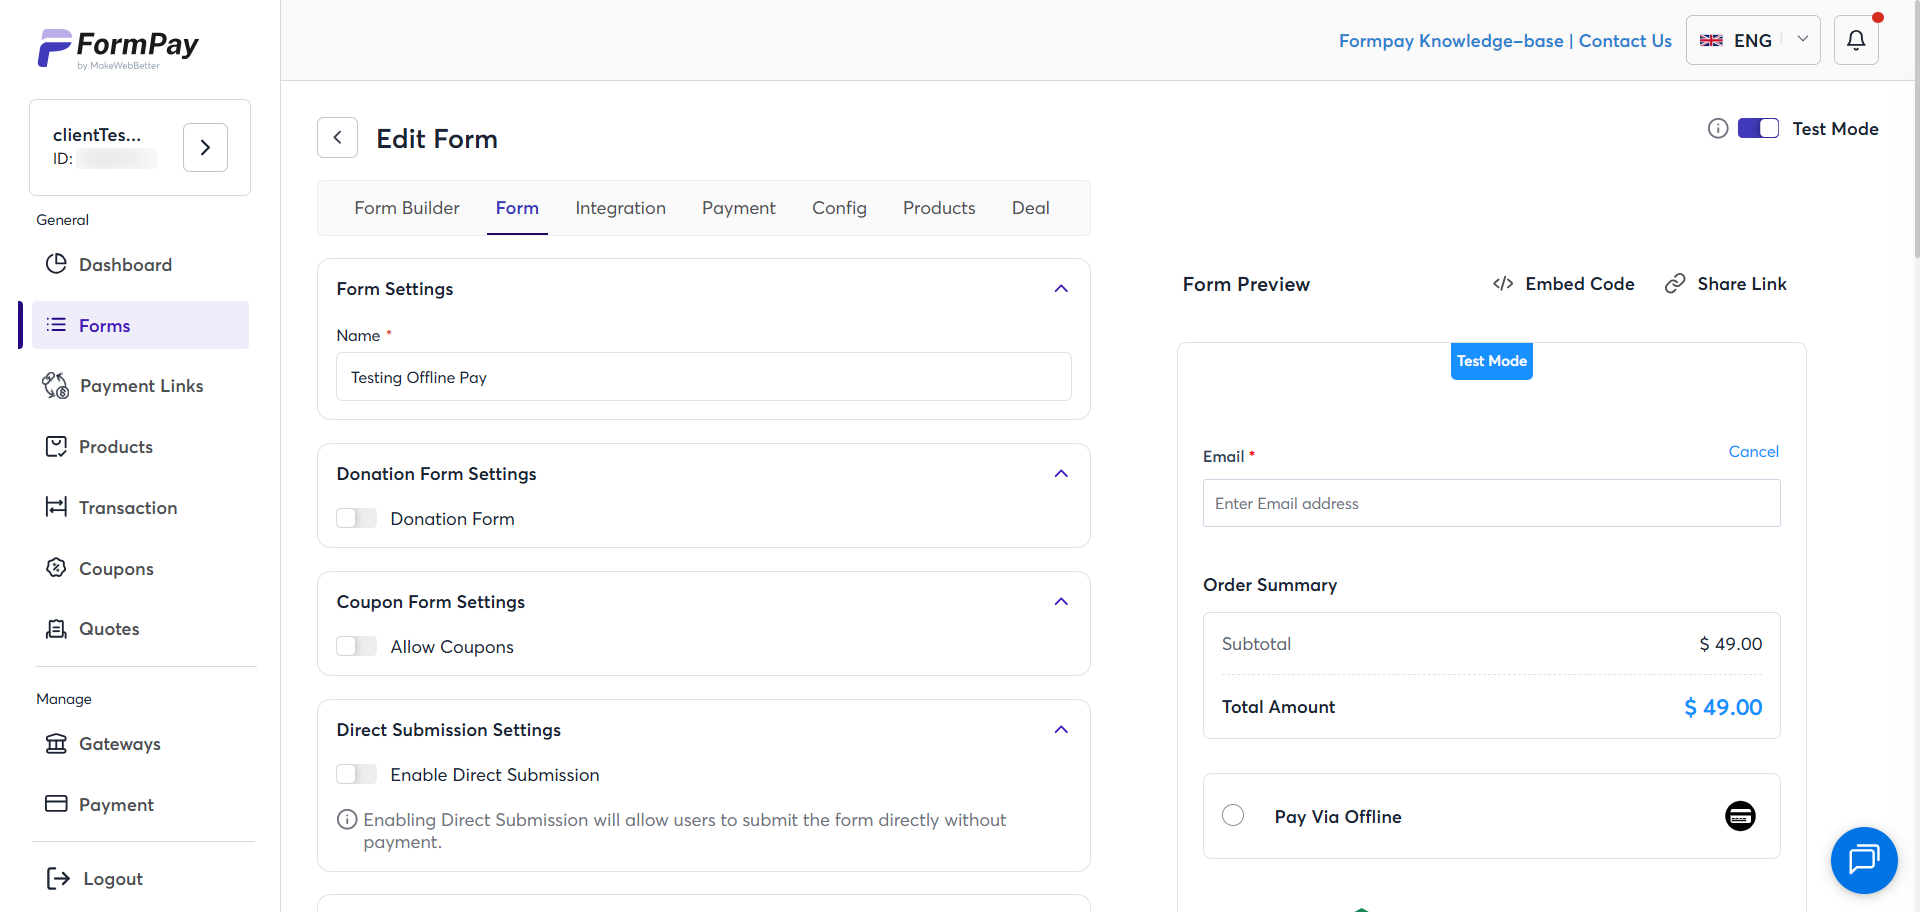
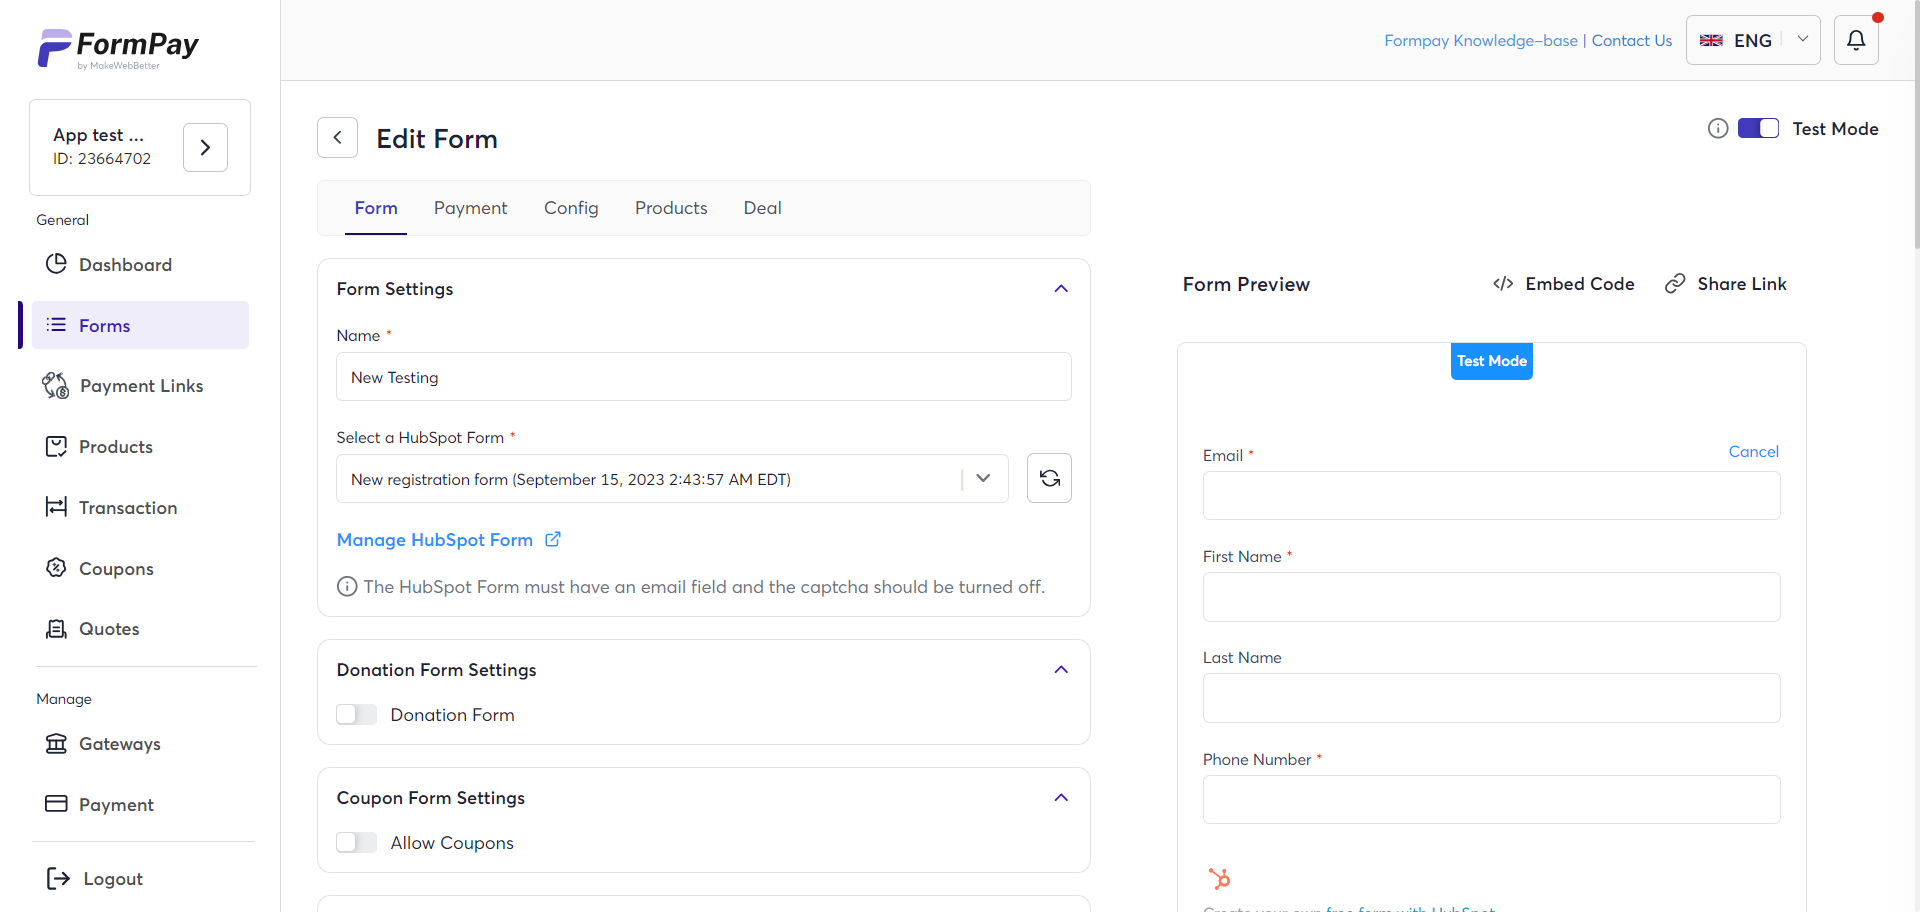
a. Form Settings
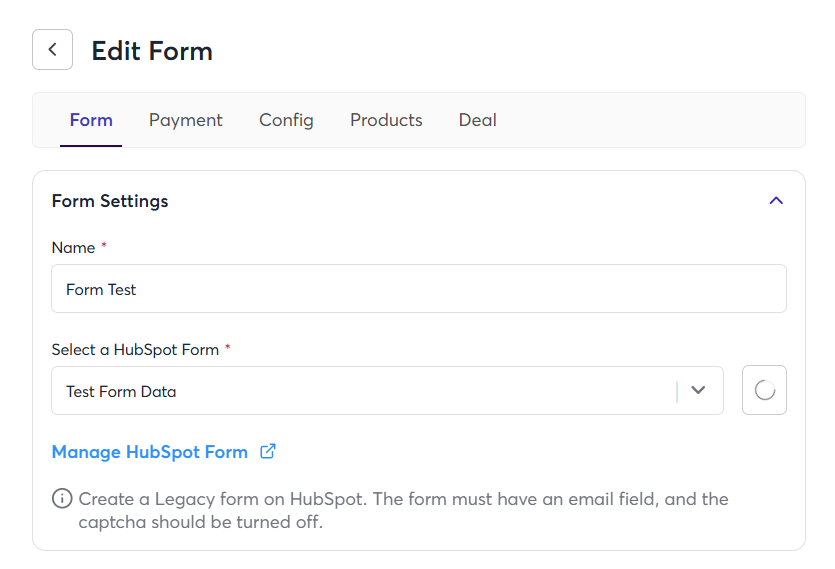
The first is Form Settings. In this section, you will get the options to set up:
- Form name: Add a name to the HubSpot Payment form you are creating.
- Select HubSpot form: Select a regular HubSpot form you want to convert into a payment form.
Note: Only the Form Settings & Integration settings in the FormPay Form Editor are different from the HubSpot Form Editor. The rest of the setup is the same.
b. Donation Form Settings
 It has different settings and some exceptions in the features accessible. When you toggle on Donation Form Settings, a few more features will emerge, and you will be able to access these features:
- Donation Form Settings
- Transaction Cost Settings
- Payment Settings (Alternate)
The process to create a Donation Form is discussed in the section below. Some settings behave differently when you toggle donation form settings. Also, a few features are accessible and inaccessible when you do so.
c. Coupon Form Settings
The coupons you have created can be added to the payment form, enabling your users who are aware of the coupon availability. This option is not ideal when you choose donation settings; thus, it’s inapplicable and disabled with donation settings.
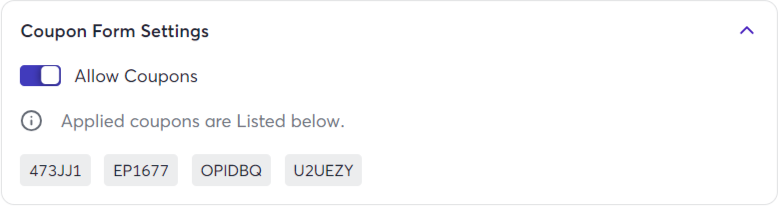
Only the already created coupons can be added to the form. The procedure to create a coupon is discussed above in this documentation. You can also create a coupon exclusive to the form after you have created the form.
d. Direct Form Submission
Enabling the direct form submission settings allows your users to submit the form without actually making any payment. This setting is specifically designed for Offline payment settings (selected in the Payment Method tab), allowing you to track offline payments in HubSpot and create an object record for offline payments.
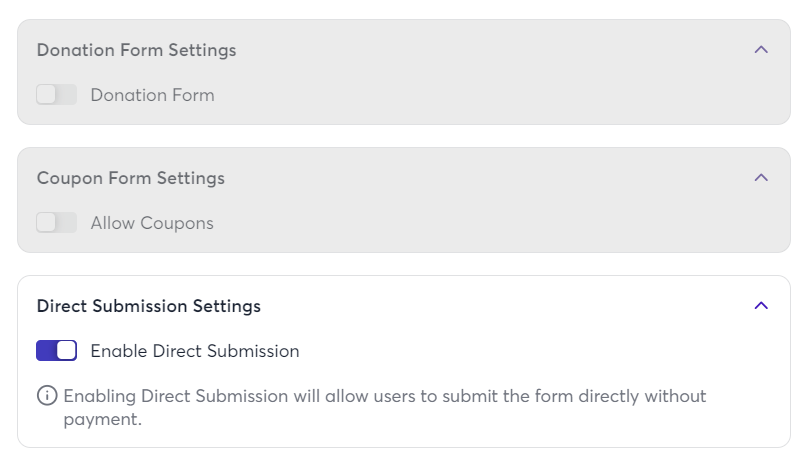
This setting will disable all other settings & tabs — donation form settings, coupon form settings, payment method, transaction charge settings, and subscription settings.
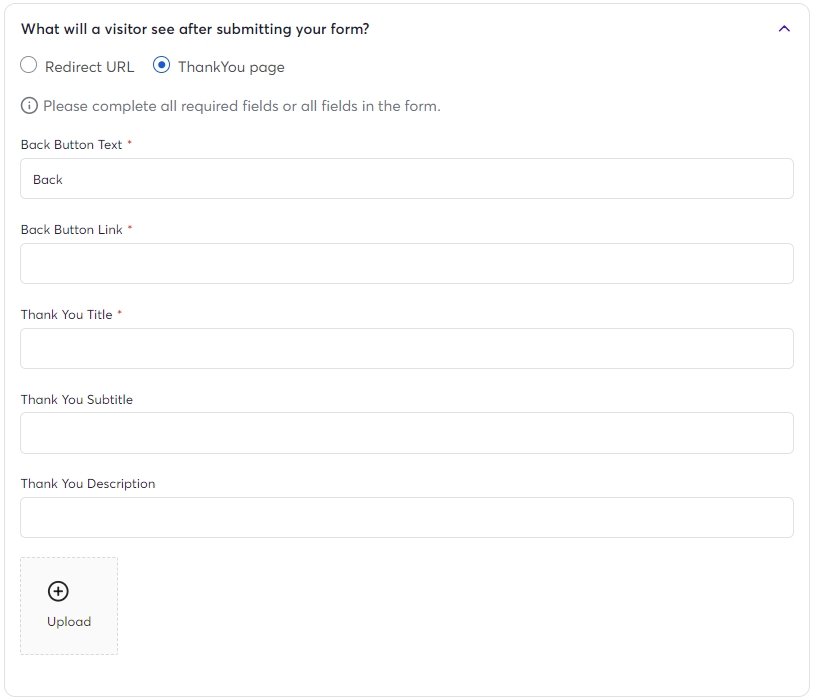
e. Redirection Settings & Thank You Settings
If you toggle on Redirection Settings, then after making a payment, the customer will be redirected to the page you desire (which can be your Home Page). You also have the option to custom-create a Thank You page by choosing the respective toggle right next to redirection settings.
This section lets you add a URL to which the end user will be redirected after making the payment.
- Toggle – Enable toggle to choose if you want the user to be redirected to a specific page.
- Redirect URL – Enter the Page URL.
The second option you have for a follow-through after the payment has been completed is the Thank You page. If you wish to implement the Thank You page settings, then you can customize the page appearance with texts (Back Button Text, Page Title, Subtitle, & Description) and an image. Moreover, you can assign a link in the back button to redirect the user to a specific page.
f. Dynamic Amount Settings
The Dynamic Amount Settings is an ideal option to suggest a payment amount.

Note: The custom amount setting under the ‘Payment Amount Setting’ can only be utilized if you have enabled the subscription settings.
So, for those who don’t fit into the “donation or charity” criteria and need to display suggested amounts as per their requirement, this setting enables you to directly reflect those suggestions on the payment page.
g. HubSpot form submission settings
This setting allows you to keep a record of and track failed transactions right within HubSpot.

Activating the ‘Enable Abandoned Cart’ toggle will help create a contact record for that failed transaction, and you can view this information in the Activities tab timeline events of that particular contact.
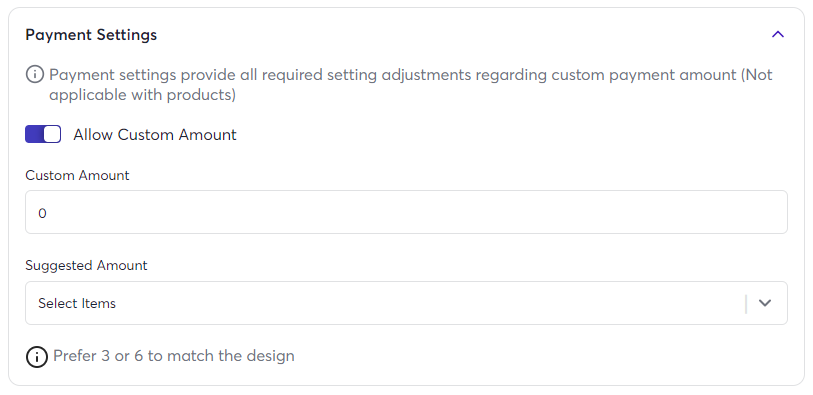
h. Payment Settings
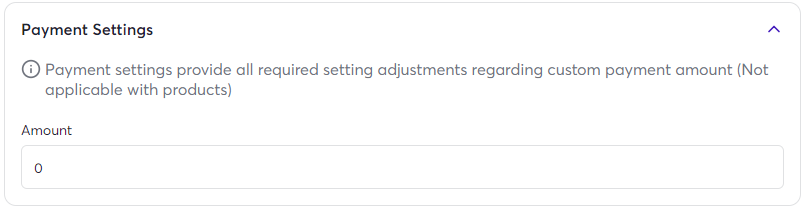
This section will let you enter the payment amount you want to receive with your form.
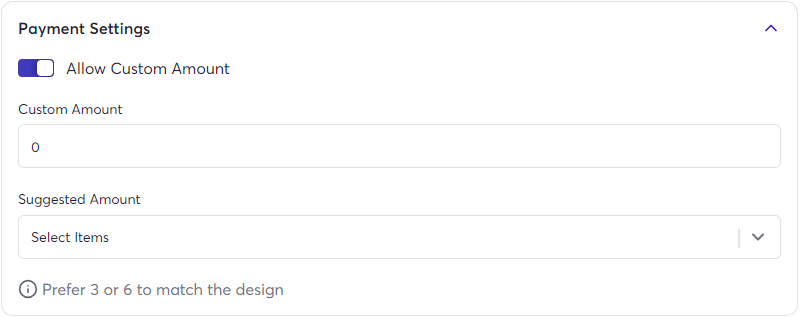
- Allow custom amount toggle: To add multiple amounts to your form, you can enable this toggle.
- Custom amount: Enter the amount you want to set as a default amount for your payment form. If you don’t enable the custom amount toggle, you will see this option as Enter Amount.
- Suggested amount: This option lets you add multiple payment values to your form. Just add a value and hit Enter, and then repeat the process to add multiple values in your form.
- Enable test mode toggle: If you want to test your form, enable this toggle.
Note: You must only create and add a custom amount when creating a donation form. Or if it suits your business style.
i. Transaction Charge Settings
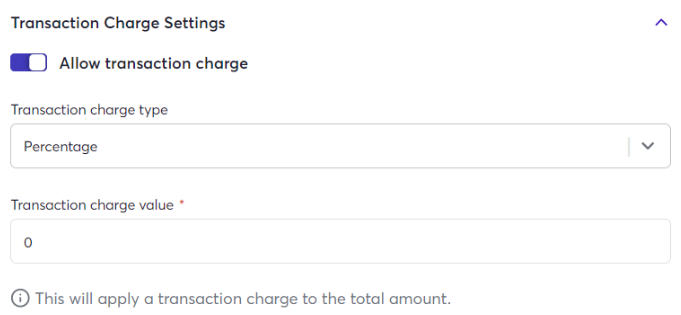
Under the transaction charge settings, you can decide on the per-transaction cost for your customers. This charge can be levied based on a percentage or a fixed value. It is generally used alongside the Donation Form Settings.
j. Payment Method
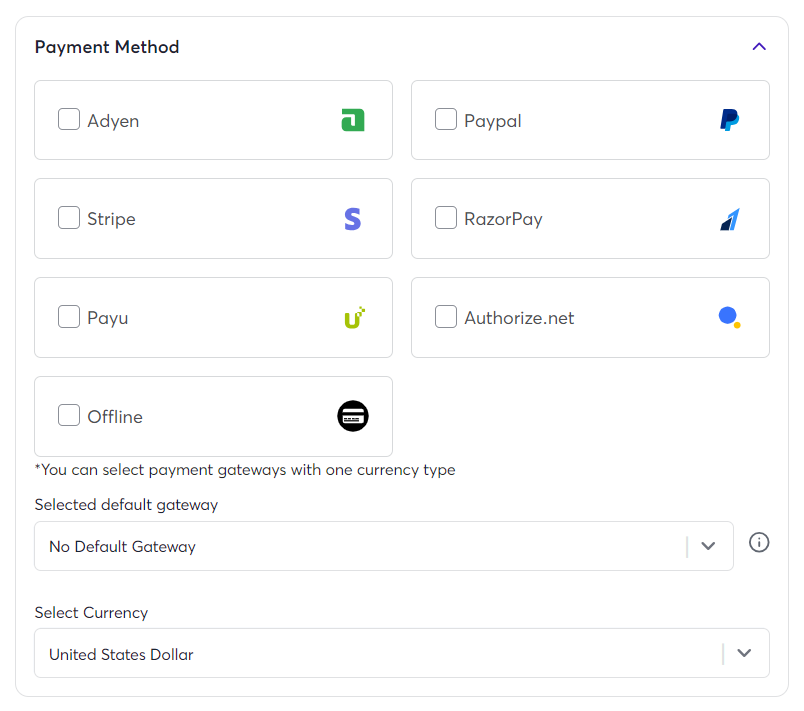
Here, you get to decide which active payment gateway you want to employ to receive payments through the form you are creating. Those gateways that you have already activated will be accessible here.
Besides the multiple gateway options, you can also choose Offline as the payment option.
Simply click the check box next to the gateways & other options to choose the desired.
k. Subscription Settings
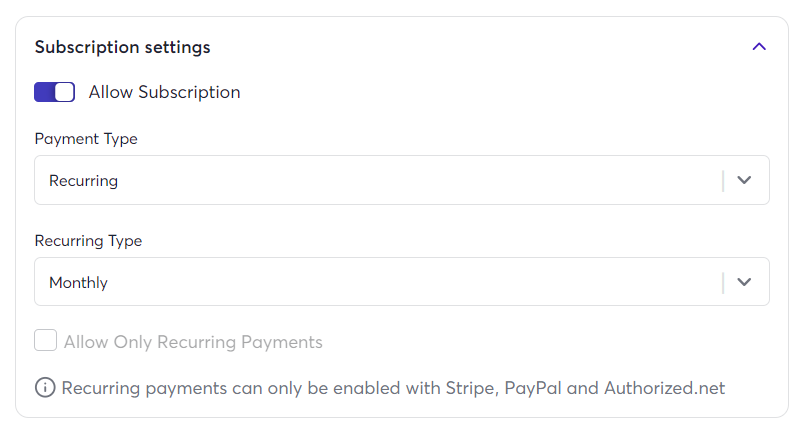 As the name suggests, enabling this toggle will create a recurring payment form for you. Choose your payment type to be One-Time or Recurring.
Note: Recurring payments can only be enabled by choosing either Stripe or Authorize.net as your payment gateway.
l. Payment Tab
When you are done setting up the form, you can switch to the Payment tab. Here, you can enable your customers to pay using Apple Pay or Google Pay with an app payment URL redirect. Again, this is only possible if you choose the Stripe gateway when setting up the form.
- Stripe Card
- Stripe Session
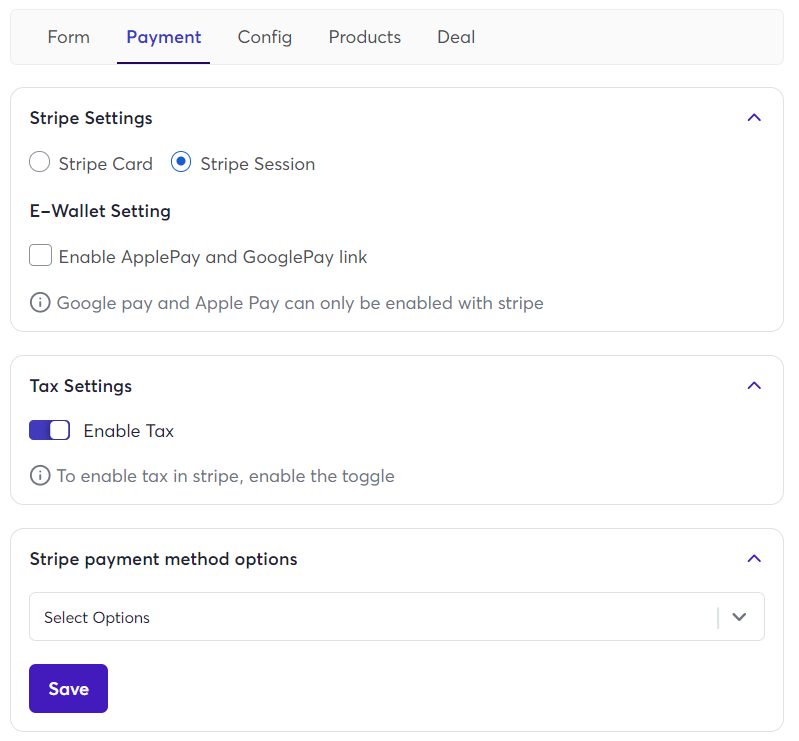
If your chosen payment method is Stripe or PayPal, then you have the following set of settings.
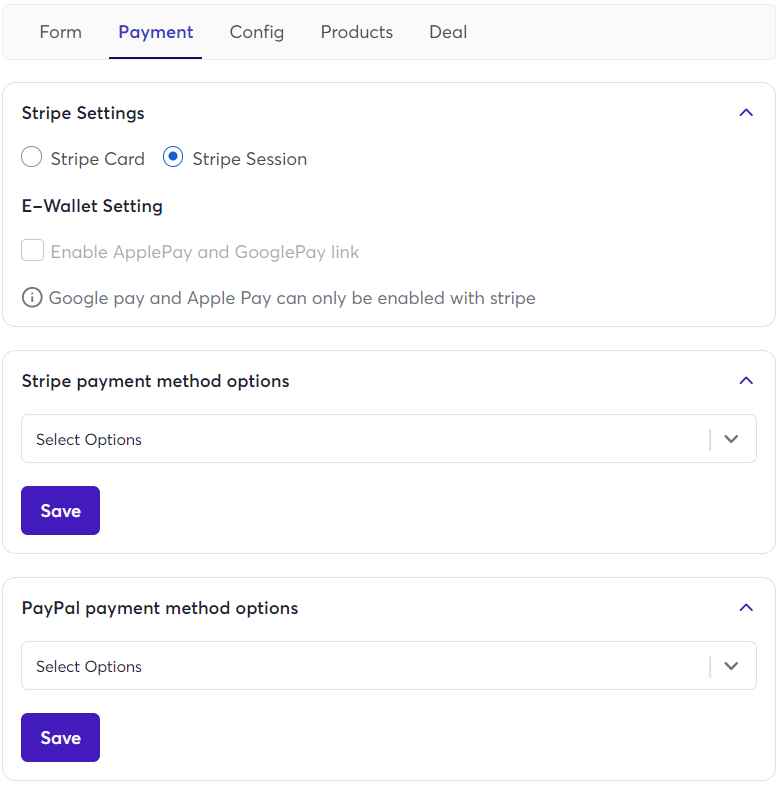
If you have chosen Stripe as your gateway in the previous tab, then here you will find a different set of settings related to payments, along with Tax Settings.
Note: Choosing Stripe Session will allow you to add multiple line items (including different subscription products with different billing frequencies).
m. Config
The Config settings will allow deciding on the styling & language & the payment form with color customization and its appearance.
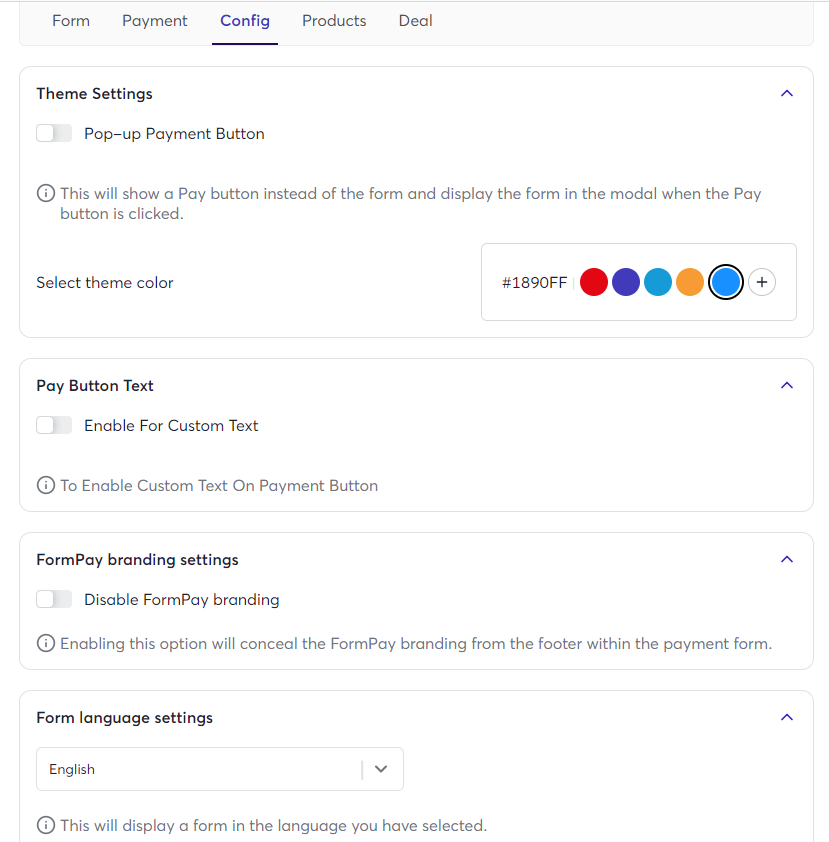
Click the Pop-up Payment button. Enabling this will convert your entire form into a single button, which will only display the ‘Pay’ button.
Furthermore, you can choose a theme color for the pay button according to your branding and change the Pay Button Text (Donate, Download, Book, etc). This Pay Button can be embedded anywhere (webpage or email).
If the buyer clicks this Pay button, then the user will be redirected to the payment page, consisting of the entire payment form.
Enabling the toggle under FormPay Branding settings will disable all the FormPay branding from the payment form that you create.
Below this, you’ll find the options to further customize with Form Language Settings. You’ll be able to select from the following language options: English, Spanish, French, German, Portuguese, Italian, Turkish, Dutch, Persian, Polish, and Filipino.
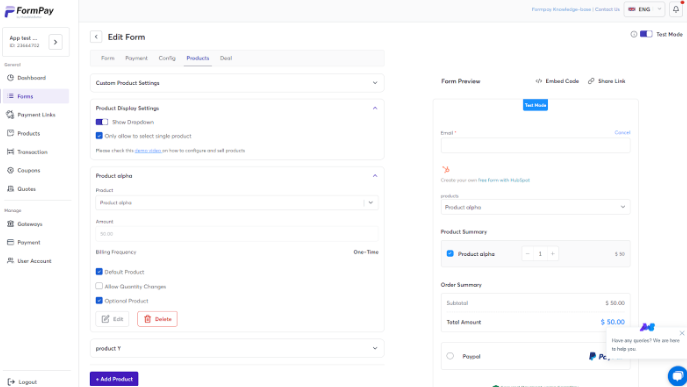
n. Products
Switching to the Product Tab when creating a form simply means you want the form to be associated with a particular product.
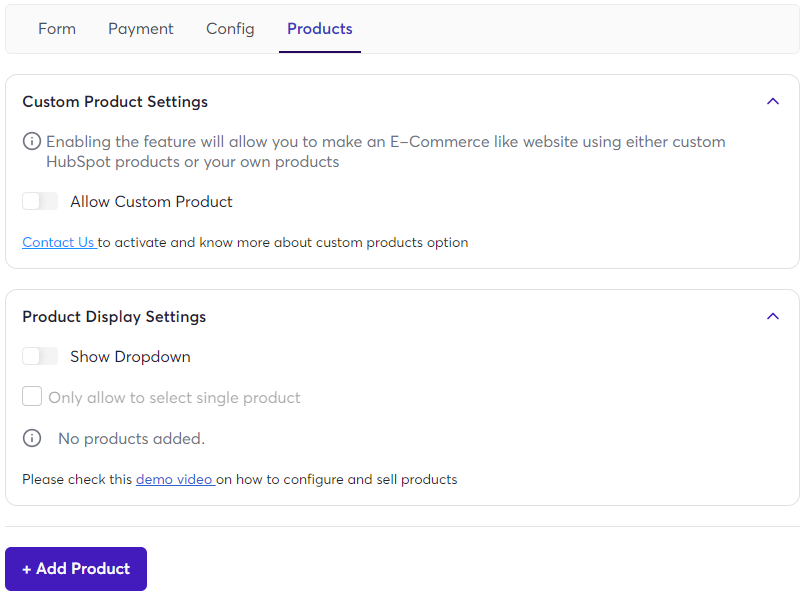
- Enable the Allow Custom Product toggle in the Custom Product Settings.
Enabling custom products will disable all other product settings.

- Enable the Show Dropdown toggle.
To enable a Drop-down, you must add at least two products, and at least one product should be set as the default.
- Enter Product Settings.
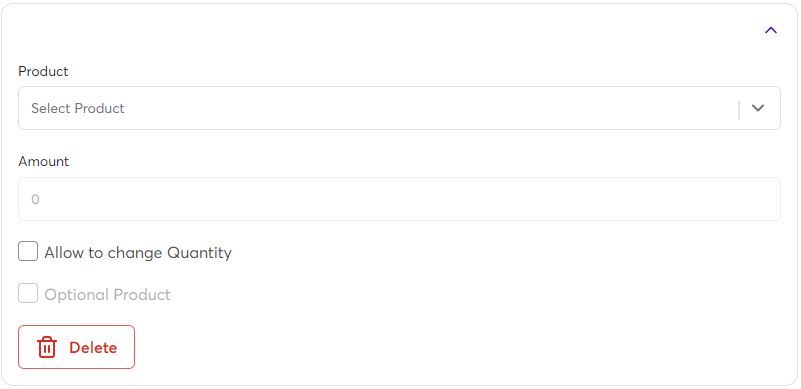
Under this, you choose the products that you wish to display. Also, you add a custom amount of the product.
- Click on the dropdown to select and search for the products.
- Choose the desired product. If you want users to buy only a single unit of the product, click on the checkbox next to Only allow to select single product option.
- If you’re adding multiple products in the same form, you can choose a product as a Default Product or an Optional Product. Moreover, you have the option to allow customers to buy multiple products with the Allow Quantity Changes option.
o. Deal
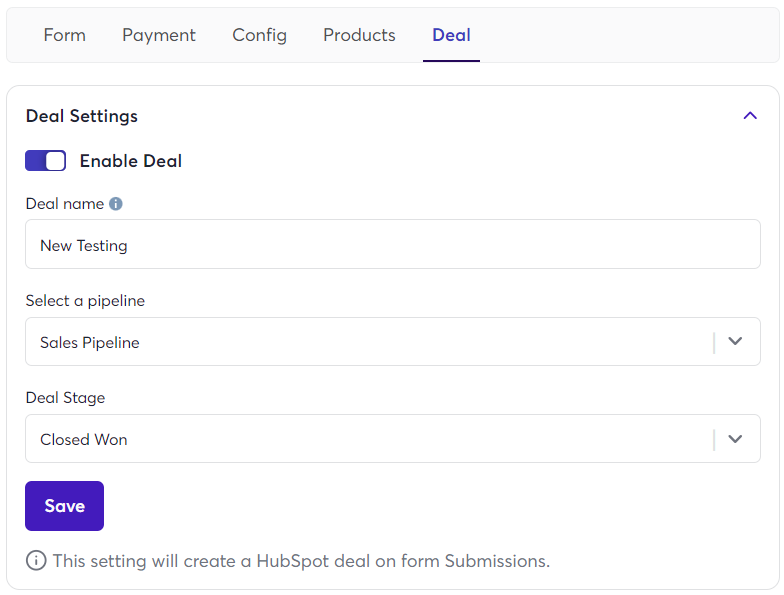
Enabling the deal toggle creates a deal in your HubSpot for the following payment form. You can also define the traits of the deal, like the deal name, sales pipeline, and deal stage.
Once done, click on the Publish Form button. Your form is successfully created now.
You will be able to view the preview of the form created.
Creating a Donation Form
To create a donation form,
- Click on the + Create New Form button in the top-right corner.
- Choose the following form settings.
- Create Form Name.
- Choose a HubSpot Form to modify.
- Toggle Donation Form Setting.
Begin by enabling the Donation Forms Settings Toggle.
1. Donation Form Setting
This section allows you to turn your form into a donation form.
- Donation form toggle: Enable this toggle to turn your form into a donation form and unlock the rest of the settings in this section.
- Title: Add your donation form title here.
- Description: Add your donation form description here.
- Logo: Upload your donation form logo here.
- Show/Hide in memory of: If you want to have a section where users can dedicate their donation to someone, enable this toggle.
When enabling donation form settings, customize your donation form with a title & description, upload an image (i.e., brand logo), and customize Donate Now.
Moreover, you can enable the Donation Memory Label toggle.
- Donation memory label: Add content for your donation memory label.
- Donate button text: Add text for your donation button.
2. Transaction Cost Settings
- Next, you can decide on the transaction cost.
- Transaction Charge Type: Define if you want it to be fixed or variable.
- Transaction Charge Value: The variable amount charged will be based on a fixed unit amount.
3. Payment Settings
- Toggle: Click the toggle to enable the custom amounts option for your users.
- Custom Amount: Add a default amount to be displayed on the page.
- Suggested Amount: Add some suggested amounts that would be displayed as suggestions to the donors. (Recommended 3 or 6)
Since receiving donations does not involve any kind of product or a discount. This is why the two above-discussed features, i.e., Coupon Code Settings & Products Settings, are cut off when you opt for Donation Form Settings.
- Then, choose if you want to redirect the donor to a specific URL after completing payment.
- Next, choose your preferred payment gateway (activate the payment gateway from the Gateways tab). Please note that you can select payment gateways with one currency type.
- Under Theme Settings, you can choose a theme color.
Finally, click Publish Form.
Share Form
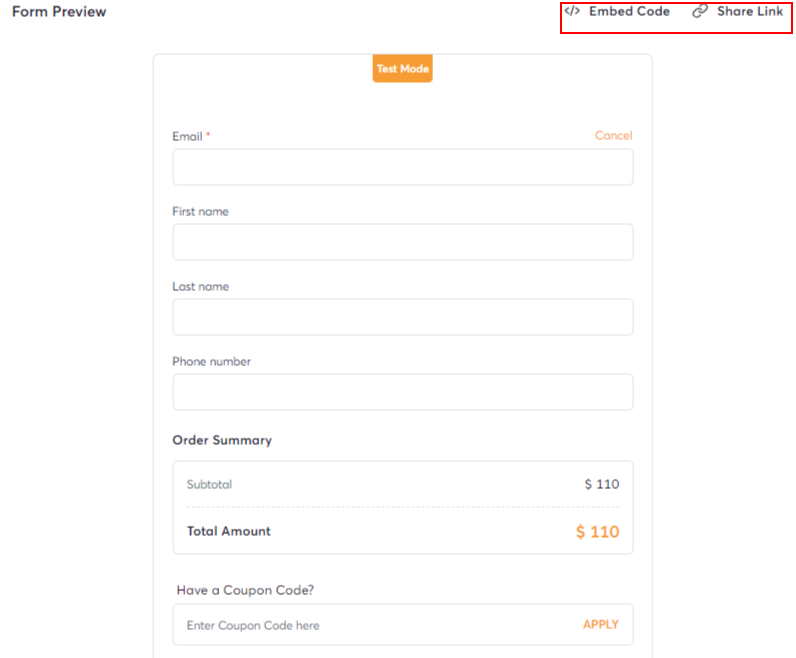
Once you have created a form. You can share your form using a Form URL or Embed Code on the desired landing page.
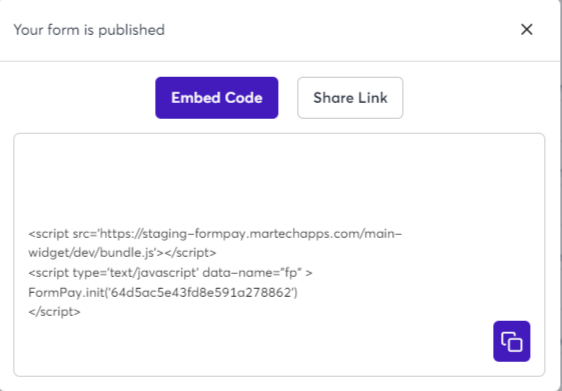
Find it on the right above the preview of the published form.
Note: You can customize the form from the preview itself. If you want to change a field, say Total Amount to Gross Amount, simply click on it.
6.How to Create a Payment Link In HubSpot
You can generate a payment link in HubSpot for contacts and deals using App Cards.
The FormPay App Card provides the easy-to-use payment link functionality, accessible as a tab in the timeline events (Overview) section of the HubSpot record (Contacts, Deals, etc).
Earlier, the ‘Create Payment Link’ functionality was enabled through the CRM Card section. However, the Classic CRM Cards are to be discontinued by HubSpot. This deprecation process began on June 16, 2025; no new apps in the HubSpot App Marketplace are allowed to include Classic CRM Cards, and developers will no longer be able to add new ones to the HubSpot UI.
By October 31, 2026, existing apps that use Classic CRM Cards must be migrated to the newer, more flexible App Cards built with React.

This requires the following setup beforehand.
In the FormPay app,
- Make sure you’ve created your FormPay account, registered using your HubSpot account, and connected your HubSpot portal.
In HubSpot,
- Log in to HubSpot using the same account/portal that you used for the FormPay App signup.
- Once inside HubSpot, click on the ⚙ (Settings button) located at the top.
- After this, in the scrollable menu on the right, go to Data Management > Object > Contacts.
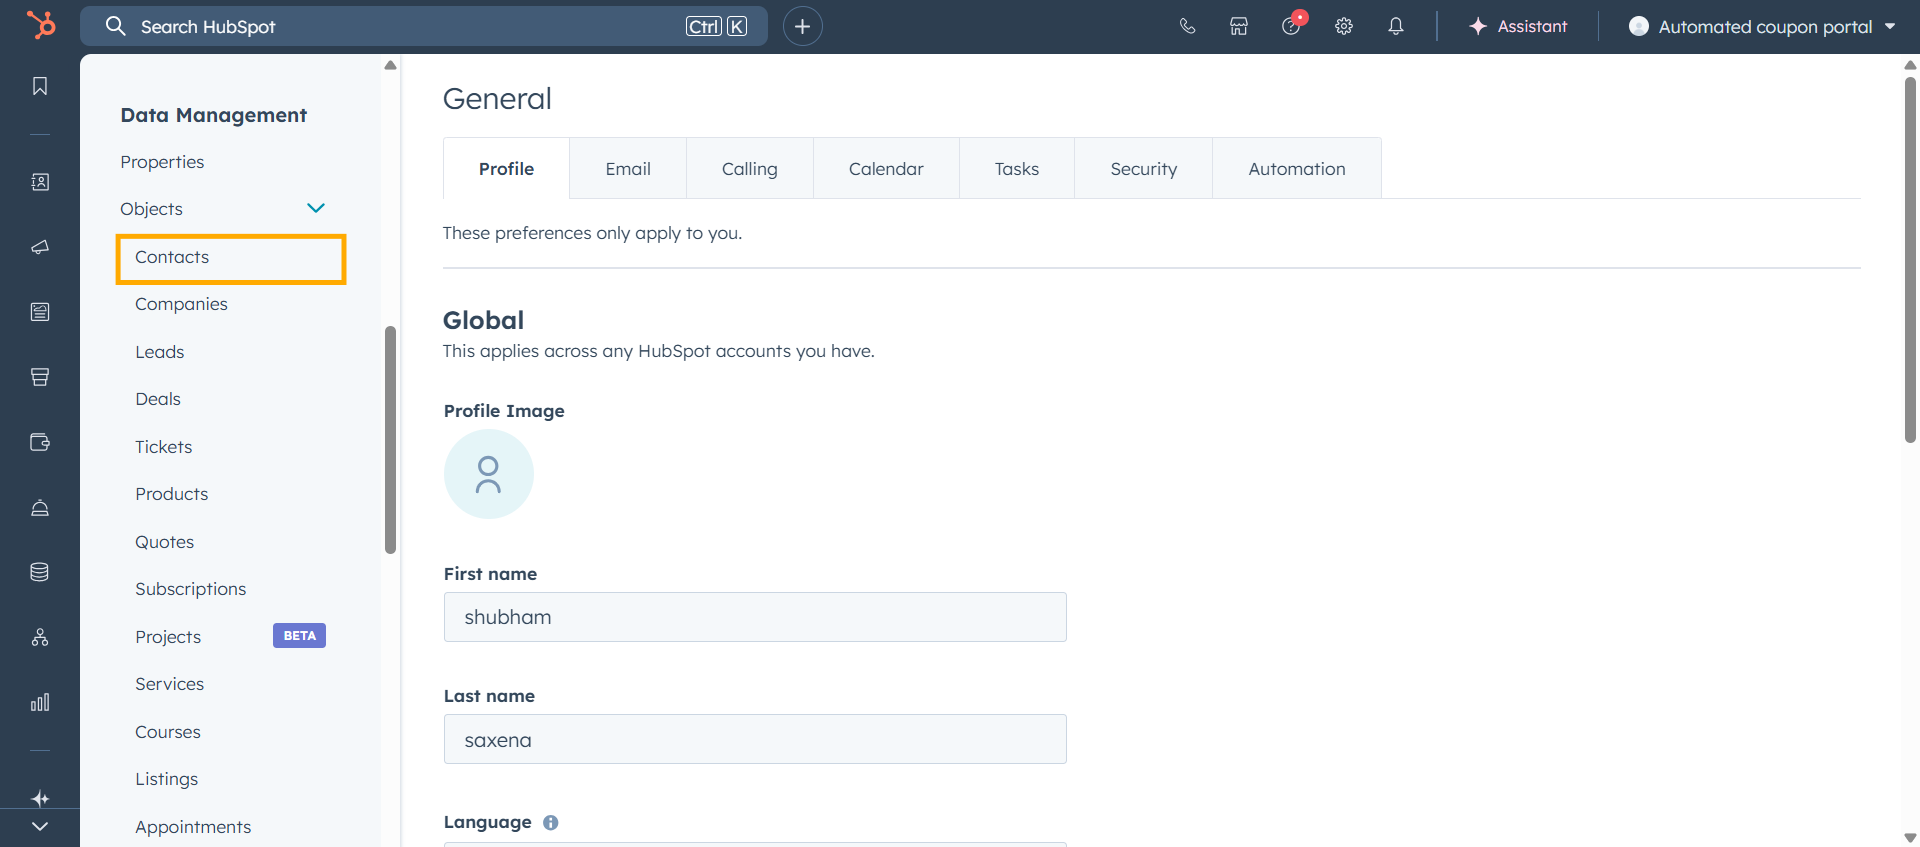
- Then, click on the Record Customization tab in Contacts.
- Next, click on the Default View team view.
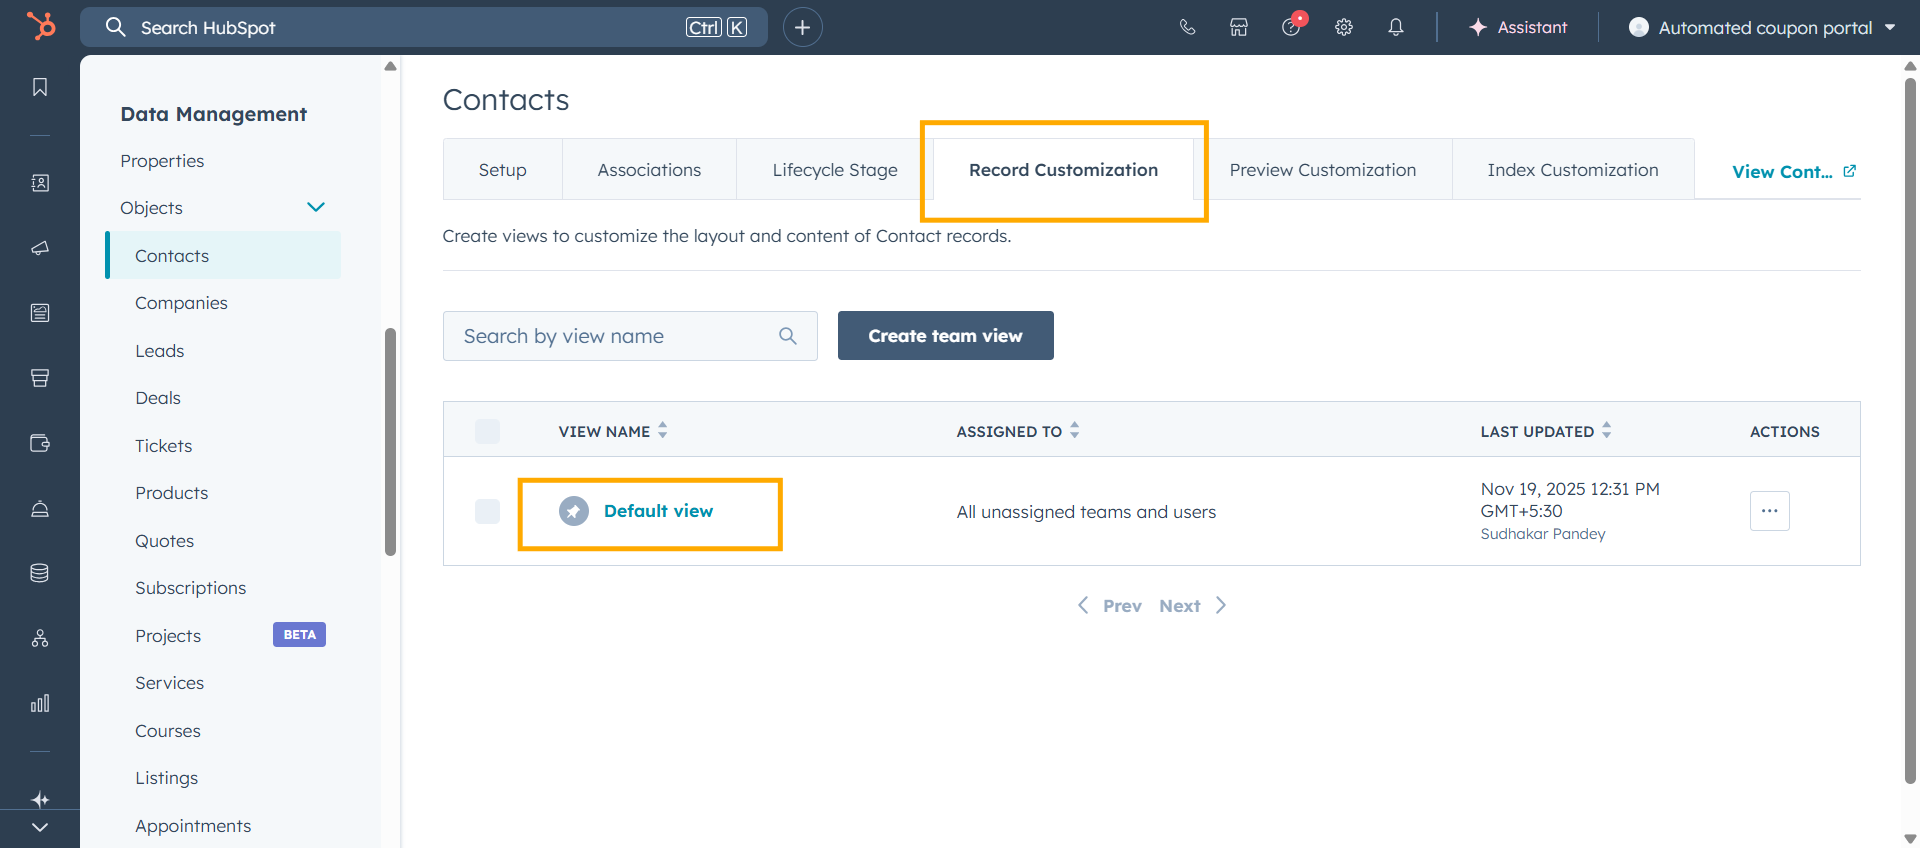
- On the next page, you will be able to customize (add, remove, arrange) the tabs in your Contact Timeline Event > Overview section.
- To add the FormPay app card to the Contact Event Overview tabs, simply hover over the top tab and then click Add Card.

- After this, the Card Library will slide in from the right.
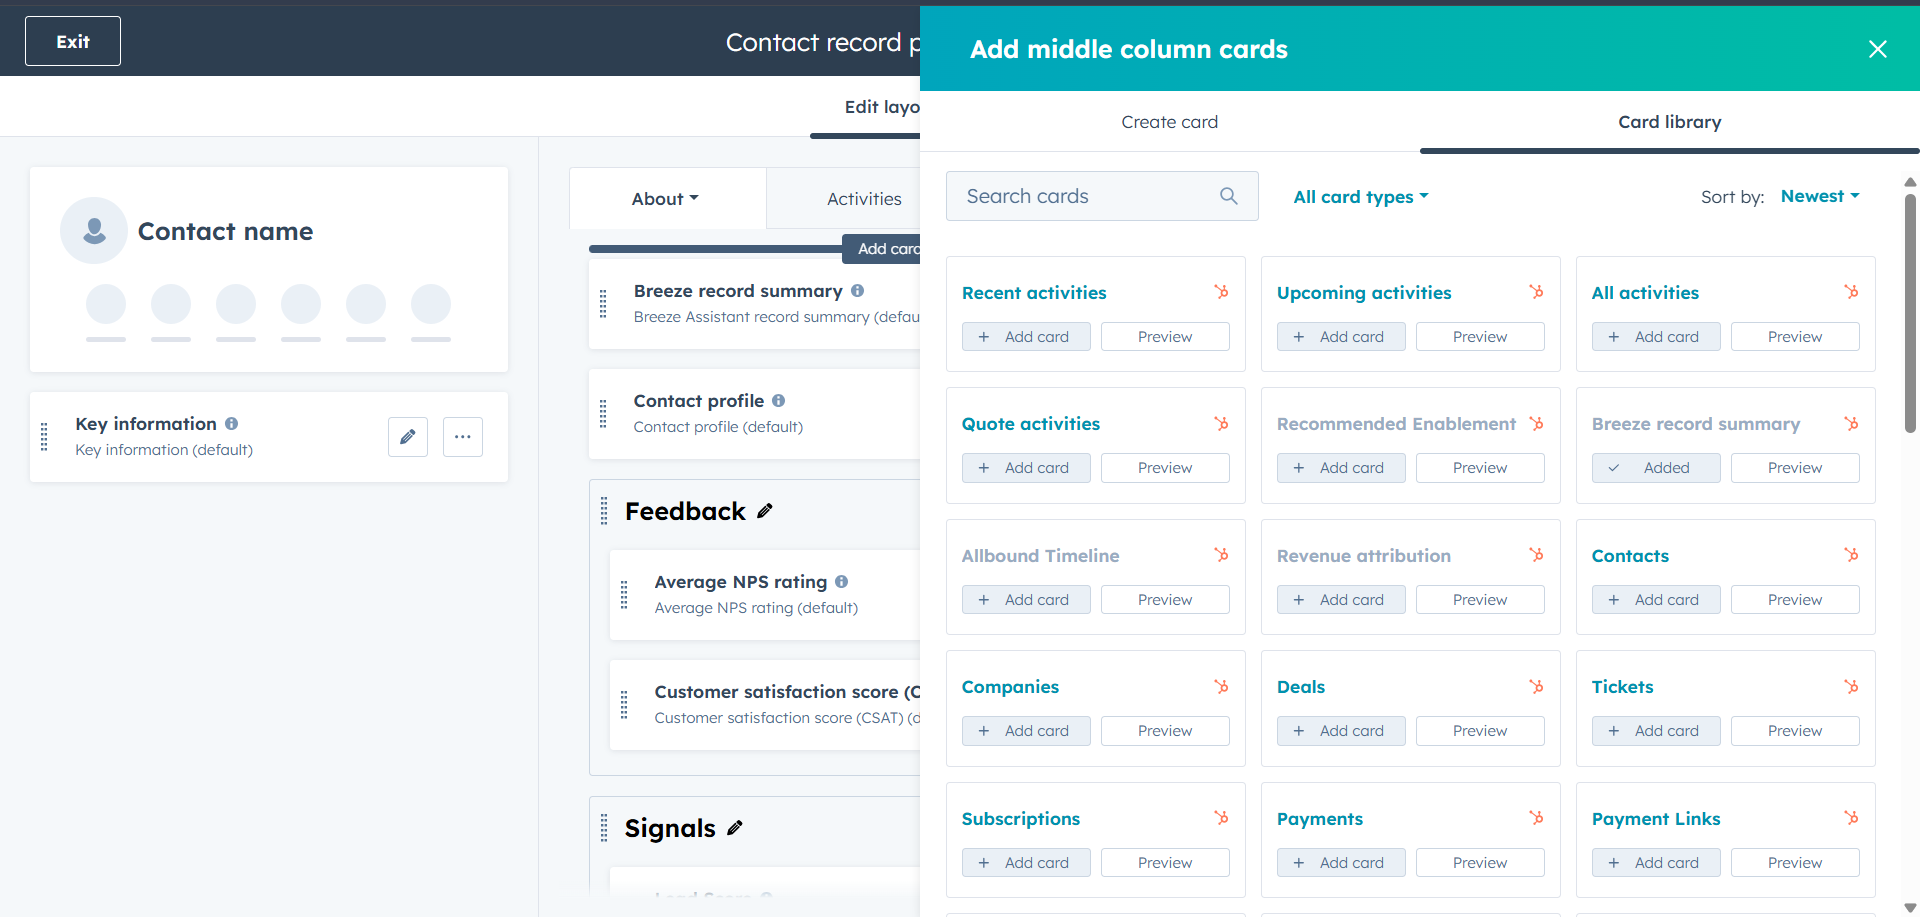
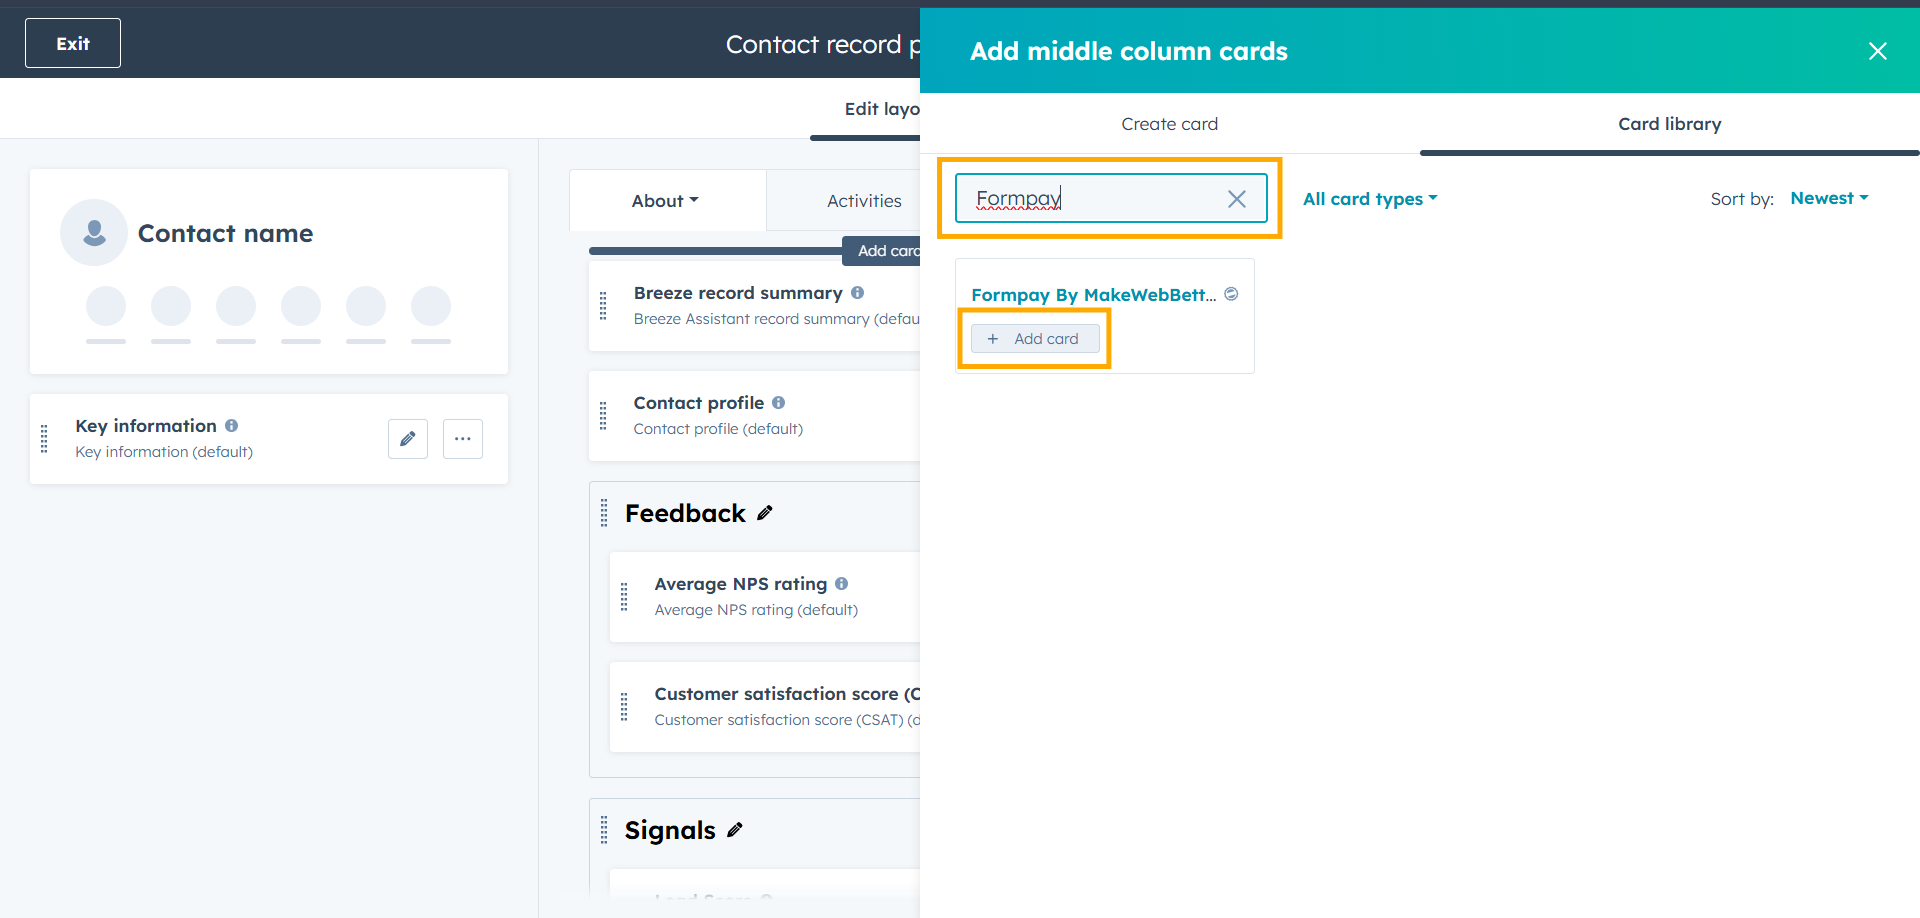
- Type ‘FormPay’ in the Search cards box.
- Next, click the + Add Card button under “FormPay Payment”.
- By following this setup, you’ll be able to access the FormPay App Card in the Timeline Events Overview section of your contacts.
a. Create Deal Payment Link
A unique Payment Link for every Deal can be created in HubSpot by utilizing the FormPay App Card feature. By accessing this feature from the deal record, you can create a deal payment link. Here’s how:
- Navigate to Sales > Deals in your HubSpot account.
- Click on the Deal you want to create a payment link for.
- Click Create Payment Link under the FormPay Payments app card.
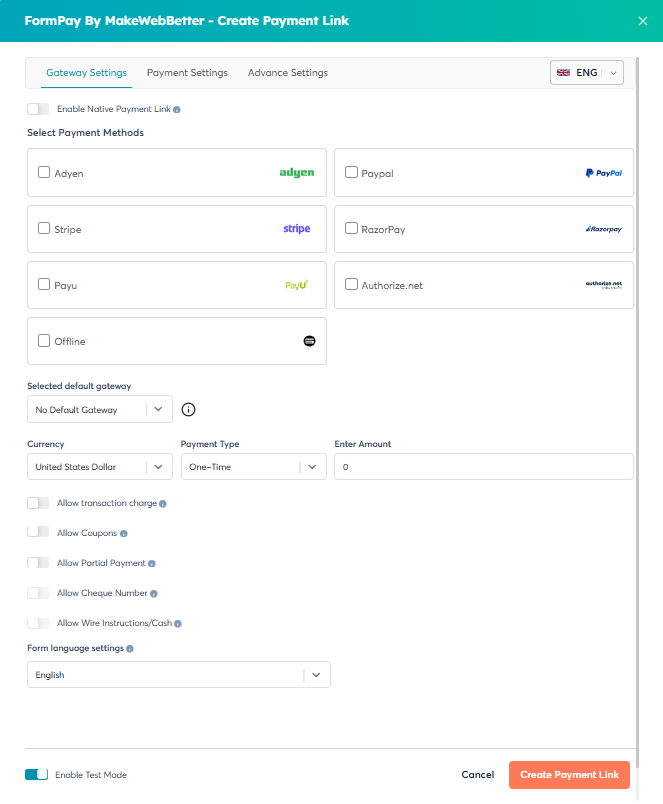
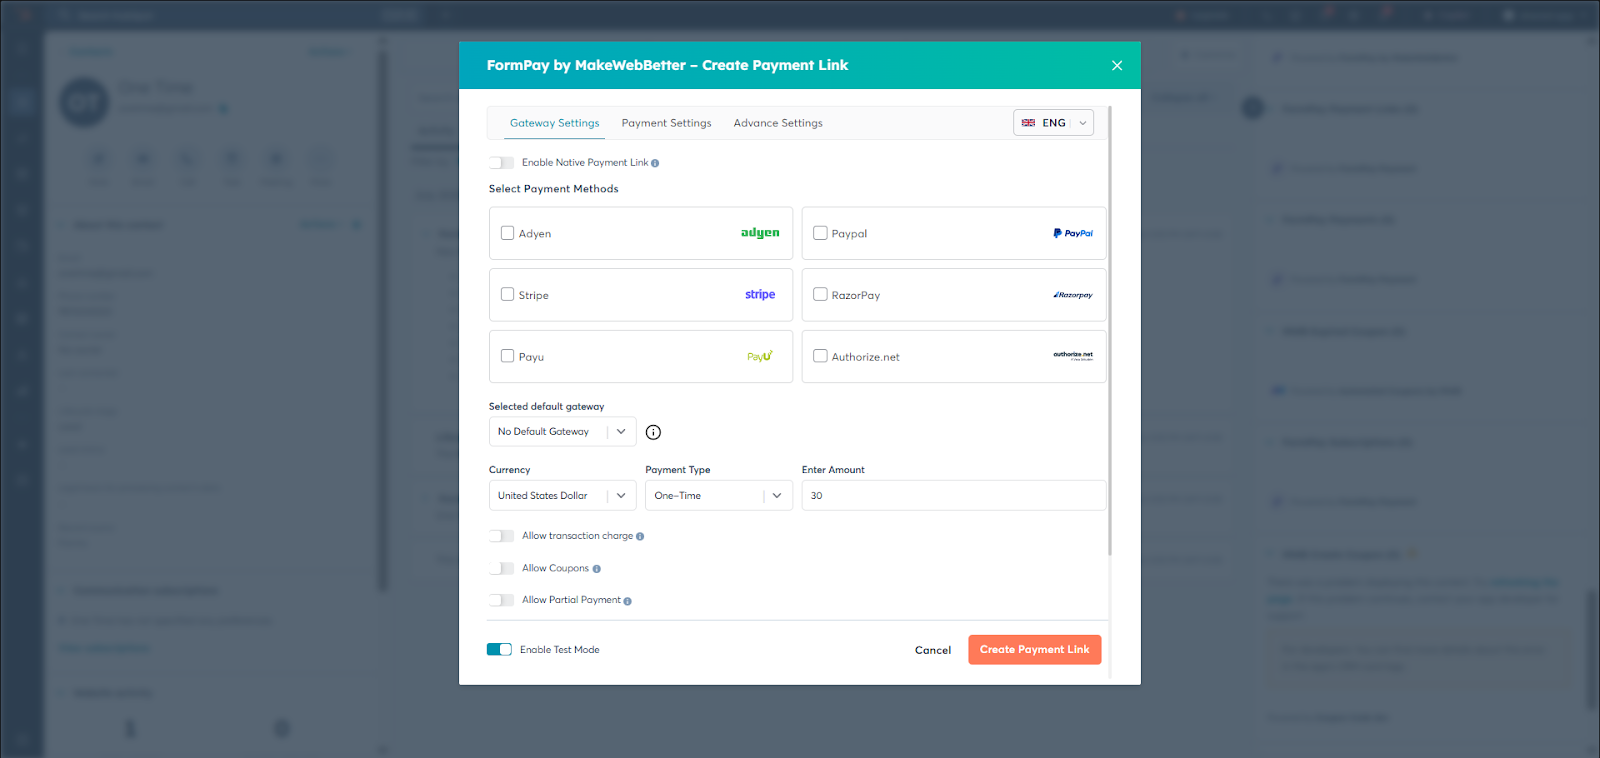
- Here, you have to choose the payment settings —
- Gateways: Select the gateway of your choice.
- Default Gateway: Select the default gateways of the link form.
- Select Contact: Choose the email address of the contact.
- Currency: Choose the currency in which the transactions are to be made,
- Payment Type: One-time & Recurring payment.
- Enter Amount: Amount to be paid.
- Allow Transaction Charge Toggle: Additional charges to be levied.
- Show Line Items: Show product details alongside the payment.
- Allow Coupons: The coupons created in FormPay.
- Allow Partial Payment: This enables the customers to pay a partial amount. (You can decide on the minimum amount to be paid.)
- Form Language Settings: Select the language of the payment form.
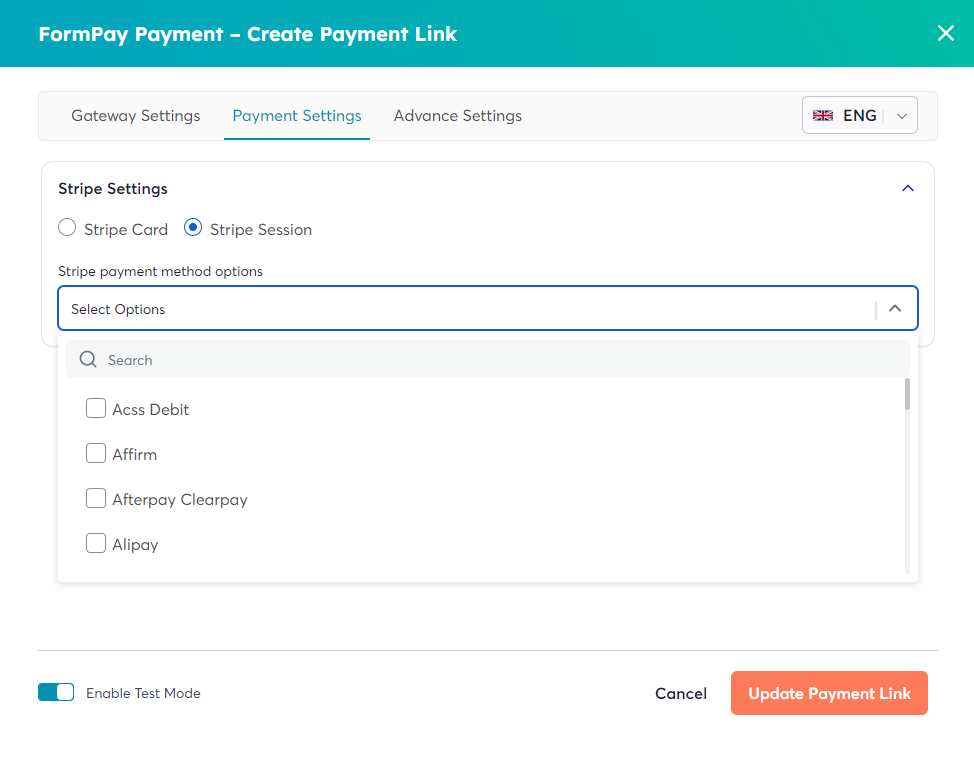
Now, switch to Payment Settings and choose Stripe Card & Stripe Session to allow the preferred payment methods.
Switching to the Advance Settings tab allows you to apply branding to your payment link page.
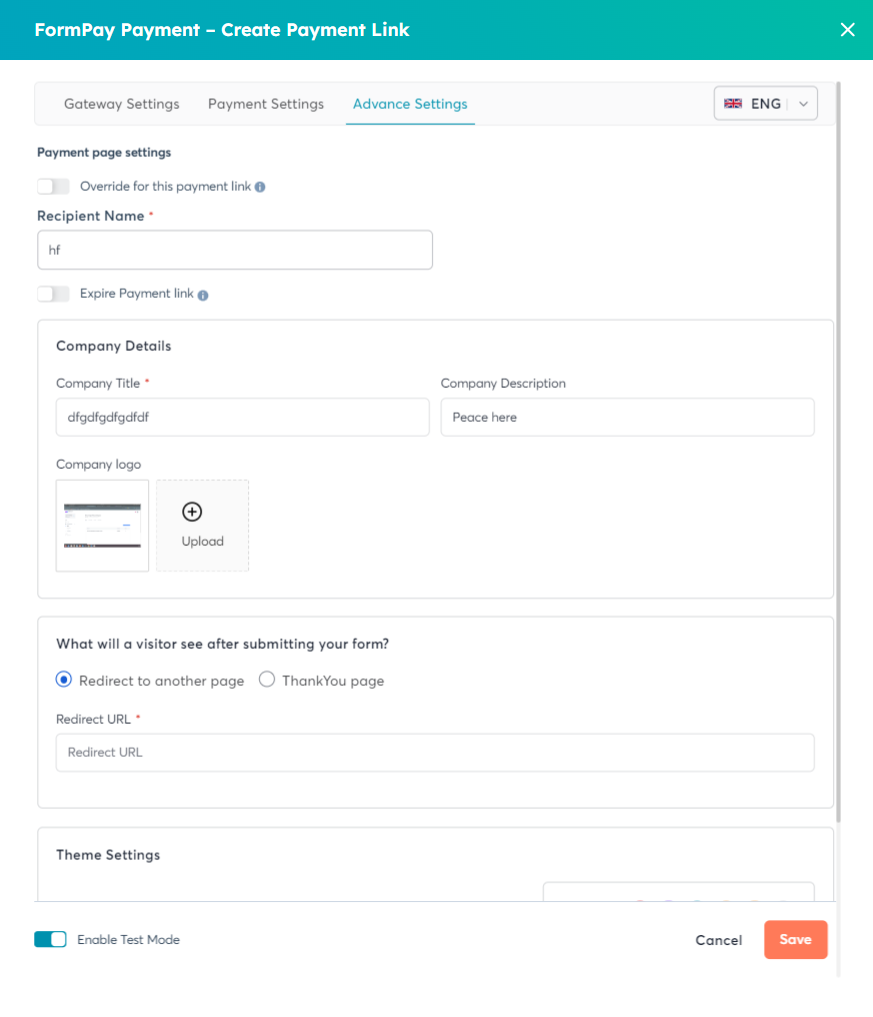
Here, you can decide on the Recipient Name under which the payment will be received. Also, the redirection settings, theme settings & URL settings can be controlled from here.
Note: The Advance Settings are required only once. You will find this section already auto-filled when you create links later on.
Once done, customize the payment page to match your branding and click Save.
Finally, move back to the Gateway Settings tab and click Create Payment Link.

You will have your payment link ready if you scroll down in this popup only.
That’s it!
b. Create Contact Payment Link
The process to create a payment link for a specific contact is no different from the process we follow in deals. Here’s how to create a contact-specific payment link:
-
Navigate to Contacts in your HubSpot account.
-
Click on the contact record you want to create a payment link for.
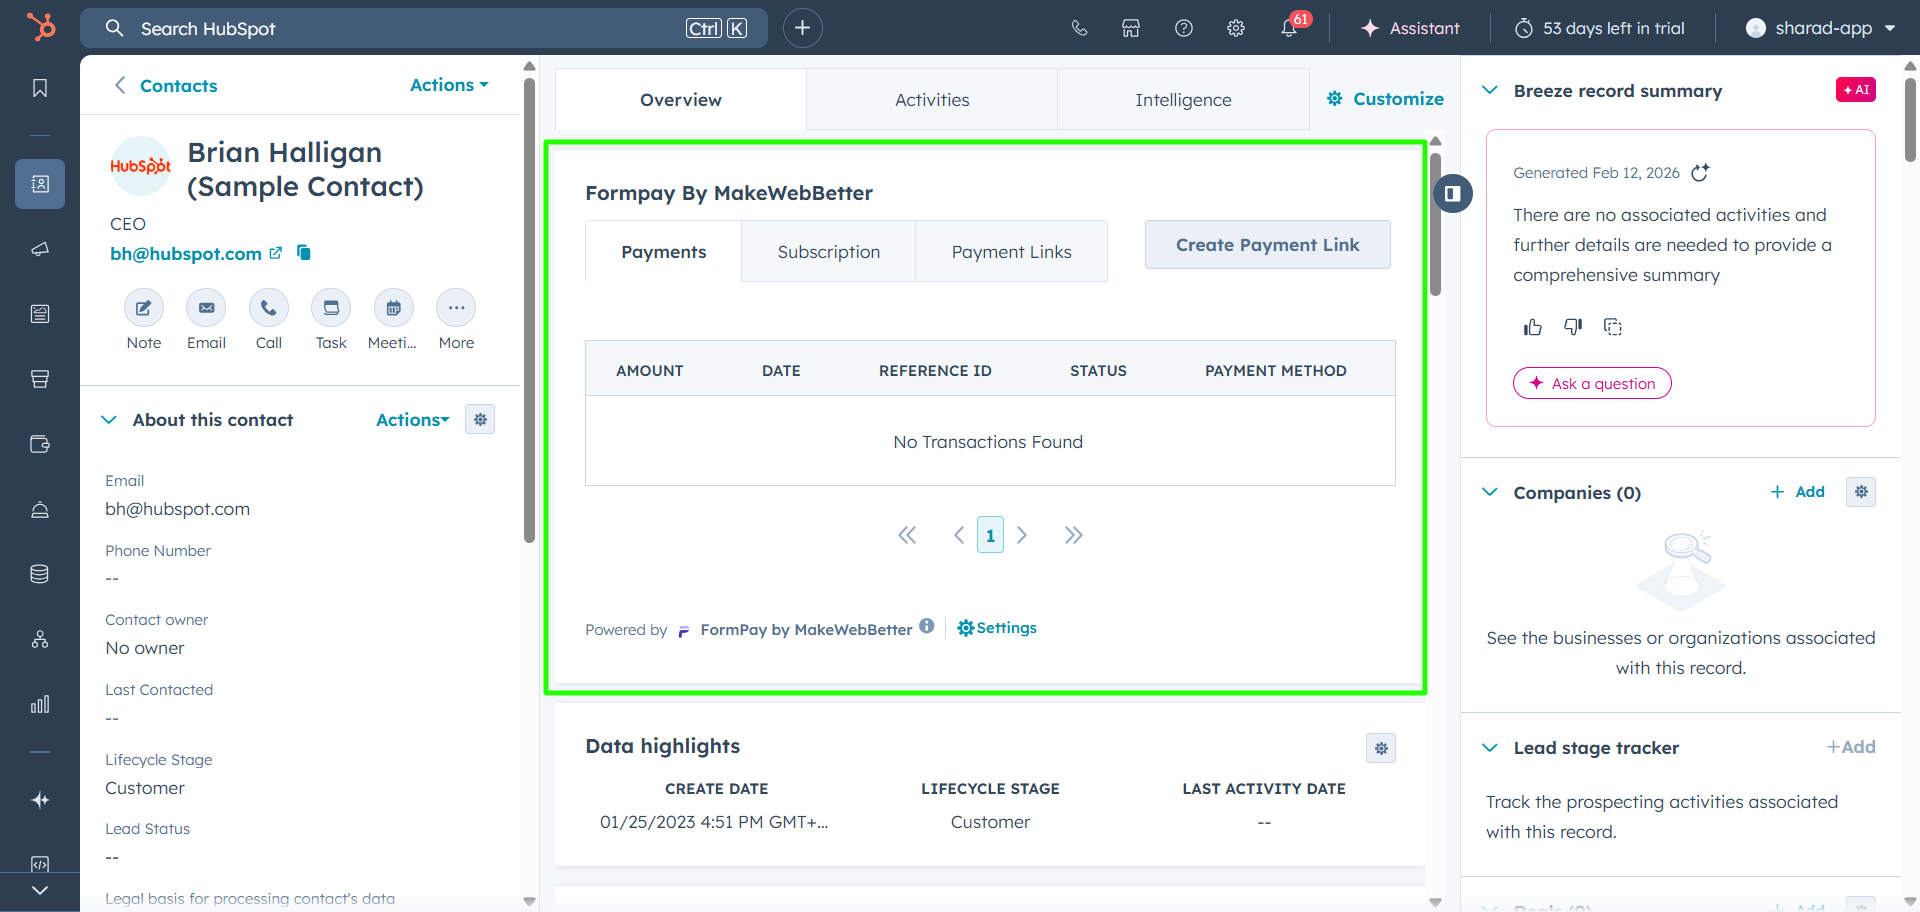
- Click Create Payment Link under the FormPay Payment app card.
- Continue the process as discussed above in the “Create Deal Payment Link” section. Refer to this for the detailed process to create a payment link for a HubSpot contact using the FormPay functionality.
7.How to Create Quotes in HubSpot Using FormPay
Receive payments through customized quote templates within HubSpot. You can custom-create detailed quotes in HubSpot and embed direct payment buttons in the quote. This enables you to obtain the e-sign & the payment together.
Note: Your portal must have Legacy Quote Support to accept payment by HubSpot Quotes.
To access this feature in HubSpot, connect with us, and we’ll add this FormPay module to your HubSpot portal as requested. Once you have this module activated in your HubSpot account and have created Quotes, you’ll have the option to receive payment through FormPay. Here’s how to create a Quote with payment functionality in HubSpot:
- Navigate to Quotes in your HubSpot account.
- Choose from the existing ones or click ‘Create quote’.
- When choosing a Quote Template, click FormPay.
- Choose a Deal or create a new Deal.
- Hit Next and choose the buyer info, your info, and the line items to be included in the quote.
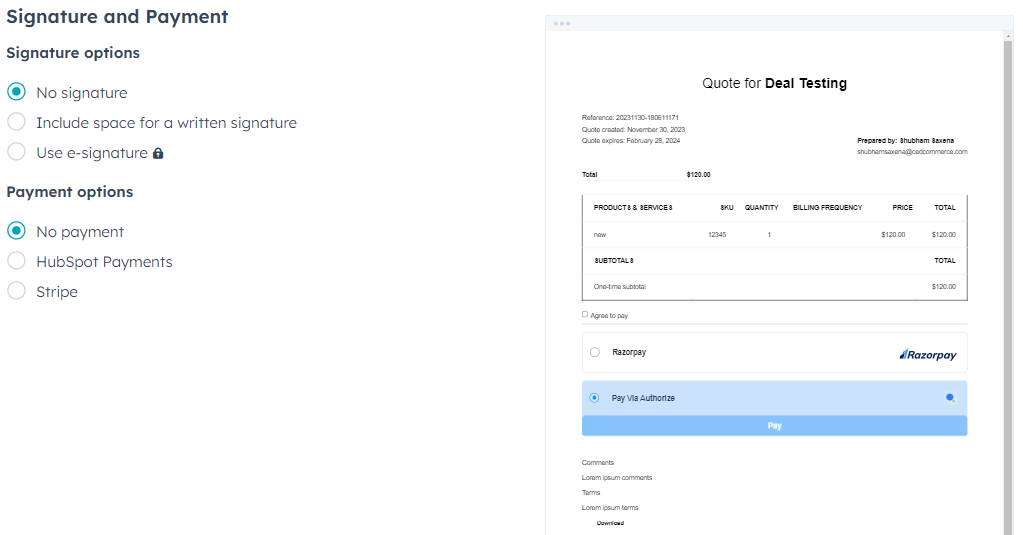
- Choose No Payment in the payment options and Publish.
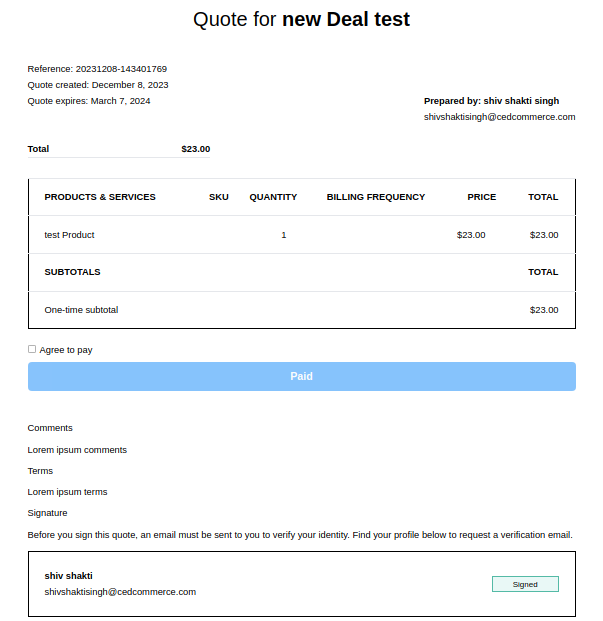
Once done, create an email with this Quote and share it with your client. Your client will only be able to complete payment when they click “Agree to pay”.
You’ll be able to view the transaction within FormPay when your client completes the payment against the Quote.
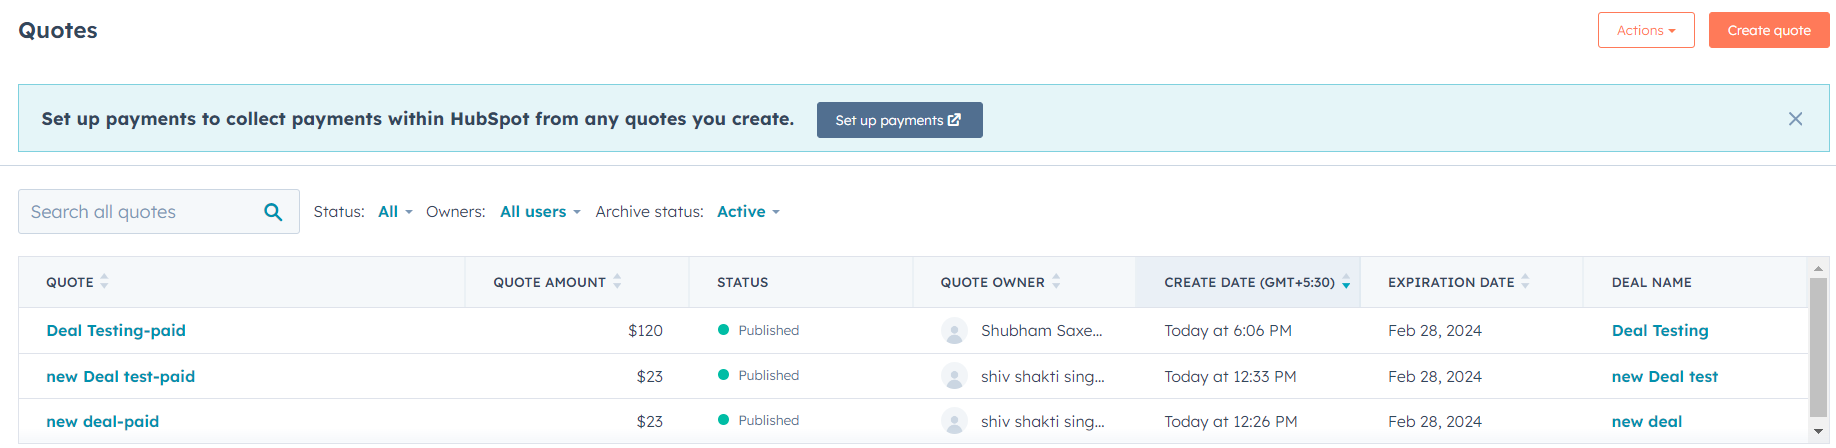
Also, the Quote name in HubSpot records will be automatically changed to paid as <Quote Name-paid>.
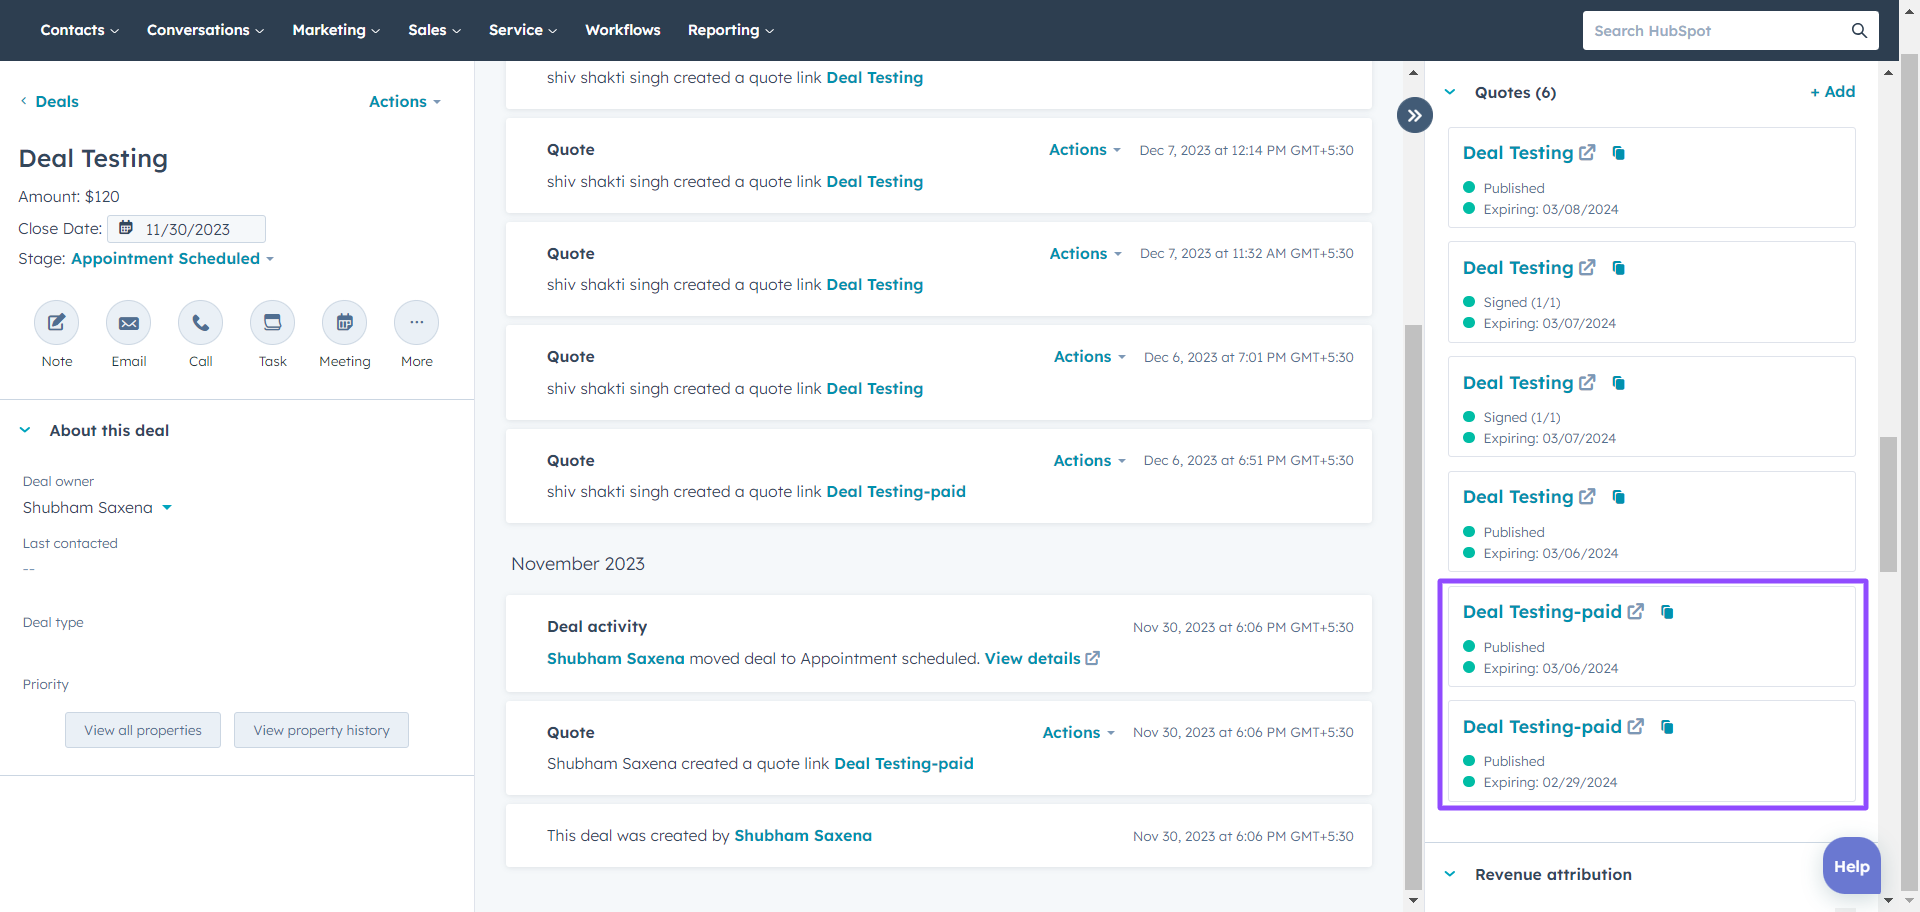
Moreover, the Quote payment data will also be visible in the respective Deal timeline activities.
8.FormPay in HubSpot
The FormPay Integration with HubSpot offers several features within HubSpot — streamlined payment collection, payment automation, and tracking. Apart from syncing & payment management, the major facilities that you get in your HubSpot CRM with FormPay include:
- App Card – Generate Deal Payment Link (+ Automation)
- App Card – Generate Contact-specific Payment Link
- Dynamic Properties
Properties
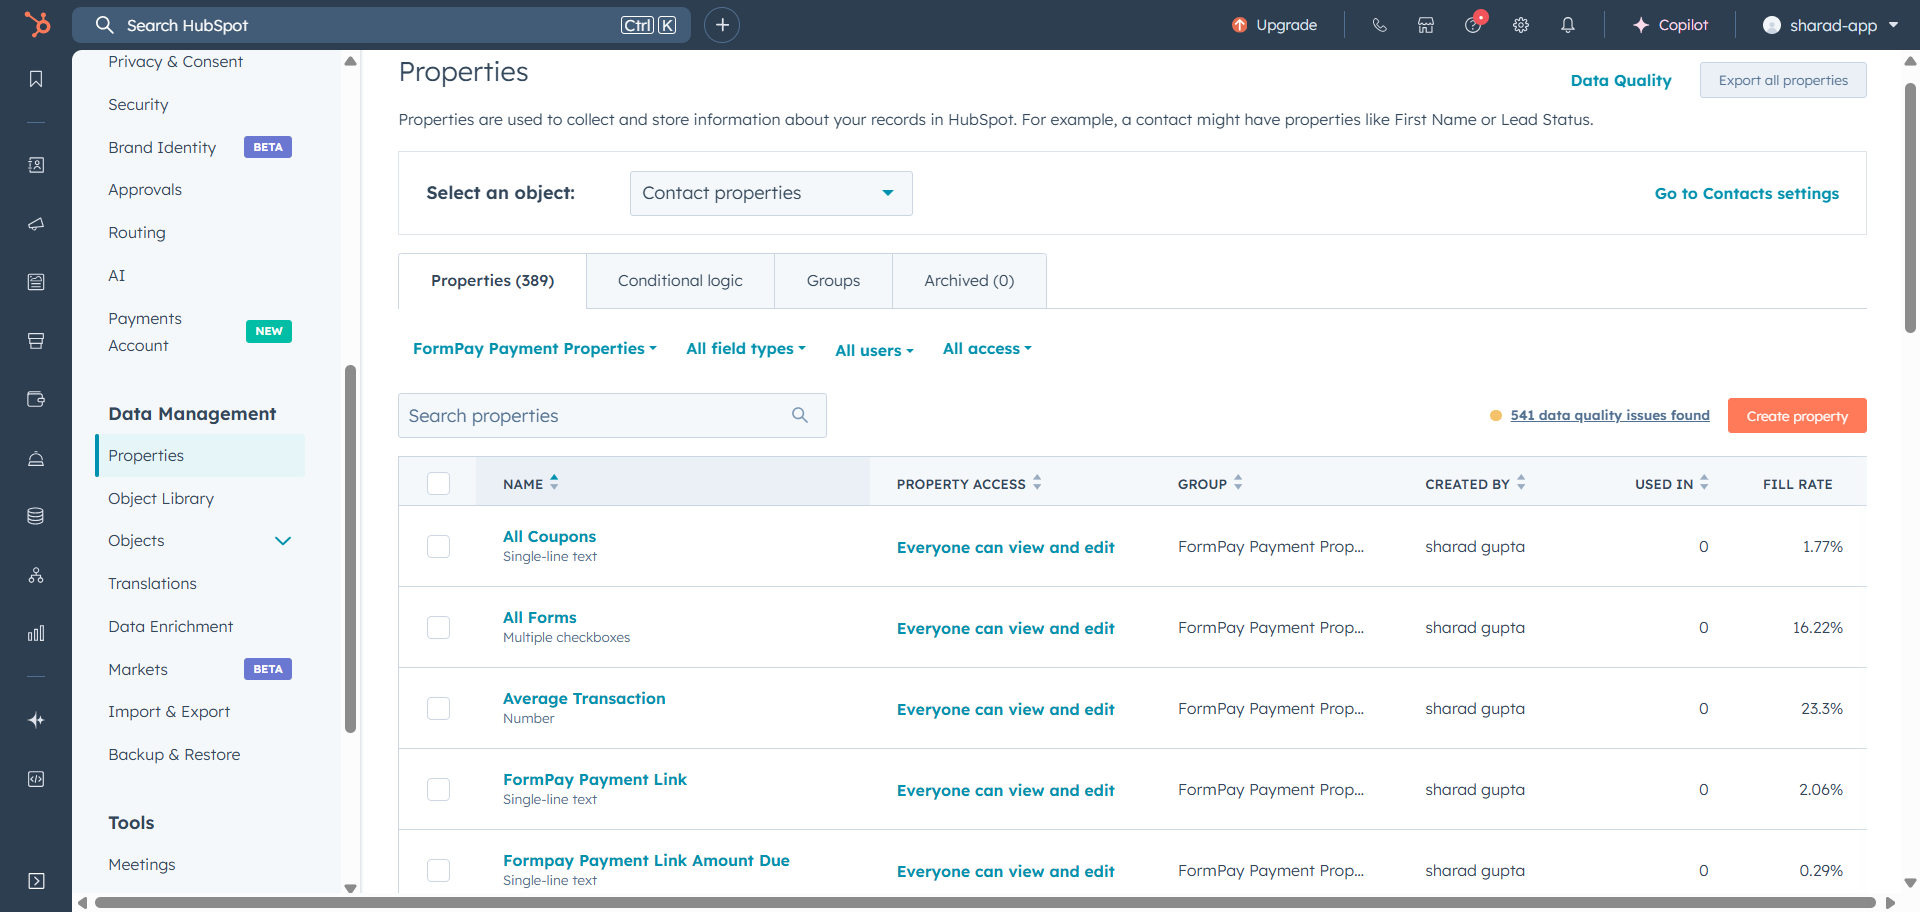
These are properties that you get in your HubSpot with FormPay’s integration.
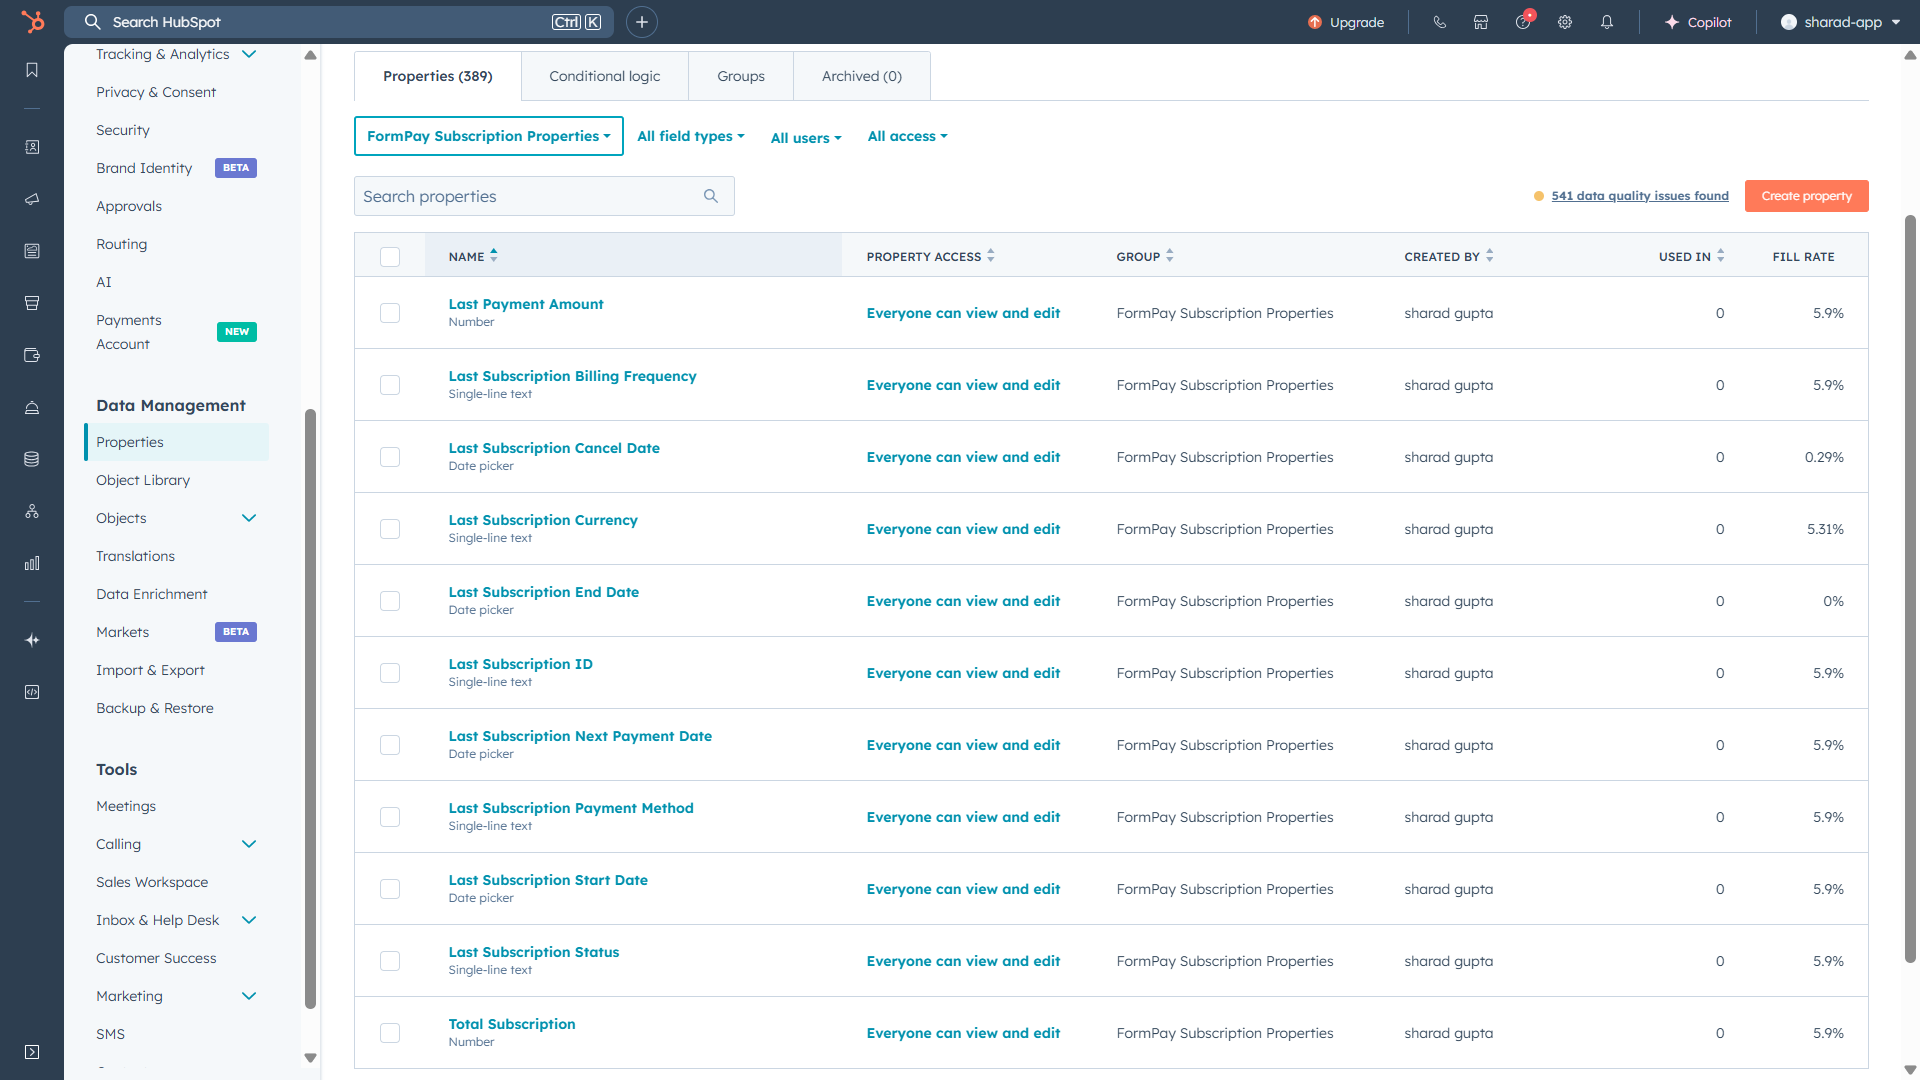
Navigate to HubSpot > Settings > properties, select filter as FormPay Payment Properties, and you can find the details of the following properties.
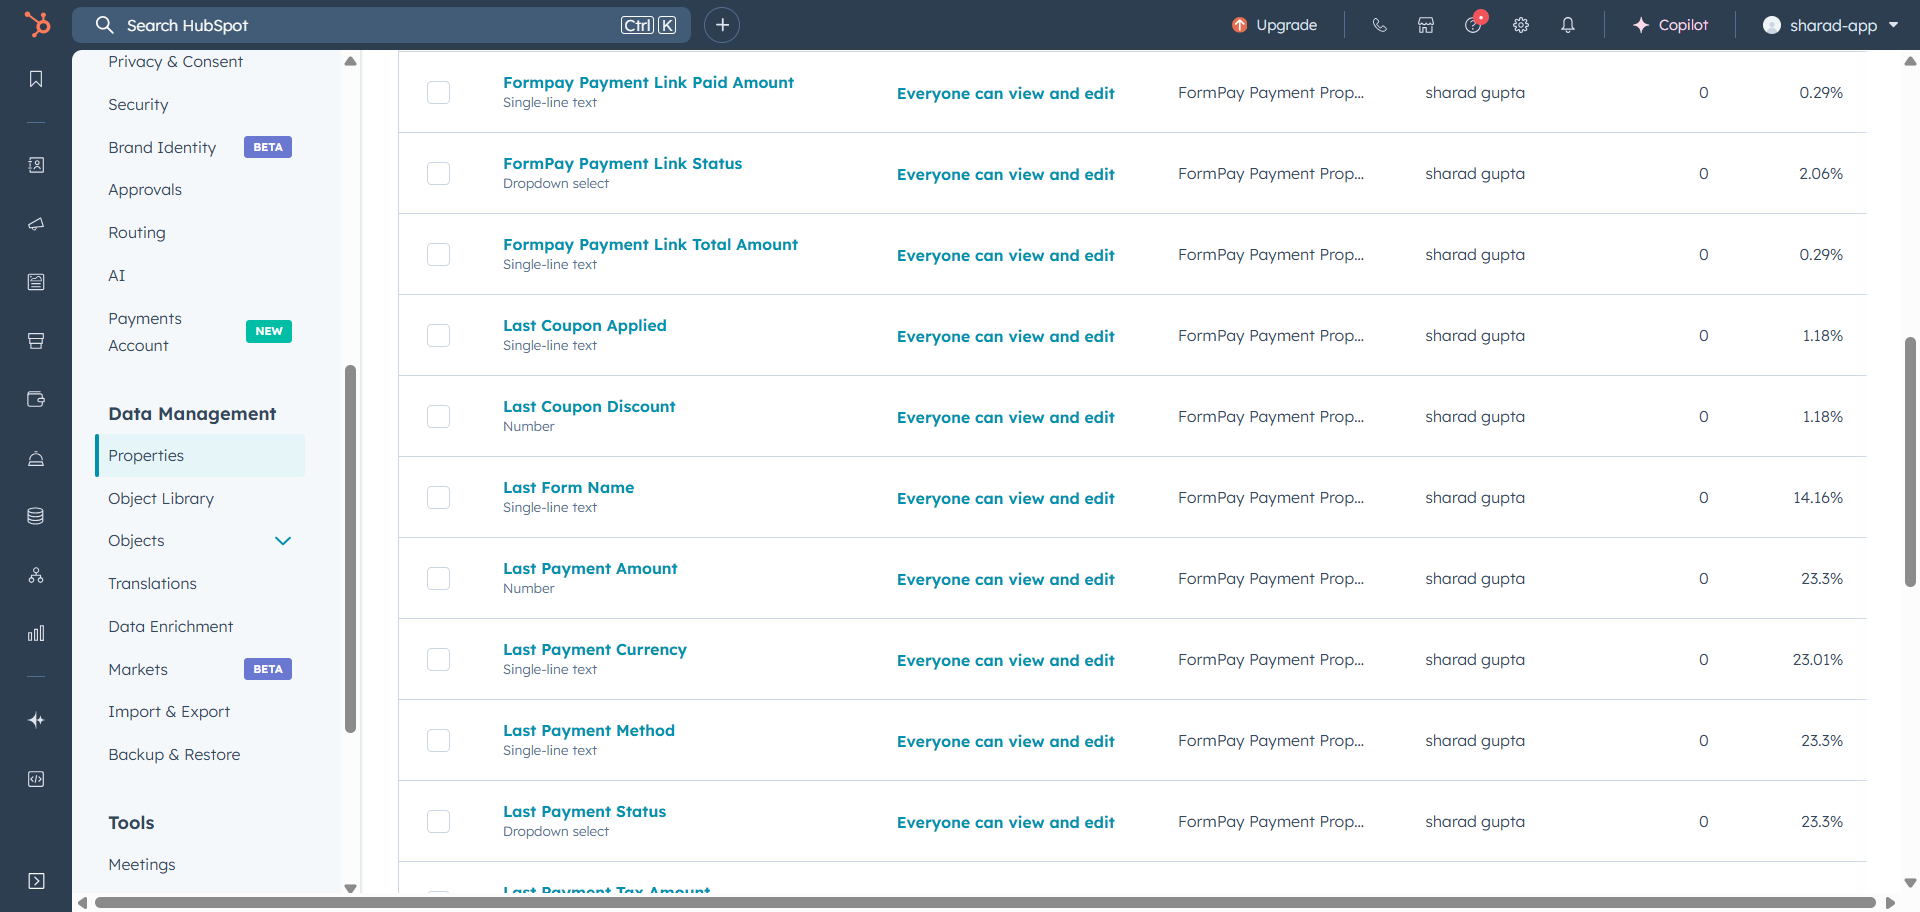
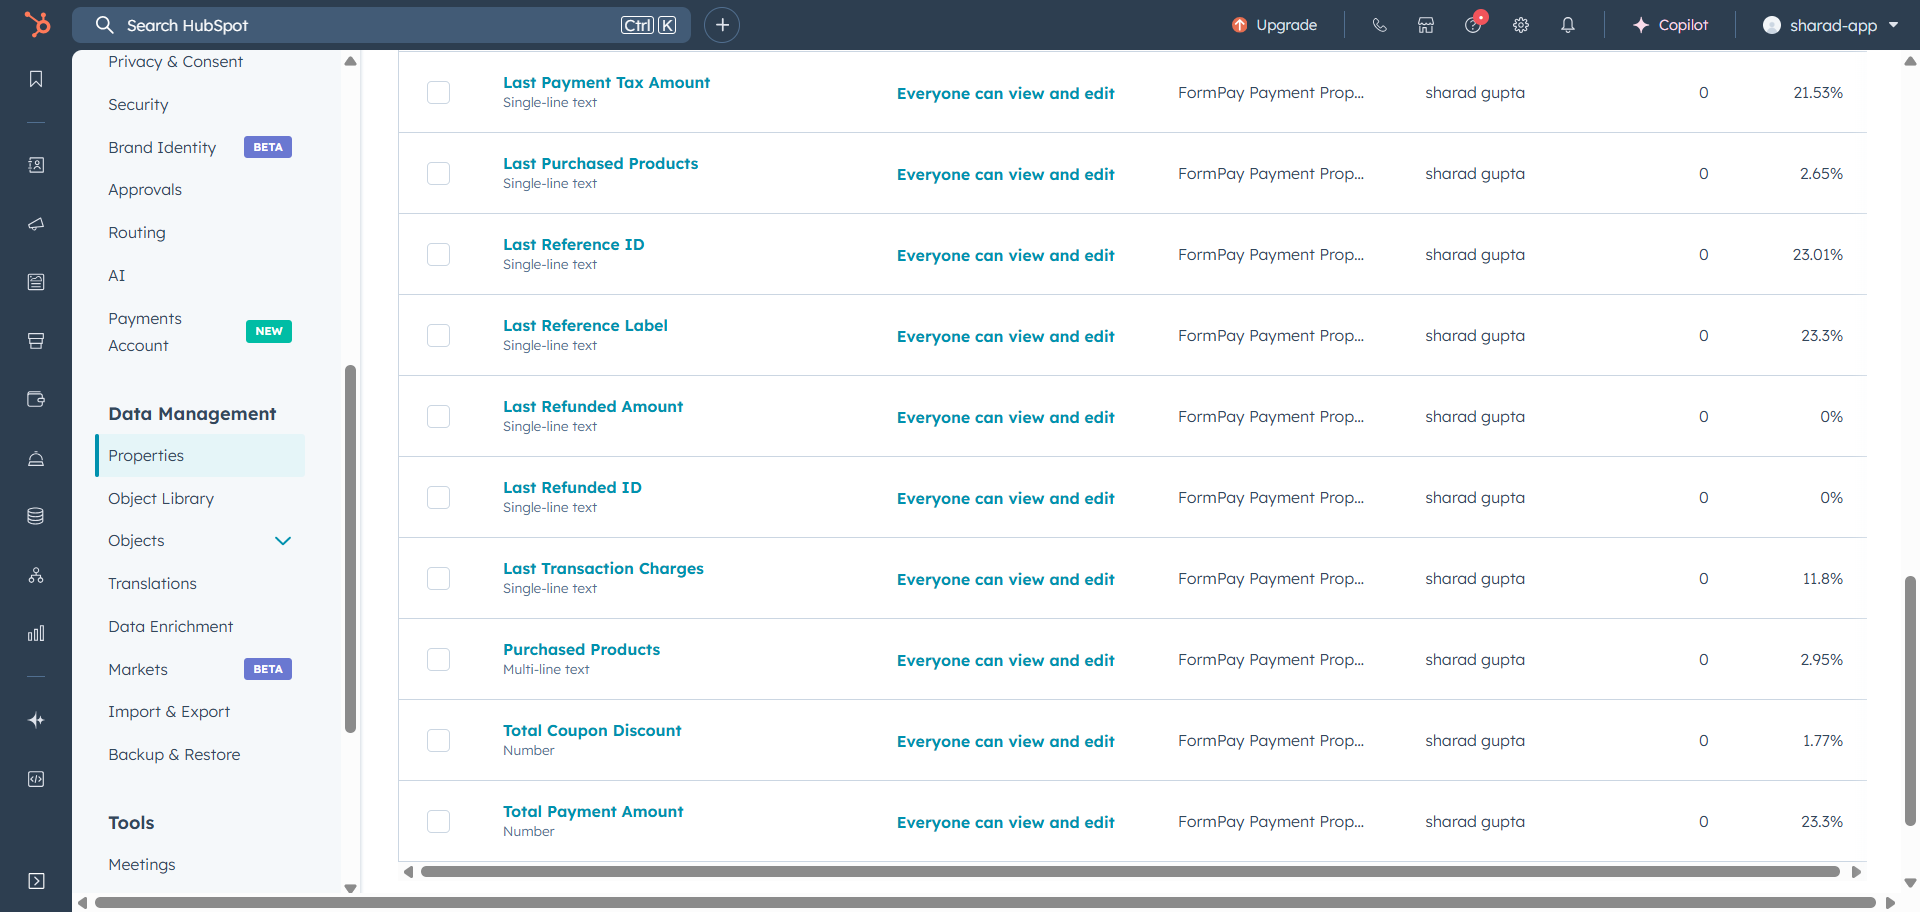
Navigate to HubSpot > Settings > Properties, select filter as ‘FormPay Subscription Properties’, and you can find the details of the following properties.
You can use these properties to create workflows within HubSpot and establish a well-structured payment automation mechanism right within.
Workflows
Using the properties & objects created in HubSpot with FormPay integration, you can implement payment automation. Here’s how:
- Navigate to Automation > Workflows in your HubSpot account.
- Click Create Workflows and choose From Scratch from the drop-down.
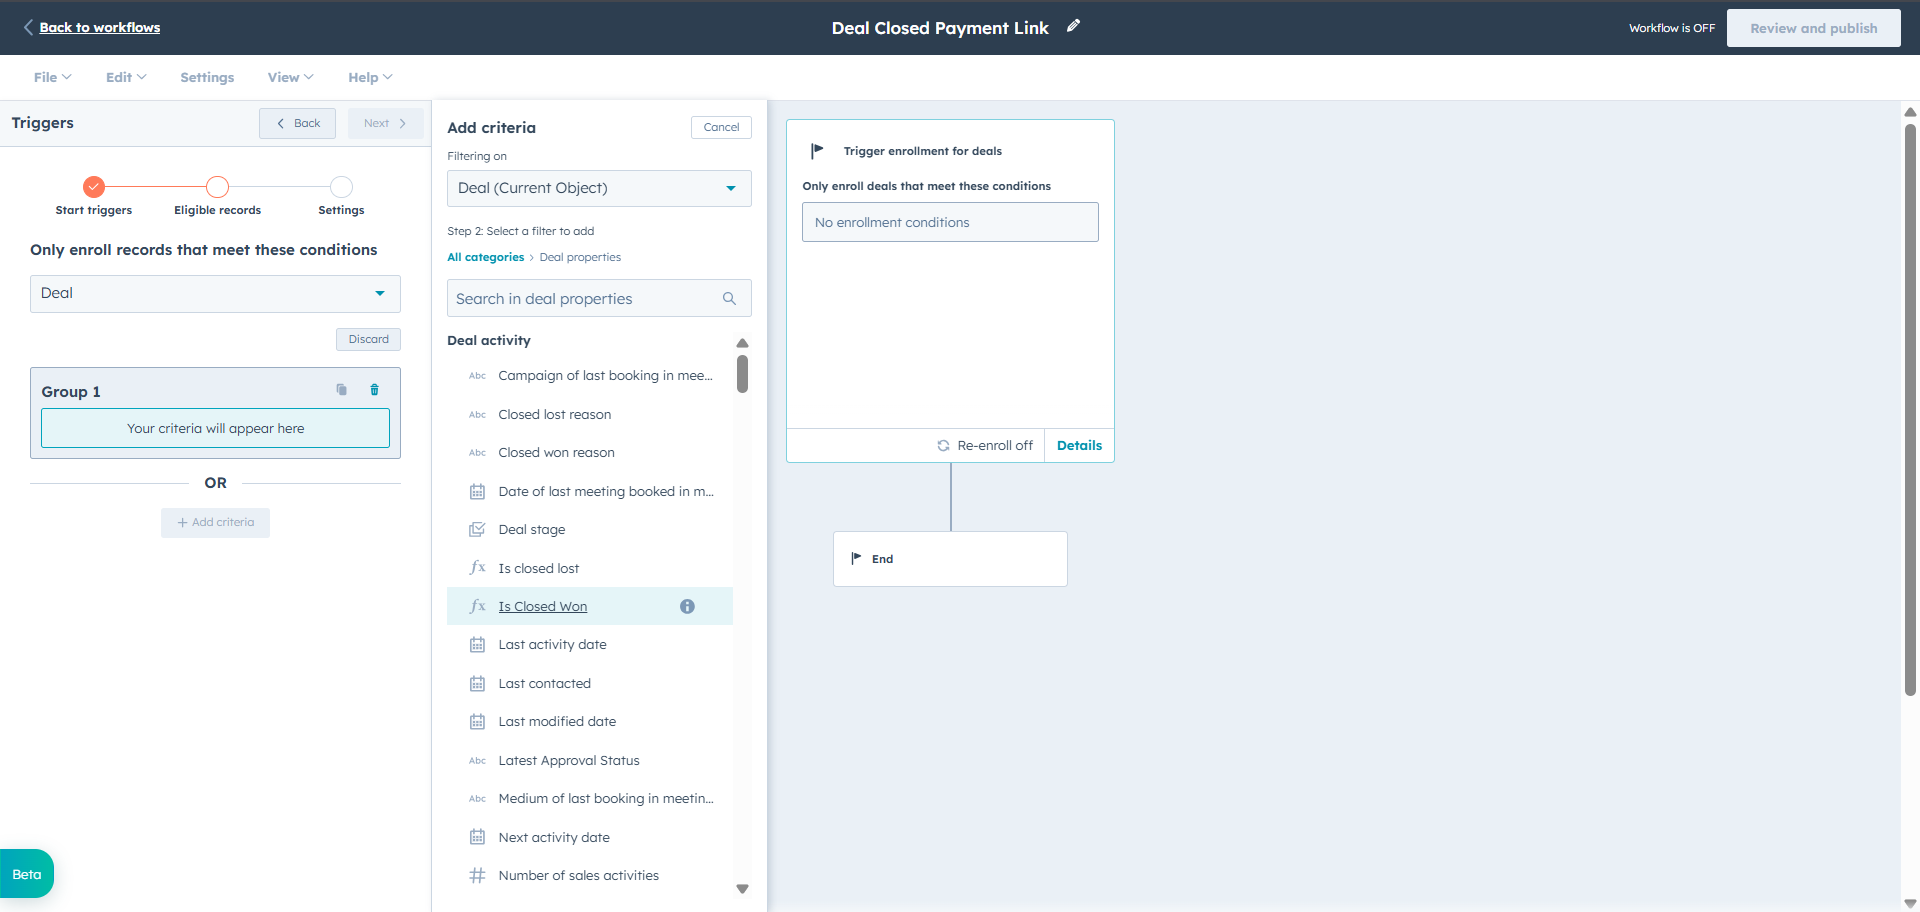
- Then, choose Data Values > Record meets a set of filter conditions.
- Next, click to choose Deal under Choose a type of record that can enroll. After this, the choice is won from the dropdown.
- Then, click Next and Save and continue.
- Next, choose the action for this trigger by clicking the + ‘plus’ button.
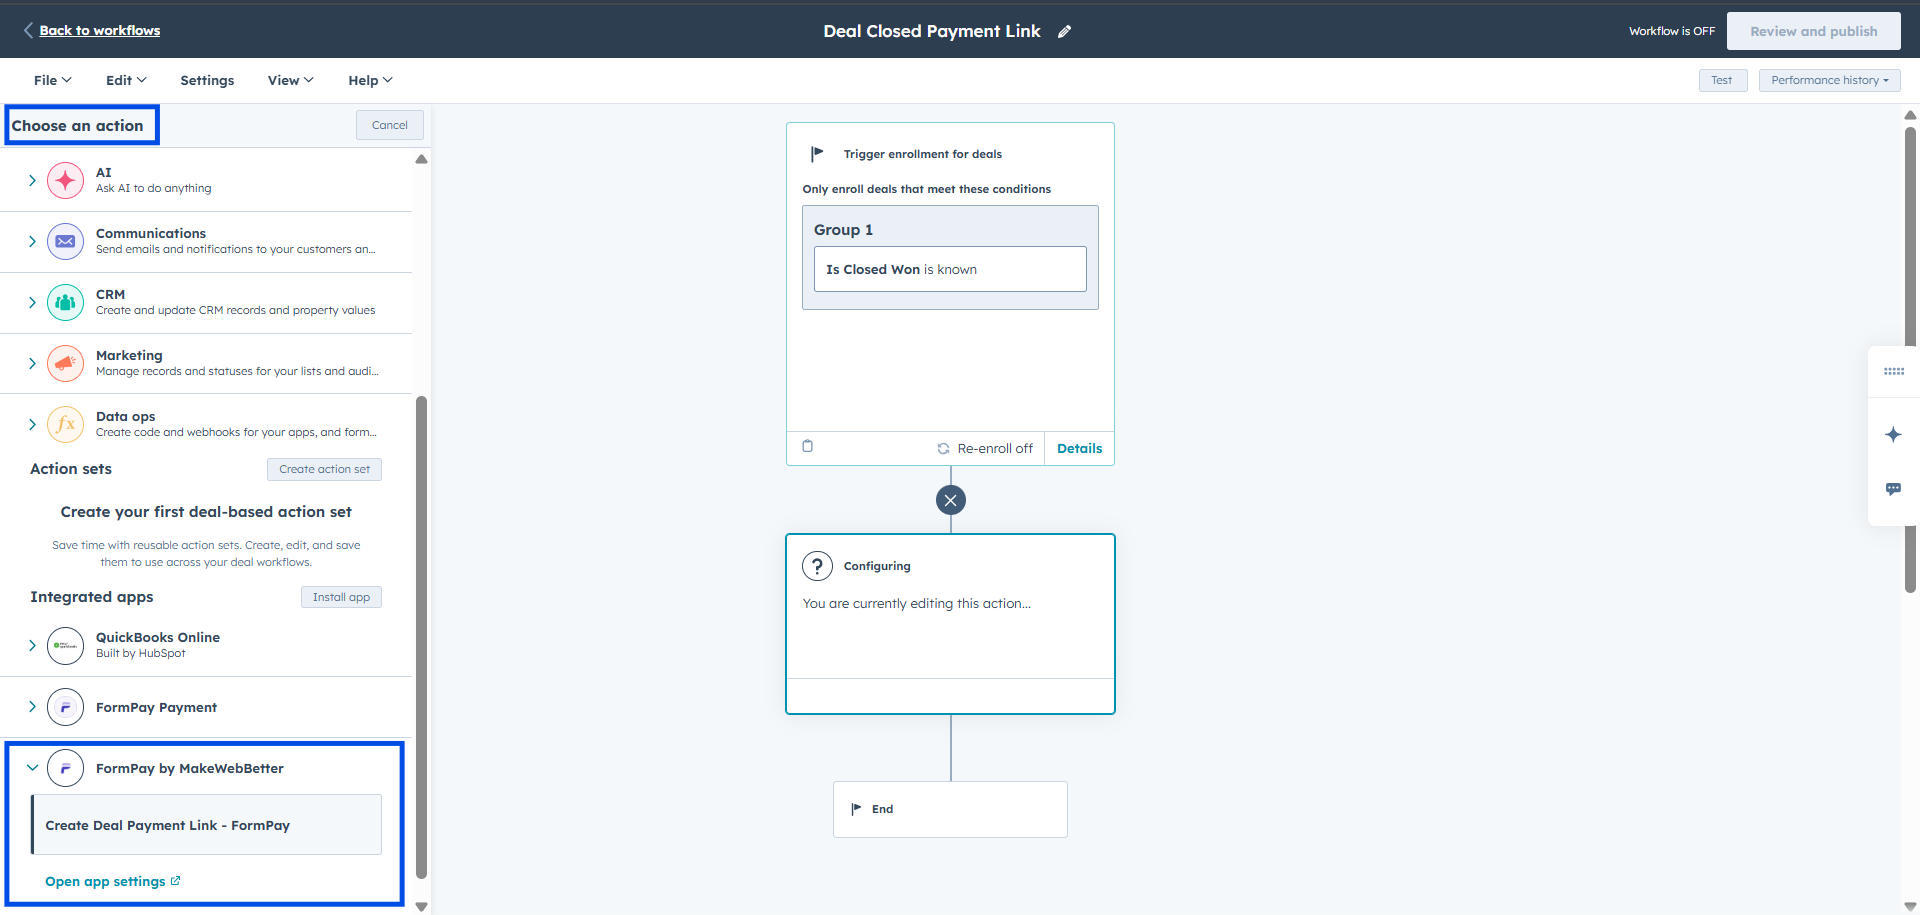
- Scroll down to the bottom to find the action “Create Deal Payment Link – FormPay” under FormPay by MakeWebBetter.
- Now choose the desired gateway and payment type (one-time or recurring). And click Save.
- Then, assign another action to share this deal link with the respective contacts. Choose Send Email. (Craft a personalized email beforehand for the same. Make sure to insert the FormPay token in the email. This way, the contacts will receive the email for the respective deal.)
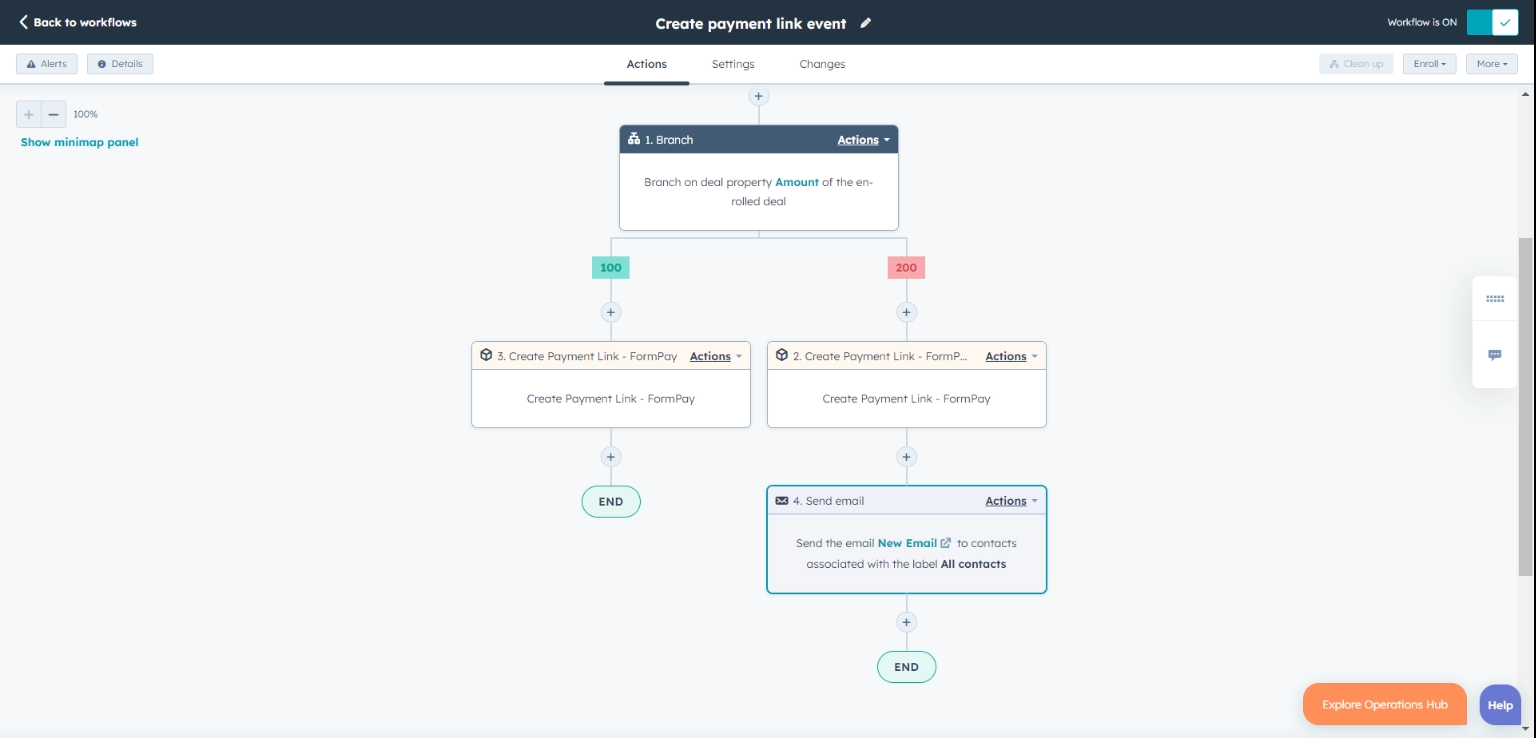
- You will finally have an automated mechanism to create a payment link for your order and share it.
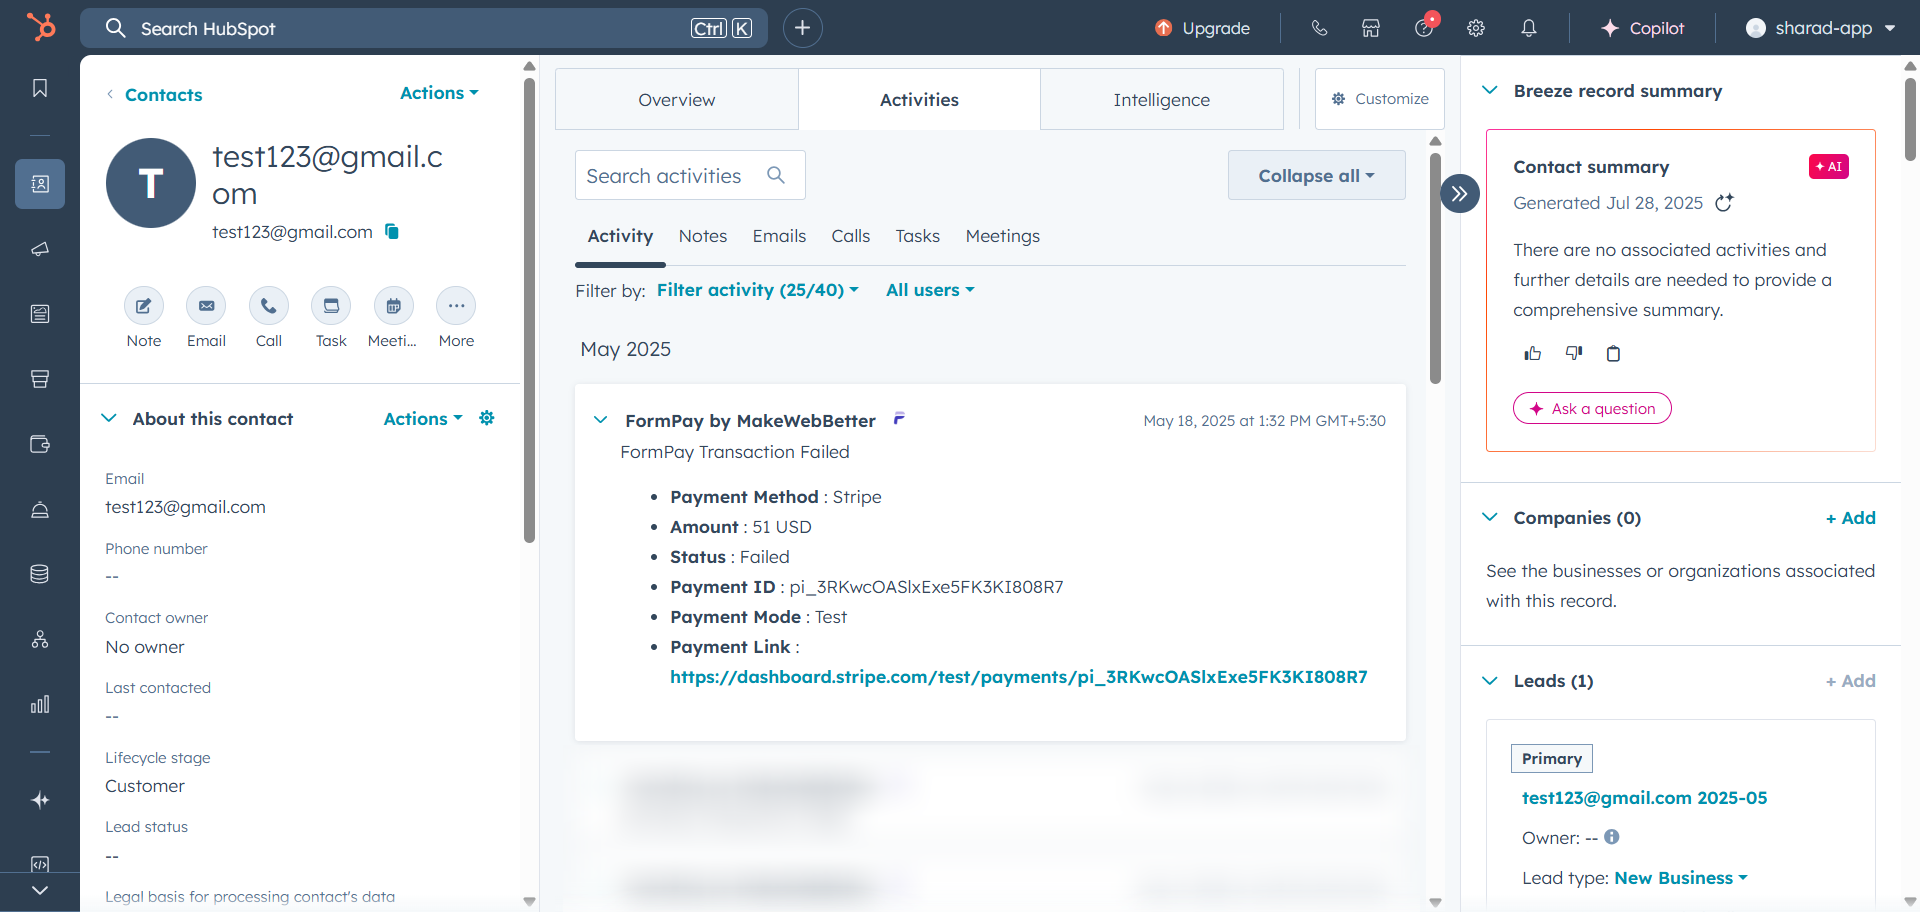
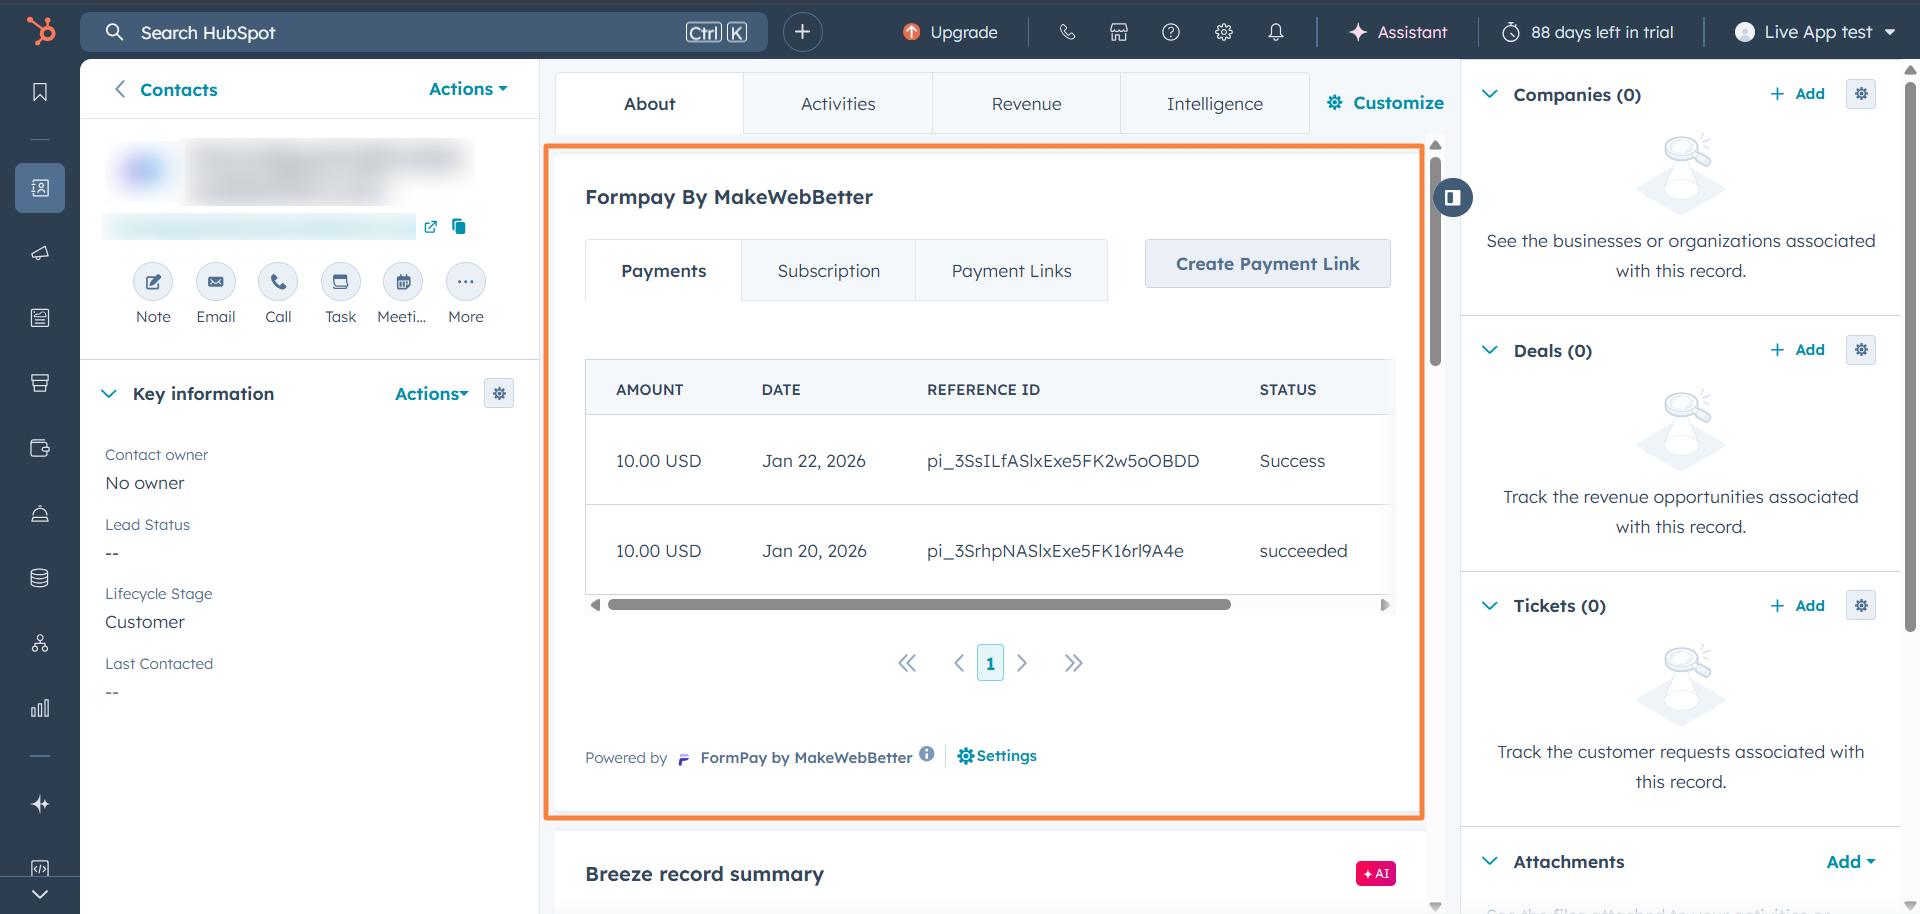
Tracking in HubSpot
You can monitor transaction status in a detailed manner under specific Contacts & Deals from timeline events & the dedicated FormPay App Card.
- In your HubSpot account, go to the respective deal or contact.

- Find every transaction detail in the timeline events overview.
On the right, scroll down and find the App Card called FormPay Payment. Here, you can access all such details by switching between:
- Payment Links: Name, Amount, Customer, Payment Method, Status, Creation Date, and Actions.
- Payments: Amount, Date, Reference ID, Payment Status, and Payment Method.
- Subscription: Customer, Email, Status, Billing Cycle, Date, Amount, Mode, Actions.
Furthermore, you can access the ‘Create Payment Link’ functionality and follow the process (explained above in the ‘How to create a Payment Link in HubSpot’).
9.How to disconnect FormPay from HubSpot?
a. Uninstalling FormPay Integration From HubSpot
Follow the steps mentioned below to uninstall FormPay from your HubSpot:
- Open HubSpot.
- Navigate to Reporting > Dashboard > Integrations.
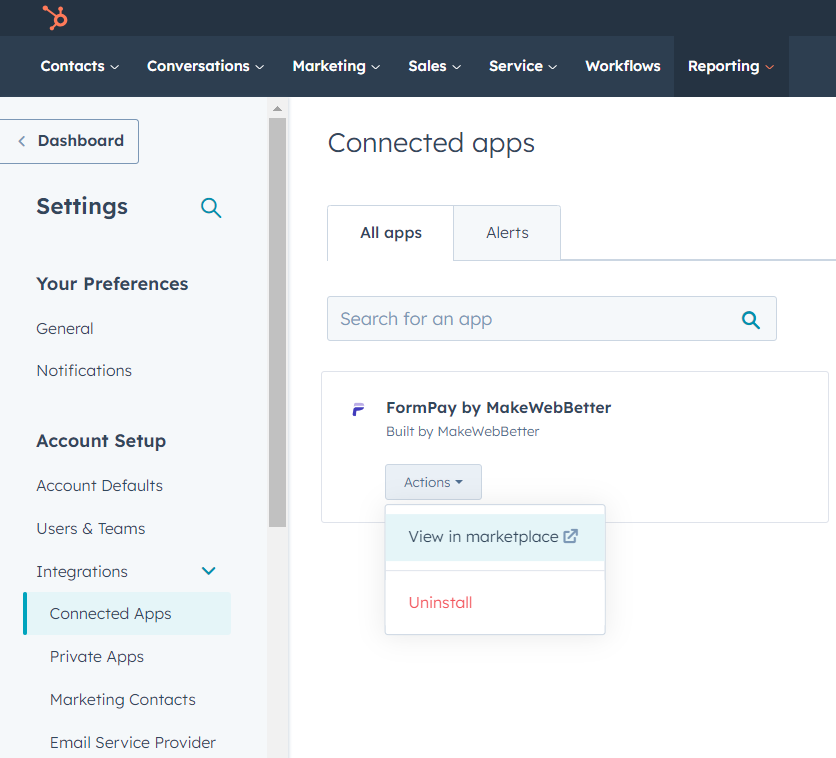
- Search for the “FormPay by MakeWebBetter” app.
- Next, click on the Actions drop-down button in the FormPay app card.
- Then, click the Uninstall button.
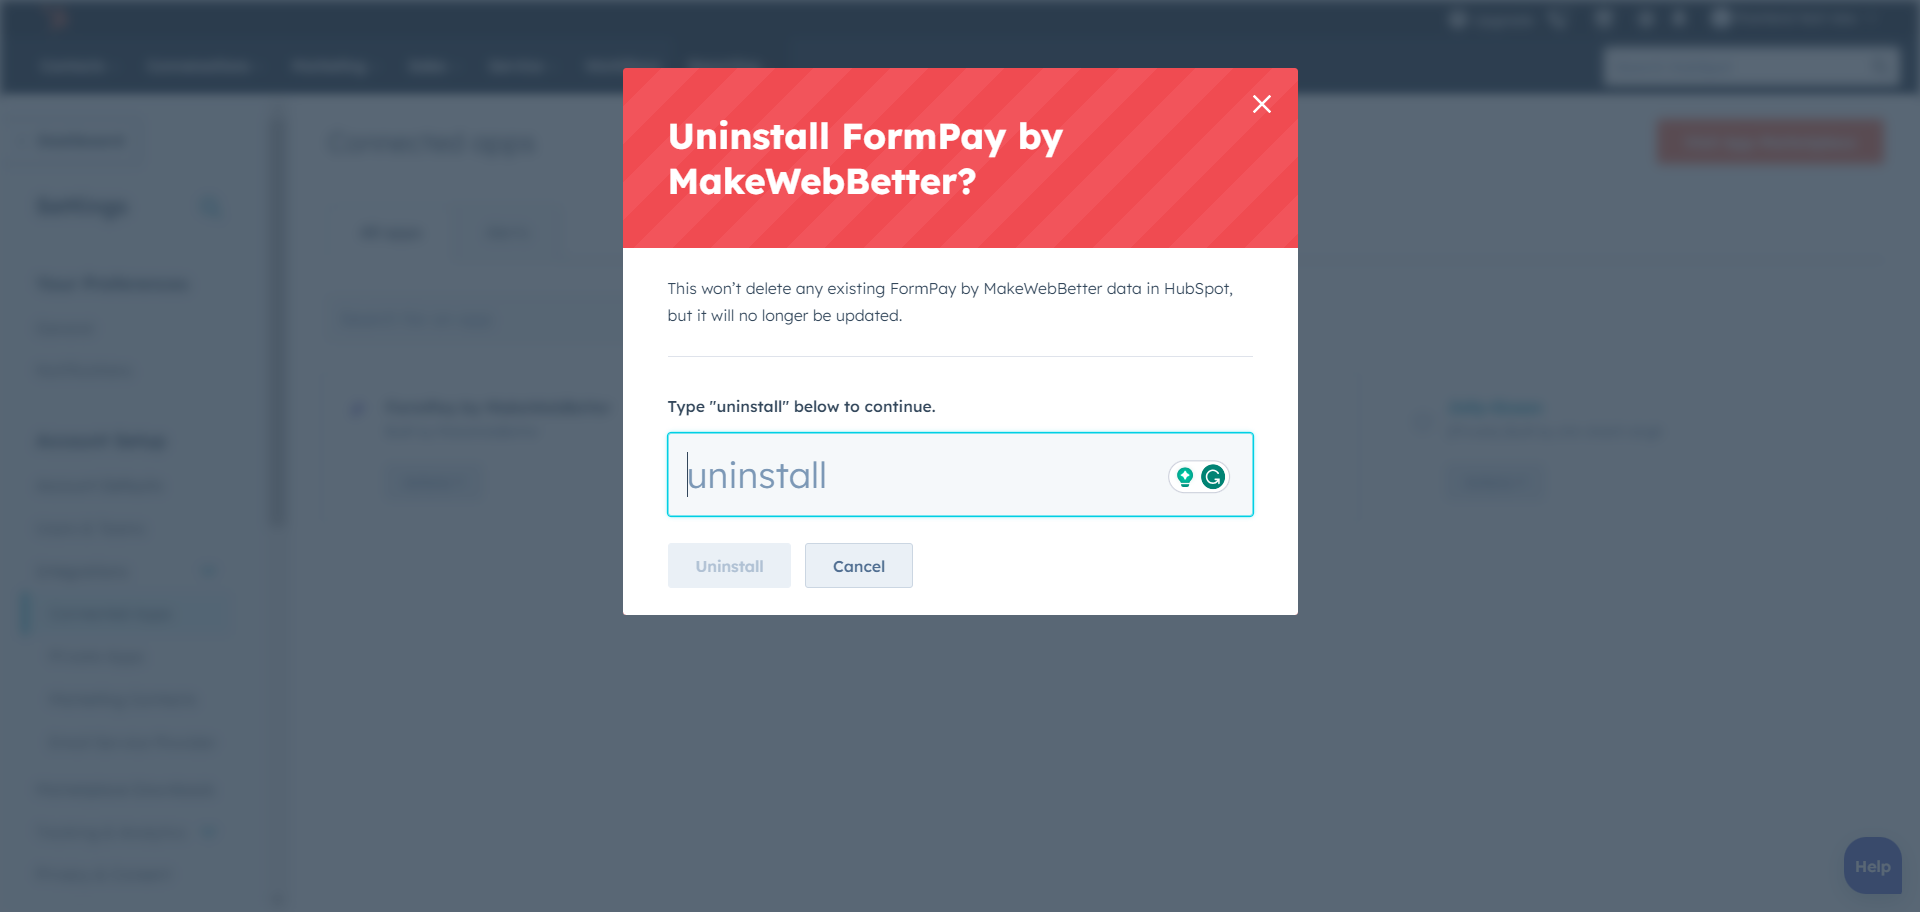
- Type uninstall in the box as shown in the screenshot above.
- Finally, click on the Uninstall button.
b. Disconnecting FormPay Integration From App Dashboard
Follow the steps mentioned below to disconnect the HubSpot integration from the FormPay app:
- Go to the FormPay app.
- In the top left corner, you’ll see the HubSpot Portal Name and ID number that is currently active.
- Click on the arrow icon
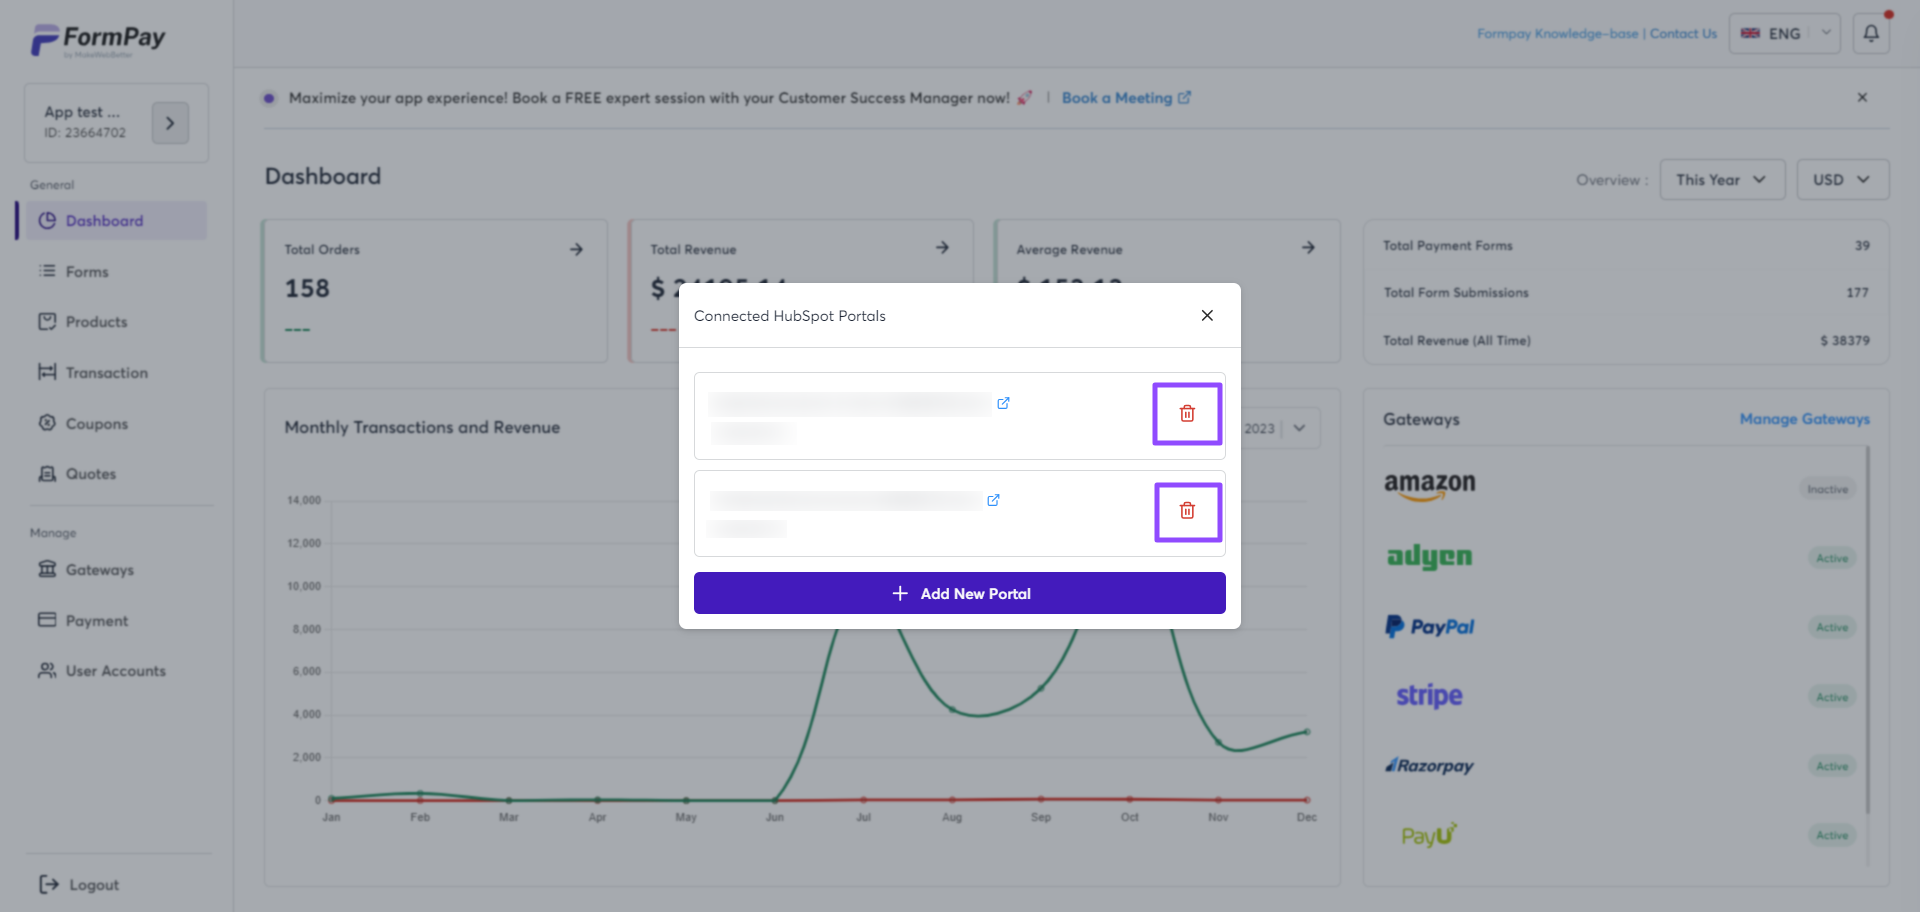
- Click on the delete icons right next to the portal name & ID, and the Portal will be disconnected successfully.
Delete all the connected HubSpot Portals one by one and then log out of the app. The HubSpot integration will be disconnected.
c. How are the Users’ HubSpot Accounts and Data affected upon uninstalling and disconnecting FormPay?
Uninstalling or disconnecting the app will affect the FormPay Data in the User’s HubSpot account.
- Stop current FormPay forms from working if they have been used anywhere.
- Custom properties created in the portal would remain unaffected.
- Deals or contacts created/updated from FormPay will continue to be reflected in the portal.
- FormPay will be removed from the timeline activity in the deal & Contact
- The FormPay App Card option on the right side will be removed and become inaccessible in deals, contacts, or anywhere within HubSpot as and when the app is uninstalled.
Disconnecting the integration from the FormPay app will affect the FormPay Data in the User’s HubSpot account.
- Stop current FormPay forms from working if they have been used anywhere.
- Custom properties created in the portal would remain unaffected.
- Deals or contacts created/updated from FormPay will continue to be reflected in the portal.
Explore FormPay pricing plans to unlock a vigilant yet care-free payment experience. Schedule a free session to discuss your requirements and better align with FormPay.