

1.Overview
Here are some key features of HubSpot WooCommerce Integration:
- Sync WooCommerce Contacts, Deals, and Products over Hubspot
- Workflows to automate sales and marketing jobs
- Active lists for refined targeting and segmentation
- Abandoned Cart Tracking & Recovery
- Powerful eCommerce Analytics
- Custom properties to sync special data over the CRM
- Send historical (existing) data of your WooCommerce store over HubSpot
- RFM Settings to rate your customers as per their engagement
Benefits:
- Lets you recover abandoned carts so you don’t lose money on the table
- Helps you refine your targeting with active lists
- Eliminates friction and manual workload around your team
- Assists you in identifying customer behaviour in your store
2.Installation
Installation of this plugin is similar to other WordPress plugins. First, you need to download the plugin and then install it on your WordPress dashboard. You can download this plugin from multiple sources like:
1. Automatic Installation
Automatic installation is the easiest option handled by WordPress.
- After downloading the plugin, login to your WordPress Dashboard.
- Navigate to the sidebar, click on Plugins.
- Click on Add New and then click on Upload Plugins.
- Hit the Browse button and choose your downloaded plugin’s .zip file, and click on Install Now.
- Once Installed, Activate the plugin.
2. Manual Installation
Manual installation of the plugin is another option to install the plugin in the sellers WordPress environment. The manual installation method involves downloading our HubSpot WooCommerce plugin and uploading it to the web server via their favourite FTP application.
The steps for manual installation are as follows:
- Upload the HubSpot WooCommerce Integration folder to the /WP-content/plugins/directory.
- Activate the plugin through the ‘Plugins’ menu in WordPress.
3.Plugin Setup
Once you have successfully installed the HubSpot WooCommerce Integration plugin on your WooCommerce store, the next step is to set up the integration. You can follow the steps below to successfully set up the plugin.
3.1.Connect HubSpot Account to your WooCommerce
- Navigate to WooCommerce > HubSpot from the drop-down list and you’ll see this page.
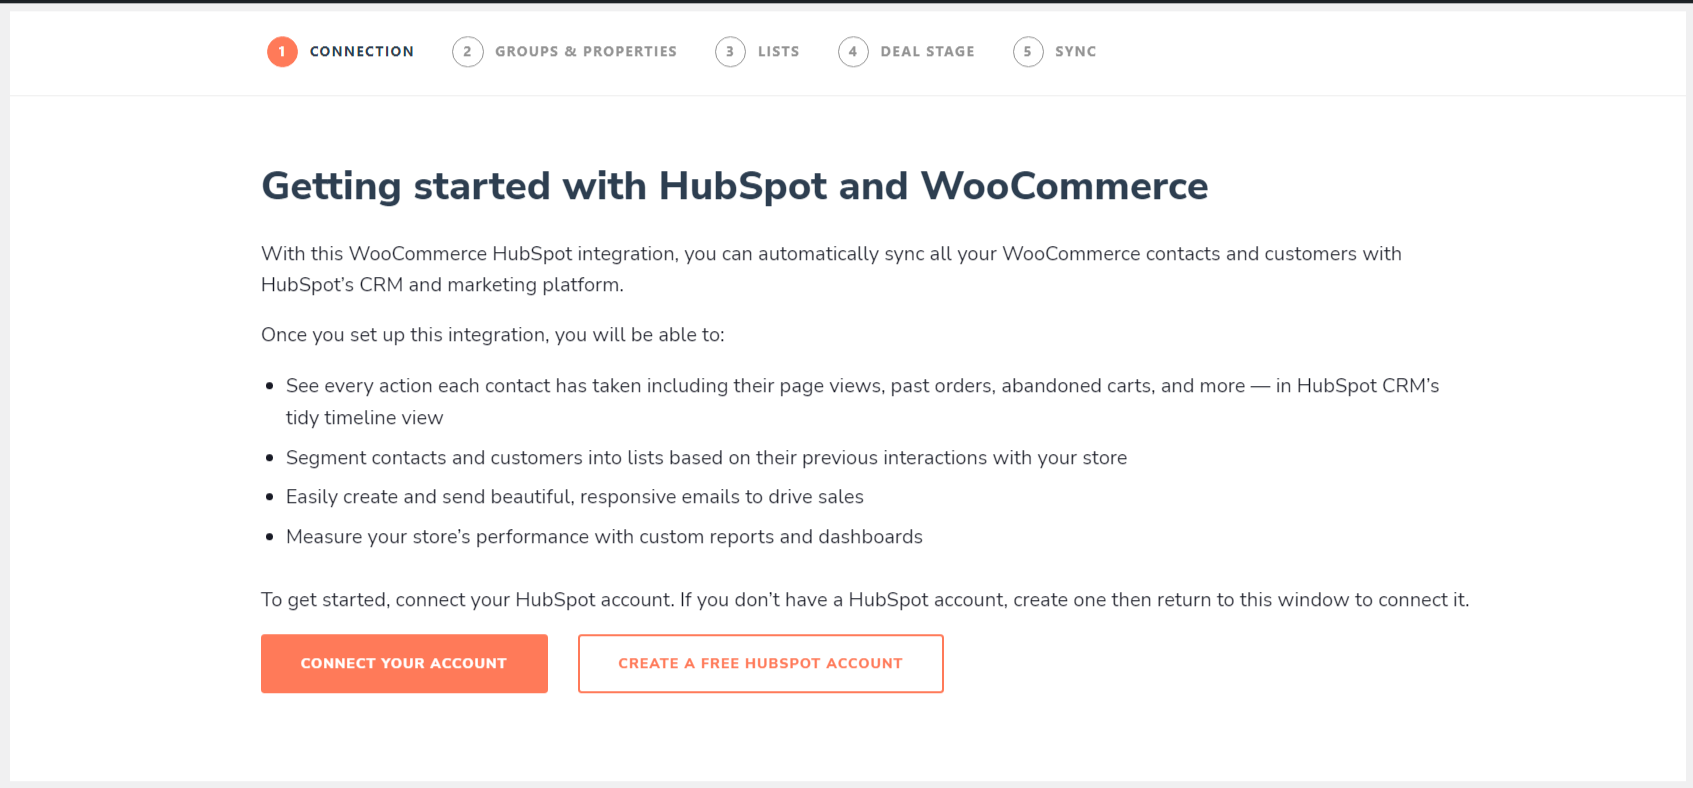
- If you already have a HubSpot account, click on Connect Your Account else click Create A Free HubSpot Account.
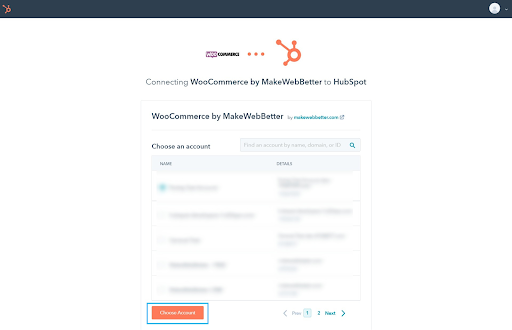
- Whatever you select, you’ll be eventually redirected to the page where you need to select the HubSpot portal you want to connect. After selecting the portal, click on Choose Account and your connection will be successfully established.
- Once the portal is successfully connected, you’ll see the second step that is creating groups and properties.
3.2.Setup Groups and Properties

- To send your WooCommerce data to HubSpot, you need to create some properties in your HubSpot account.
- Once the connection is set up you’ll see the 2nd step called Set up groups & properties in HubSpot.
- Click on Create Groups and Properties. As soon as you click it, the progress bar will start running means your properties are being created. After successful creation of the properties, you’ll be moved to the 3rd step that is Create lists in HubSpot.
- If you want to see these Groups and Properties on your HubSpot account, navigate to Settings > Properties in your HubSpot portal and you’ll see all those custom properties there.
3.3.Setup Smart Lists to segment your Contacts
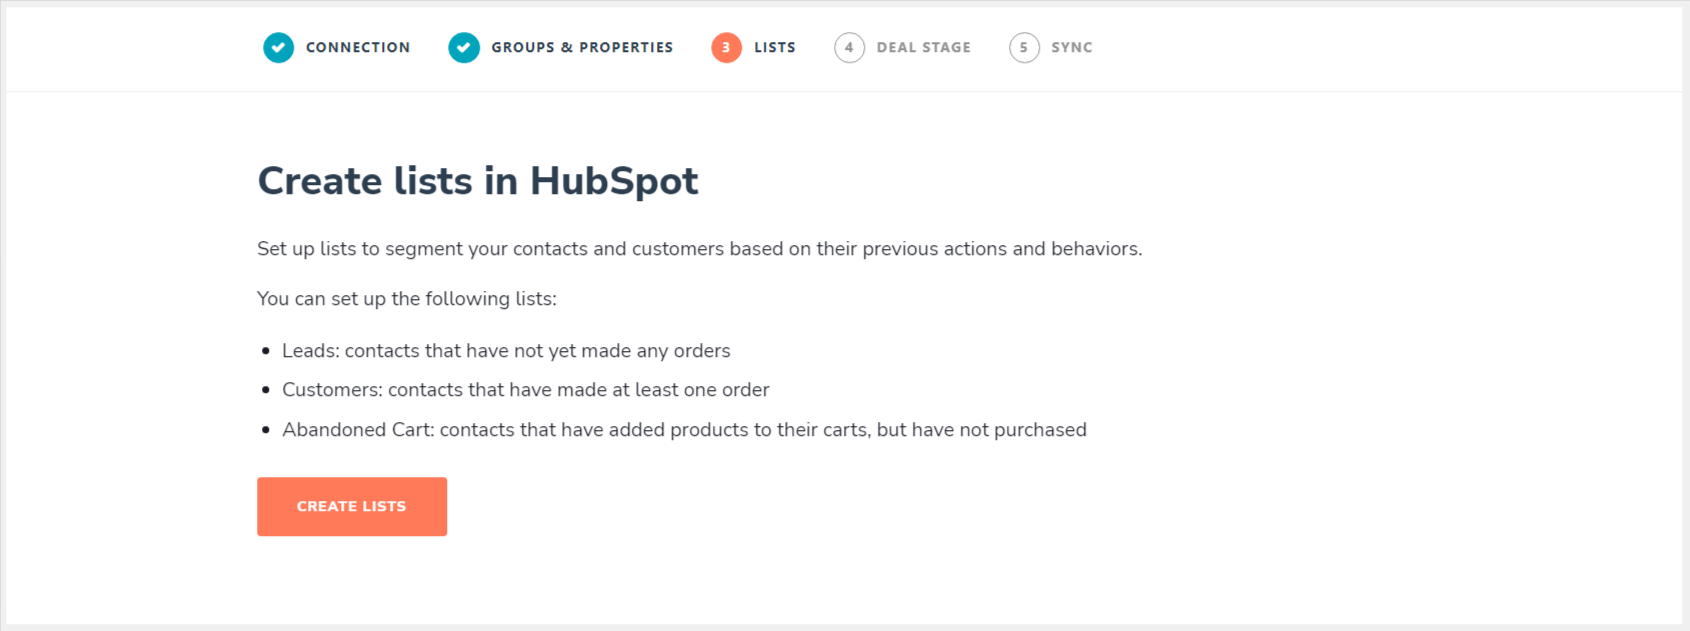
- In this step, you need to create lists to segment your contacts.
- Click on Create Lists and the progress bar will run again and once it reaches 100%, your lists will be successfully created.
- To view this list on your HubSpot account, navigate to Contacts > Lists and you’ll see the created lists there.
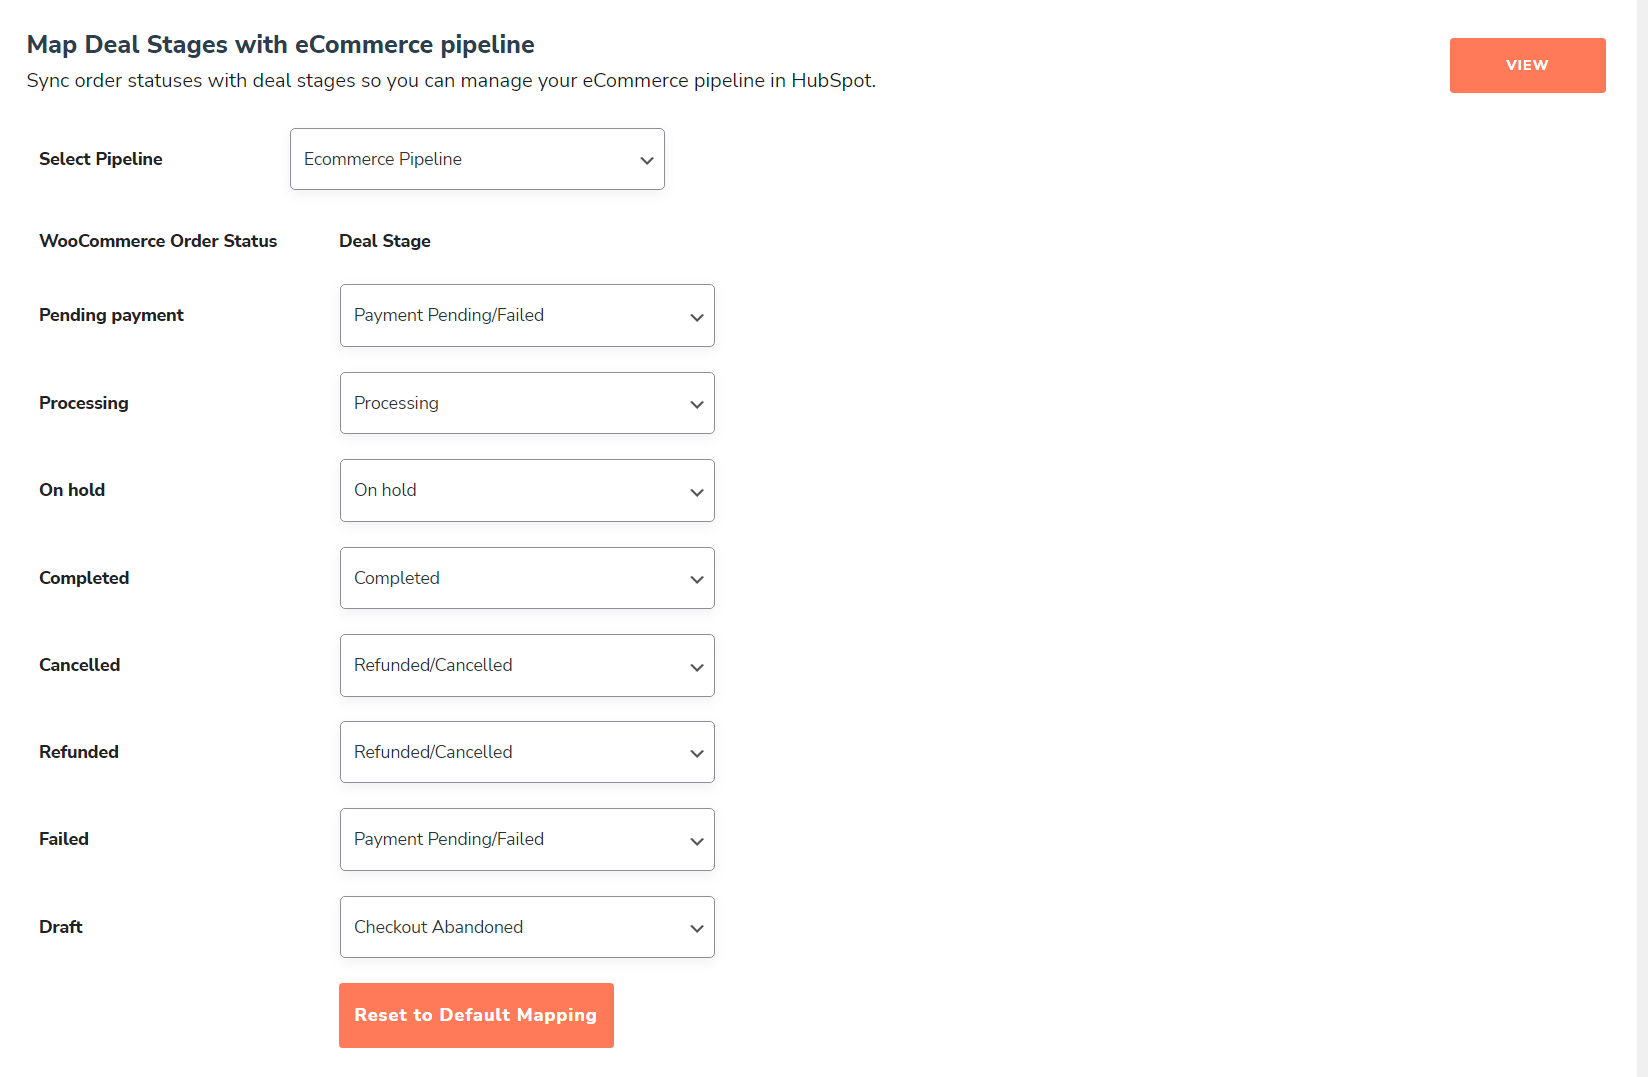
3.4.Map Deal Stages with Pipeline
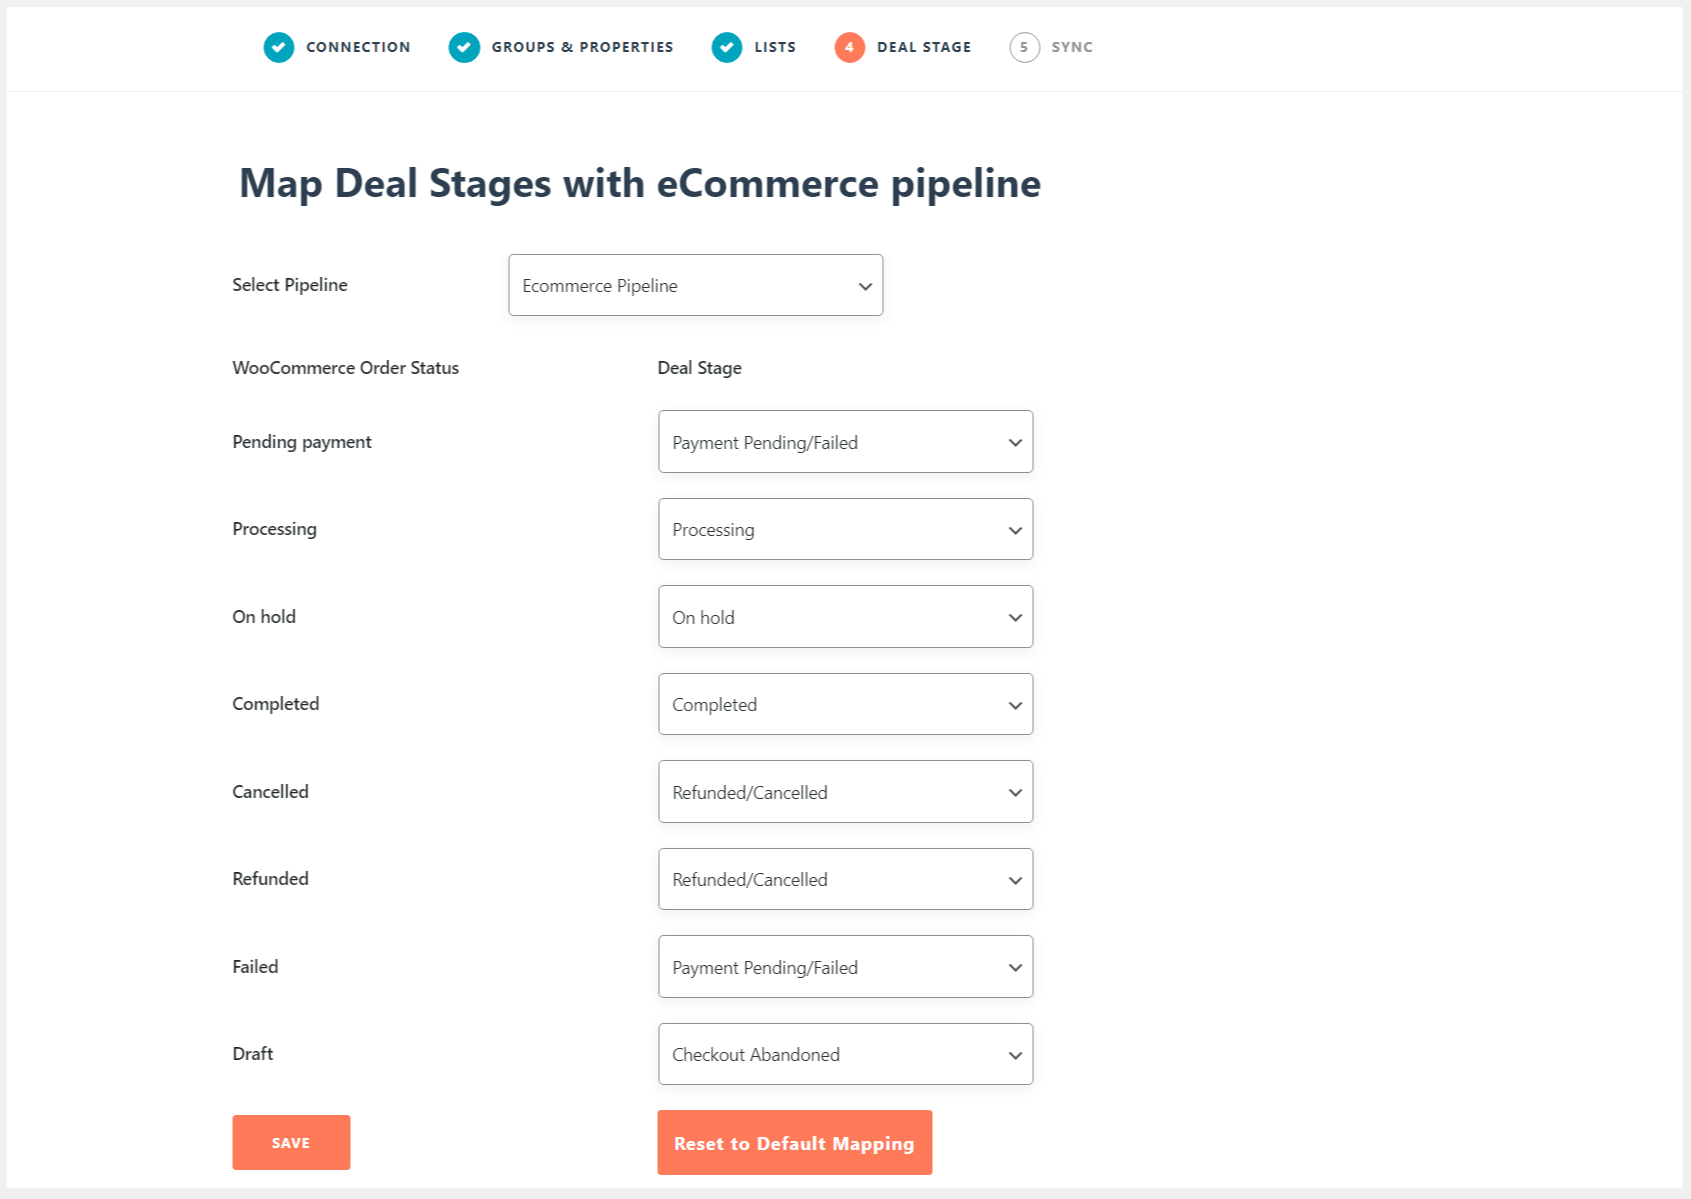
After lists are created, the next step is to map your deal stages in the pipeline you want.
Here you can click on the Select Pipeline dropdown and you’ll see all the pipelines created in your HubSpot portal. Select the one you want to map your deal stages in.
After selecting the pipeline, select the deal stage for every respective WooCommerce Order Status to map them correctly.
Once the deals are mapped successfully, click on Save button and move to the next step.
Note: If you’re not sure about the mapping, click on Reset to Default Mapping.
-Also, “If you create a new deal stage in your HubSpot CRM, you’ll need to re-authorize your HubSpot portal from your WooCommerce store to see those stages.”
3.5.Sync your Historical WooCommerce data over HubSpot

After mapping your deal stages, you’ll see the last step that will ask you to sync your historical or existing data to HubSpot. Here you’ll get 2 options:
- Sync Now: Clicking on this button would start the syncing right away.
- Skip Historical Data Sync: Clicking on this button would skip this step and keep syncing your data in the background.
Tip: If you have a large amount of data, you can click Skip and let it sync in the background. Else you can connect with us for fast syncing.
That’s it. You’ve successfully set up the HubSpot WooCommerce integration plugin. Now let’s talk about the features of this integration.
3.6.Enable Multicurrency
The multicurrency feature is very useful for online business owners that are selling their products and services in multiple countries. This stores the currency in a deal property in which the contact has purchased the product.
To enable this feature follow these steps:
- Log in to your WordPress admin panel and visit the WooCommerce → HubSpot page.
- On this page click on the Deals tab and click on the dropdown menu next to the Create Deals for New Orders option
- Lastly, press the check button next to the Enable Multi-Currency Sync option.
Now to add currency to your HubSpot account, trace the following steps:
- Log in to your HubSpot account and click on the ⚙ icon.
- Now from the side menu click on Account Defaults under Account Setup.

- Next, click on the Currency tab to add currencies. Then click on the Add Currency button and choose a currency and add the exchange rate.
Note: If you have WPML’s WooCommerce Multilingual & Multicurrency plugin enabled, you will need to follow the above steps to ensure correct synchronisation with their multicurrency features.
3.7.Multilanguage
The multilanguage feature of the plugin stores the language in which a user has accessed your website in a default property created by HubSpot called ‘Preferred Language’ which basically is a contact property.
- Firstly, click on the ⚙ icon and then, from the side panel visit the Properties page under the Data Management section.
- Next, from the dropdown menu beside the Select an object option, choose the Contact properties option.
- Lastly, in the search bar write Preferred Language to fetch the property.
Note: This feature has been made compatible with the WPML WordPress plugin. Therefore, ensure that the plugin has been installed and configured in your WordPress environment.
4.Workflow
4.1.Dashboard
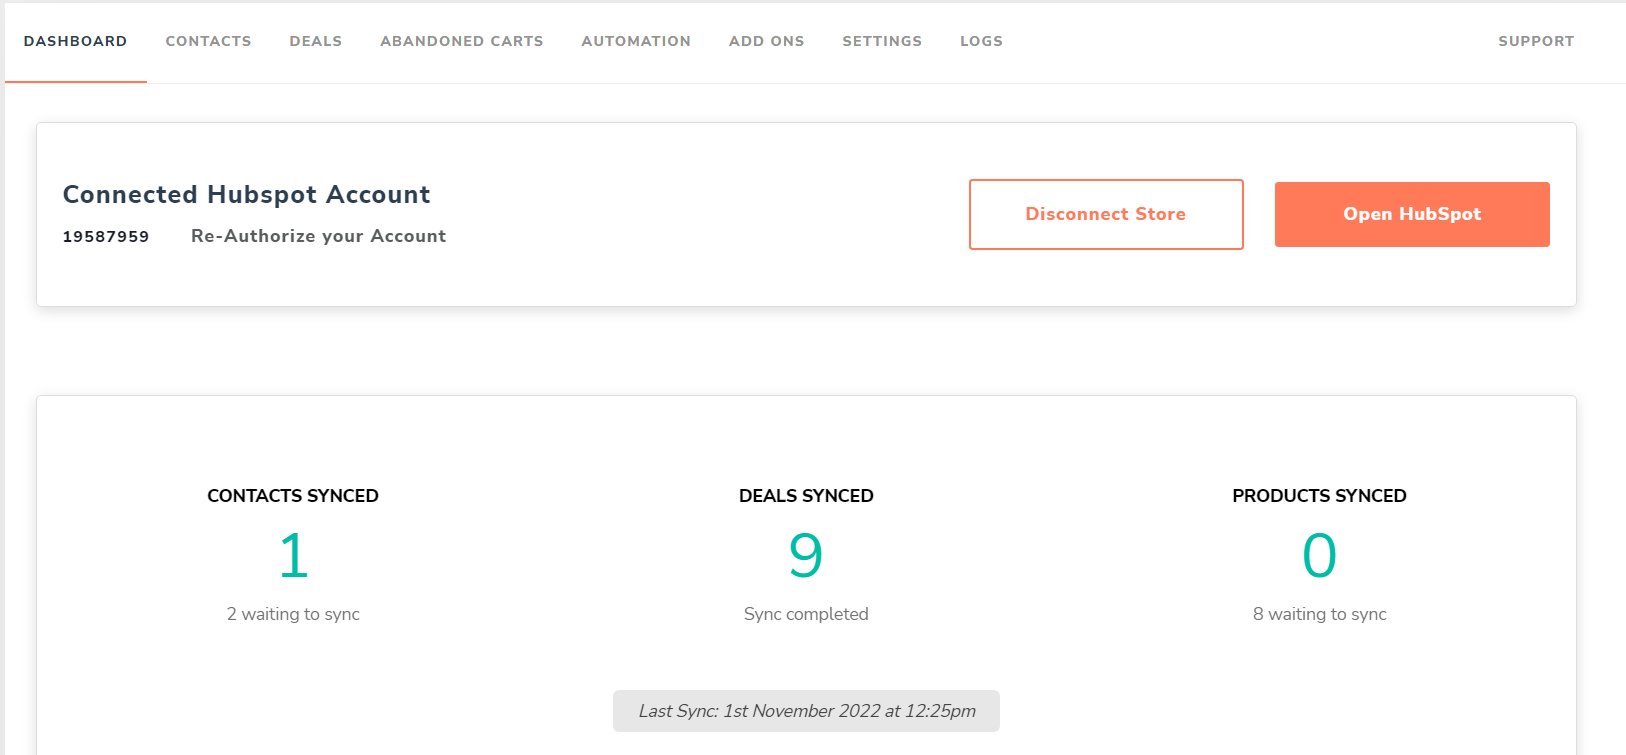
The dashboard of this plugin displays the data successfully synced over HubSpot. You can see the number of Contacts, Deals, and Products synced successfully over HubSpot.
4.2.Contact
You can send your WooCommerce contacts over HubSpot through this setting.
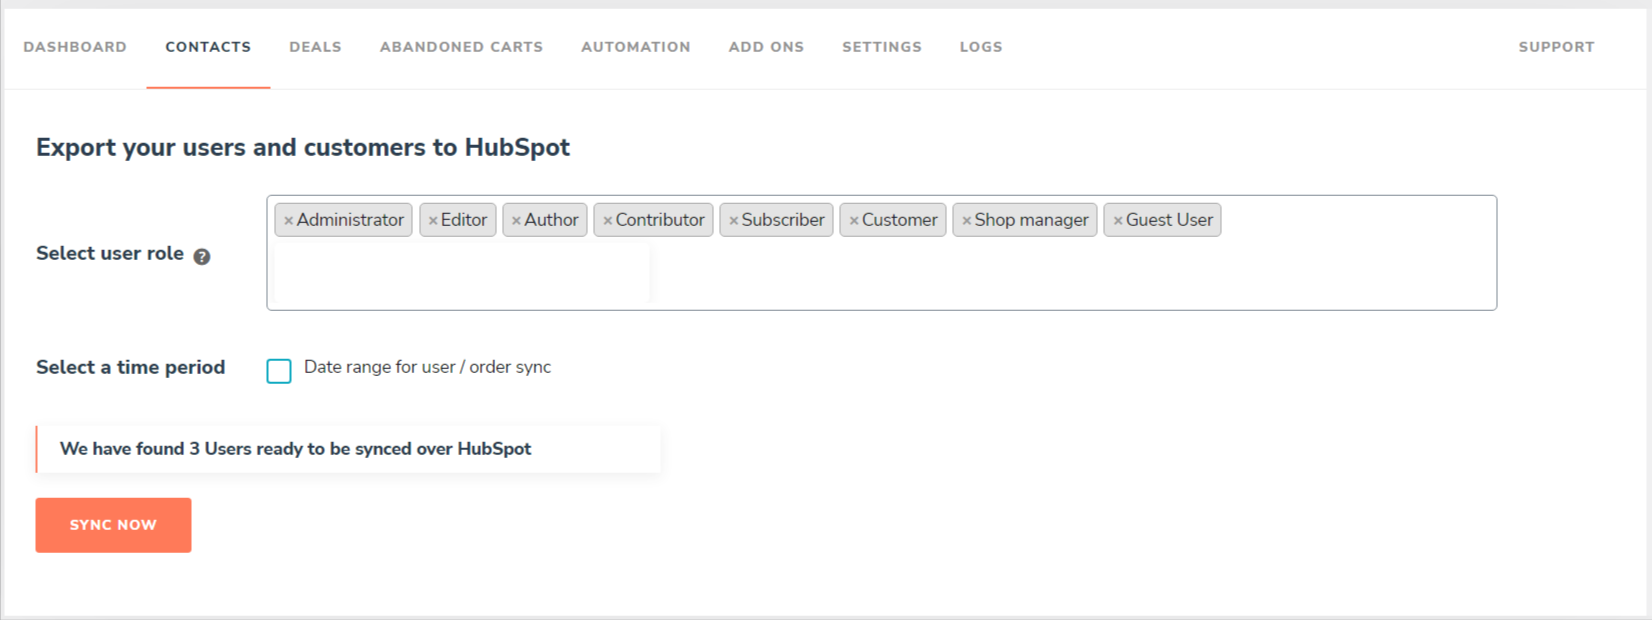
- Select User Role: All the users with the roles you select here will be synced over HubSpot.
- Select the time period: Select the time period you want to sync the data for. If you have any data in that time frame that still needs to be synced, click on the Sync Now button to sync those contacts.
4.3.Deals Settings
This setting lets you perform all the activities related to deals.
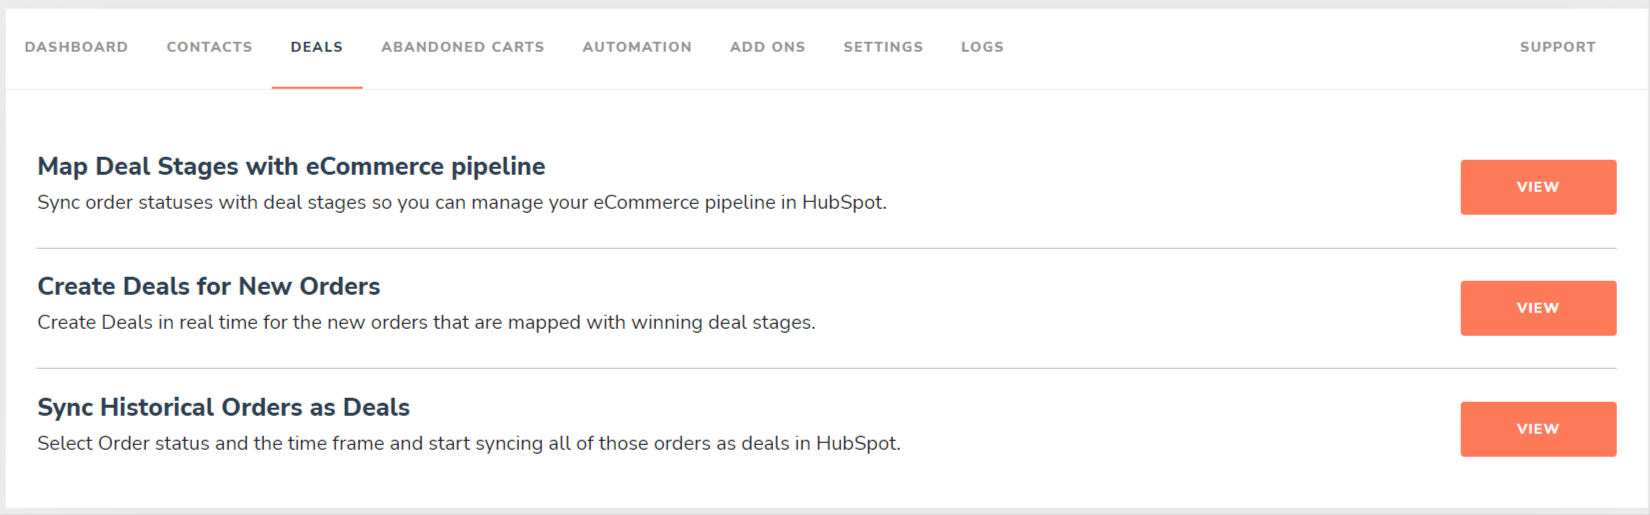
Here are the settings you get in this setting:
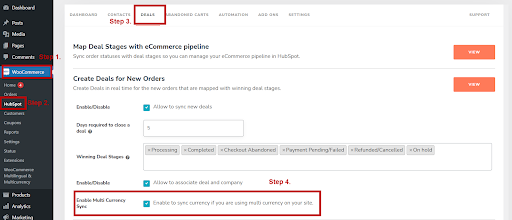
- Map deal stages with eCommerce pipeline: You can select your pipeline and map your WooCommerce order statuses with HubSpot deal stages defined in your HubSpot CRM’s pipelines. (Mapping is already done for the default WooCommerce order statuses)
- Create deals for new orders: Enable this feature (by clicking on the checkbox) to create a new deal over HubSpot everytime a new order is placed at your WooCommerce store. Add the number of days you require to close a deal and select the winning deal stages.
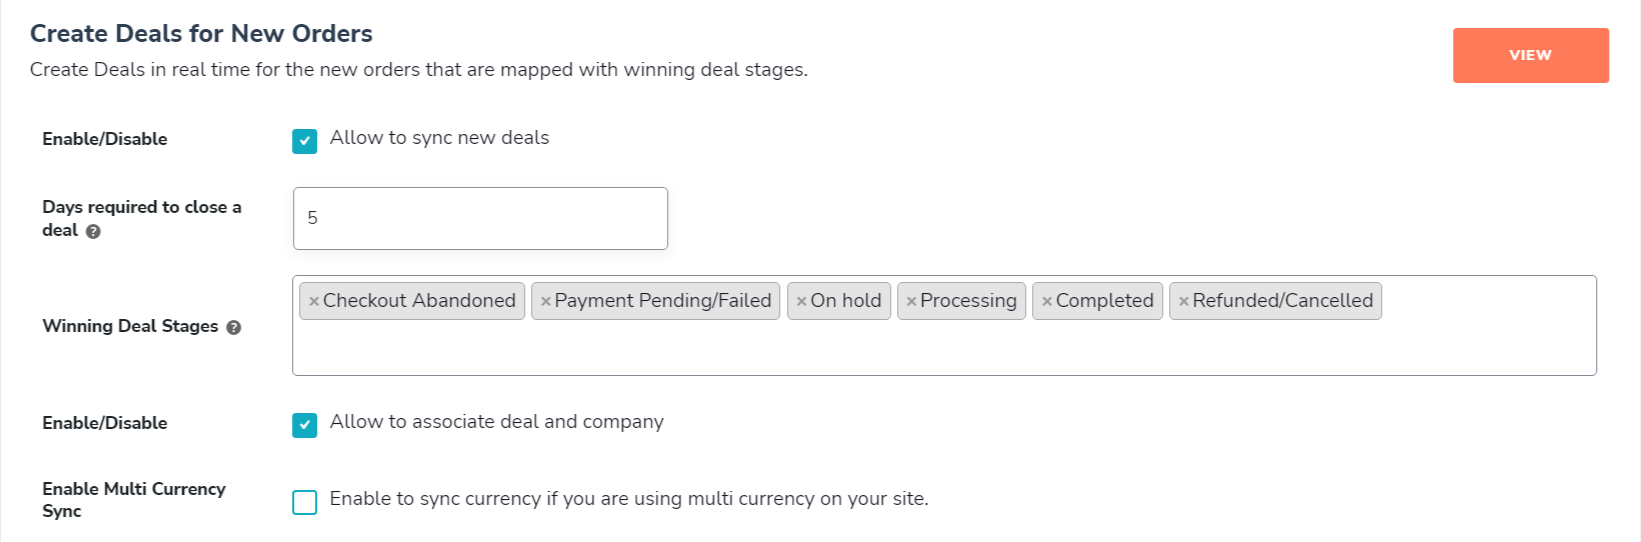
You can click the checkbox to associate the company with the respective deal. If a company is associated with the contact (that has placed the order), it’ll be associated with the same deal as well.
If you have a multi-currency plugin enabled on your website, then you can sync deal currency to HubSpot by enabling the last checkbox named Enable Multi-currency Sync.
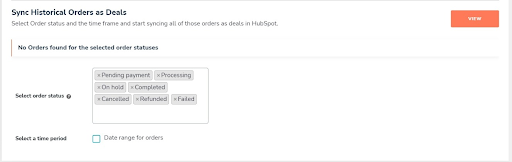
- Sync Historical Orders as Deals: Sync your existing WooCommerce orders over HubSpot as deals. Select the order statuses you want to sync and the date range to begin sending the orders over the CRM.
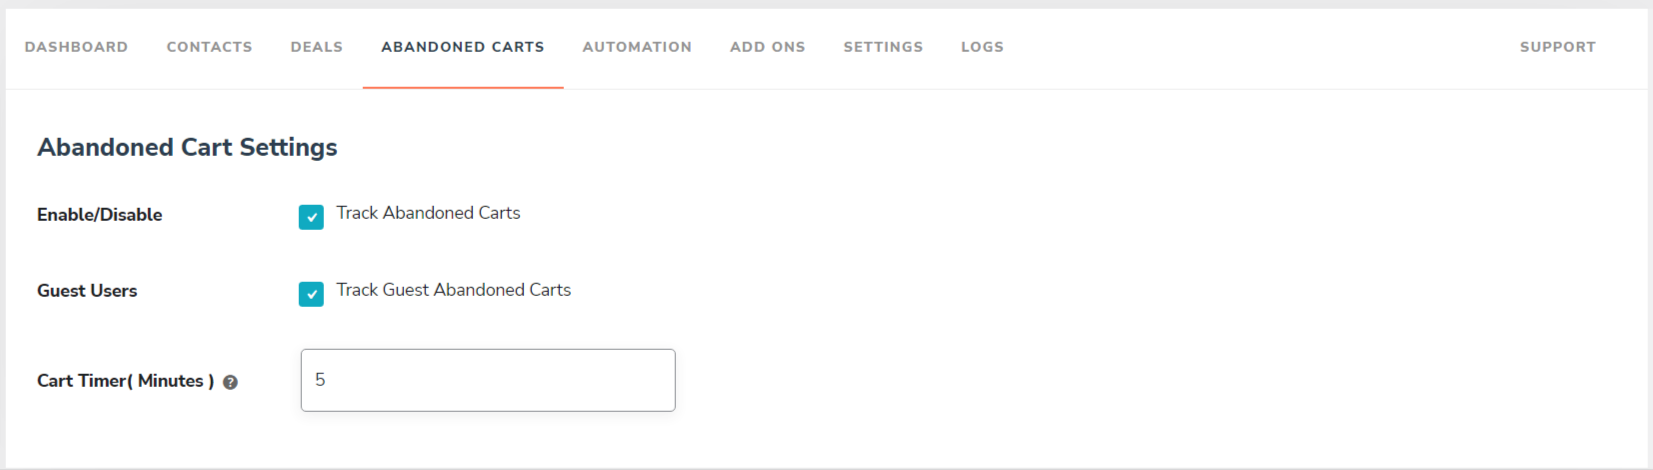
4.4.Abandoned Carts Settings
- Click on the checkbox, to enable abandoned cart tracking and guest user abandoned cart tracking.
- Set the timer for the abandoned cart. If you select 10 minutes, the abandoned cart data will be updated over HubSpot every 10 minutes.
Important: Users please make a note of it that it is due to the HubSpot CRM’s settings that whenever any deal falls to the “pending” stage, after 24 hours, it is automatically moved to the “checkout abandoned” stage. This happens due to the configuration of the eCommerce bridge API used. This has no direct relationship with the working of our integration plugin. Please also note that Whenever a user will abandoned the cart on your website, this plugin will sync the abandoned cart data in that particular contact’s property on HubSpot, only.
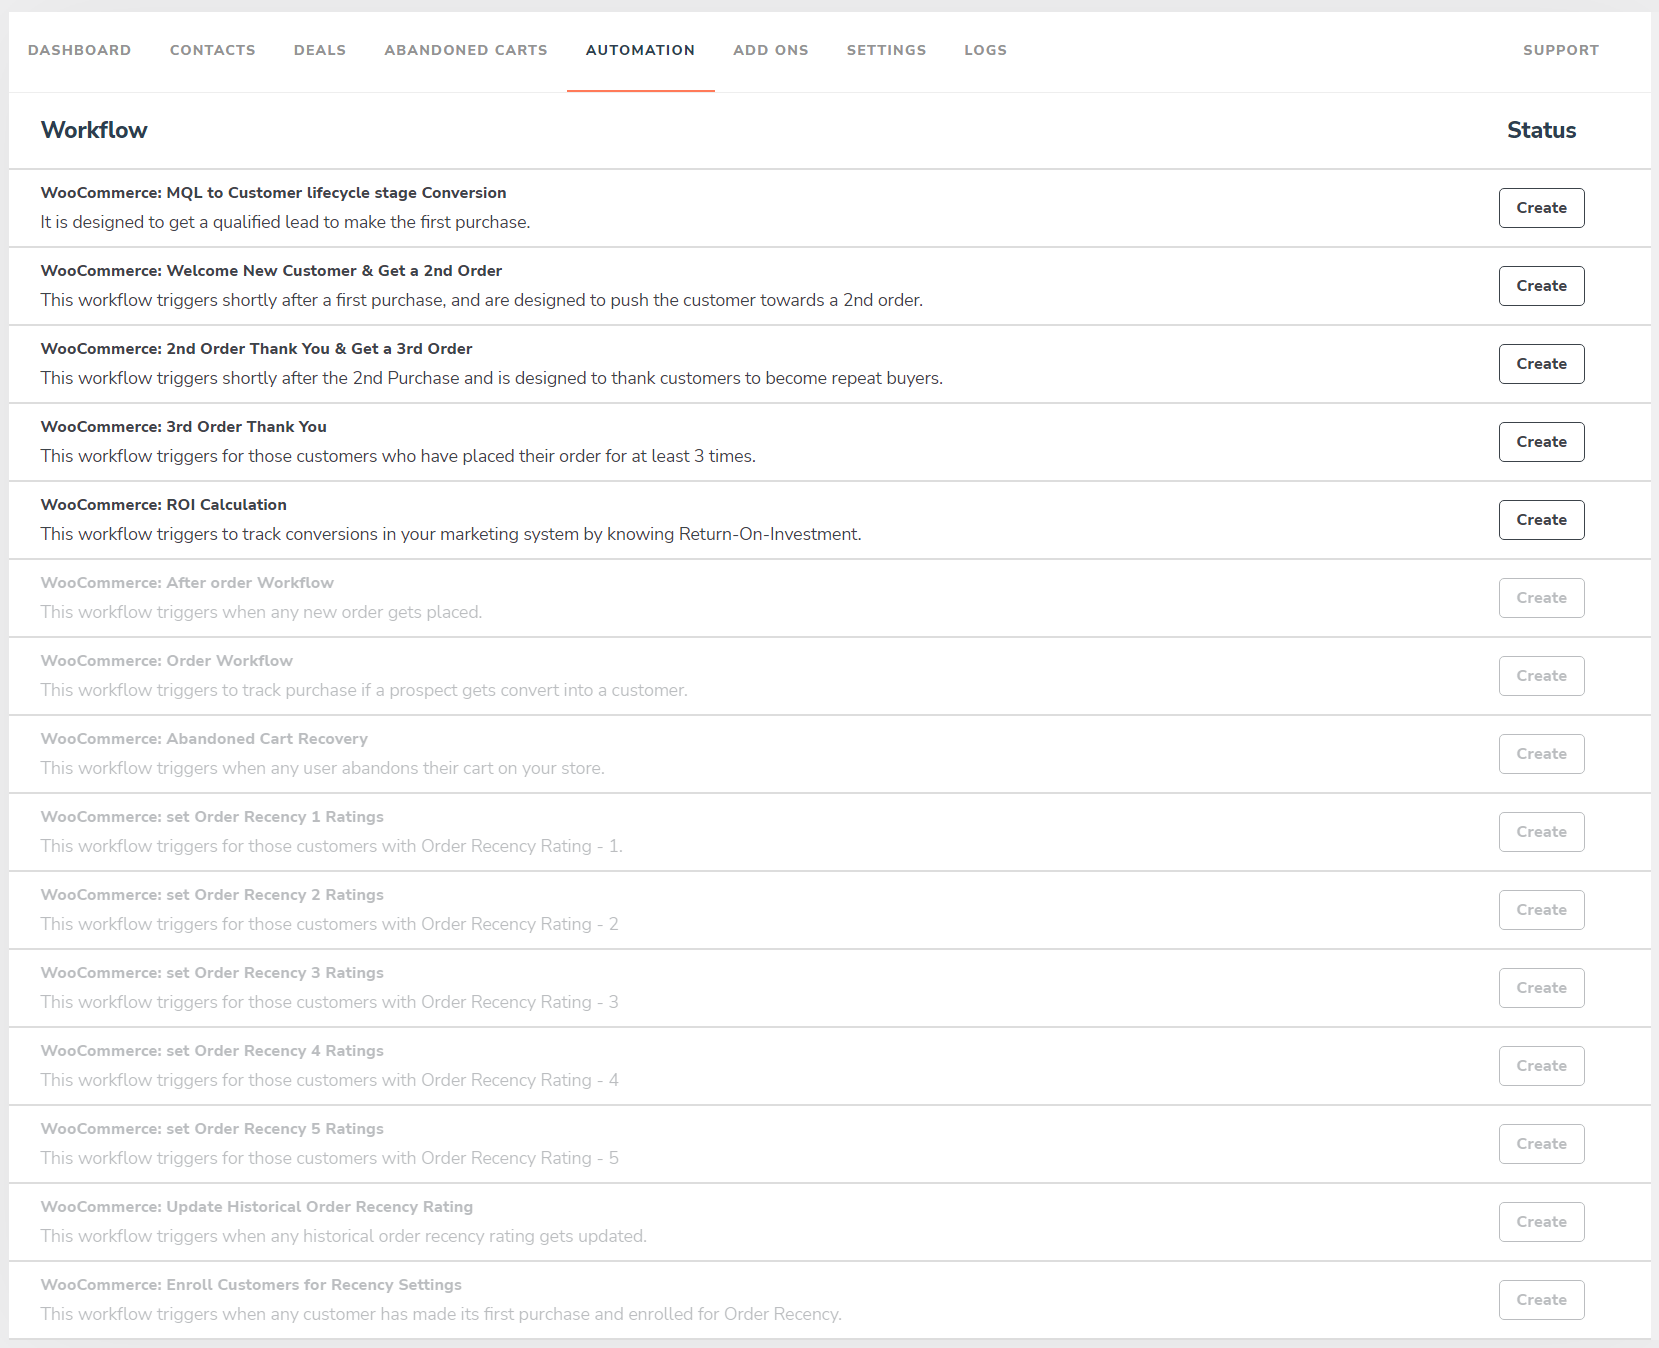
4.5.Automation
In this setting, you get some ready-to-use workflows. You can create these workflows in your HubSpot portal in a single click.
4.6.Add-ons
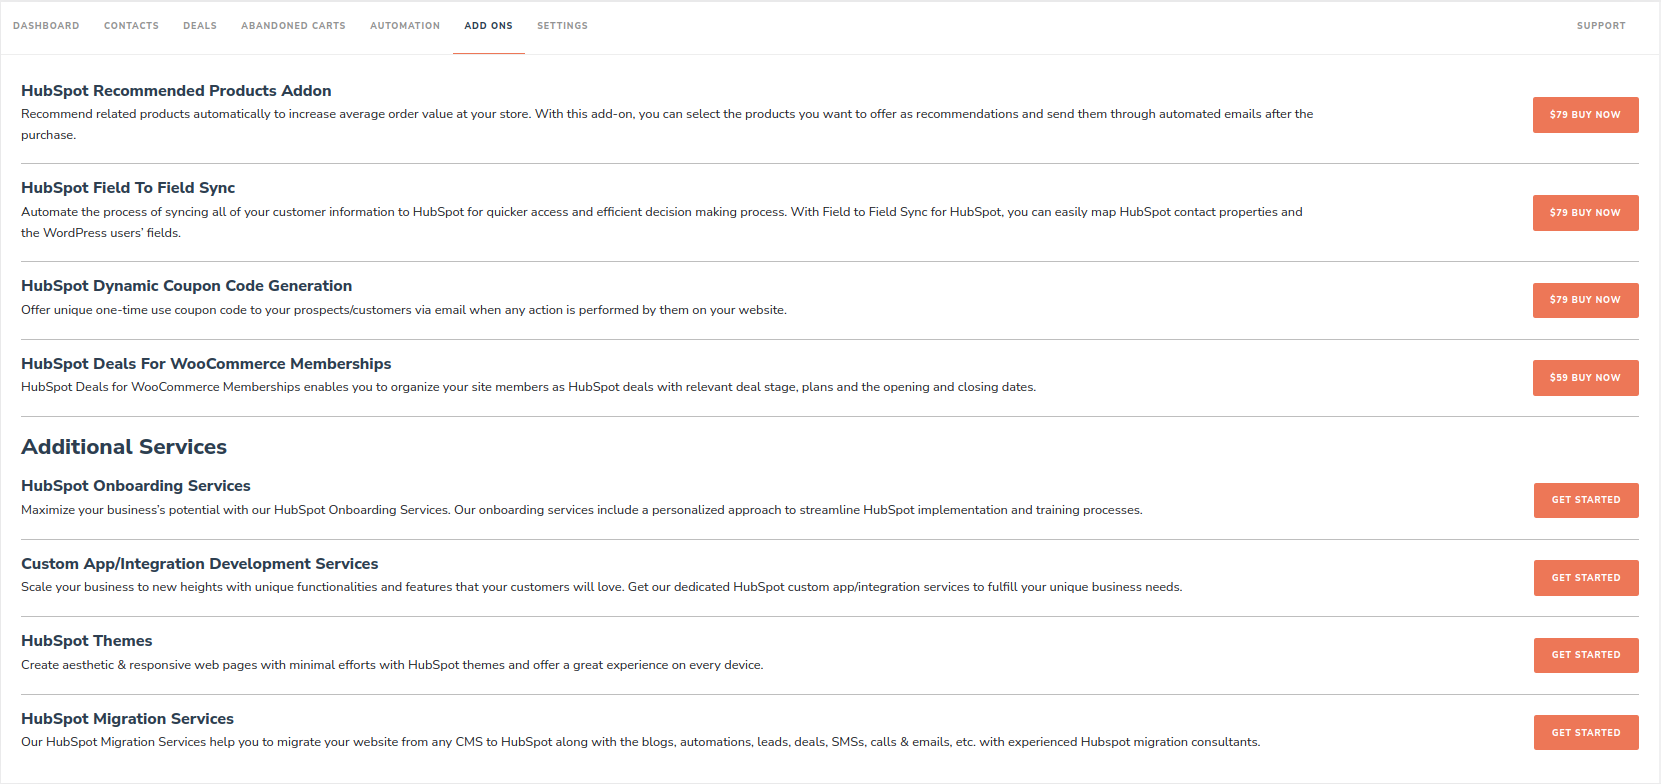
This section showcases some of the popular addons for this integration along with some HubSpot services MakeWebBetter offers. Here’s the list of those:
- HubSpot Field To Field Sync: Automate the process of syncing all of your customer information to HubSpot for quicker access and efficient decision making process. With Field to Field Sync for HubSpot, you can easily map HubSpot contact properties and the WordPress users’ fields.
- HubSpot Deals for WooCommerce Memberships: HubSpot Deals for WooCommerce Memberships enables you to organize your site members as HubSpot deals with relevant deal stages, plans, and opening and closing dates.
- HubSpot Recommended Products Addon: Recommend related products automatically to increase average order value at your store. With this add-on, you can select the products you want to offer as recommendations and send them through automated emails after the purchase.
5.Uninstallation Process
5.1.How to Uninstall HubSpot for WooCommerce Integration Plugin on your WordPress/WooCommerce Store?
To uninstall the HubSpot for WooCommerce integration from your store, you need to follow the following steps:
- Login to your WordPress Admin Panel > Go to “Plugins”
- Go to the HubSpot for WooCommerce Integration plugin and select “Deactivate”
- Allow the permissions to proceed with the uninstallation procedure.
The HubSpot for WooCommerce integration plugin is uninstalled successfully.
5.2.How to Uninstall HubSpot for WooCommerce App from your HubSpot Account?
To uninstall the WooCommerce integration app from your HubSpot CRM, you must follow the steps mentioned below:
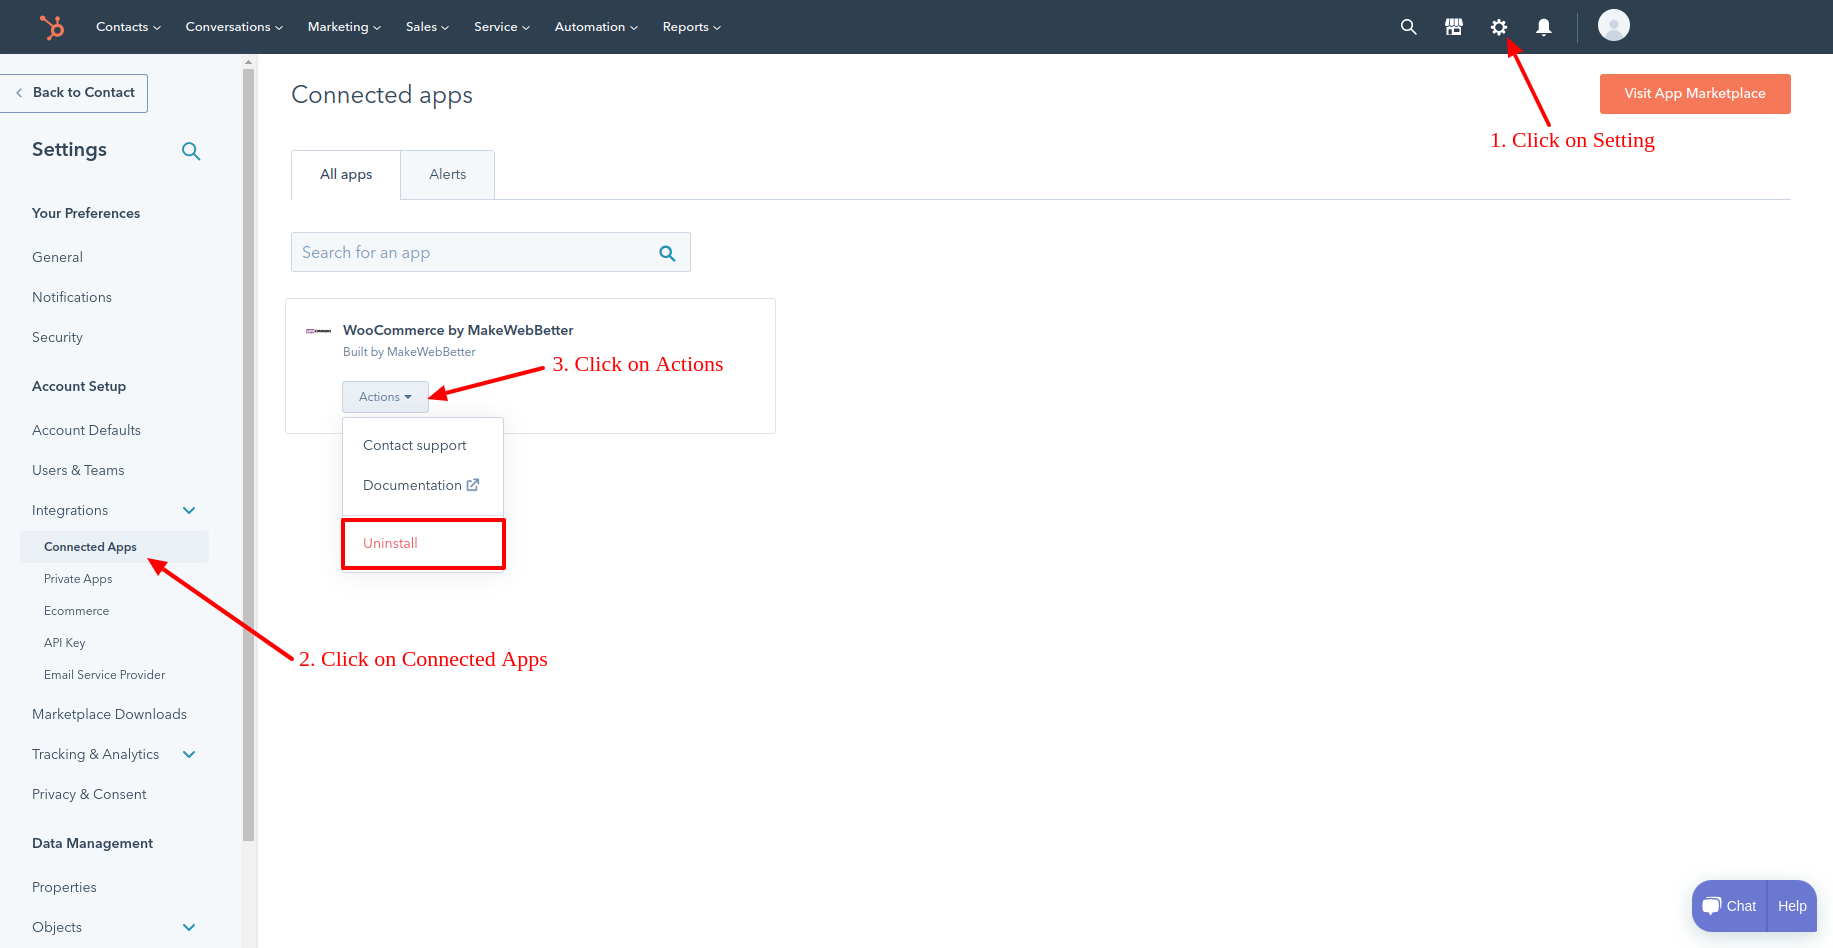
- Log in to your HubSpot CRM account and go to “Settings” in the right-top corner of your screen.
- You’ll see a Menu appears next to the left side of your screen. Select the “Integrations” option from the menu.
- Next, you’ll see a list of all the “Connected Apps” appearing on your screen. Go to “Actions”, a drop-down menu against the app you wish to uninstall. Select “Uninstall” from the drop-down menu to proceed.
Your app will be uninstalled successfully.
6.Additional Services
- HubSpot Onboarding Services: Maximize your business’s potential with our HubSpot Onboarding Services. Our onboarding services include a personalized approach to streamline HubSpot implementation and training processes.
- Custom App/Integration Development Services: Scale your business to new heights with unique functionalities and features that your customers will love. Get our dedicated HubSpot custom app/integration services to fulfill your unique business needs.
- HubSpot Themes : Create aesthetic & responsive web pages with minimal efforts with HubSpot themes and offer a great experience on every device.
- HubSpot Migration Services: Our HubSpot Migration Services help you to migrate your website from any CMS to HubSpot along with the blogs, automation, leads, deals, SMSs, calls & emails, etc. with experienced Hubspot migration consultants.
6.1.Settings
6.1.1.Basic Settings
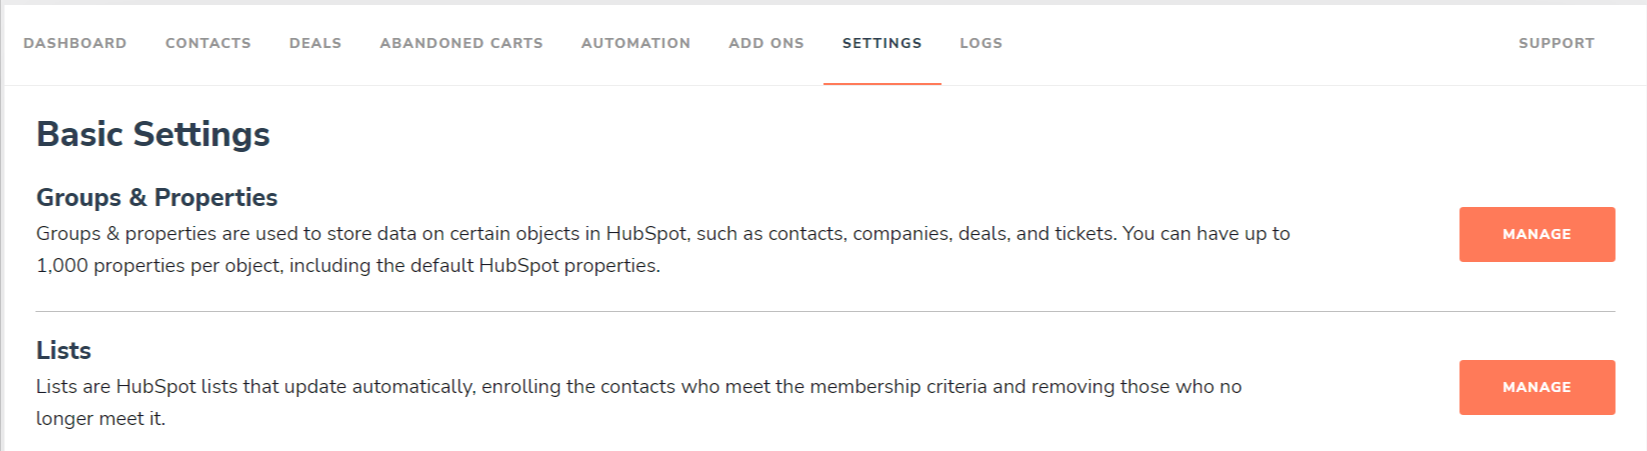
In this section of the setting, you’ll find two settings:
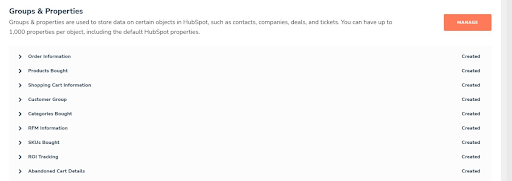
- Groups & Properties: Click on Manage, to view pre-built groups and properties. You can also create the properties over HubSpot from here.
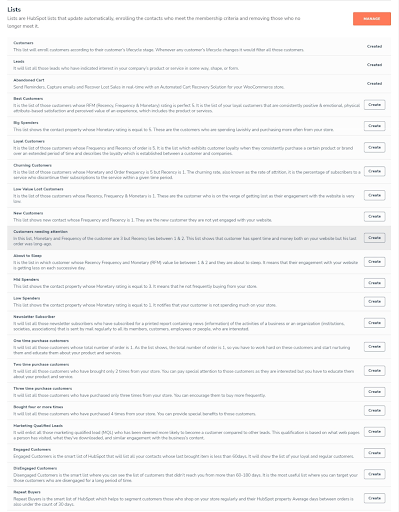
- Lists: Click on Manage, to view pre-built HubSpot Lists. You can also create these lists in your HubSpot portal from here.
6.1.2.Advanced Settings
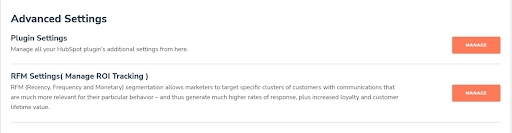
Advanced settings also contain two settings. Let’s look at them:
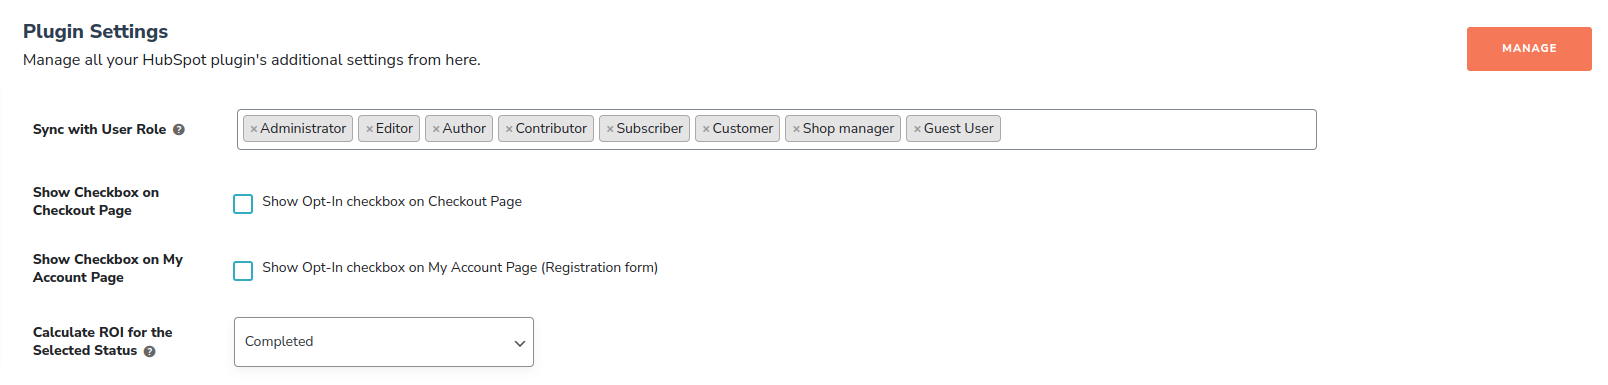
- Plugin Settings: You can manage all your HubSpot plugin’s additional settings from here.
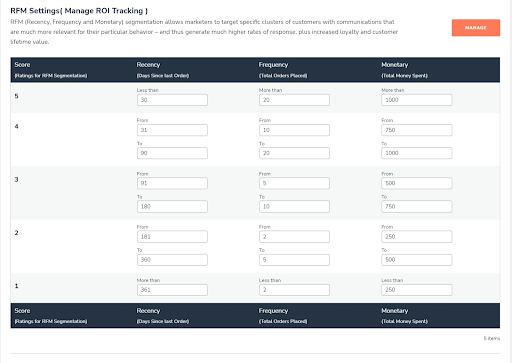
- RFM Settings (Manage ROI Tracking): RFM (Recency, Frequency, and Monetary) segmentation allows marketers to target specific clusters of customers with communications that are much more relevant for their particular behavior – and thus generate much higher rates of response, plus increased loyalty and customer lifetime value.
6.1.2.Logs
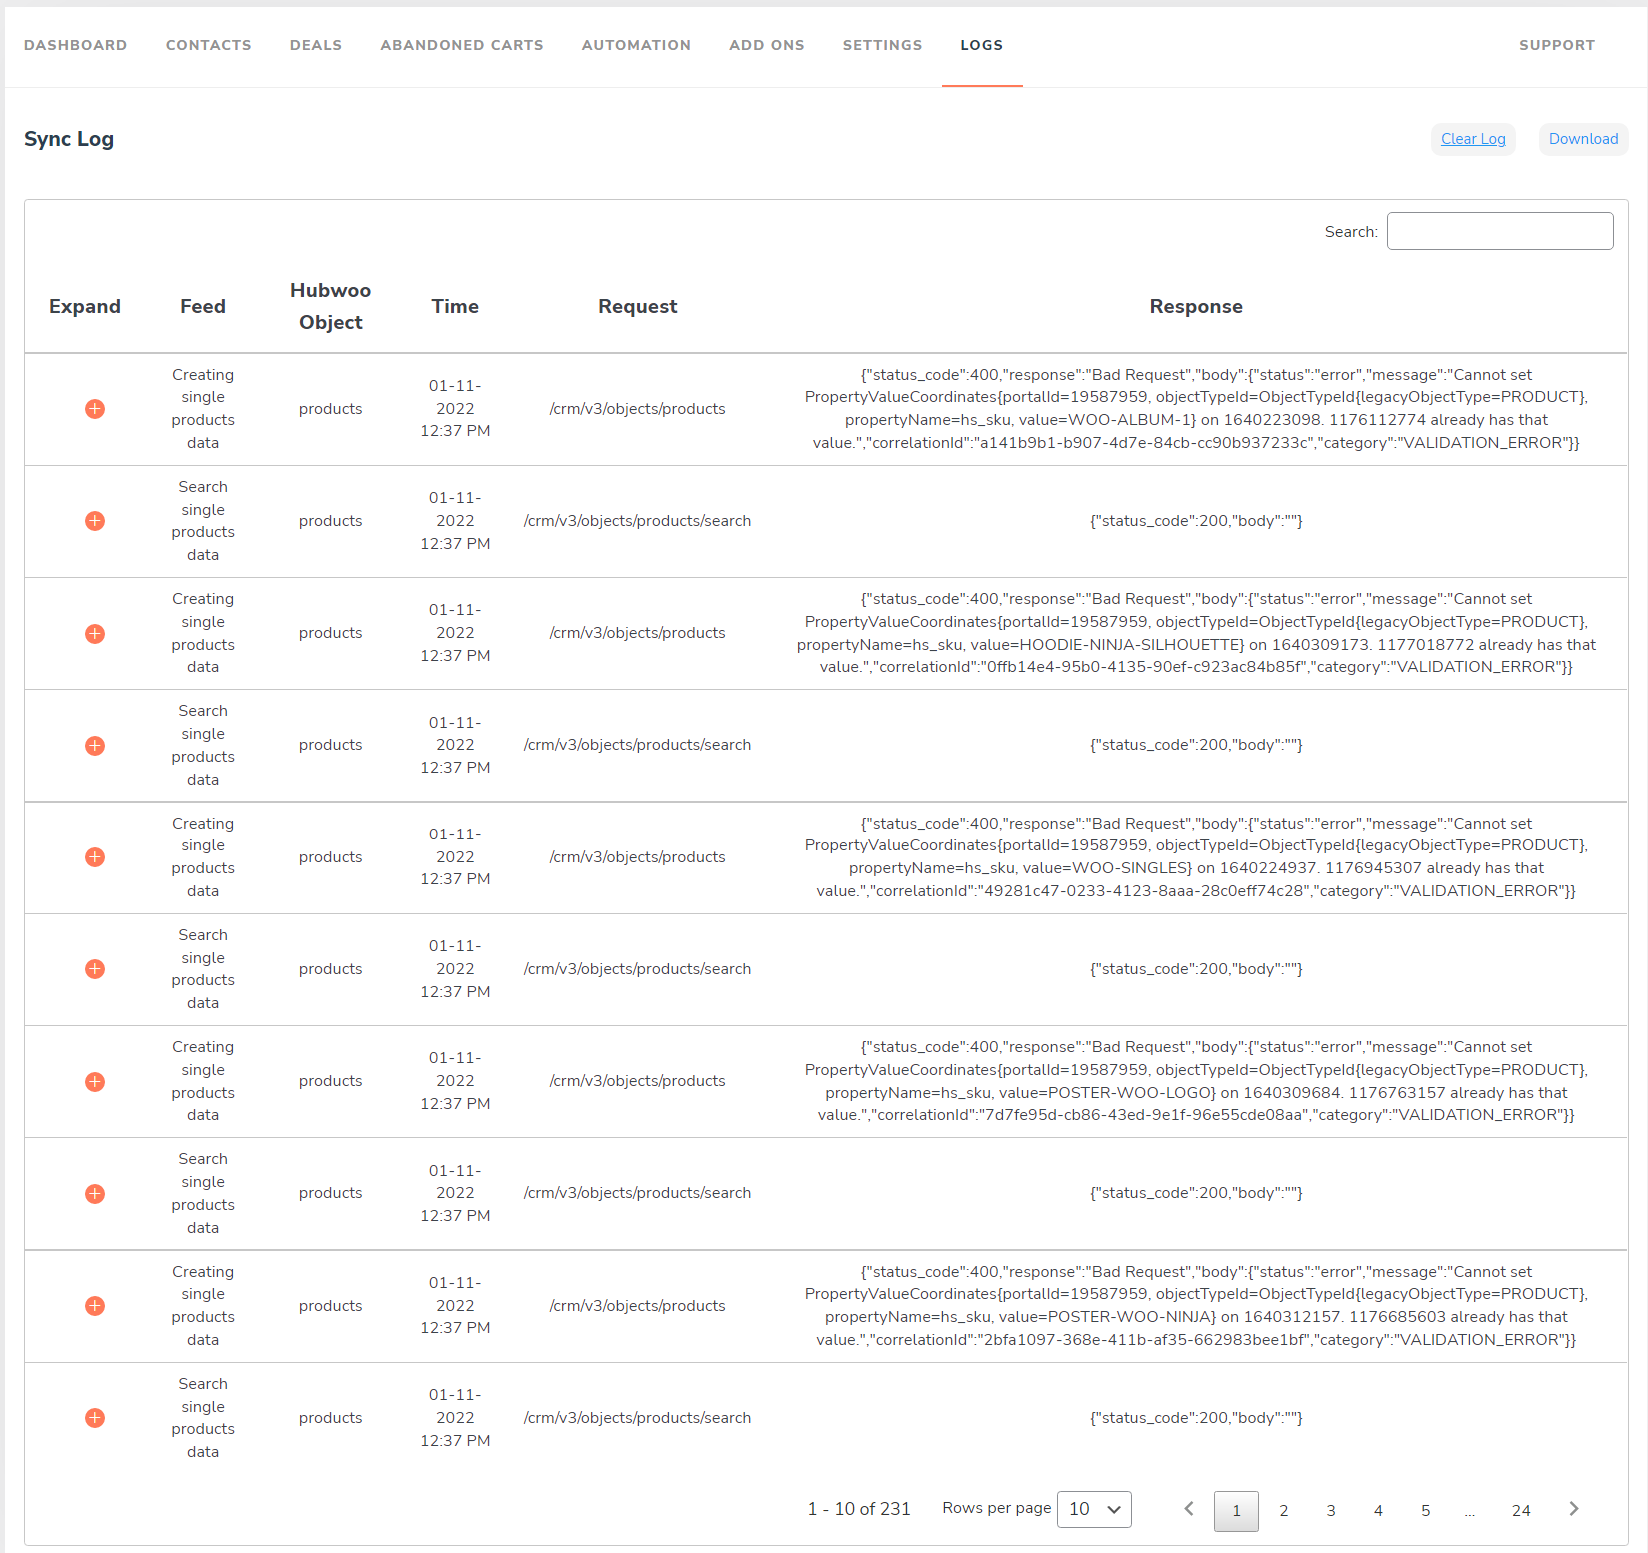
The logs section displays all the logs of the API calls made. Through this section, you can check and monitor all the activities happened in this HubSpot WooCommerce integration plugin. For example, if you’ve created a list in your HubSpot CRM using our plugins list section, it will be logged here.
All the logs will automatically be deleted after 30 days.
7.Top Queries About HubSpot WooCommerce Integration
7.1.What does Historical Sync do?
- Automatically sync real-time WooCommerce users, orders, and products to HubSpot.
- One-click sync of historic customer data to HubSpot makes recognizing user behavior easy.
- The extension automatically creates best-practiced groups, properties, active lists, and workflows that save time and provide a customized HubSpot for WooCommerce.
- Incorporates workflows for HubSpot with a fast setup to grow your audience and increase revenue with effective automated workflow conversion tactics.
7.2.What are the Groups and their Properties this plugin creates?
Once the plugin is set up, the following groups and properties are created automatically with each WooCommerce metadata.
Order Information
- Last Order Status
- Last Order Fulfillment Status
- Last Order Tracking Number
- Last Order Tracking URL
- Last Order Shipment Date
- Last Order Number
- Last Order Currency
- Total Number of Current Orders
Products Bought
- Last Product Bought
- Last Product Types Bought
- Last Products Bought
- Last Products Bought HTML
- Last Total Number Of Products Bought
- Product Types Bought
- Products Bought
- Total Number Of Products Bought
- Last Products Bought Product 1 Image URL
- Last Products Bought Product 1 Name
- Last Products Bought Product 1 Price
- Last Products Bought Product 1 Url
- Last Products Bought Product 2 Image URL
- Last Products Bought Product 2 Name
- Last Products Bought Product 2 Price
- Last Products Bought Product 2 Url
- Last Products Bought Product 3 Image URL
- Last Products Bought Product 3 Name
- Last Products Bought Product 3 Price
- Last Products Bought Product 3 URL
Shopping Cart Information
- Shipping Address Line 1
- Shipping Address Line 2
- Shipping City
- Shipping State
- Shipping Postal Code
- Shipping Country
- Billing Address Line 1
- Billing Address Line 2
- Billing City
- Billing State
- Billing Postal Code
- Billing Country
Customer Group
- Customer Group/ User role
- Customer Source Store
- Accepts Marketing
- Marketing Newsletter
- Shopping Cart ID
Categories Bought
- Last Categories Bought
- Categories Bought
RFM Information
- Total Value of Orders
- Average Order Value
- Total Number of Orders
- First Order Value
- First Order Date
- Last Order Value
- Last Order Date
- Average Days Between Orders
- Account Creation Date
- Monetary Rating
- Order Frequency Rating
- Order Recency Rating
SKUs Bought
- Last SKUs Bought
- SKUs Bought
ROI Tracking
- Customer New Order
- Abandoned Cart Recovery Workflow Conversion
- Abandoned Cart Recovery Workflow Conversion Amount
- Abandoned Cart Recovery Workflow Conversion Date
- Abandoned Cart Recovery Workflow Start Date
- Current ROI Campaign
- Customer Re-engagement Workflow Conversion
- Customer Re-engagement Workflow Conversion Amount
- Customer Re-engagement Workflow Conversion Date
- Customer Re-engagement Workflow Start Date
- Customer Rewards Workflow Conversion
- Customer Rewards Workflow Conversion Amount
- Customer Rewards Workflow Conversion Date
- Customer Rewards Workflow Start Date
- MQL Capture, Nurture & Conversion Conversion
- MQL Capture, Nurture & Conversion Conversion Amount
- MQL Capture, Nurture & Conversion Conversion Date
- MQL Capture, Nurture & Conversion Start date
- New Customer Workflow Conversion
- New Customer Workflow Conversion Amount
- New Customer Workflow Conversion Date
- New Customer Workflow Start Date
- Second Purchase Workflow Conversion
- Second Purchase Workflow Conversion Amount
- Second Purchase Workflow Conversion Date
- Second Purchase Workflow Start Date
- Third Purchase Workflow Conversion
- Third Purchase Workflow Conversion Amount
- Third Purchase Workflow Conversion Date
- Third Purchase Workflow Start Date
Abandoned Cart Details
- Current Abandoned Cart
- Abandoned Cart Date
- Abandoned Cart Counter
- Abandoned Cart URL
- Abandoned Cart Products SKUs
- Abandoned Cart Products Categories
- Abandoned Cart Products
- Abandoned Cart Products HTML
- Abandoned Cart Tax Value
- Abandoned Cart Subtotal
- Abandoned Cart Total Value
Product Information
- Source Product ID
- Product Source Store
Note: Both of these properties in the above group are product properties.
7.3.What Smart Lists does this plugin create?
- Customers
This list will enroll customers according to their customer’s lifecycle stage. It filters all those customers whose customer lifecycle changes.
- Leads
It will list all those leads who have indicated an interest in your company’s product or service in some way, shape, or form.
- Abandoned Cart
Send Reminders, Capture emails and Recover Lost Sales in real-time with an Automated Cart Recovery Solution for your WooCommerce store.
- Best Customers
It is the list of those customers whose RFM (Recency, Frequency & Monetary) rating is perfect 5. It is the list of your loyal customers that are consistently positive & emotional, physical attribute-based satisfaction, and perceived value of an experience, which includes the product or services.
- Big Spenders
This list shows the contact property whose Monetary rating is equal to 5. These are the customers who are spending lavishly and purchasing more often from your store.
- Loyal Customers
It is the list of those customers whose Frequency and Recency of order is 5. It is the list that exhibits customer loyalty when they consistently purchase a certain product or brand over an extended period of time and describes the loyalty which is established between a customer and companies.
- Churning Customers
It is the list of those customers whose Monetary and Order frequency is 5 but Recency is 1. The churning rate, also known as the rate of attrition, is the percentage of subscribers to a service who discontinue their subscriptions to the service within a given time period.
- Low-value Lost Customers
It is the list of those customers whose Recency, Frequency & Monetary is 1. These are the customers who are on the verge of getting lost as their engagement with the website is very low.
- New Customers
This list shows new contacts whose Frequency and Recency is 1. They are the new customer and they are not yet engaged with your website.
- Customers needing attention
In this list, the Monetary and Frequency of the customer are 3 but Recency lies between 1 & 2. This list shows that the customer has spent time and money both on your website but his last order was long-ago.
- About to Sleep
It is the list in which customers whose Recency Frequency and Monetary (RFM) value lie between 1 & 2 and they are about to sleep. It means that their engagement with your website is getting less on each successive day.
- Mid Spenders
This list shows the contact property whose Monetary rating is equal to 3. It means that he not frequently buying from your store.
- Low Spenders
This list shows the contact property whose Monetary rating is equal to 1. It notifies that your customer is not spending much on your store.
- Newsletter Subscriber
It will list all those newsletter subscribers who have subscribed for a printed report containing news (information) of the activities of a business or an organization (institutions, societies, associations) that is sent by mail regularly to all its members, customers, employees or people, who are interested.
- One time purchase customers
It will list all those customers whose total number of orders is 1. As the list shows, the total number of orders is 1, so you have to work hard on these customers and start nurturing them and educating them about your product and services.
- Two-time purchase customers
It will list all those customers who have brought only 2 times from your store. You can pay special attention to those customers as they are interested but you have to educate them about your product and service.
- Three-time purchase customers
It will list all those customers who have purchased only three times from your store. You can encourage them to buy more frequently.
- Bought four or more times
It will list all those customers who have purchased 4 times from your store. You can provide special benefits to those customers.
- Marketing Qualified Leads
It will enlist all those marketing qualified leads (MQL) who have been deemed more likely to become a customer compared to other leads. This qualification is based on what web pages a person has visited, what they’ve downloaded, and similar engagement with the business’s content.
- Engaged Customers
Engaged Customers is the smart list of HubSpot that will list all your contacts whose last bought item is less than 60days. It will show the list of your loyal and regular customers.
- Dis-engaged Customers
Disengaged Customers is the smart list where you can see the list of customers that didn’t reach you from more than 60-180 days. It is the most useful list where you can target those customers who are disengaged for a long period of time.
- Repeat Buyers
Repeat Buyers is the smart list of HubSpot which helps to segment customers who shop on your store regularly and their HubSpot property Average days between orders are also under the count of 30 days.
7.4.Automation with Workflows
You get the following ready-to-use workflows for your WooCommerce store.
- WooCommerce: MQL to Customer lifecycle stage Conversion
It is designed to get a qualified lead to make the first purchase.
- WooCommerce: Welcome New Customer & Get a 2nd Order
This workflow triggers shortly after a first purchase, and is designed to push the customer towards a 2nd order.
- WooCommerce: 2nd Order Thank You & Get the 3rd Order
This workflow triggers shortly after the 2nd Purchase and is designed to thank customers to become repeat buyers.
- WooCommerce: 3rd Order Thank You
This workflow triggers for those customers who have placed their order for at least 3 times.
- WooCommerce: ROI Calculation
This workflow triggers to track conversions in your marketing system by knowing Return-On-Investment
8.FAQs
How does this extension sync customer’s data to HubSpot?
HubSpot For WooCommerce has an optimized backend scheduler that syncs real-time user data and updates it to HubSpot without affecting the server performance. The scheduler will run every 5 minutes and push all the updates done on your store related to customers and their orders.
What about the new changes I made to store after setting up your plugin?
Adding new categories or products on your store will be auto-synced on HubSpot as our plugin continuously monitors those changes and pushes them on HubSpot.
What product data can I send over HubSpot through this plugin?
If you have the free HubSpot plan, you can sync Product Name, Product Image, Product Price, Product Description. And if you use a Marketing professional or enterprise plan, you can sync all the data included in the free plan along with the Product SKU and Product Image URL.
Can I sync products data over HubSpot through this plugin?
If you have the free HubSpot plan, you cannot sync any product data on HubSpot CRM and the line items will also not associate with them.
9.Resources That May Help You Understand HubSpot Better
12.1 Why Go HubSpot For Ecommerce?
12.2 Most Powerful HubSpot CRM Features For Ecommerce You Need This 2020?
12.3 Why Choose HubSpot Solutions Partners For HubSpot Onboarding?
10.Important Links
The free plugin is available for download –
WordPress
Also, check our –