Overview
↑ Back to topKeap Integration for WooCommerce by WP Swings lets you connect your WooCommerce store with the Keap CRM formerly known as Infusionsoft. Using the Keap integrations plugin, you can sync your orders data, products, and contacts data with the CRM with merely two clicks.
Installation
↑ Back to top- Download the .zip file from your WooCommerce account.
- Log into your WordPress Dashboard and navigate to Plugins > Add New.
- Click on the Upload Plugin button on top and upload the zip file of the plugin.
- Install the plugin and click Activate to get started.
- To start using the plugin, you need to authorize the connection between WooCommerce and Keap.
- Visit the Keap Integration for WooCommerce Setup Guide to connect, authorize and do the initial setup for this CRM integration for the Integration with Keap for WooCommerce plugin.
Initial Setup of Keap CRM and WooCommerce Integration
↑ Back to topBelow is the setup guide to connect, authorize and do the initial setup for this Infusion CRM. This step will walk you through the complete setup process- installation, authentication, and initial setup steps.
- Install and activate the keap integrations plugin on your dashboard. The following tab will appear once you open the settings.
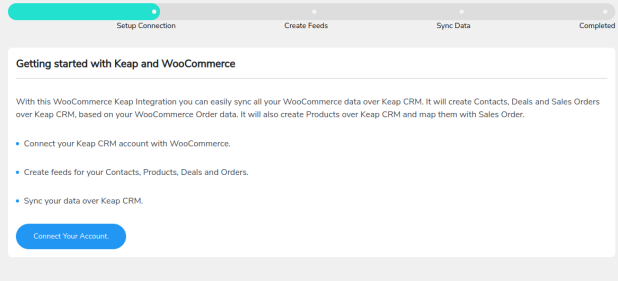
- Click on the Connect Your Account button to open the API credentials form, as shown below. You need to enter the Client ID and Secret ID in the space provided.
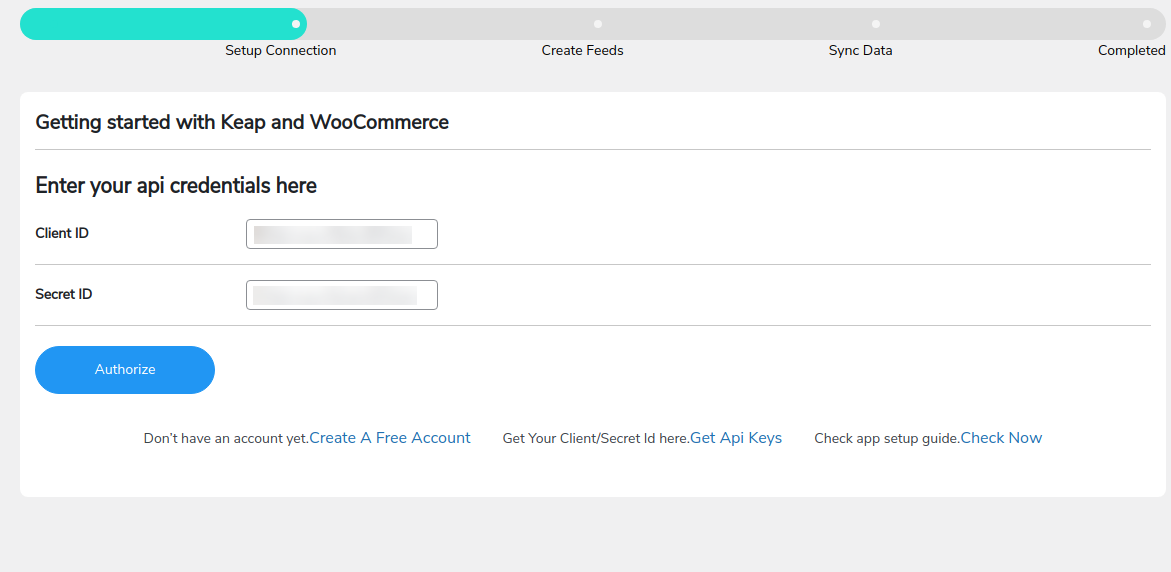
Follow the steps given below to get these details:
- Click on the Get APIs keys link.
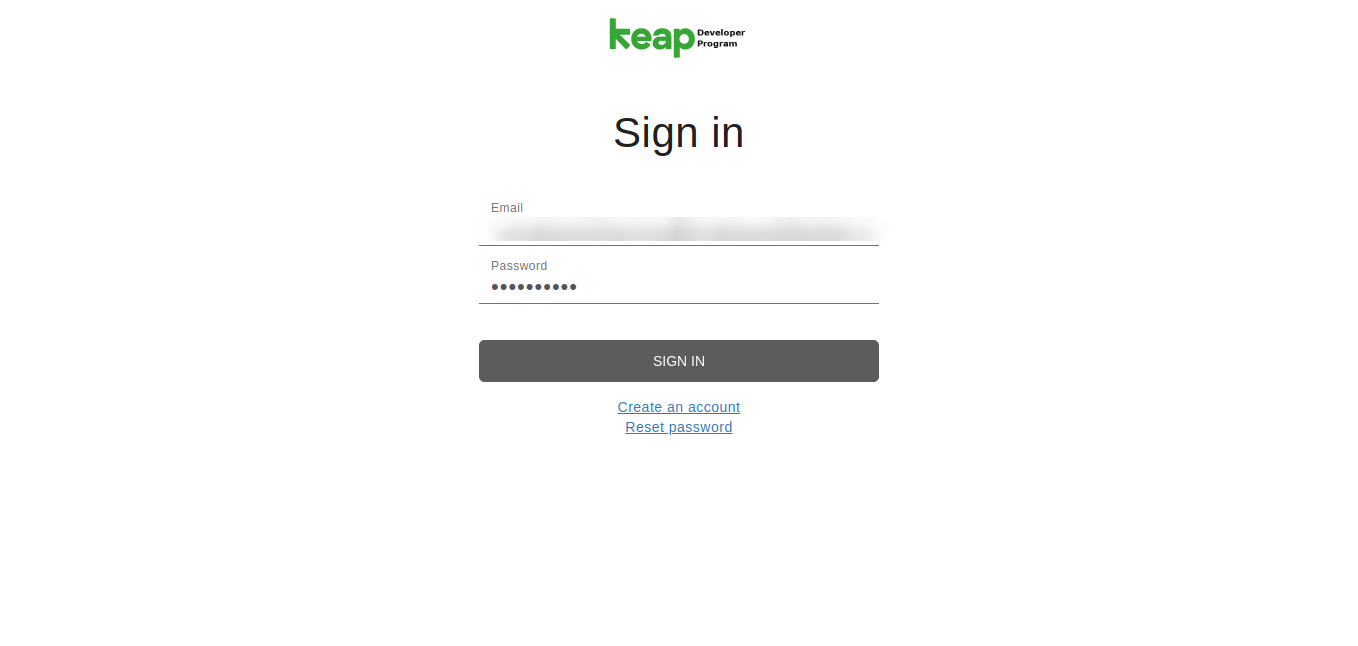
- Click on Sign In and enter your login credentials (for the developer account) to sign in to the Keep Infusionsoft dashboard.
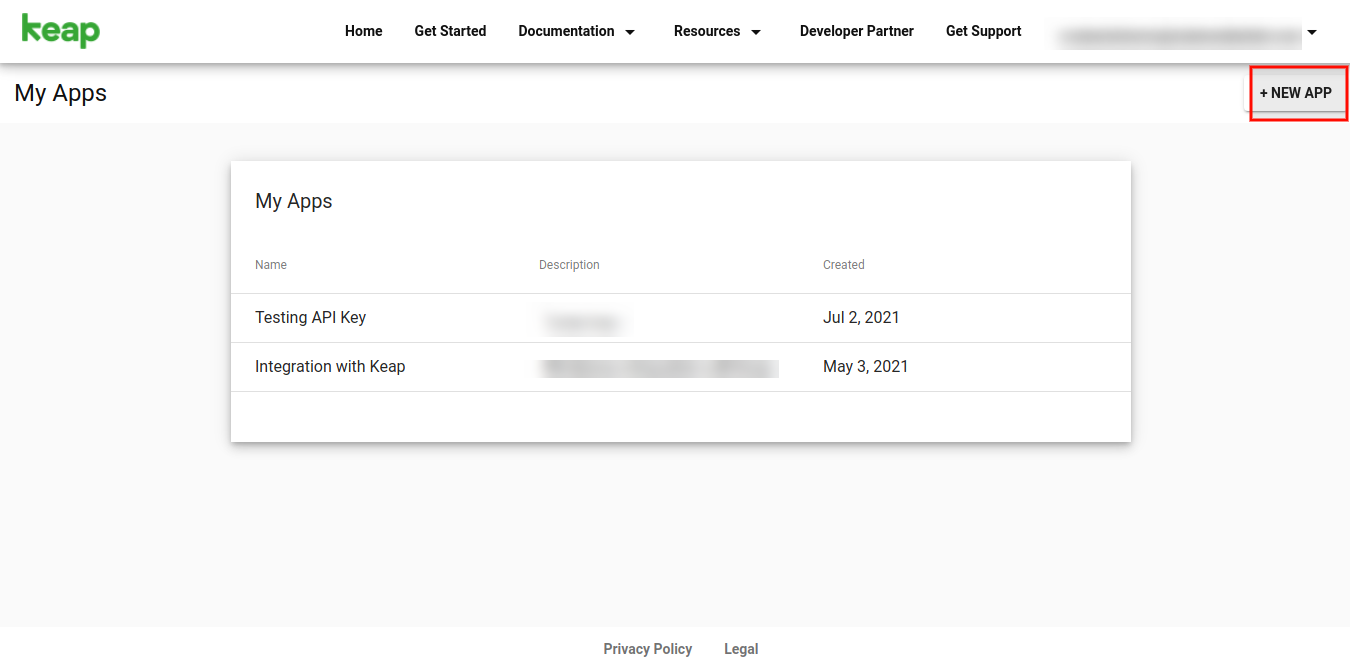
3. Now click on the dropdown menu below your user id in the top right corner to select Apps.

4. In the new window, click on the +NEW APP.
5. Enter the App Name, Description, and App ID. Click on Enable. Click on Save. You will get the needed API keys now. Copy the Key for the Client ID, and copy the secret ID. Fill in these credentials in the backend of your WooCommerce store as shown in step 2.
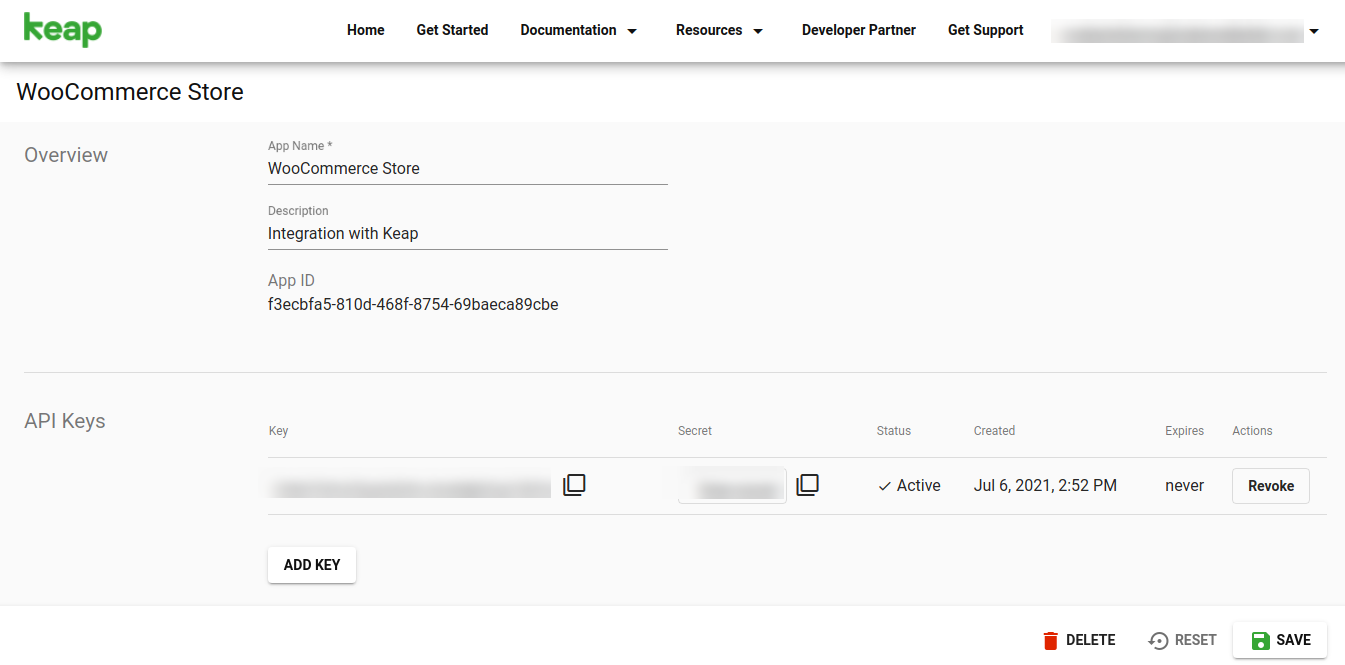
6. Click on the Authorize button.
7. Now, click on Move to Next Step.
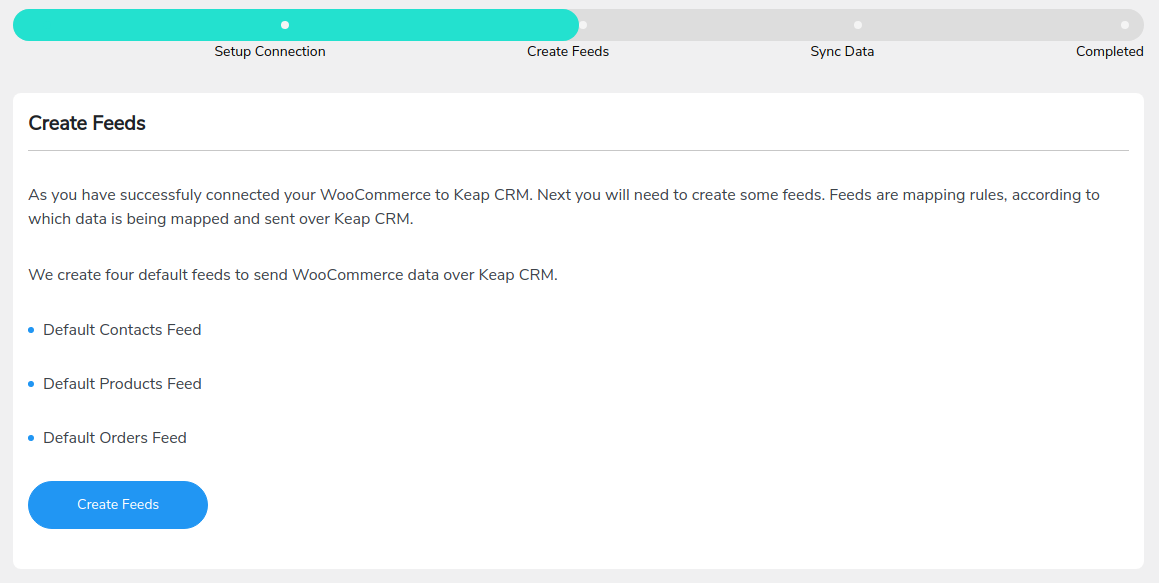
8. Click on Create Feeds. Then, click on Move to Next Step.
Data Synchronization Process
Important: The prerequisite for synchronizing your order’s data is synced Products. Therefore, make sure your products are synced once the setup is complete.
For WooCommerce Stores With a Limited Number of Orders:
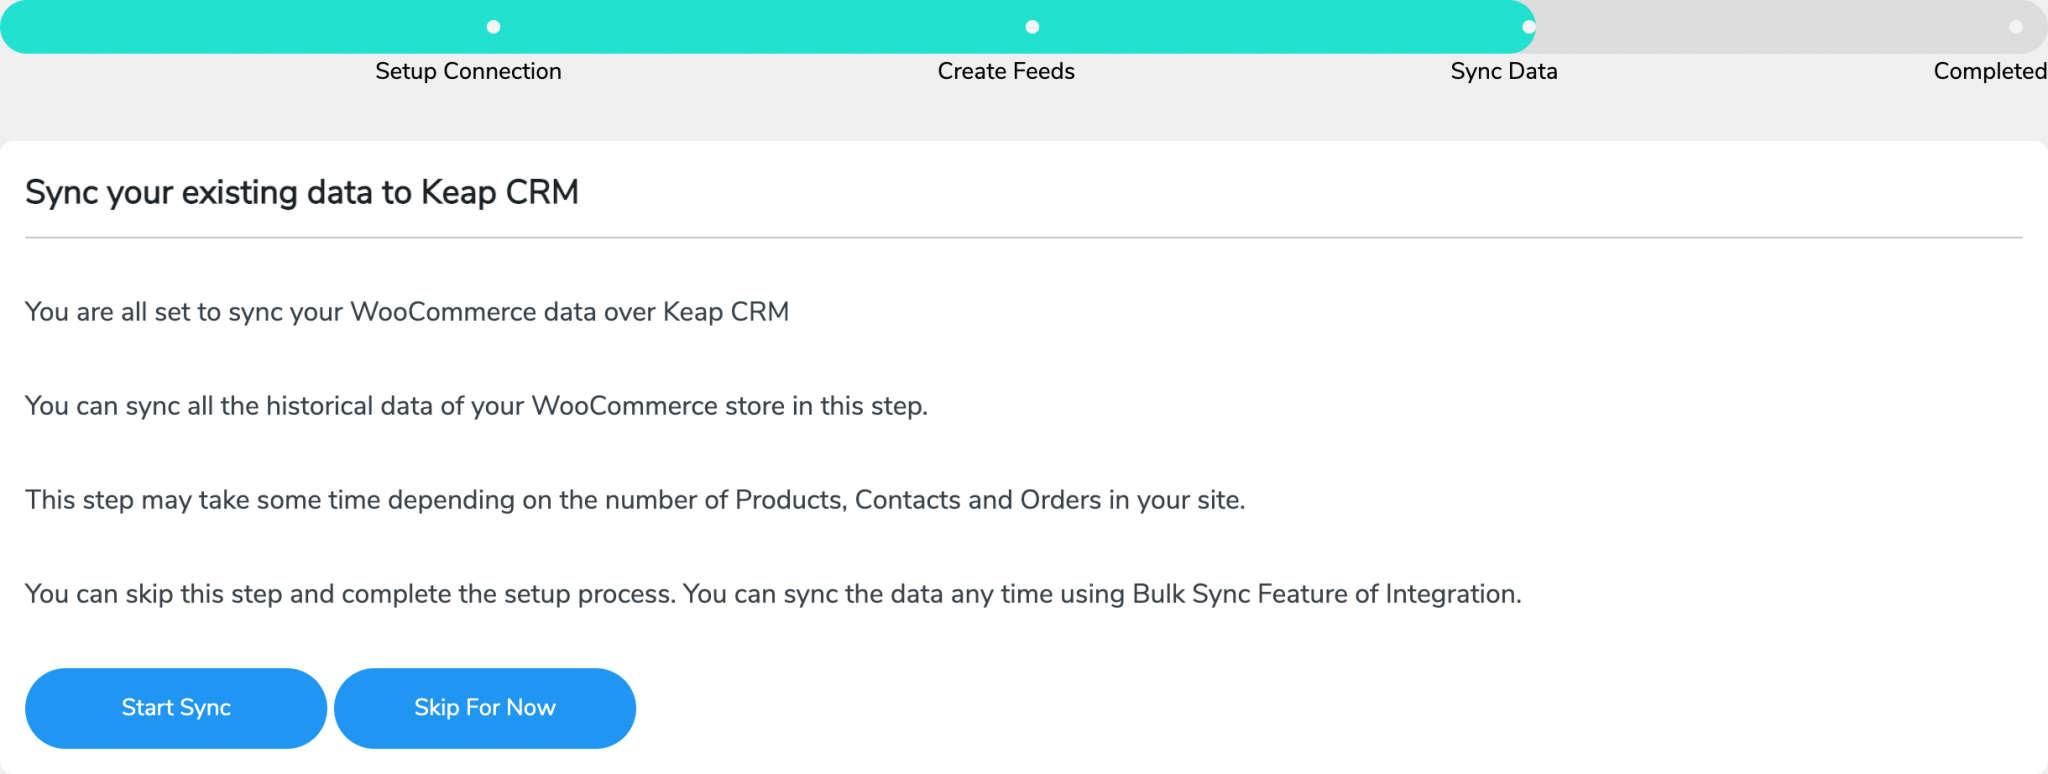
10. Click on Sync Data to sync your existing product, contacts, and orders data using the respective feeds in CRM keap. However, if you have a large number of Products, Contacts, and Orders the sync may take time. In that case, click on the Skip For Now button.
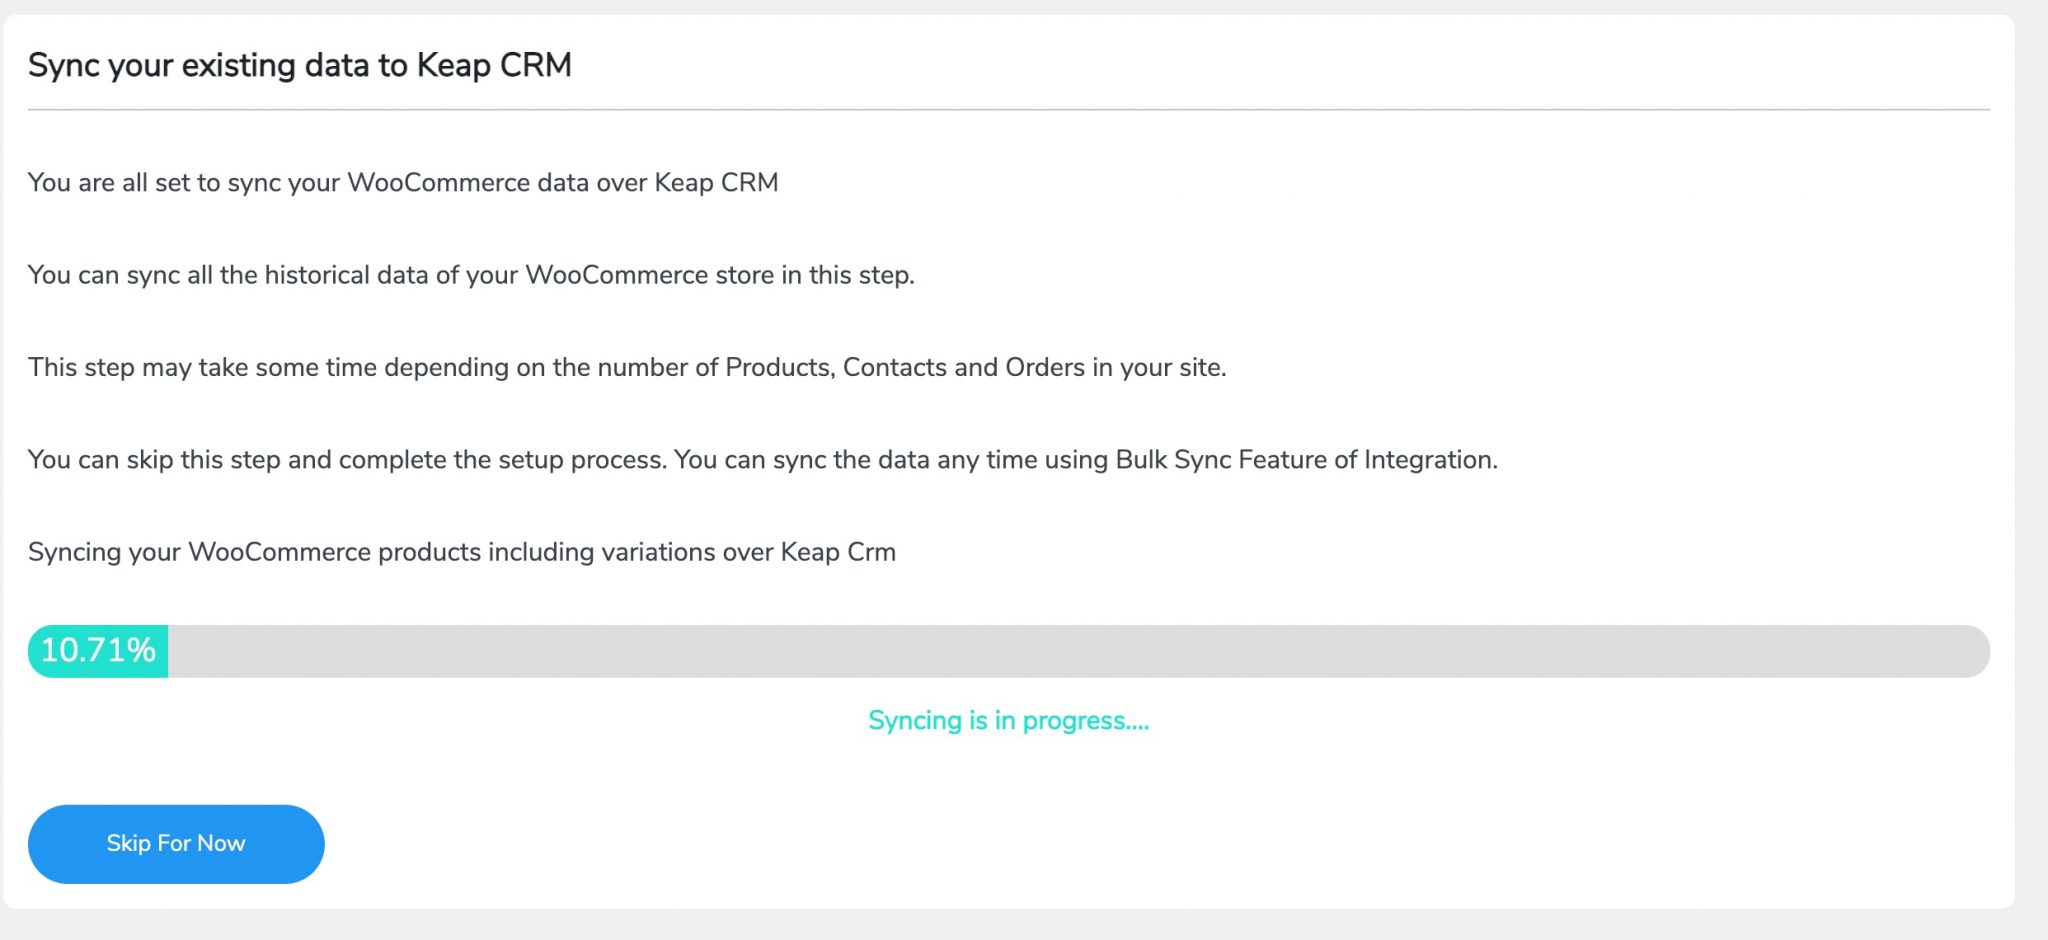
11. You will see your WooCommerce Products syncing first.
12. The Keap Woo integration plugin will then sync your WooCommerce contacts data with the Keap panel
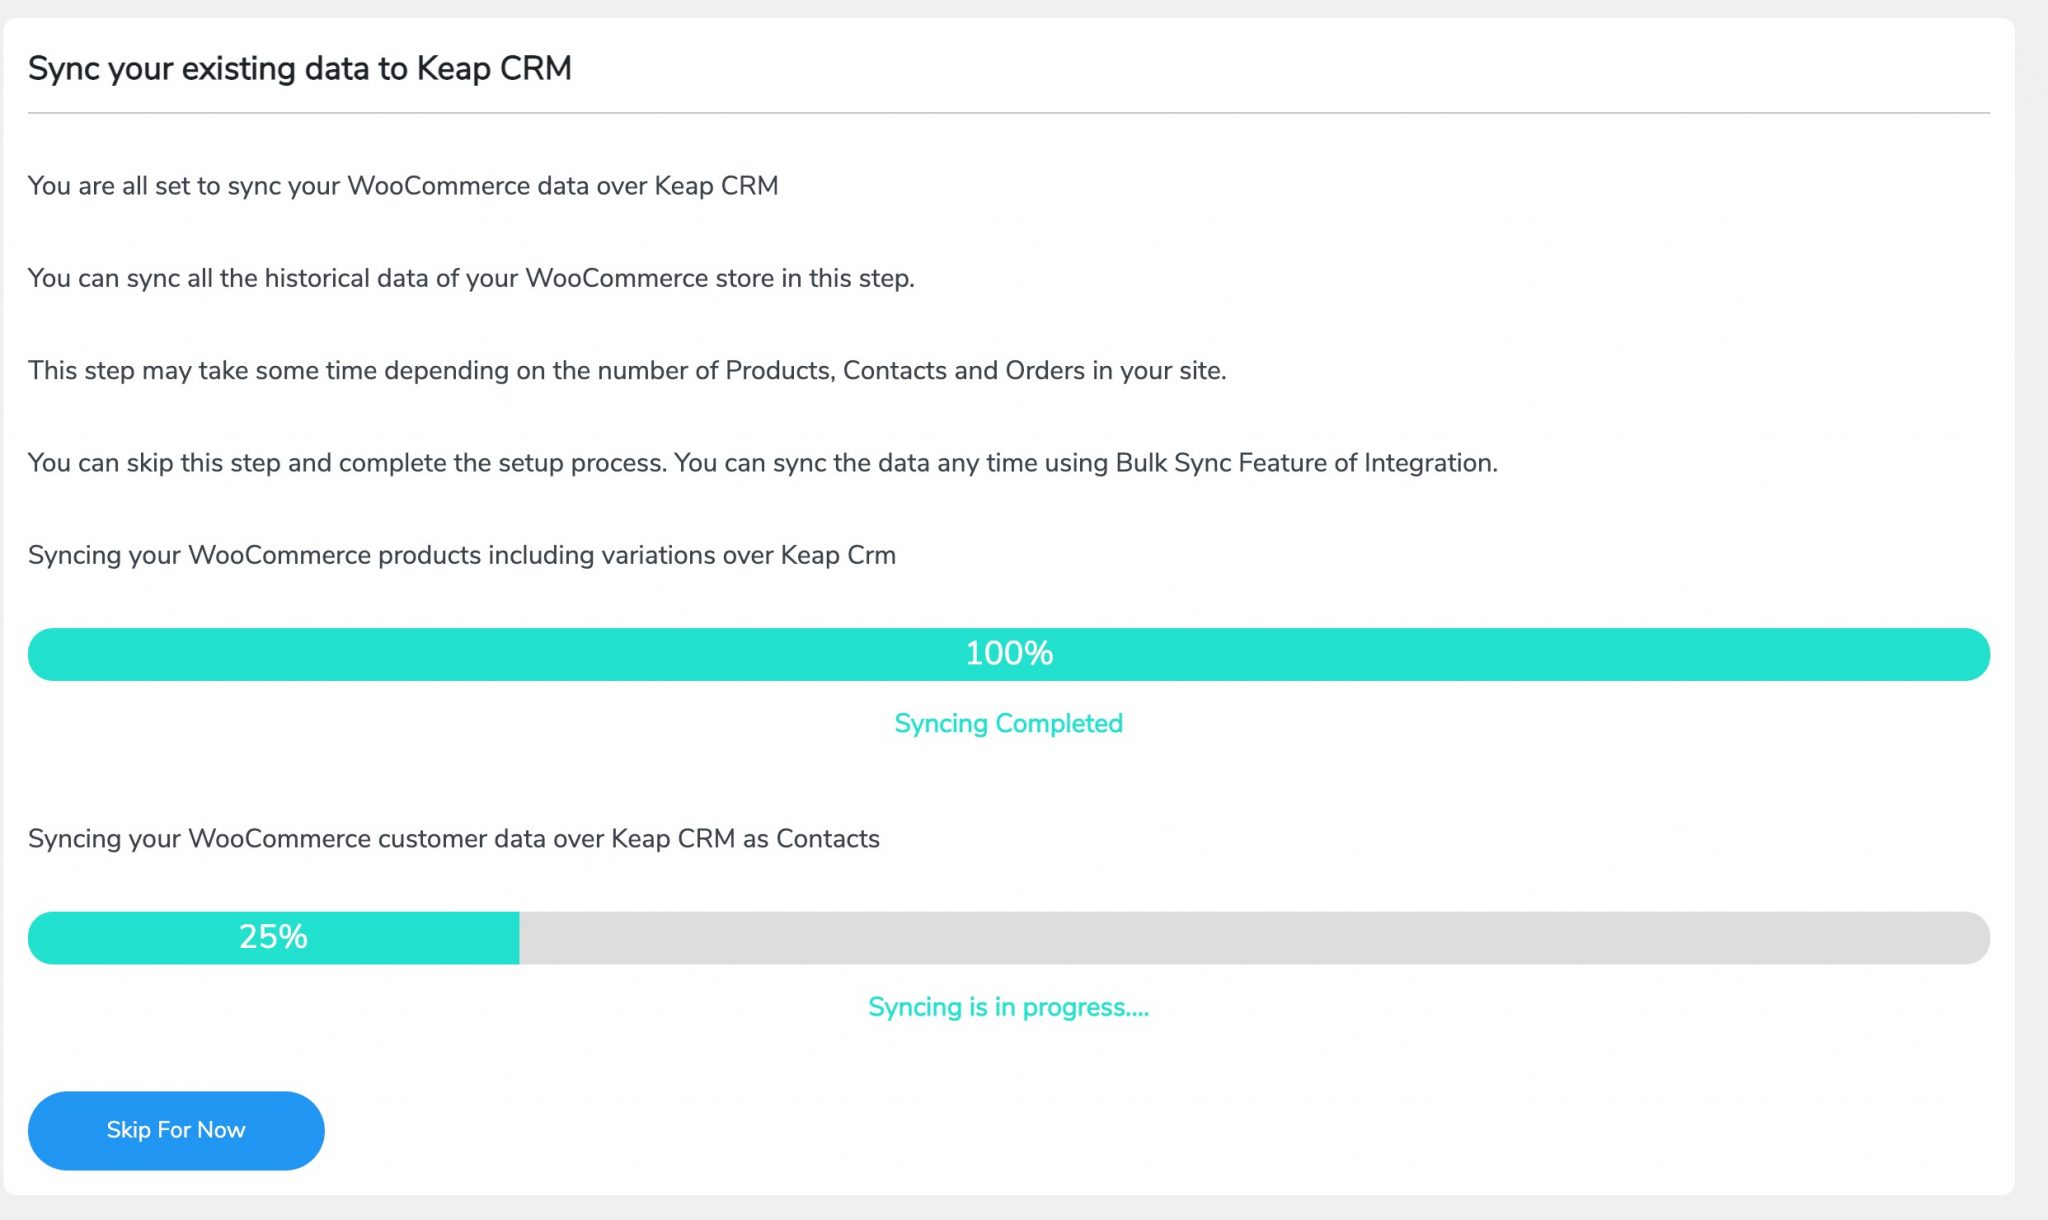
13. Lastly, all your WooCommerce orders will be synchronized.
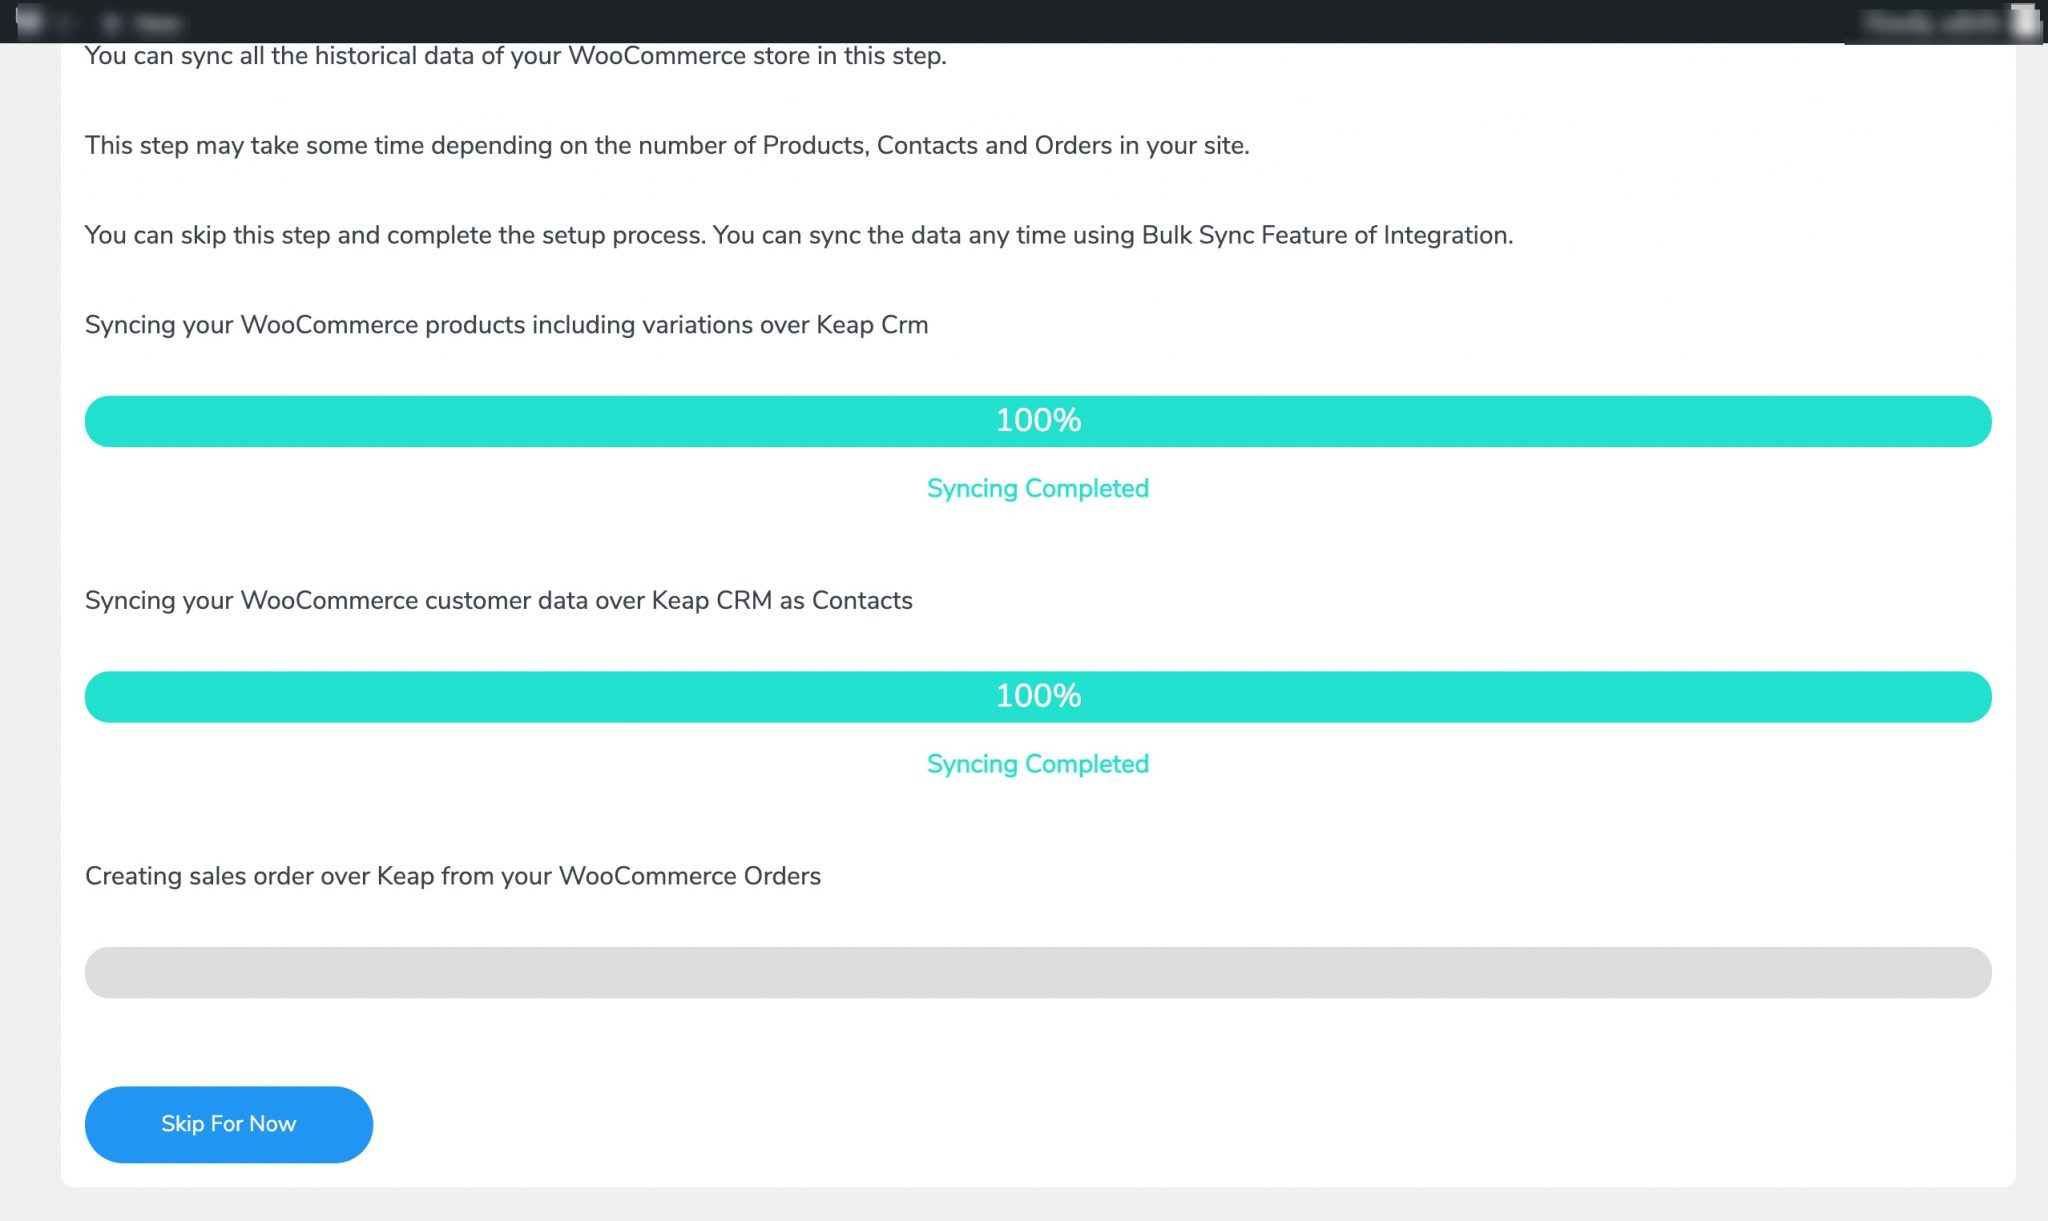
14. If you think that your products, contacts, and orders might take longer than your expected time, you can click on the Skip For Now button at any moment and continue to view your dashboard.
For WooCommerce Stores With a Large Number of Orders
15. When you click on the Start Sync button you will be prompted with a dialog box seeking permission to either Initiate Sync or Skip Sync. As data sync over Keap CRM is a time taking process, we recommend you click on the Skip button.
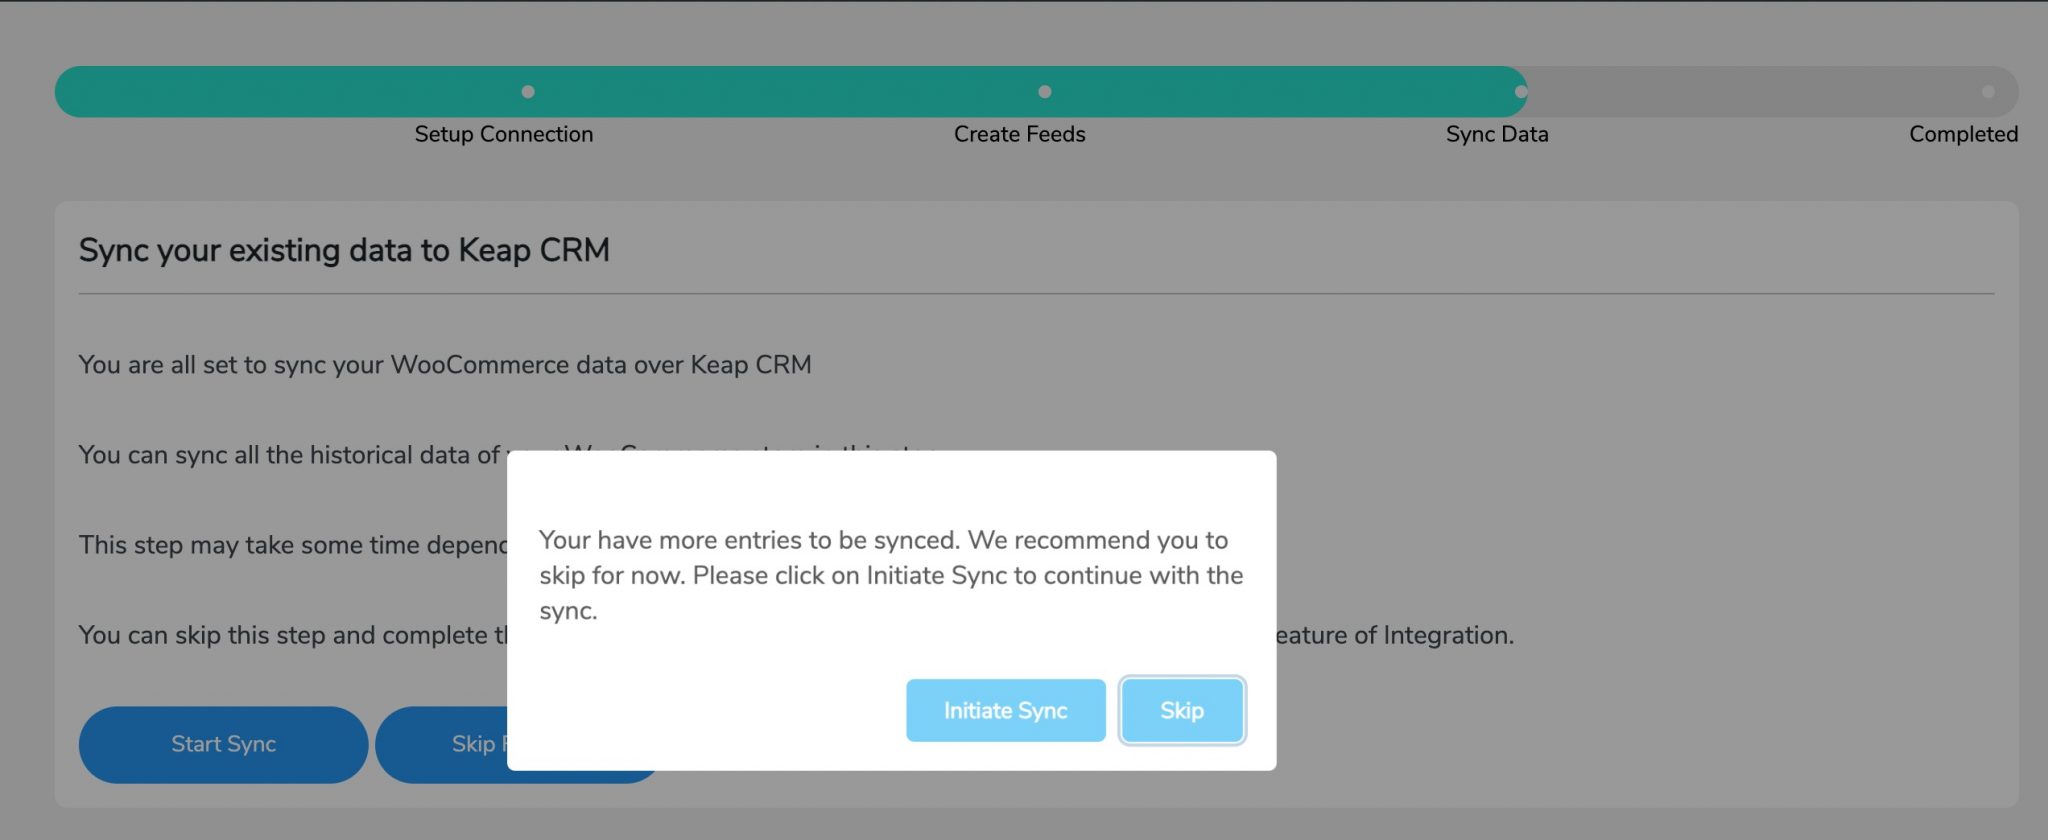
16. If you Initiate Sync, only your products will be synced. If you Skip this step, you can right away go to your dashboard. However, it is mandatory to synchronize the products firsthand for the smooth functioning of the WooCommerce integration plugin after your setup.
[If you miss the product and contact synchronization, your product ID and contact ID will go missing during order sync. Therefore, it is advised to synchronize products mandatorily]
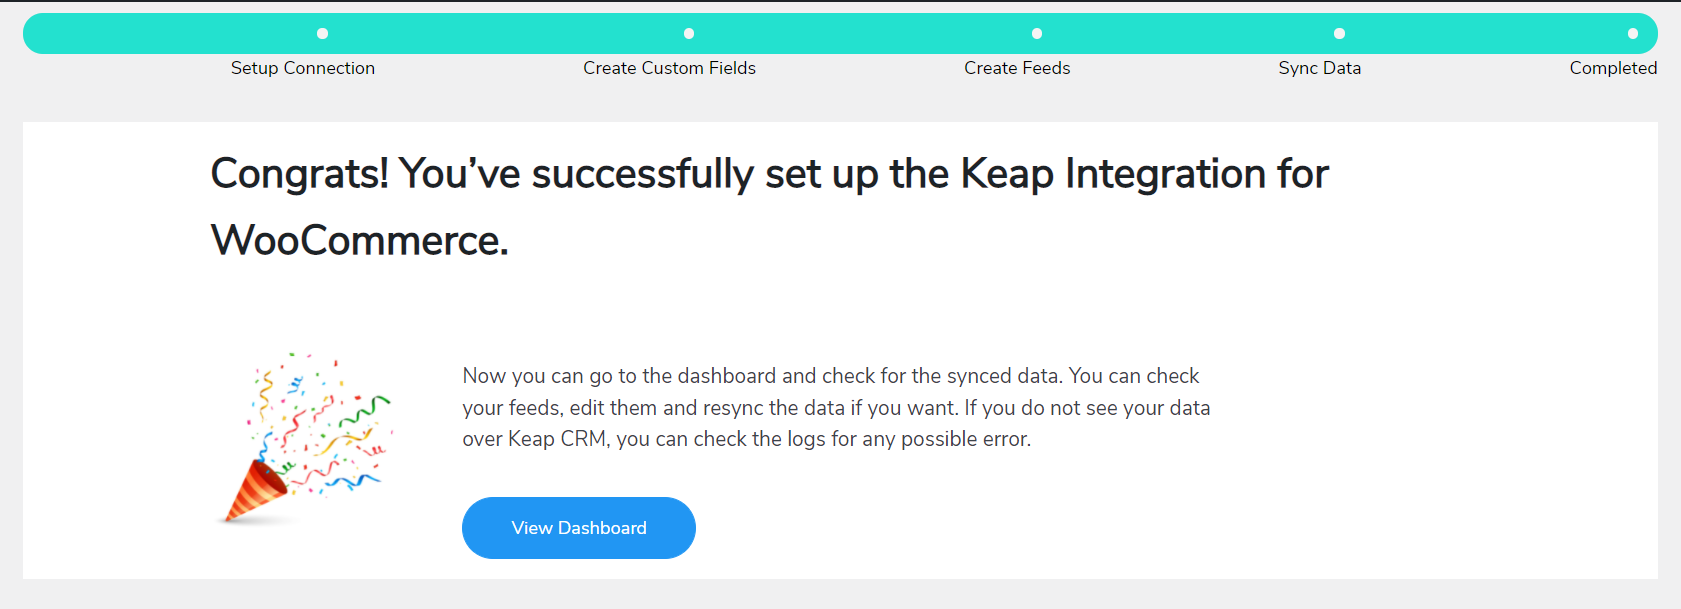
17. Click on View Dashboard to start using your Keap integrations plugin.
Dashboard
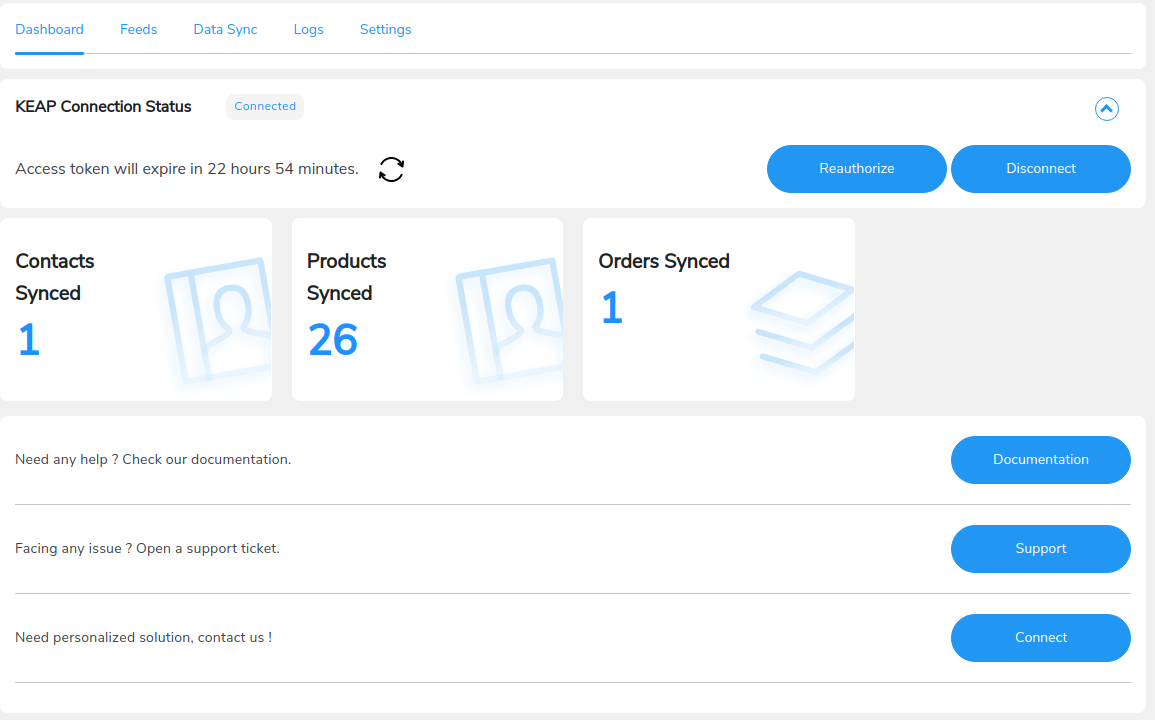
↑ Back to top1. You can view the contacts, products, and orders that are successfully synchronized over Keap on the dashboard.
2. To re-establish the connection with the Keap CRM App, click on the Reauthorize button.
3. To disconnect the Keap integration plugin with your Infusionsoft CRM, click on the Disconnect button.
Feeds
↑ Back to top1. Feeds allow you to create a set of rules to define how to integrate WooCommerce data over Keap CRM. There are 3 different default feeds provided with the integration for Keap for WooCommerce plugin, namely,
a. Default Products Feed
b. Default Contacts Feed
c. Default Sales Order Feed
a. Contact Feed:-
1. Billing Country
2. Billing Address 1
3. Billing Address 2
4. Billing City
5. Billing Postal
6. Billing State
7. Billing Zip
8. Email
9. Phone
10. First Name
11. Last Name
b. Sales Order Feed:-
1. Country Code
2. First Name
3. Last Name
4. Billing Address 1
5. Billing Address 2
6. Billing City
7. Phone
8. Billing State
9. Billing Postal Code
10. Email
11. Status
12. Total
13. Order Title
c. Product Feed:-
1. Product Description
2. Product Name
3. Product Price
4. Short Description
5. SKU
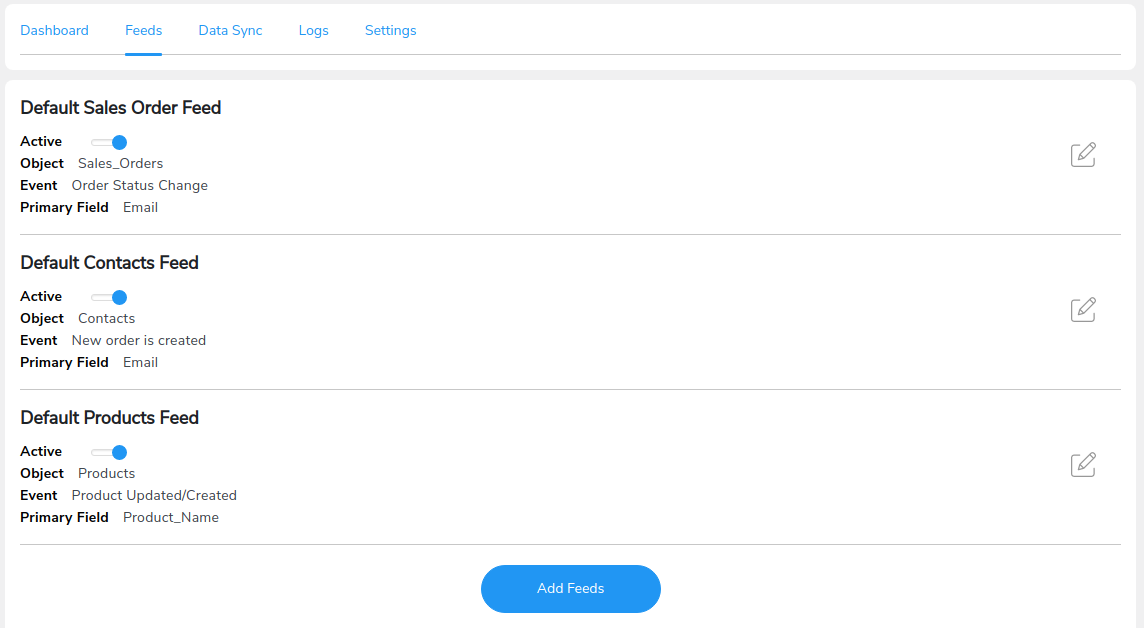
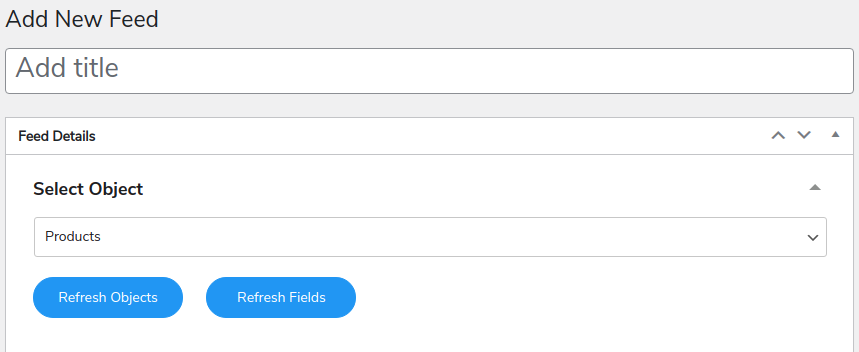
2. To add a new feed using WooCommerce objects, click on the Add Feeds button. Add the title of the new feed in the space provided.
- Select Object: Select the WooCommerce object that you mean to sync your data for, over Keap CRM.
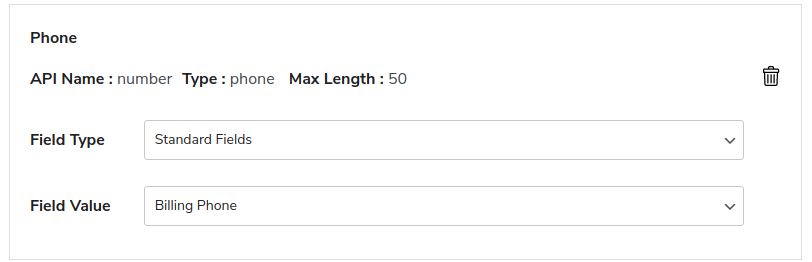
- Map Fields: This setting helps you map a field to the value it will contain. For example, you can map an Account feed with a First Name field to make sure the Account feed will store the first name value.
You can map fields using 1. Custom Value, and 2. Standard Value
- For Standard Value, you can directly select the Keap object field you want to sync your WooCommerce field with.
- For Custom Value, use the placeholders from the dropdown menu to create a custom entry for any Salesforce object field.
For example, if you want to sync “WooCommerce_Account_xyz@gmail.com” from your WooCommerce orders to the ‘Name’ field in your Accounts object in your Keap dashboard.
Select the placeholder for ‘{shop_order__billing_email}’ after entering your desired string (‘WooCommerce_Account_’ in this example) . Similarly, you can customize values for any object field.
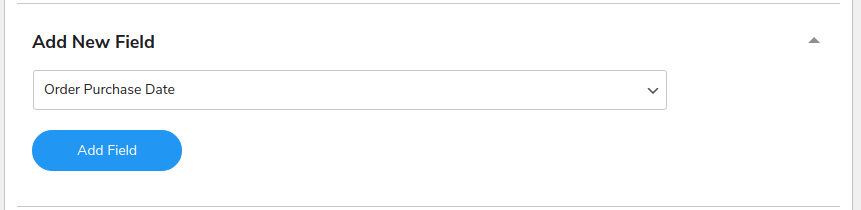
- Add New Field: Using this setting in the Keap integration plugin, you can add a new field in a given feed. It will allow you to add that field to the corresponding feed.
- Lead Source: This setting will help you to add the source. You can add a source by which the lead is reaching your site.

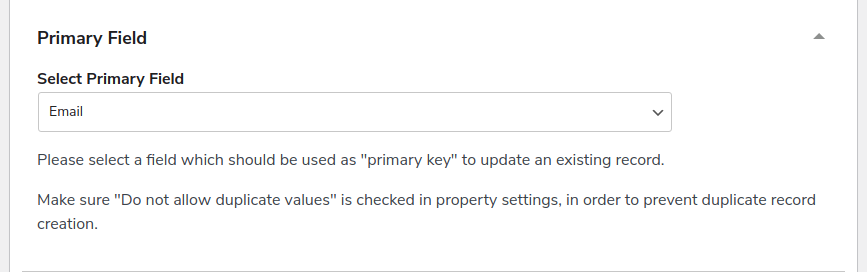
- Primary Field: Select the primary key to update the record using this setting.
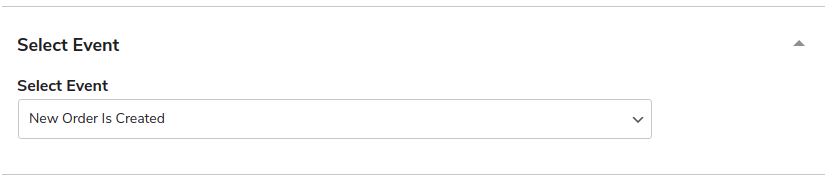
- Select Event: The event that you select here will trigger the data synchronization for the particular field.
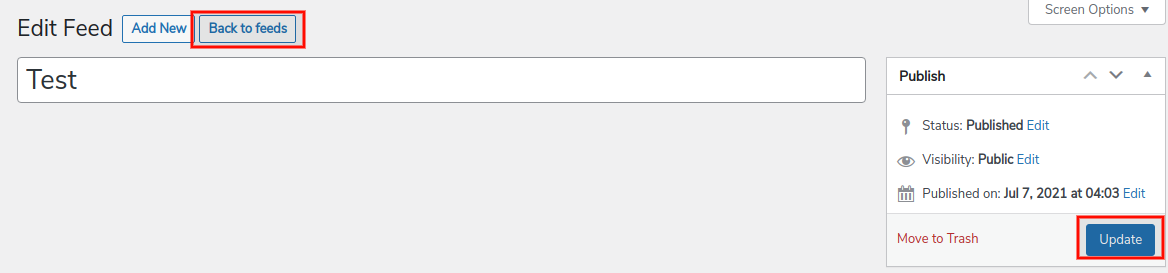
3. Click on the Publish/ Update button in the right panel. Click on Back to Feeds to go back to your Keap CRM dashboard.
Data Sync
↑ Back to topThere are two settings for Data Sync- Bulk Data Sync or One-Click Sync.
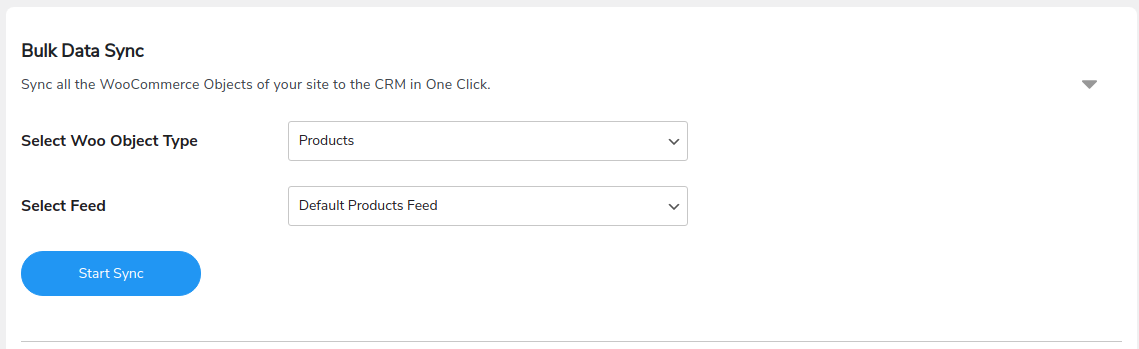
- Bulk Data Sync:
This setting allows you to synchronize all the data at once, including historical data for a particular feed.
Select Woo Object Type from the given dropdown menu.
Select Feed- either a default feed or a newly added feed. Click on the Start Sync button to start syncing.
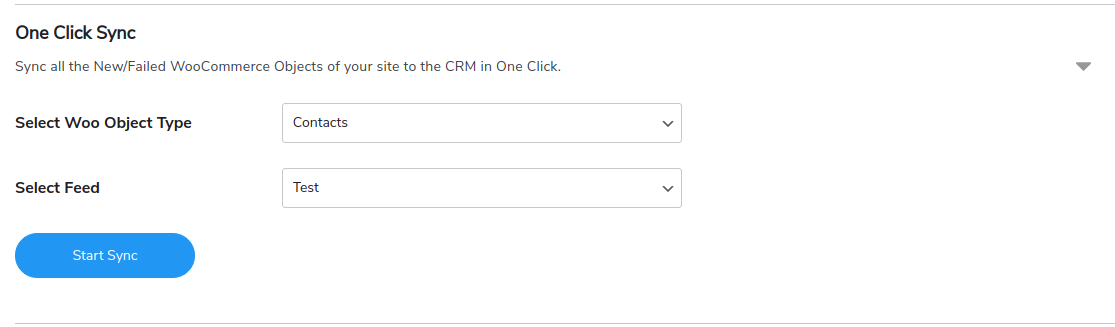
- One-Click Sync:
Using this setting, you can save your time by syncing only the new or failed objects.
Select Woo Object Type from the given dropdown menu.
Select Feed- either a default feed or a newly added feed. Click on the Start Sync button to start syncing.
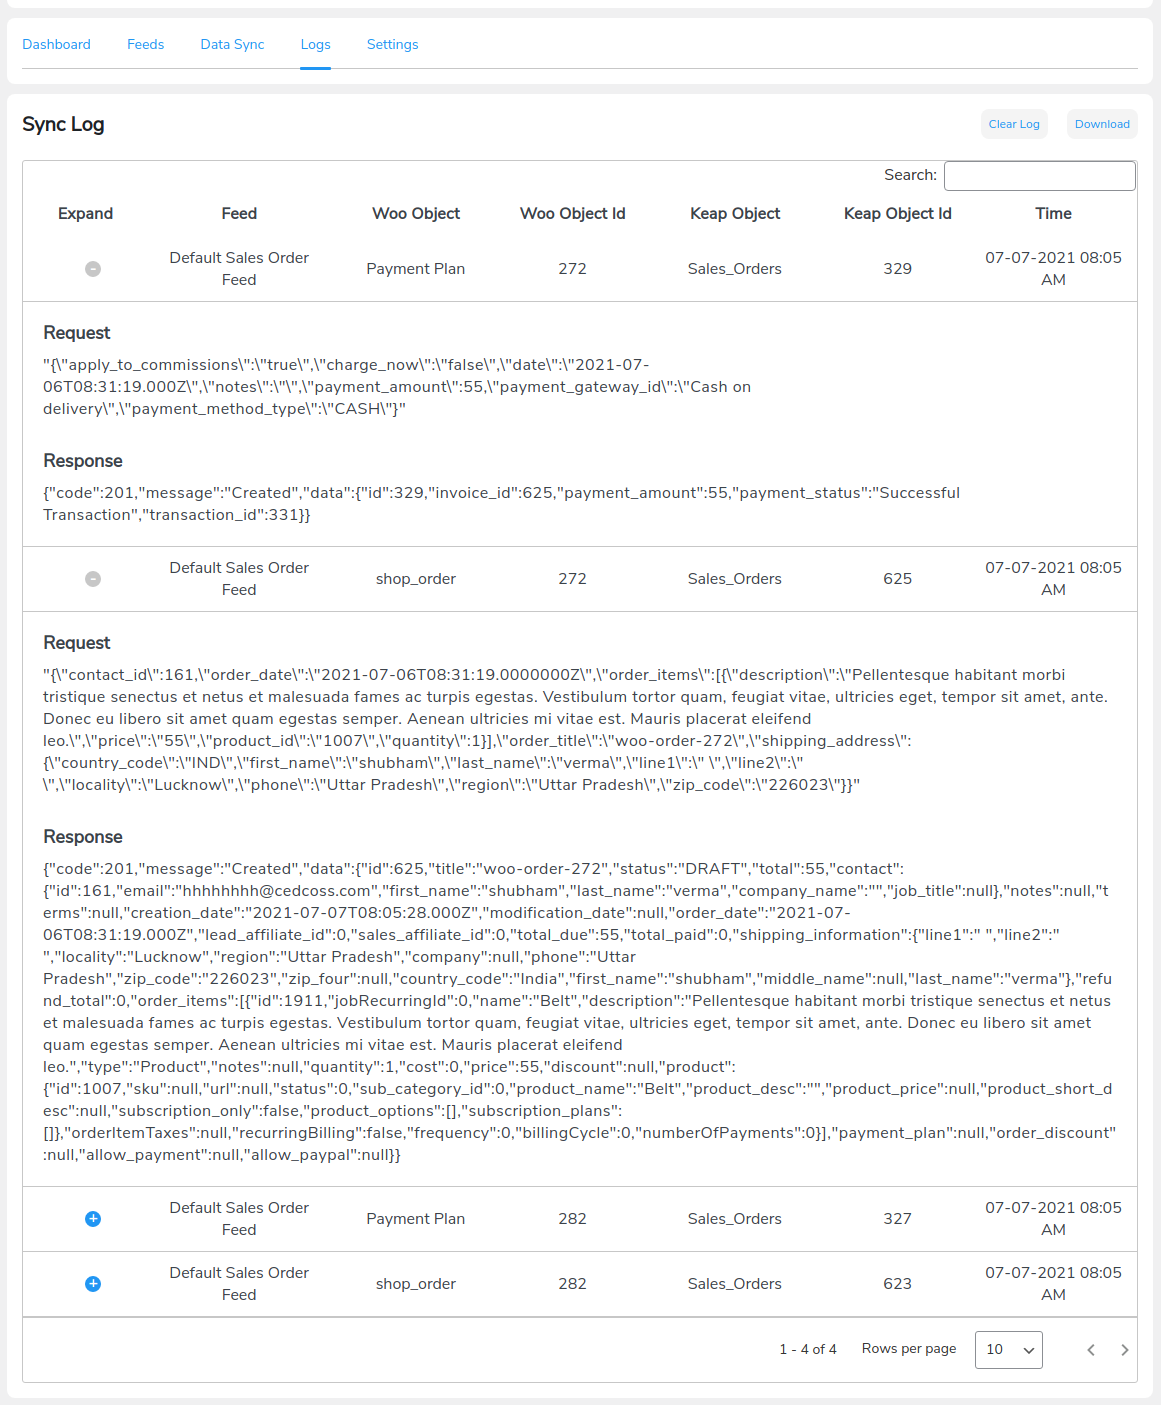
Logs
↑ Back to topUsing data sync logs, you can easily spot errors in synchronization. Each log mentions the following details:
- Feed: Under this head, you will be able to find the feed for which the respective data was synced.
- Woo Object: You can view the WooCommerce object for the corresponding log.
- Woo Object ID: This field displays the ID of the respective WooCommerce object.
- Keap Object: View the synced Keap object for the corresponding log.
- Keap Object ID: This field displays the ID of the respective Keap object
Tags
↑ Back to top- To start syncing the tags, switch on the toggle button for Enable Tag sync. This is a mandatory setting to sync any tags over the Keap CRM.
- If you want to avoid syncing tags manually for your product updates, turn on the toggle switch for Enable Tag on instant sync. Please note that your tags will still sync without this setting manually.
- To sync your ‘products bought’ tags, turn on the toggle switch for Enable Products Bought Tags.
- To sync your ‘product SKUs’ tags, turn on the toggle switch for Enable Products SKUs Tags.
- To sync your ‘product type’ tags, turn on the toggle switch for Enable Products Type Tags.
- To sync your ‘order statuses’ tags, turn on the toggle switch for Enable Order Statuses Tags
- Click on the Save button.

Settings
↑ Back to top1. Switch on the toggle button to Enable instant sync of your WooCommerce data over the Keap CRM dashboard.
2. Use the toggle switch to Disable/ Enable logging.
3. Enter the number of days in which you want to delete your log in the space provided for Delete log after x days.
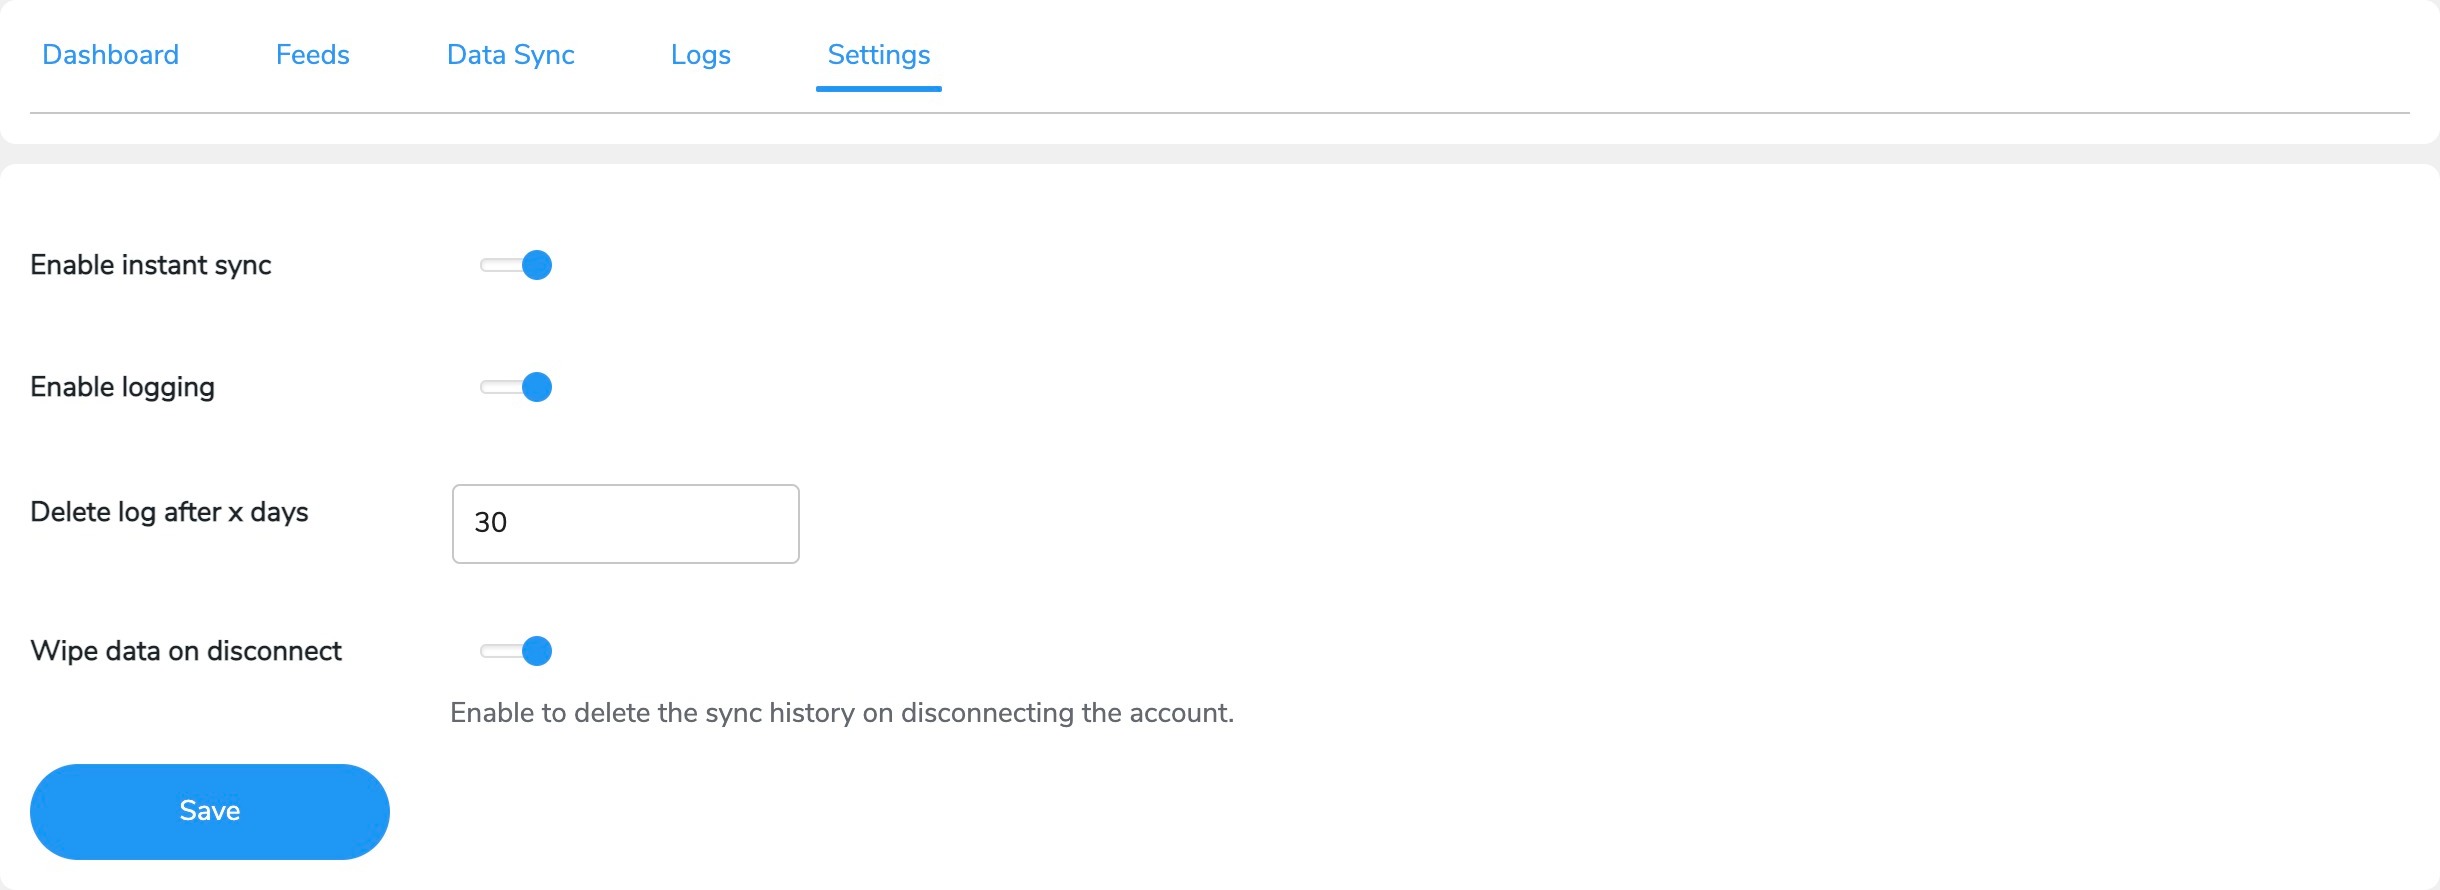
4. Wipe Data on Disconnect: Enabling this toggle in the Settings tab will erase all the sync history once you disconnect the integration with your Keap CRM.
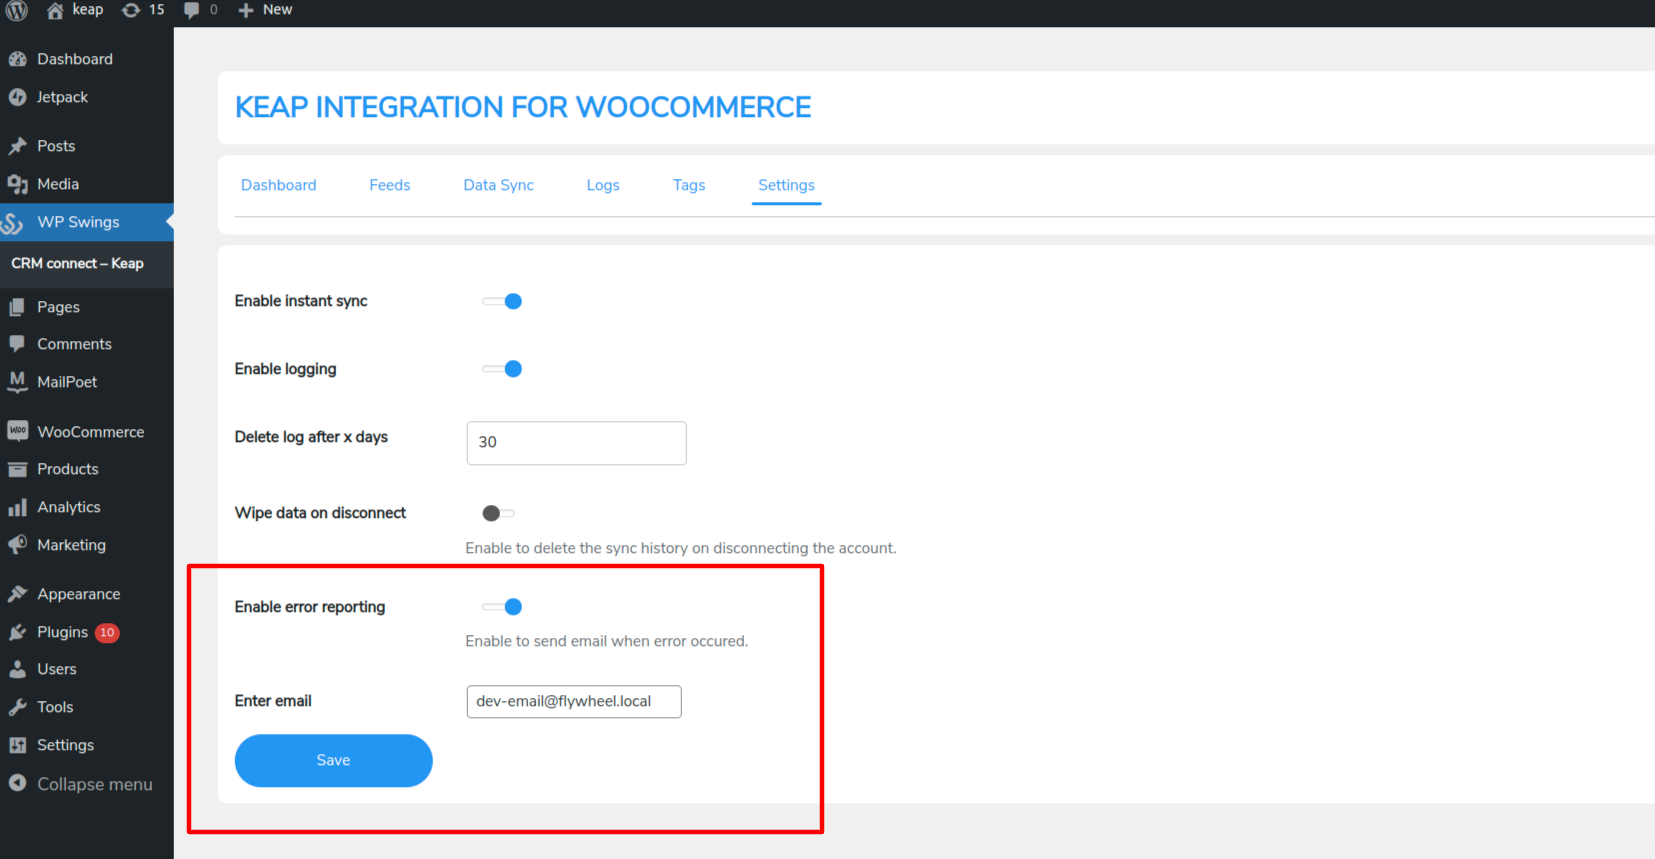
5. Enable Error Reporting: Enabling this feature in the Settings tab will let the admins receive emails for any errors while adding a new product for syncing.
6. Enter email: The admin can enter the email ID in this box, on which he wished to receive the mentioned error reporting emails.
Stop Failed orders syncing to Keap
↑ Back to topThe failed order status in the Keap WooCommerce integration plugin will be shown when a customer has placed an order but due to payment failure or wrong details, the order gets failed or canceled.
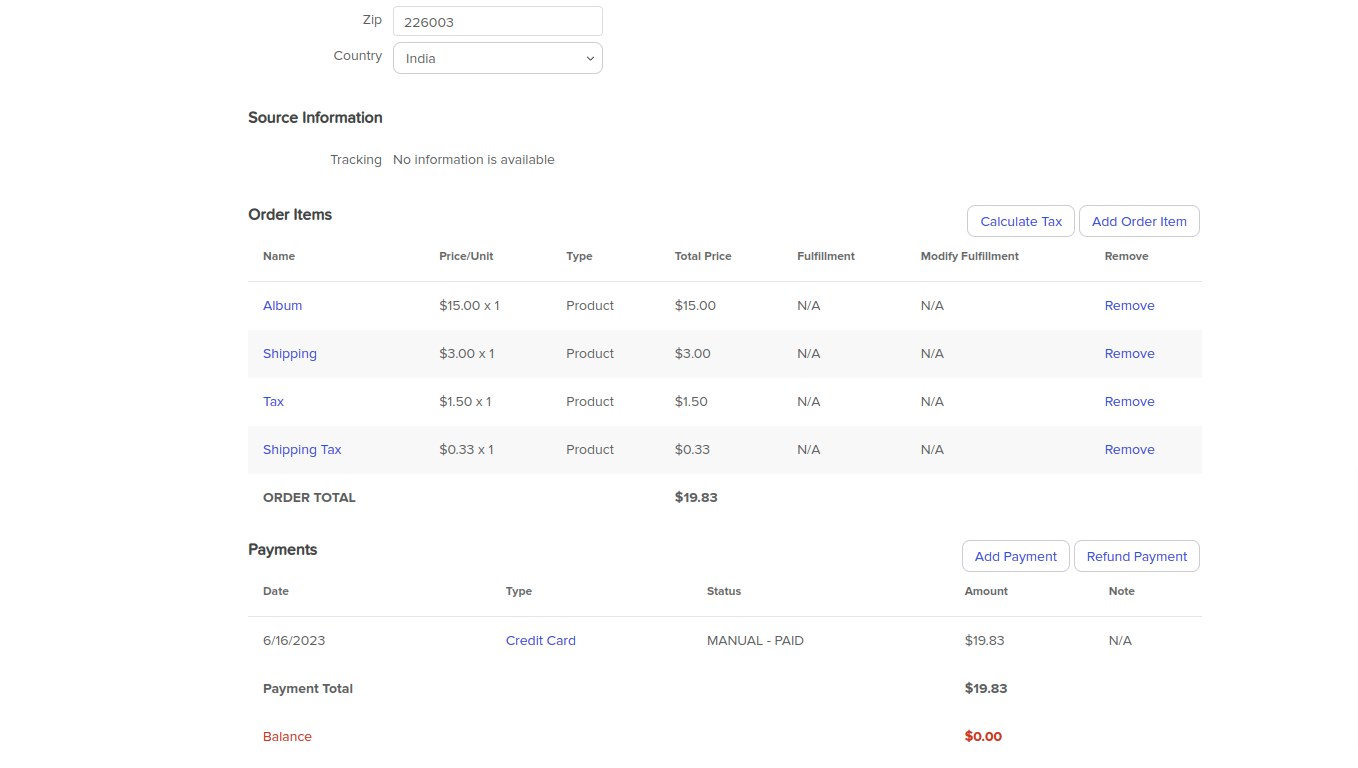
Shipping and Tax Syncing
↑ Back to topWith this feature for Keap integration for Woo plugin, admins will now be in a position to sync their Shipping, Shipping tax, and Taxes with different order items.
↑ Back to top
↑ Back to top
FAQs
↑ Back to topQ1. Can this plugin help in creating invoices?
This CRM WooCommerce plugin will help in creating Customers, Items, and Invoices over Keap.
Q2. Can we sync the data with this plugin?
Yes, we have given two options for this: Bulk sync and One-click Sync which you can choose according to your need.
Q3. What is the difference between Bulk sync and One-click Sync?
a. Bulk Sync: Syncs all the data of a particular object.
b. One-click Sync: Syncs only the newly added data or the one that failed to sync earlier.
Q4. I don’t want to sync all the data automatically, what options can we opt for?
We have given the option of Manually syncing data in Keap integrations so that you can choose the manual option too.
Q5. Can we check sync error logs with this plugin?
Yes, there is an option in the backend where you can check all your logs.
Q6. Can the logs be deleted automatically after some days?
Yes, you can set the number of days you want to store the logs. They’ll be deleted after the set days.
Q7. We want to delete some data from the plugin, is this possible?
Yes, with this plugin you can delete plugin data as you want.