
1.Overview
1.1. Features
- Hassle-free integration plugin to integrate CF7 with Mautic account.
- Easy mapping of form fields with Mautic modules.
- Filter CF7 submissions as per feeds.
- Detailed logs with data sync details
- Delete logs after n days
- Clear and download logs
- Error email notification
- Delete plugin data when uninstalling the plugin
2.Install & Activate MWB CF7 Integration with Mautic Plugin
Important: Please make sure that your Contact Form 7 plugin is installed and activated before you proceed with the installation and activation process for the MWB CF7 Integration with Mautic plugin.
To install this Mautic CF7 integration plugin, you can opt for either of the following ways:
2.1. Automatic Installation
To automatically install the integration plugin, follow the steps below –
- Login to your WordPress dashboard > navigate to the sidebar from the admin panel.
- Go to Plugins > Add New.
- Go to the search bar & browse for “MWB CF7 Integration with Mautic”.
- Find the plugin & click on “Install Now”.
When the plugin is installed, click on “Activate” to enable the plugin.
2.2. Manual Installation
Manual installation includes uploading the downloaded plugin file to the web server via your favorite FTP application. If you already have the .zip file of the plugin, please proceed with the installation process else, download the free plugin from WordPress.org before you move ahead.
- Go to the WordPress admin panel > Plugins > Add New > Upload Plugin.
- Click on the Choose Plugin option and select the downloaded .zip file of the MWB CF7 Mautic integration plugin.
- Click on the “Install Now”.
- Go to Plugins > Installed Plugins > MWB CF7 Integration with Mautic. Click on “Activate” to enable the plugin.
Note: Once the plugin is installed and activated, you can find it under the “Contact” menu in your WordPress dashboard’s sidebar as “Mautic”.
3.Authorize Connection
3.1.Basic Authentication Setup
To proceed with this authentication type, follow the steps below –

- Select the Authentication Type as “Basic” from the drop-down menu.
- Add your Username, Password, and Mautic URL.
- Click on the “Authorize” button.
Note: For the Basic authentication type, you don’t need to enable the API credentials over your Mautic account.
3.2.OAuth2 Authentication Setup
To connect the contact form 7 integration plugin with your Mautic account via the OAuth2 Authentication type, make sure to enable the API settings over your Mautic account as you’ll be needing the API client_id and client_secret_key to authenticate the connection. To proceed with this authentication type, follow the steps below –
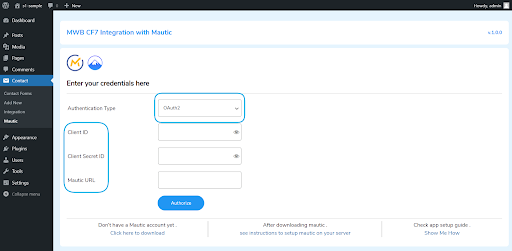
- Select the Authentication Type as “OAuth2” from the drop-down menu.
- Add your Client ID, Client Secret ID, and your base Mautic URL.
- Click on the “Authorize” button.
Note: You can acquire your Client ID and Client Secret ID from the API Credentials tab of your Mautic Dashboard Settings menu.
Once your authentication will be successfully completed, you’ll be notified to proceed ahead.
4.Workflow
The successful authentication of connection ensures you the safe route for the exchange of requests between the CF7 form data and Mautic account modules.
4.1.Dashboard
After your authentication process completes, you’ll be redirected to the dashboard of the MWB CF7 Integration with Mautic plugin. This dashboard includes the following information along with the data sync count –
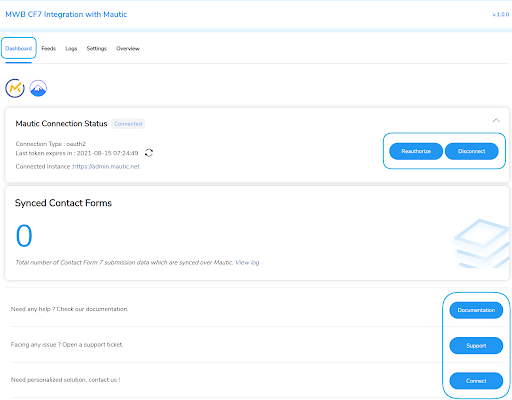
- Mautic Connection Status: This section of the dashboard includes the connection details like connection type, last token expiry period, connected instance, and buttons to re-authorize and disconnect.
- Synced Contact Forms: This section of the CF7 integration with the Mautic plugin dashboard shows the count of total Contact Form 7 forms synced over Mautic and also contains a link to the data sync log tab.
- Documentation, Support, Connect: The last section of the dashboard includes direct links to help you out in your preferred ways, in case of any confusion or problem in understanding the plugin.
4.2.Feeds
Feeds are the association rules that help you to map the particular values from the form data with their specific modules over Mautic. The MWB CF7 Integration with Mautic plugin gives you full access to create Feeds as required.
To create feeds, follow these steps –

- Go to the Contacts > Mautic > Feeds.
- Select the Contact Form 7 form for which you want to create feeds
- Click on the “Add Feeds” button.
4.2.1.Add New Feed
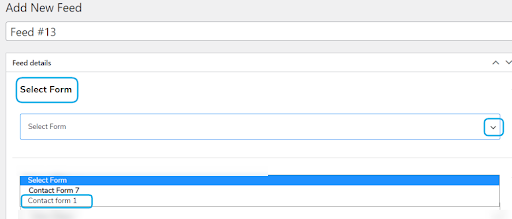
The next step is to add the information like feed name and details and then save the feeds by clicking on the “Publish” button.
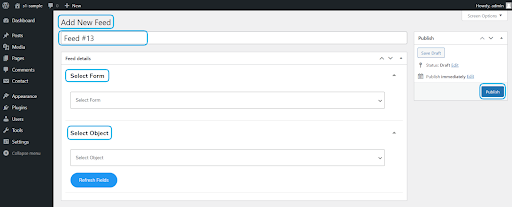
- Select Form: Select the CF7 form from here that you want to sync with your Mautic account. All your active Contact Form 7 forms will appear here in the drop-down menu.
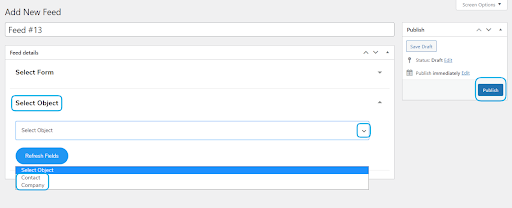
- Select Object: Select the object you want to associate your CF7 form data fields with Mautic fields. This Mautuc CF7 Integration plugin provides 2 objects to select from – Contact and Company.
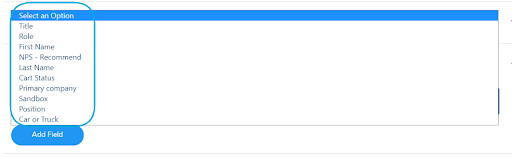
- Add New Field: To map form data fields with Mautic, you need to first add the required fields. You can select the fields from the provided options and click on “Add Field”.
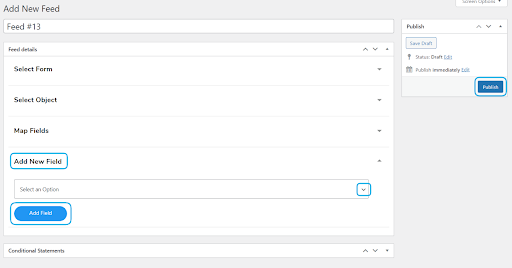
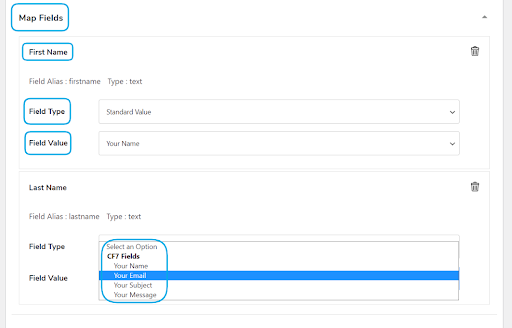
- Map Fields: Once the fields are added in the feed, go to “Map Fields” settings and select the “Field Type” as “Standard Value” or “Custom Value”. Then select the “Field Value” to be mapped from the drop-down menu. Field Value options include the fields from your selected forms.
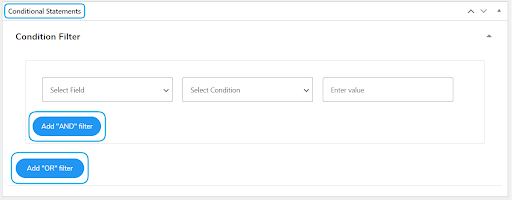
- Conditional Statements: This setting allows you to add AND/OR logic statements to sync form submission data over Mautic only when the condition is fulfilled.
After all the settings are configured, click on “Publish” to create the feed.
4.2.3.Logs
The Logs section displays all the details of every entry/ submission shared with Mautic and the corresponding response from Mautic.
- Go to Dashboard > Contact > Mautic > Logs. The logs page will appear next with the listed details of the Mautic fields and responses from Mautic.
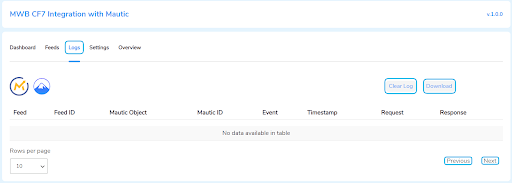
- Clear Log: The admin can clear all the “Mautic Logs” instantly by clicking on the “Clear Log” button.
- Download: The admin can download the log details from the Mautic CF7 integration plugin as a log file by clicking the button “Download”.
4.2.4.Settings
The “Settings” tab includes the enable/disable options for the data logs and other settings like –
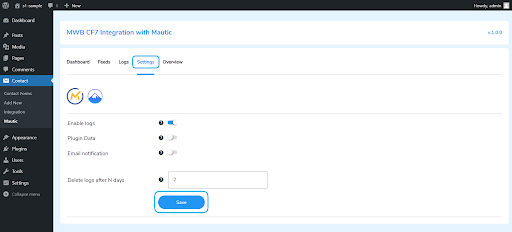
- Enable Logs: To sync all your form data over Mautic, enable this setting by moving the toggle button to right.
- Plugin Data: This setting deletes all your log data if enabled when the MWB CF7 Integration with Mautic plugin is uninstalled or deactivated.
- Email Notification: This setting of the Mautic CF7 integration plugin, if enabled, sends an email to the admin when an error occurs during the data sync process.
- Delete Logs After n Days: Enabling this setting allows the admin to set the number of days after which the logs will automatically be cleared.
Click on “Save”, once all your settings are configured.
5. FAQs
How to integrate Mautic CRM with Contact Form 7 plugin?
You can Integrate Contact form 7 with your Mautic account by simply entering Mautic API credentials to integrate Contact Form 7 with your Mautic accounts. Enabling MWB CF7 Integration With Mautic plugin creates a sub-menu in the name of Mautic on the Contact Form. The admin can sign-up or log in to his Mautic CRM account and connect the CF7 and Mautic CRM.
How to add new feeds using CF7 Integration with Mautic CRM?
With the Mautic CF7 Integration plugin, the admin can link any Contact form 7 field to every available Mautic module field. Any module field like Contacts, Accounts, Leads, Quotes, Deals and Sales integrates perfectly with this plugin. The admin can add as many feeds as he wants. In the same way, the new fields can also be added by Selecting the CF7 Form and Mautic Object. The steps involved are as follows:
Go to Dashboard > Contact > Mautic > Mautic Feeds > Add Feeds
How to Authorize the Connection of Your Mautic Accounts?
The admin needs to have the Mautic account or can directly sign up using the link we have provided in our plugin in the Mautic Account tab and then proceed with selecting between the Production and Sandbox Environment. Then enter the Consumer Key, Consumer Secret & Callback URL after generating it following the instruction shared in a plugin. The instructions can be seen by clicking the plus icon in the top right corner.
What is the use of the conditional statement that is there in the Mautic CF7 plugin while creating the new field?
Mautic CF7 Integration plugin has a conditional filter for adding conditions to the form submissions. If the condition filters are set, only those CF7 submissions will be exported that fulfill those conditions. The admin has options for the AND filter and the OR filter.
How Can we filter Contact form 7 entries with this CF7 Integration with Mautic plugin?
Yes, the CF7 Submissions filtering option is available according to the user inputs. Filtering contact forms will be made possible by Contact form 7 entries of AND / OR logic, sent to Mautic CRM based on user input.