Overview
↑ Back to topThe Salesforce Integration for WooCommerce plugin by WP Swings connects your Woocommerce store with your Salesforce CRM account. This plugin syncs all your WooCommerce data (Orders/Customers/Products ) over Salesforce CRM as per the modules available in Salesforce. It creates Accounts, Contacts, Products, Orders, and Opportunities over Salesforce CRM
Installation
↑ Back to top- Download the .zip file of the plugin from your WooCommerce account.
- Log into your WordPress Dashboard and navigate to Plugins > Add New.
- Click on the Upload Plugin button on top and upload the zip file of the plugin.
- Install the plugin and click Activate to get started.
Steps to Setup And Authorize Connection For Salesforce Website Integration
↑ Back to topThis app setup guide will tell you how to connect, authorize and do the initial setup for this WooCommerce Salesforce integration plugin.
Important: The setup process starts after you’ve successfully installed and activated the Salesforce CRM connector plugin. If you’ve not done it yet, follow the installation steps before you continue.
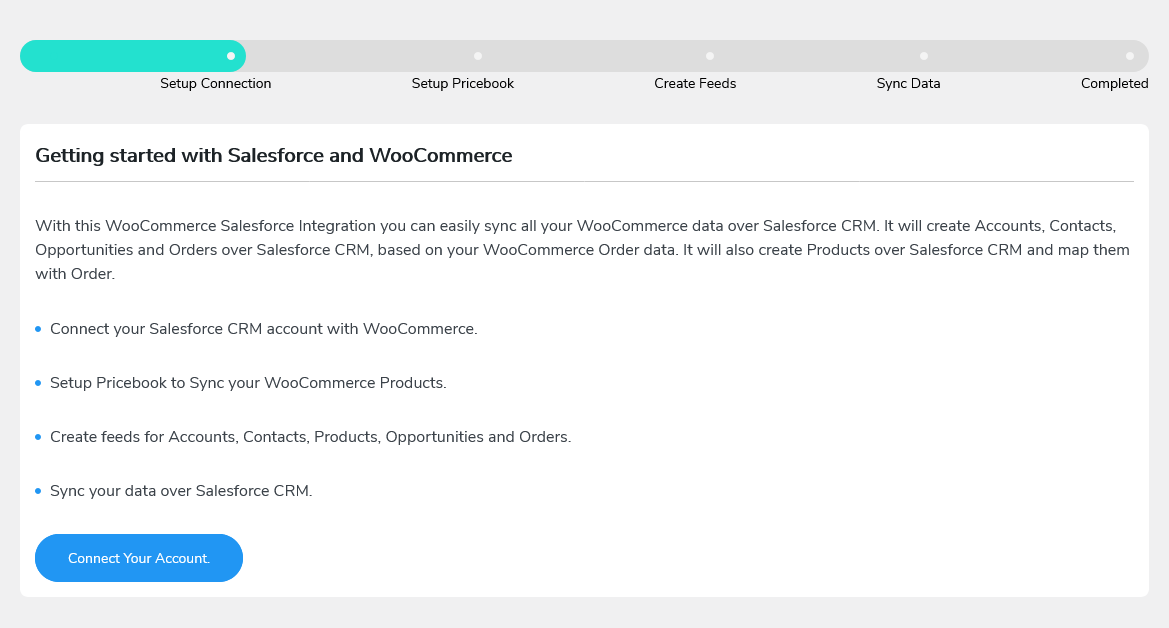
- Once the plugin is installed and activated, the next step is to set up the plugin and connect it to your Salesforce account. To do so, go to WP Swings→ Salesforce Woo on your WordPress admin dashboard. You’ll see the following screen then. Click on the button- Connect Your Account.
- There are two ways to establish the connection between your WooCommerce store and your Salesforce account.
Direct Login and Authorize
Log in using your Custom App - Direct Login and Authorize: To log in directly, without using the custom app, make sure that the toggle button against the Use Custom App setting is disabled. Then, follow the steps below
Select the Environment.
Click on the Login & Authorize button.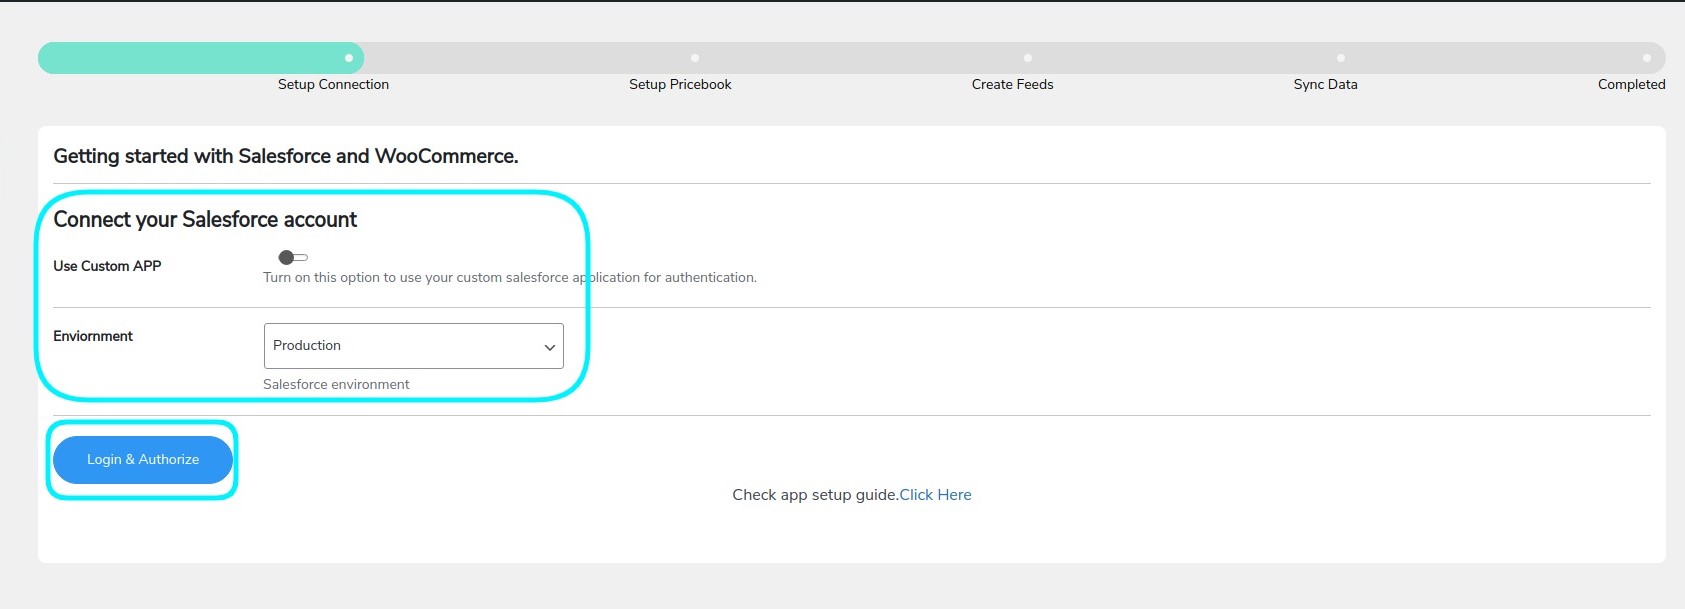
- Thereafter, you’ll be redirected to the Salesforce account login page. Login using the Salesforce account that you wish to connect and sync your WooCommerce data to.
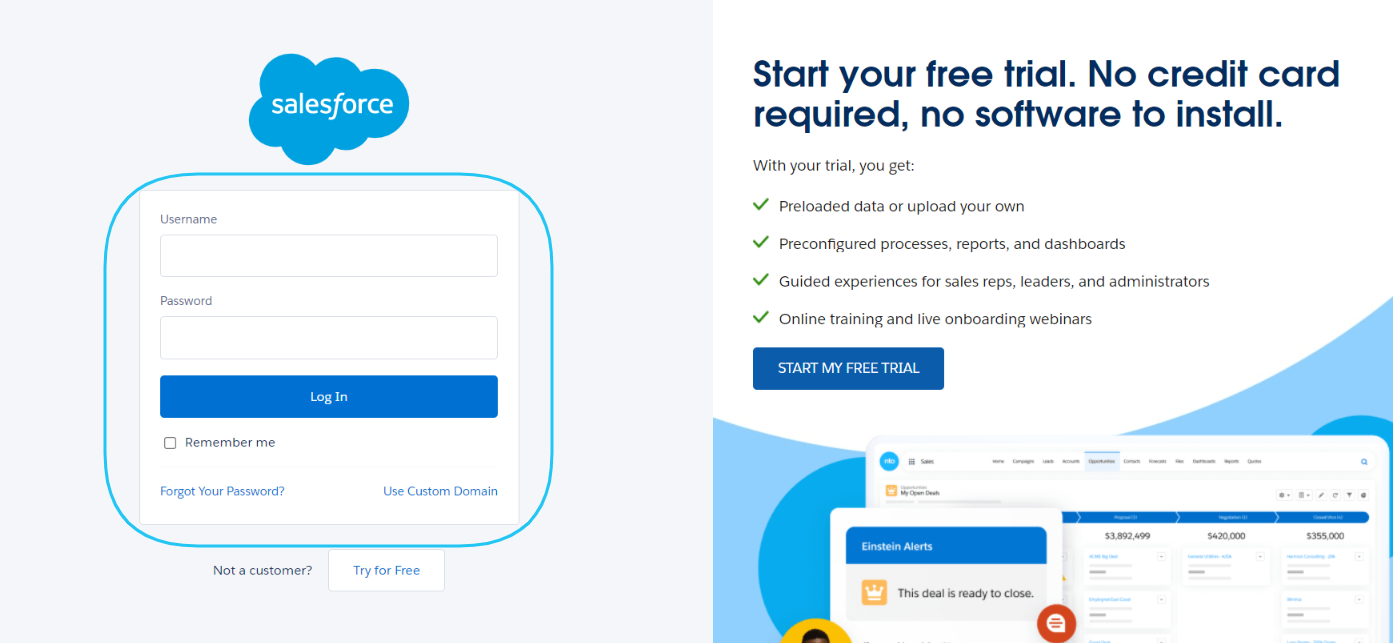
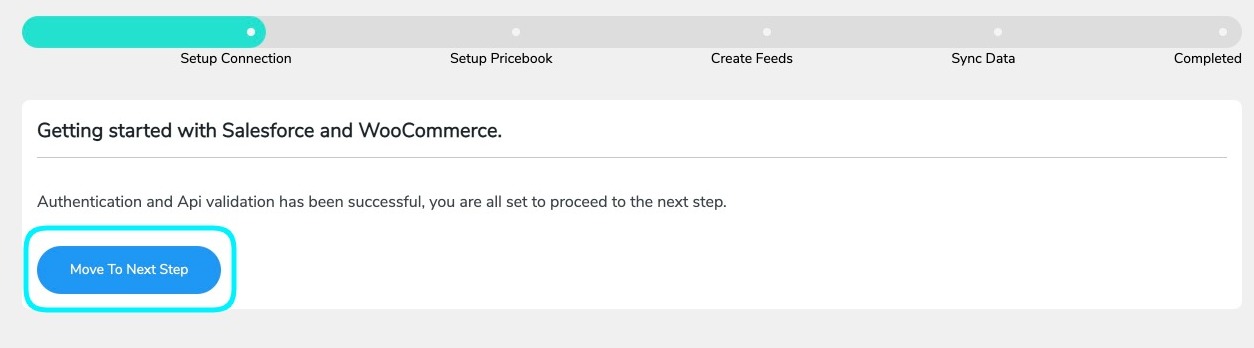
- Once you enter the login credentials and click on Login, you’ll be redirected back to the plugin setup screen. Your authentication is complete.
- Log in using your Custom App:: For logging in and authorizing using a custom app you need to follow through with the following steps:
a. Use Custom App
b. Consumer Key
c. Consumer Secret
d. Environment
e. Callback URL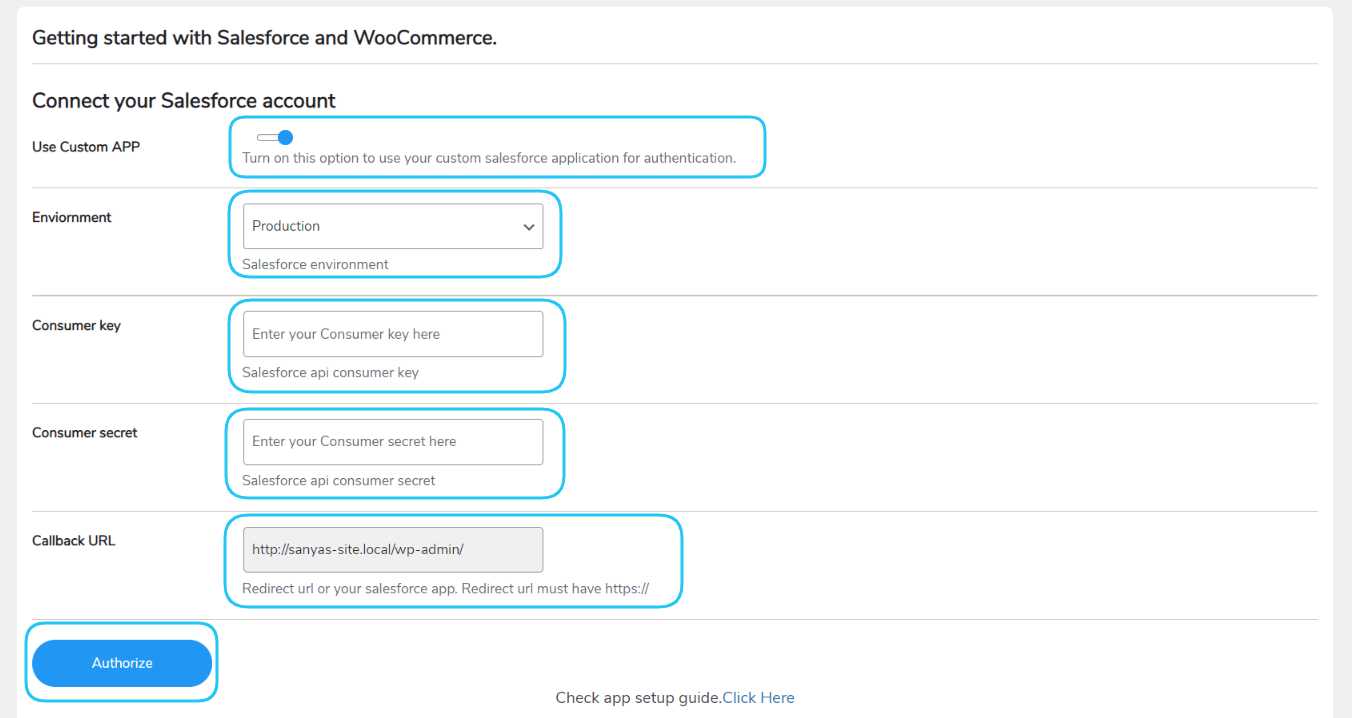
- Steps to get the details required to be filled in the above form:
Login to your Salesforce CRM account and go to Settings→ Setup→ Setup Home.
Search for the App Manager from the search menu.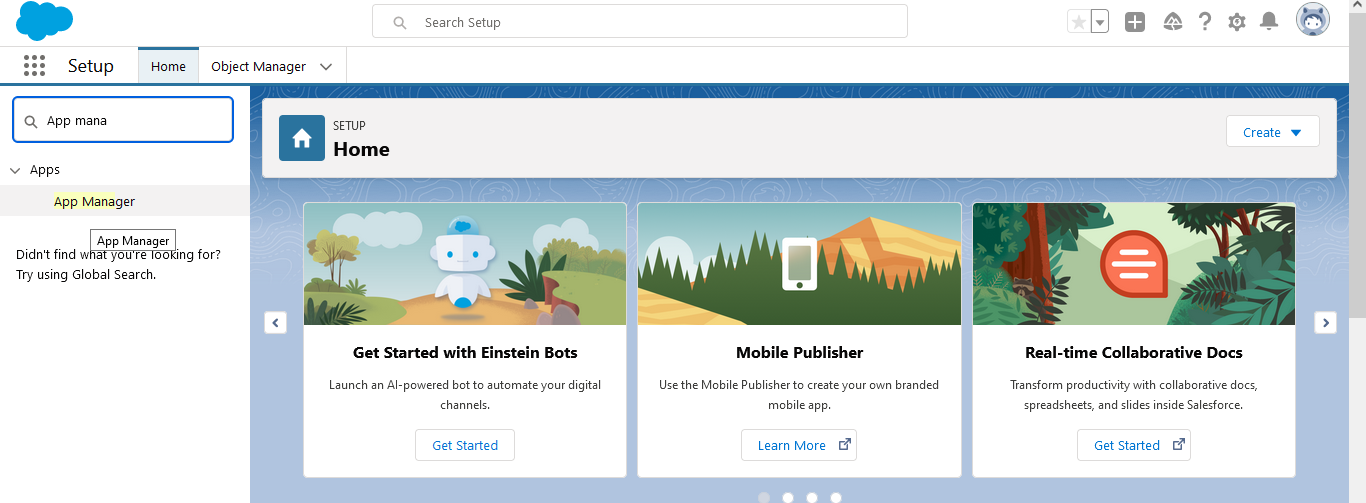
After your App Manager screen opens up, select the New Connected App button.
The Basic Information form will open next as below. Fill in the required information like – - Connected App Name
- API Name
- Contact Email, etc.

- Scroll down to the next section and enable the OAuth settings.
- Add your callback URL.

Select the OAuth scopes from the available scopes.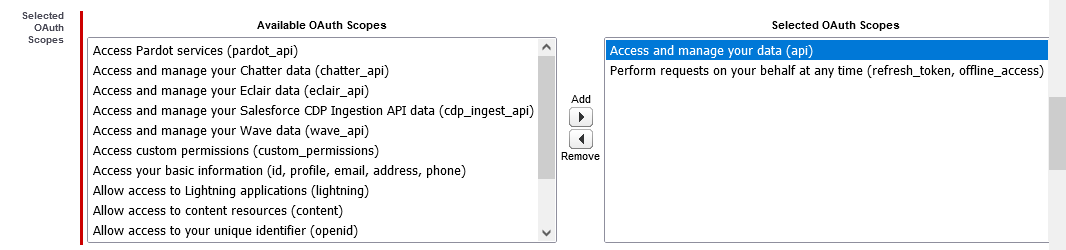
Save your changes. The next screen appears with a message, “Changes can take up to 10 minutes to take effect.” - Click on the button Continue.

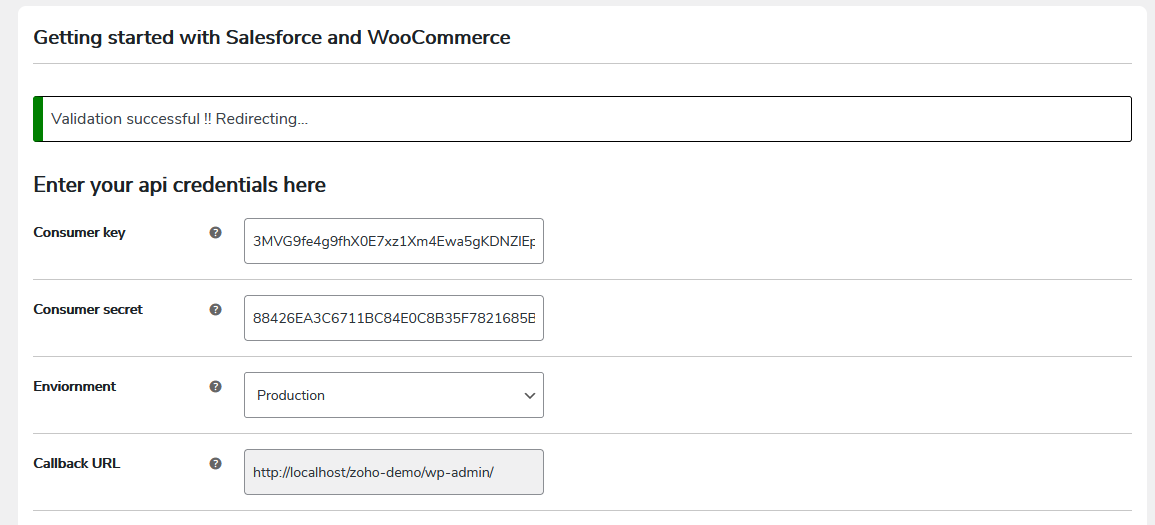
You’ll now get your Consumer Key and Consumer Secret IDs. Copy the IDs from here and add them to your integration with the salesforce plugin authorization form. After adding in all the information, click on Authorize.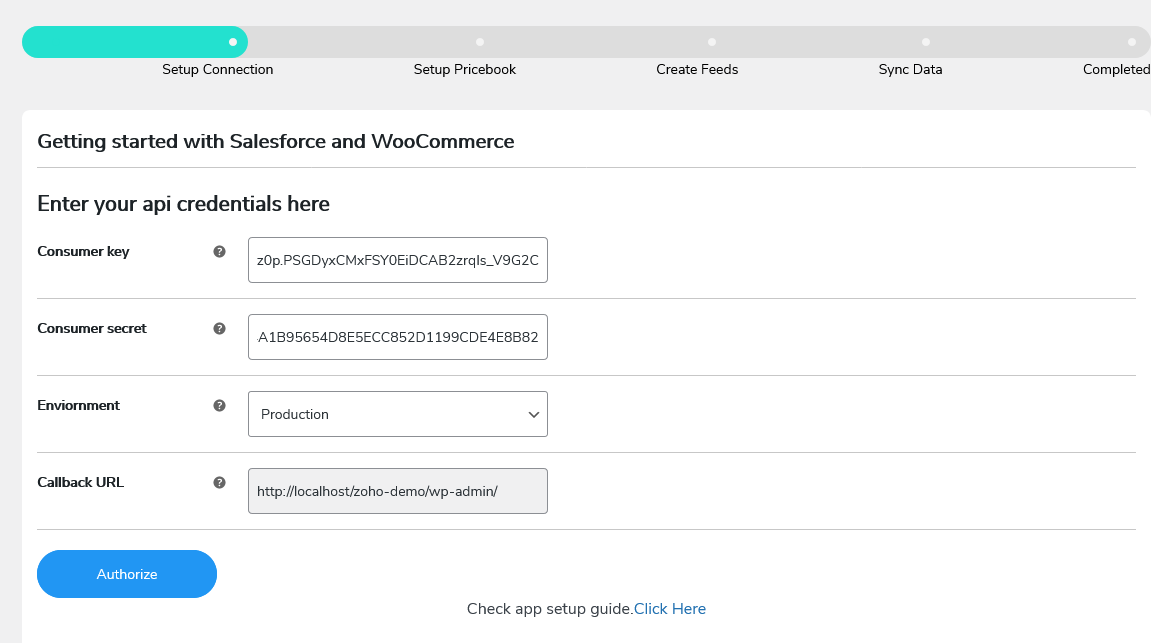
- After you click on Authorize, then a dialogue box will appear seeking your permission to access the data. Click on Allow.
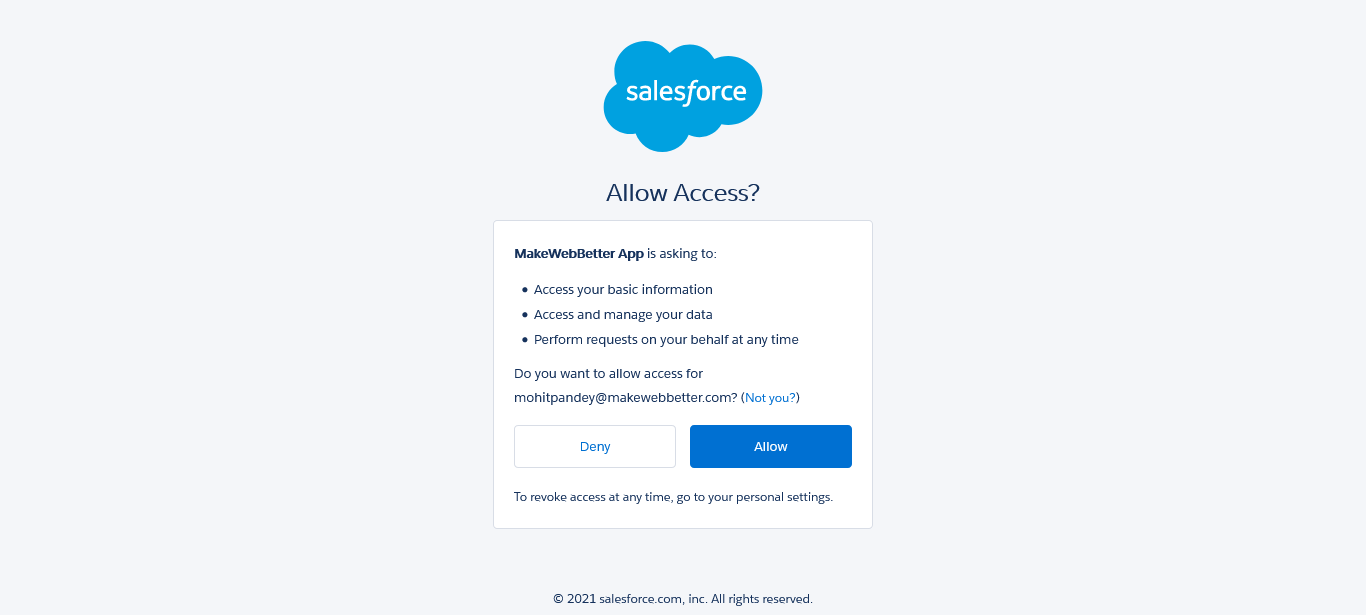
- Your connection authorization request is now validated.
- The next step is to set up the PriceBook. After you have given the permissions, you’ll be automatically redirected to the screen as shown below.
Click on the Refresh PriceBooks button. Select the PriceBook option from the dropdown menu and click on Select and Move to Next.
To create your very own PriceBook, click on Create New.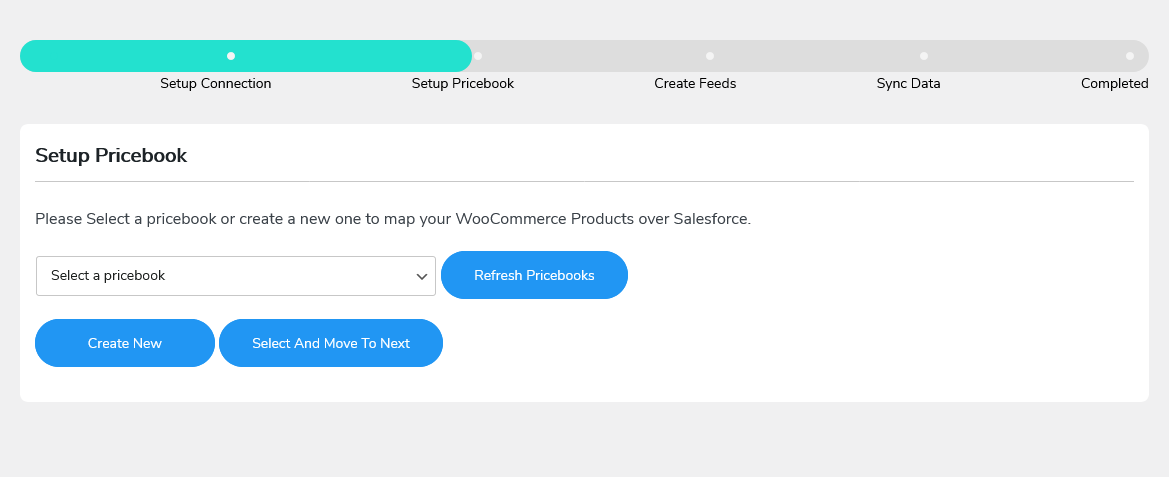
-
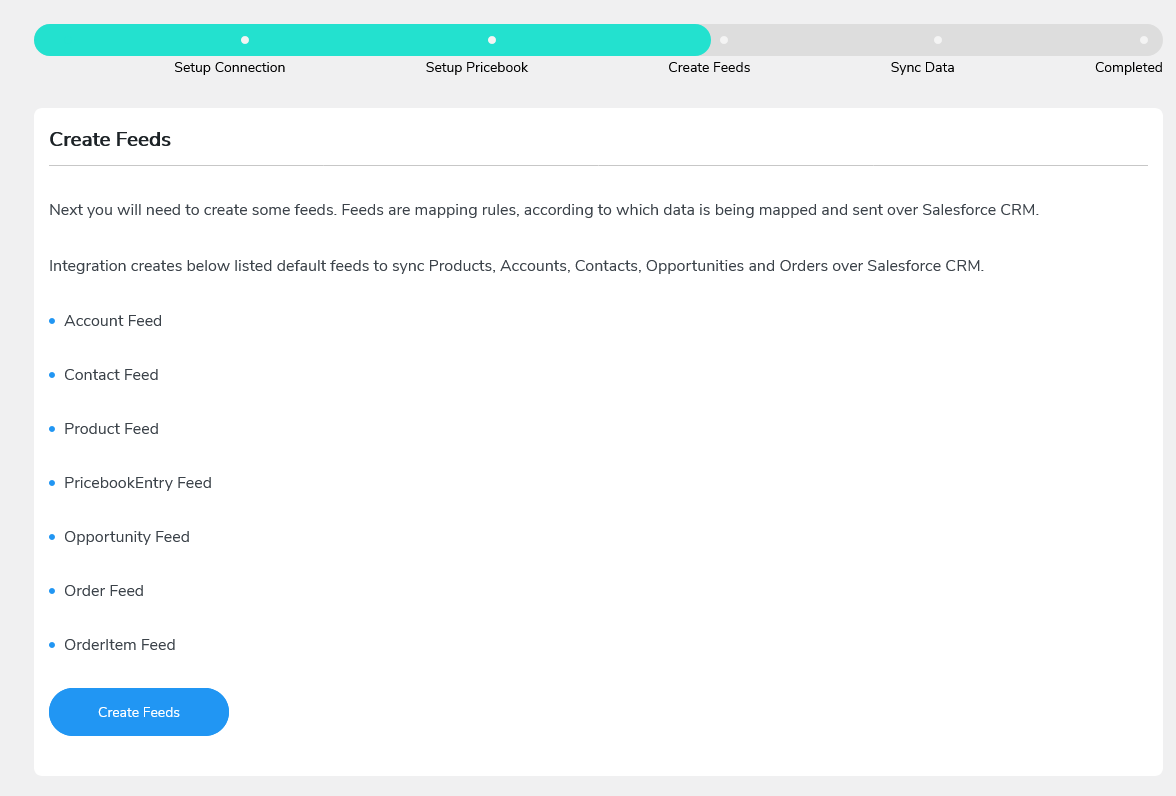
Next, you need to create feeds to map WooCommerce objects with Salesforce object fields.
To create fields, click on the button- Create Feeds.
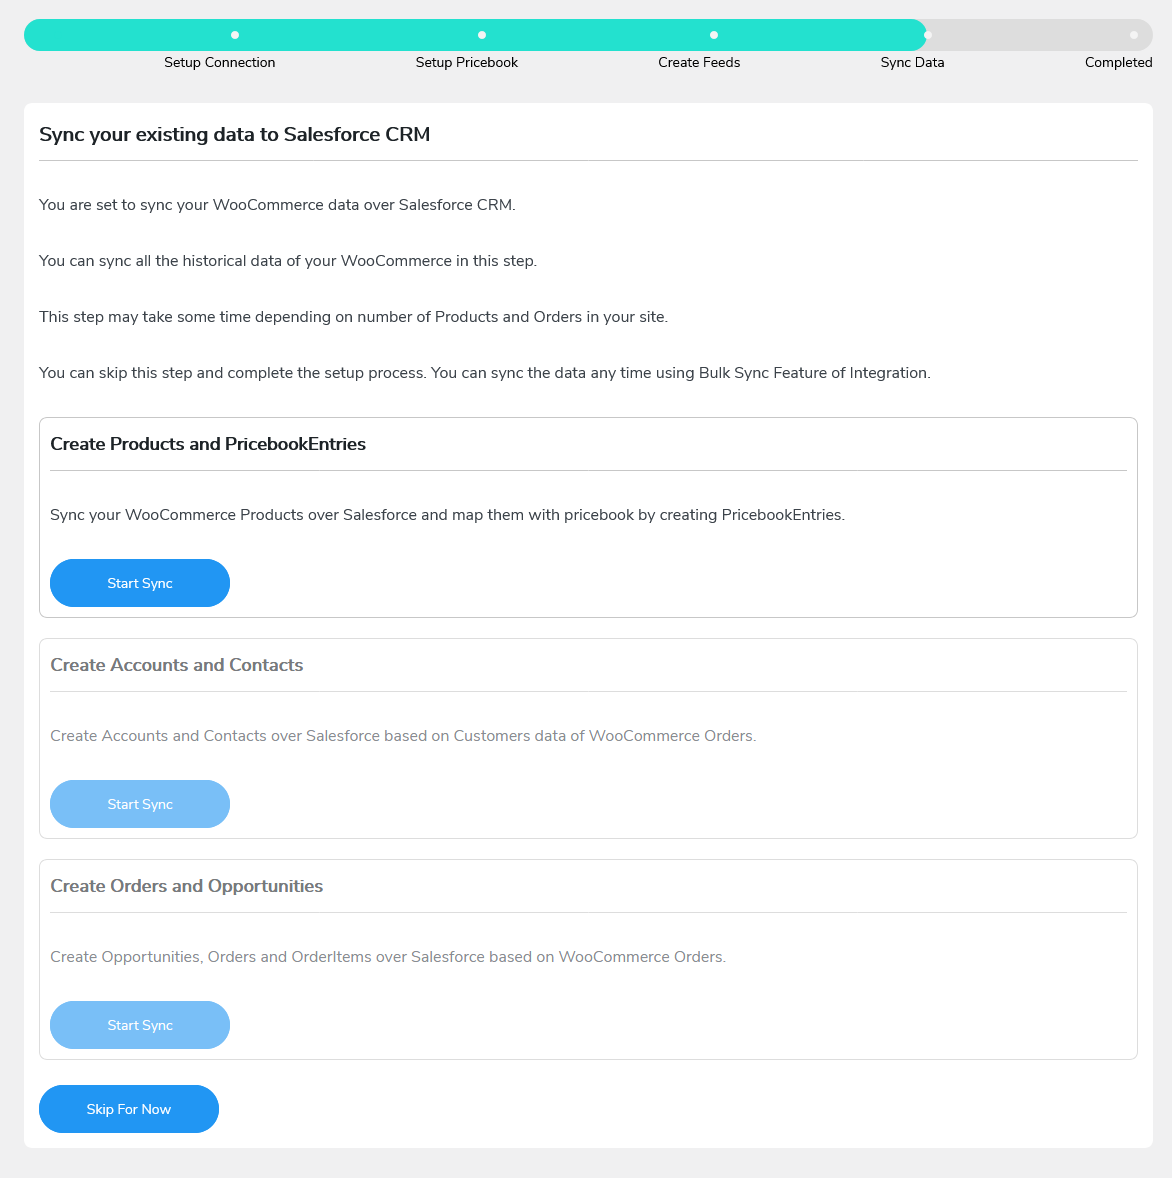
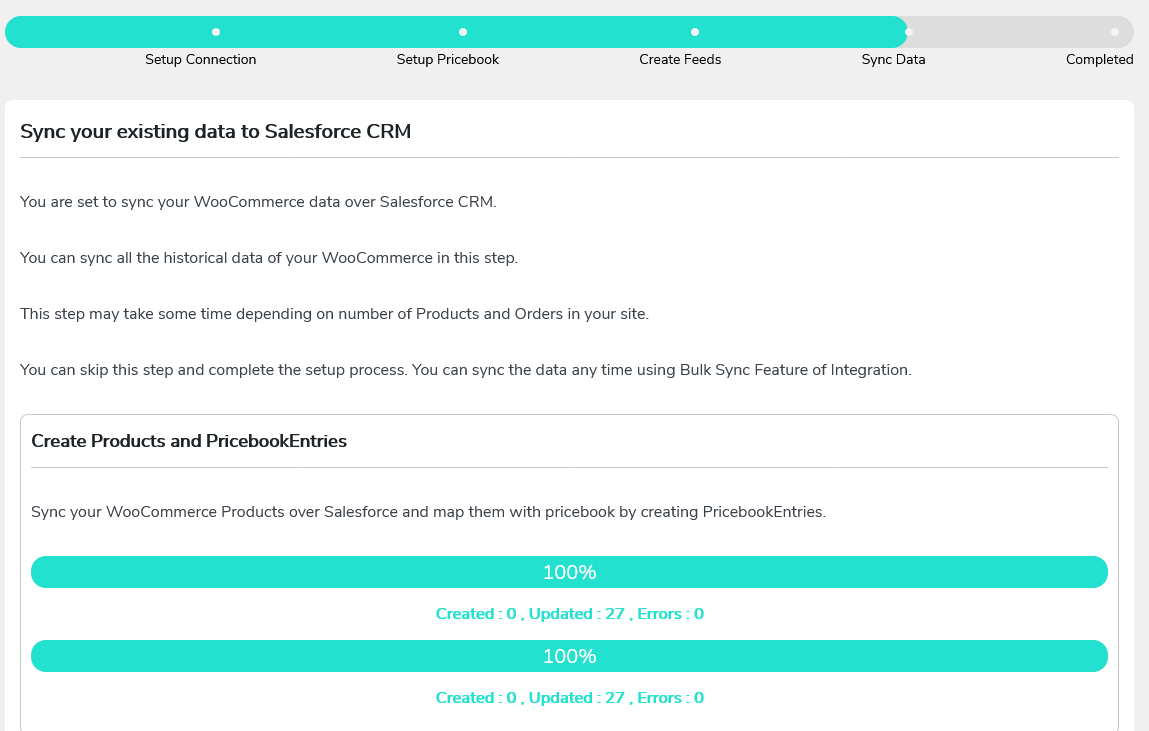
- Now you’re ready to sync your WooCommerce data with Salesforce CRM. Click on the Start Sync button to start syncing your data step-by-step.
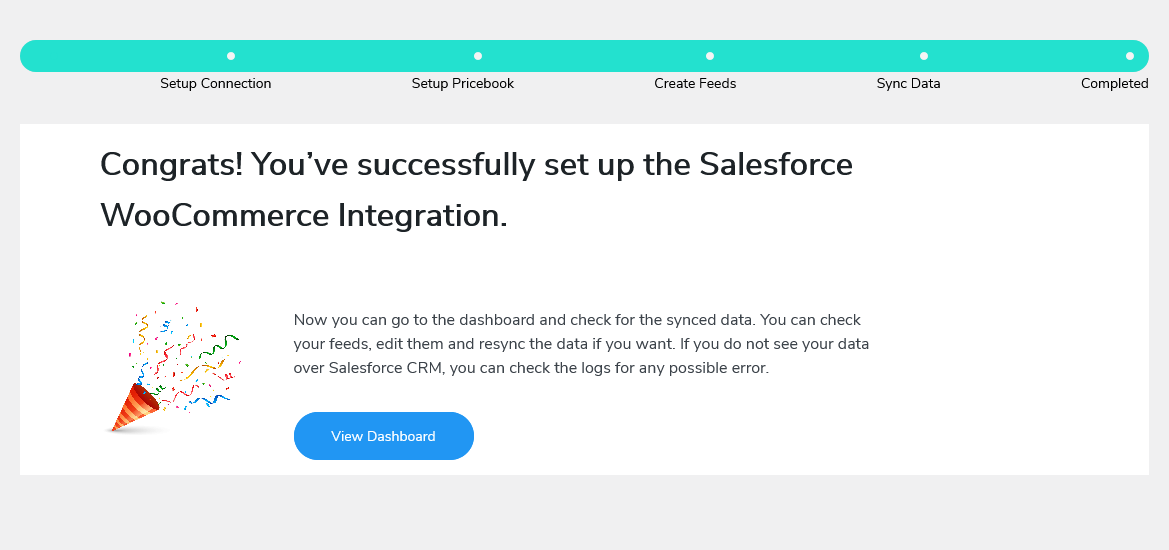
- Your Salesforce CRM Integration for the WooCommerce plugin’s setup process is complete now.
Dashboard
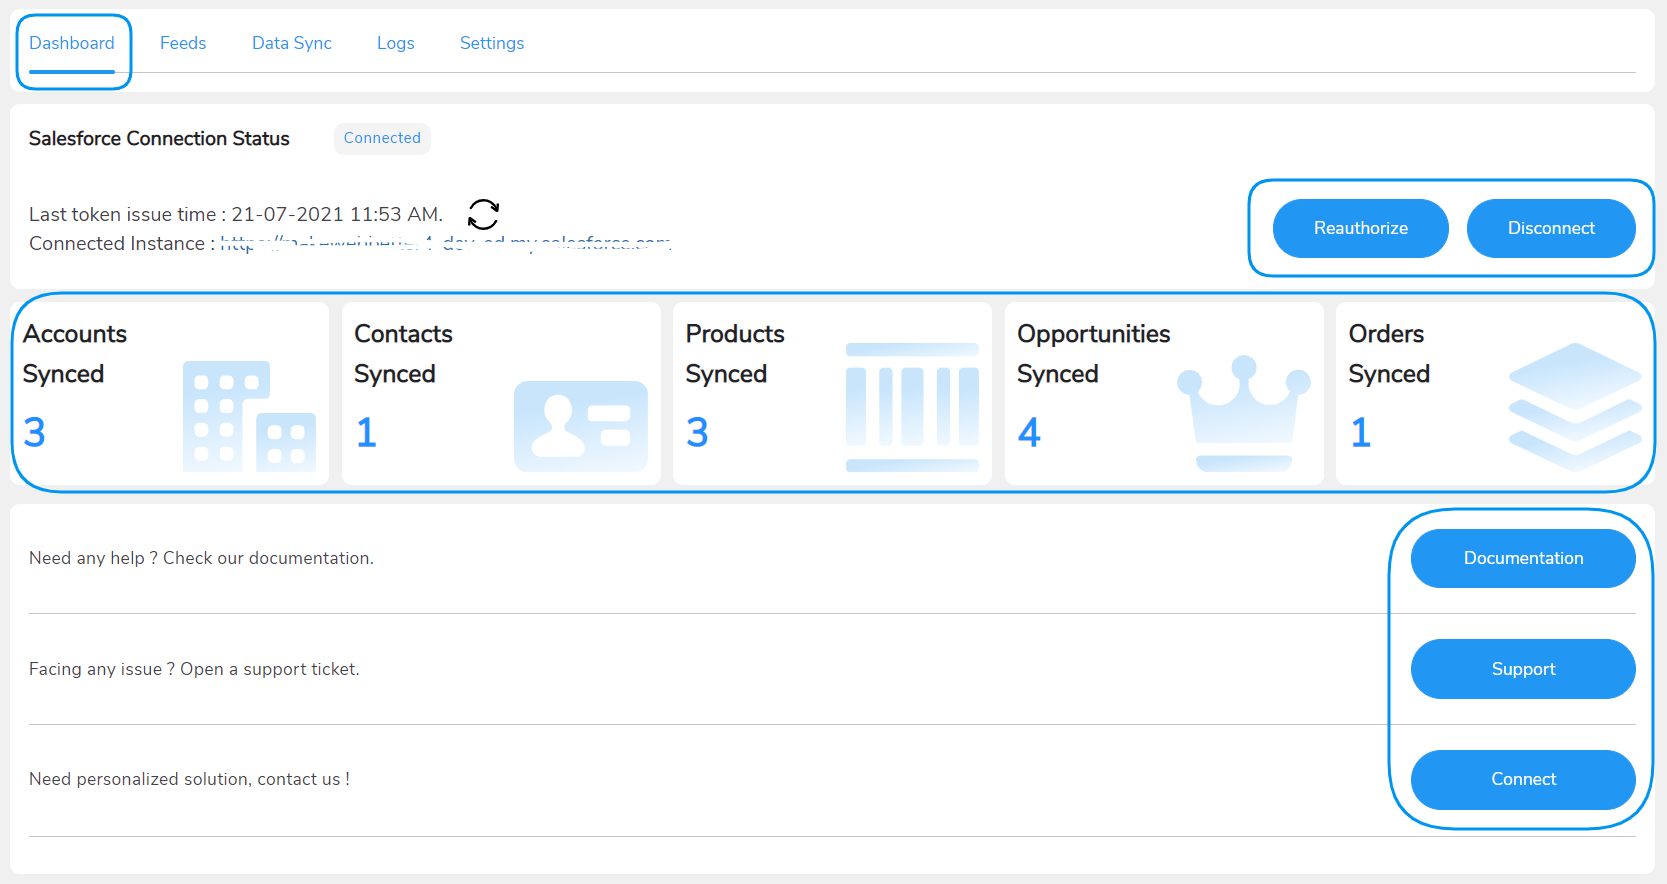
↑ Back to topThe Salesforce Integration for WooCommerce plugin dashboard displays the number of accounts, contacts, products, opportunities, and orders synced over Salesforce CRM. It also includes the option to disconnect or re-authorize the connection.
Feeds
↑ Back to topThe feeds are the set of association rules to map the WooCommerce data with the right Salesforce objects. Activate the default feeds and edit the functionality as suited or create new feeds hurdle-free.
The Salesforce CRM Connector plugin offers the following feeds by default:
- Account Feed
- Contact Feed
- Product2 Feed
- PriceBookEntry Feed
- Opportunity Feed
- Order Feed
- OrderItem Feed
And a button at the bottom to “Add Feeds”.
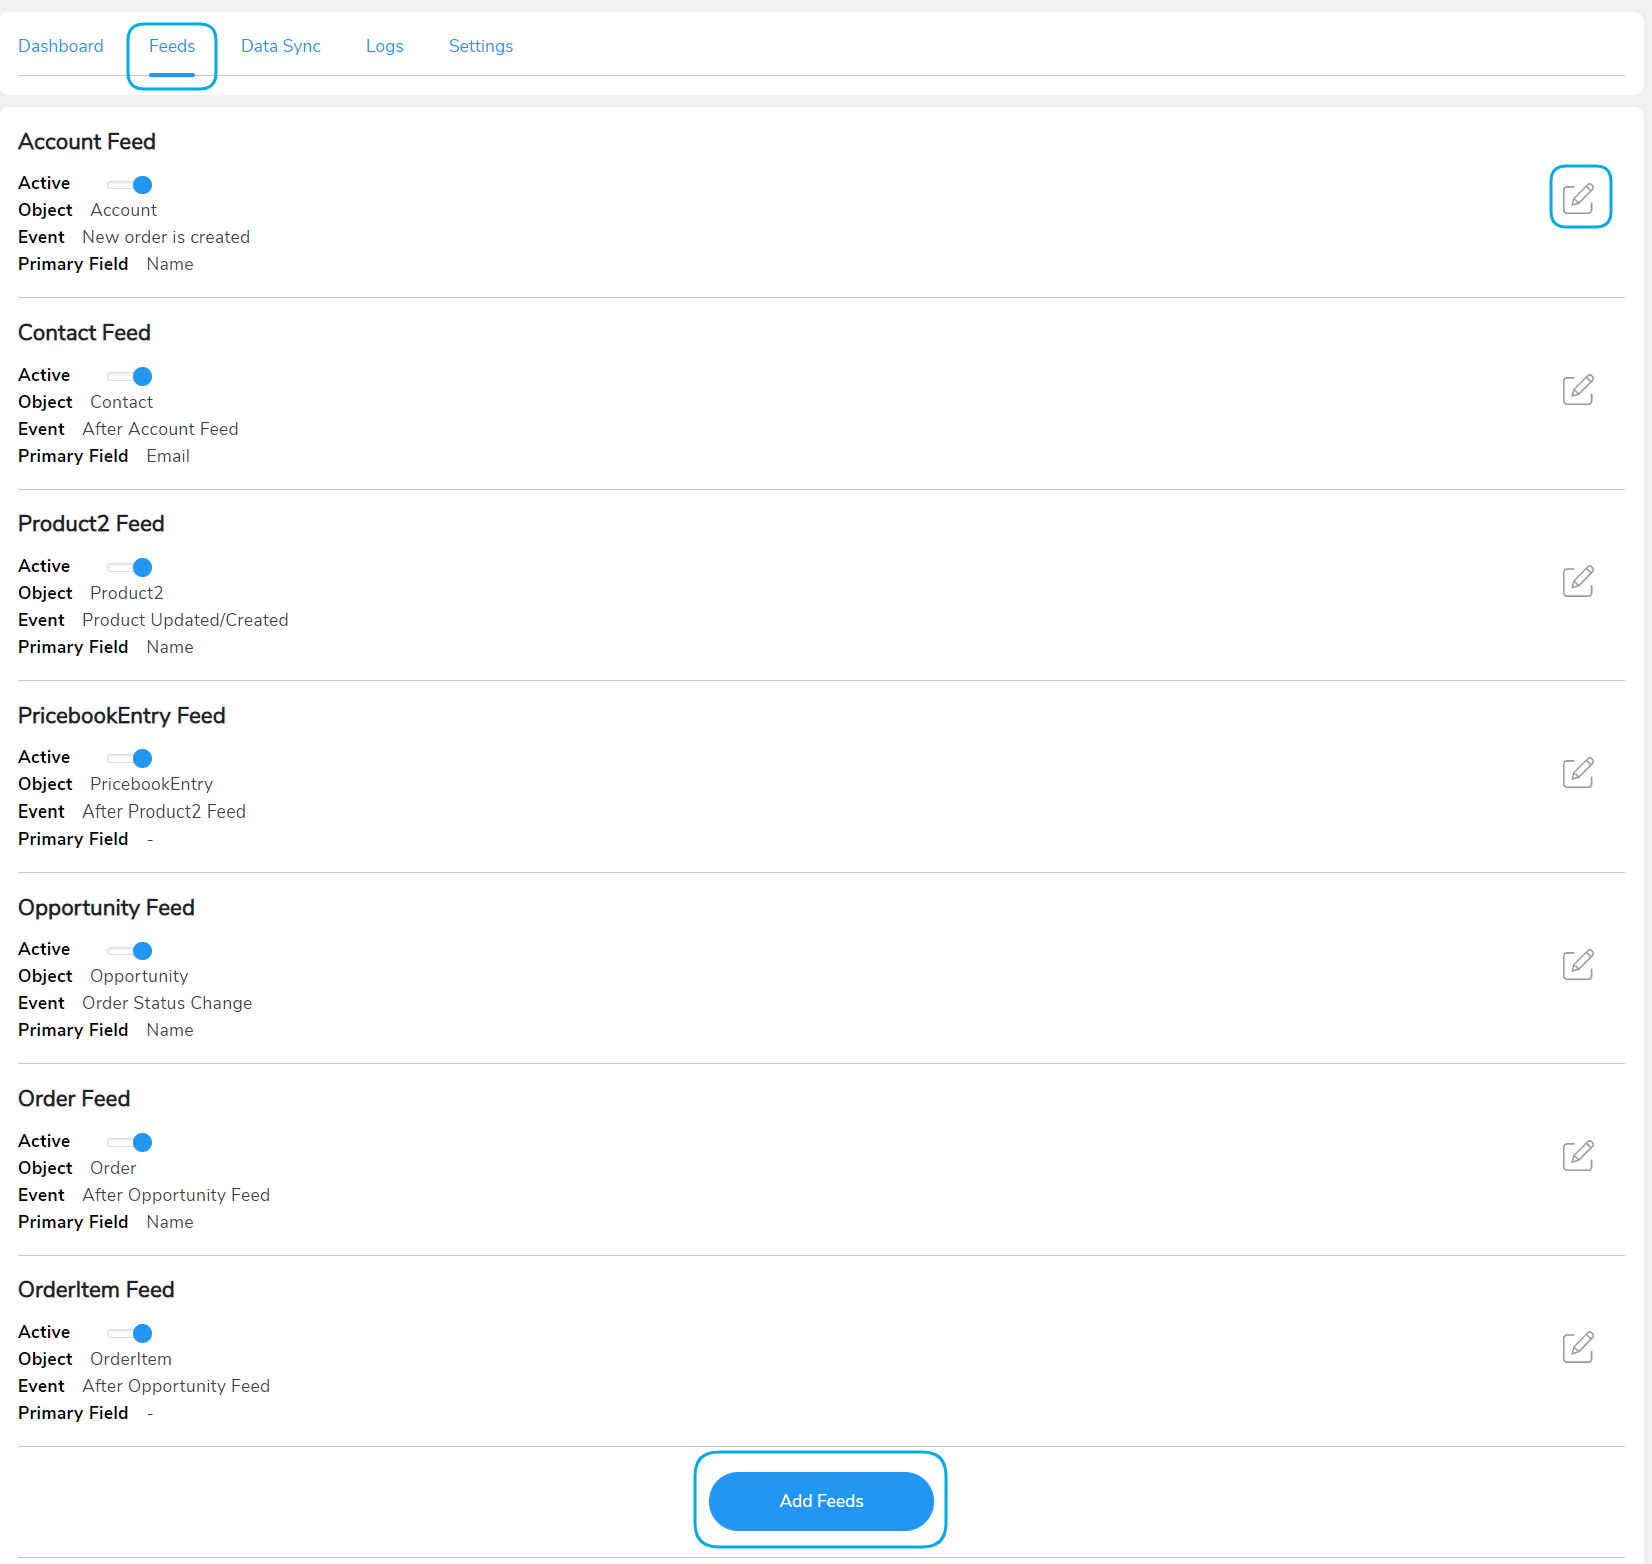
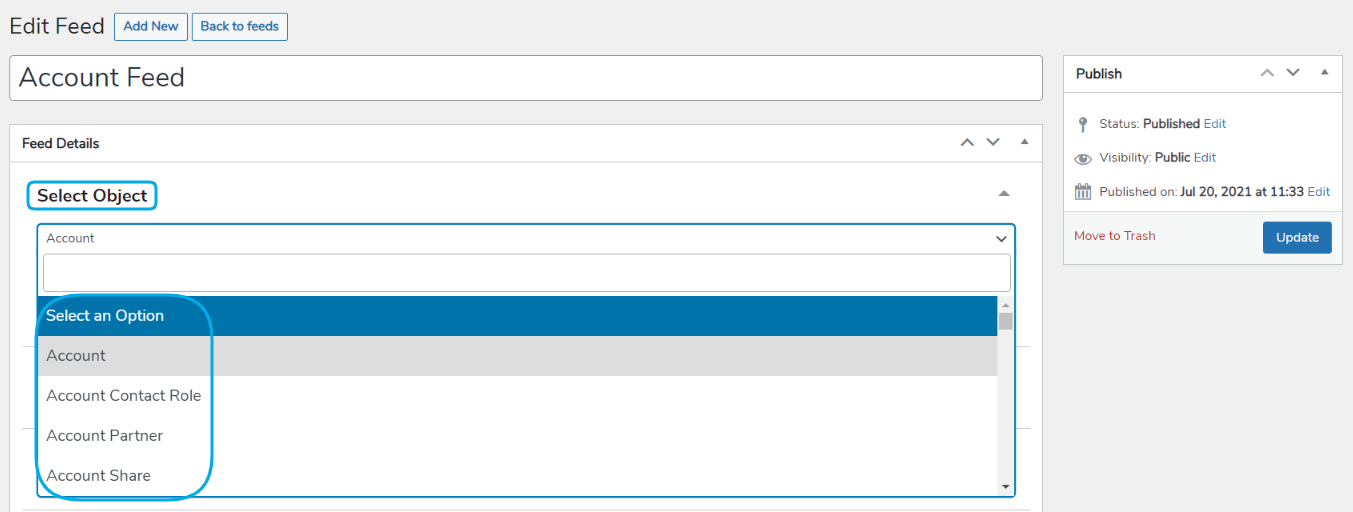
Every feed contains multiple settings to customize its functionality. Click on the Edit icon adjacent to the feed name to access those settings. Here are the settings you get under the feeds:
- Select Object: This setting allows you to select a WooCommerce object for which you want to sync the data.
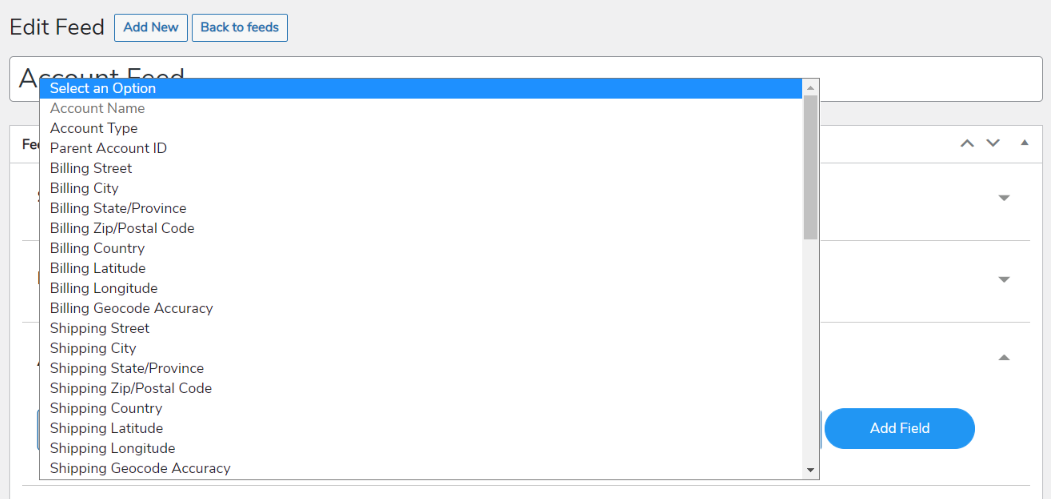
- Map Fields: This setting helps you map a field to the value it will contain. For example, you can map an Account feed with a First Name field to make sure the Account feed will store the first name value.
You can map fields using
1. Custom Value
2. Standard Value
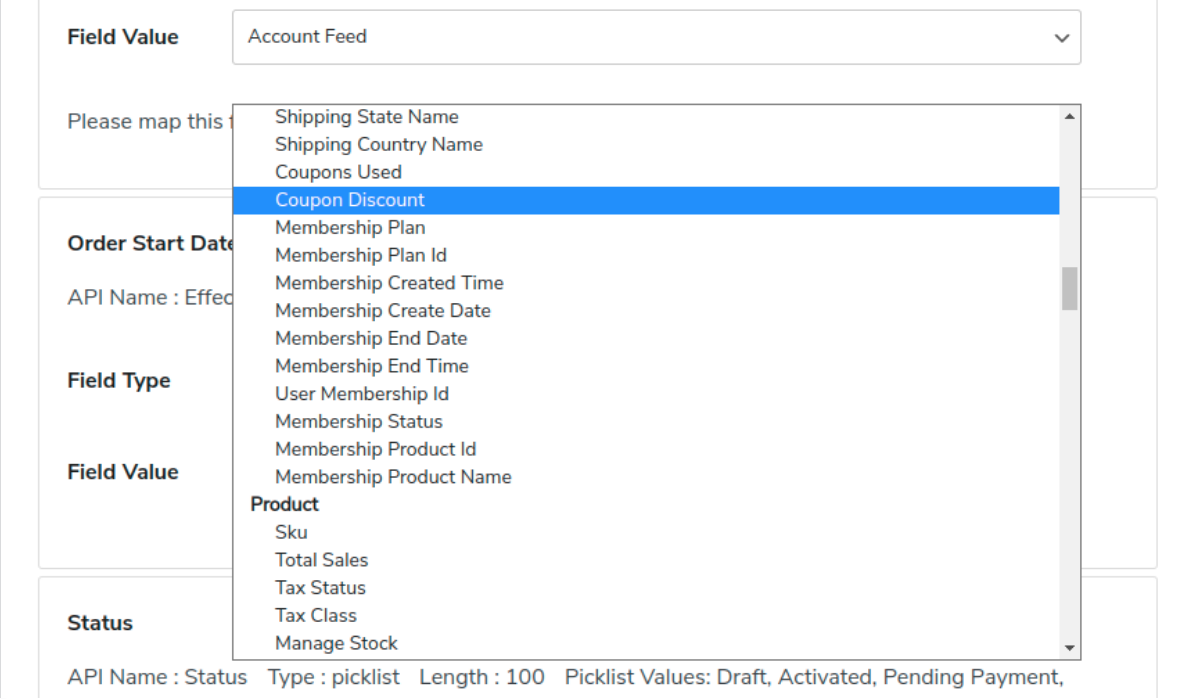
- For Custom Value, use the placeholders from the dropdown menu to create a custom entry for any Salesforce object field.
- For Standard Value, you can directly select the Salesforce object field you want to sync your WooCommerce field with.
For example, if you want to sync “WooCommerce_Account_xyz@gmail.com” from your WooCommerce orders to the ‘Name’ field in your Accounts object in your Salesforce dashboard.
Select the placeholder for ‘{shop_order__billing_email}’ after entering your desired string (‘WooCommerce_Account_’ in this example) . Similarly, you can customize values for any object field.

- Add New Field: The salesforce CRM integration setting helps you in adding a new field in the feed. If you want to sync some other related data, you can add that field to the respective feed.
Note: After applying Coupons Used and Coupon Discount, salesforce sends coupon codes and sends the discount given through coupons to Salesforce.
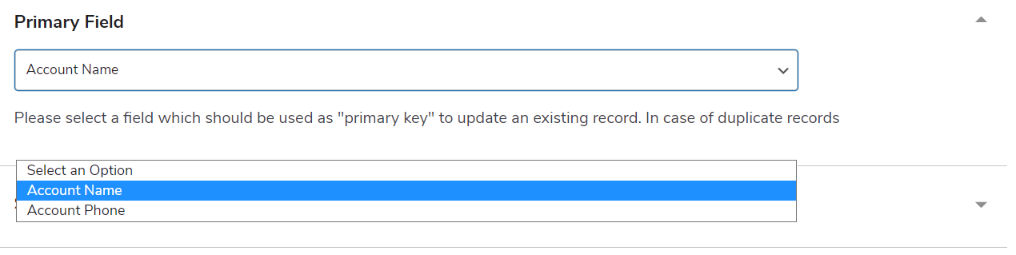
- Primary Field: The salesforce web integration settings allow you to choose a field that will work as a primary key. The primary key works as the identifier field.
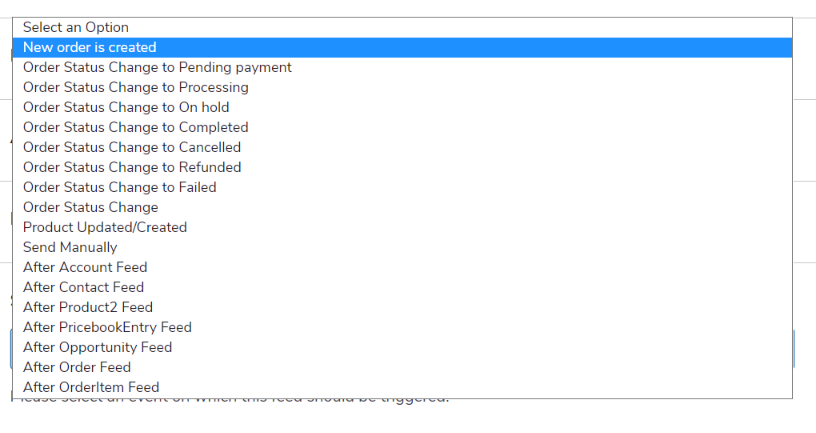
- Select Event: This setting allows you to select the event which will trigger the data synchronization process.
Note: The event will trigger the feed to function ONLY WHEN Instant Sync is turned on under the Settings tab.
- Sync Variable Product: Once you enable the option to sync variable products, your parent product will automatically sync along with the variations. You can also use this option for your variable subscription products.

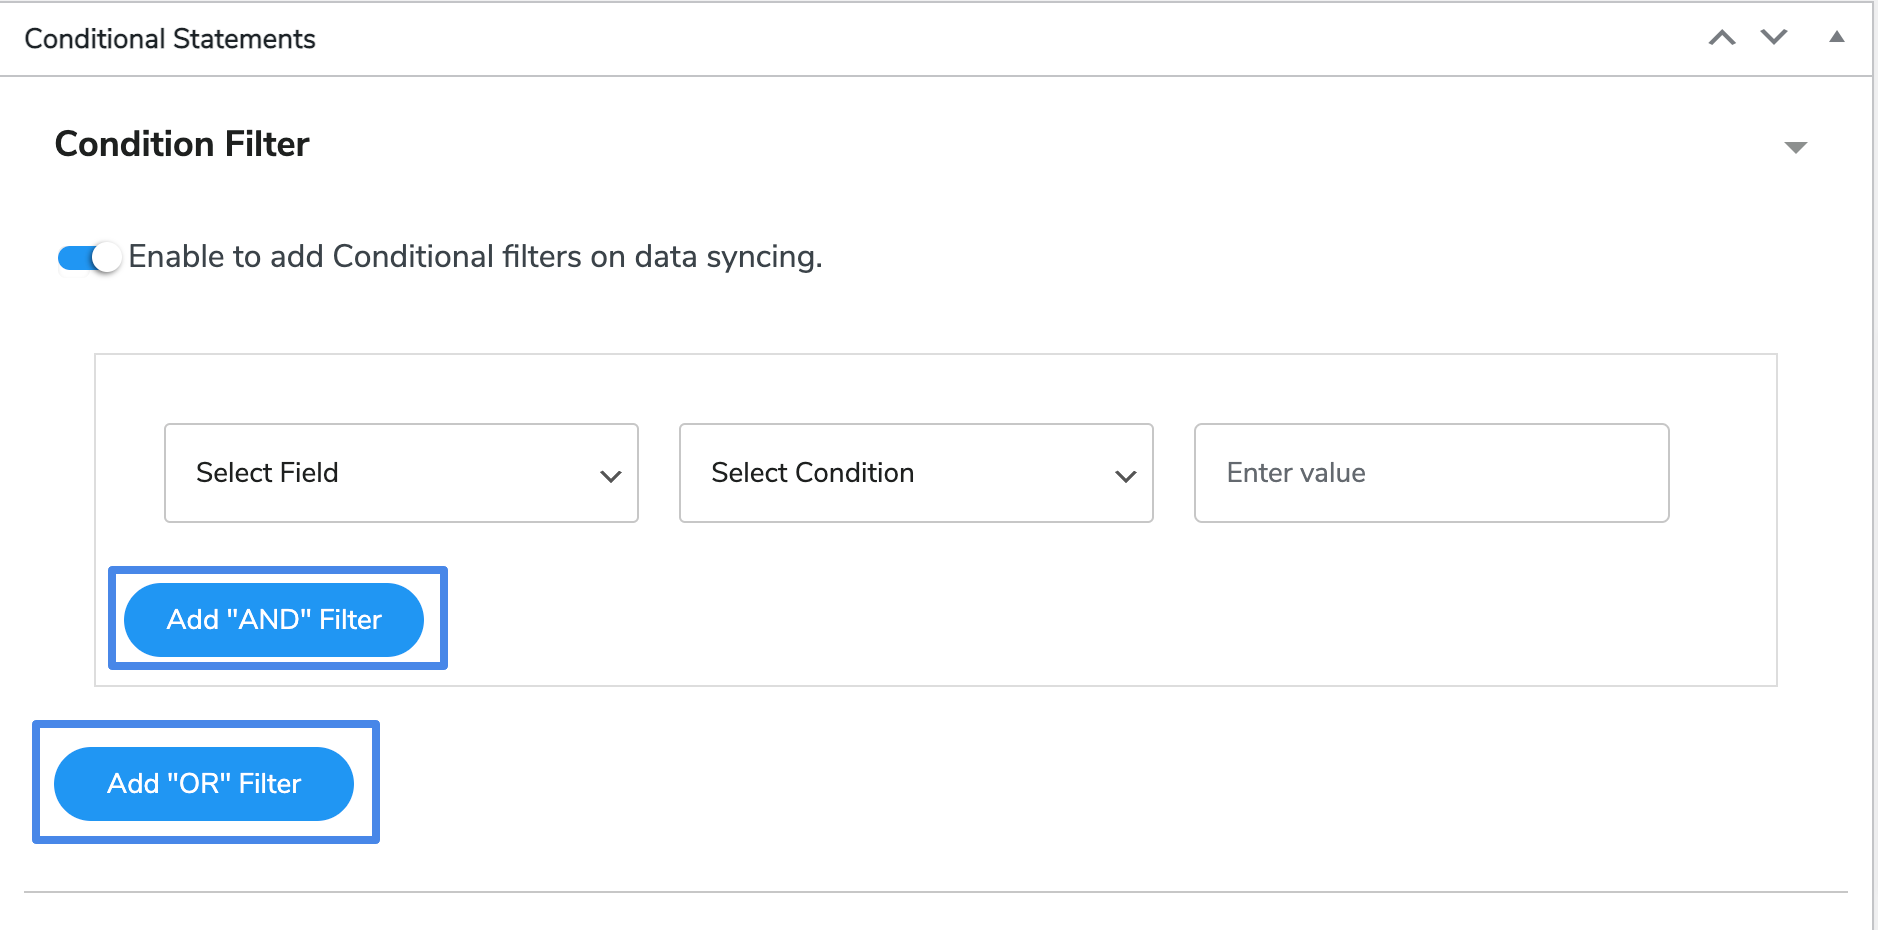
- Conditional Filters: Using these conditional statements given in when you create a feed using the Salesforce WooCommerce plugin, you can apply conditions for each feed. These filters will filter out the unwanted entries to be synced with the Keap object fields.
You can use the AND filter. When each of the conditions defined is satisfied by the form submission, it will be synced.
When you use the OR filter, if any of the defined conditional statements are satisfied, the sync will be triggered.
5.1 Account Feed
↑ Back to top- Go to WP Swings→ Feeds→ Account Feed→ Edit in your admin dashboard.
- The Account feed is associated with the “Account” object. This will assist you to map all the relevant account fields in the WooCommerce store over your Salesforce account.
- The default mapped fields in this feed are Account Name and Account Phone.
- You can also fetch the order edit URL, order sub-total, and order number in order values
- You can map more fields by clicking on the Add New Field option as described in the section above.
- The default Primary Field for this Account feed is Account Name. You can edit this field as per your requirements.
- The default Selected Event is ‘New order is created’ in this feed.
- You can also use the Condition Filter as per your requirements.
- Click on the Update button to save your changes in the default feed.

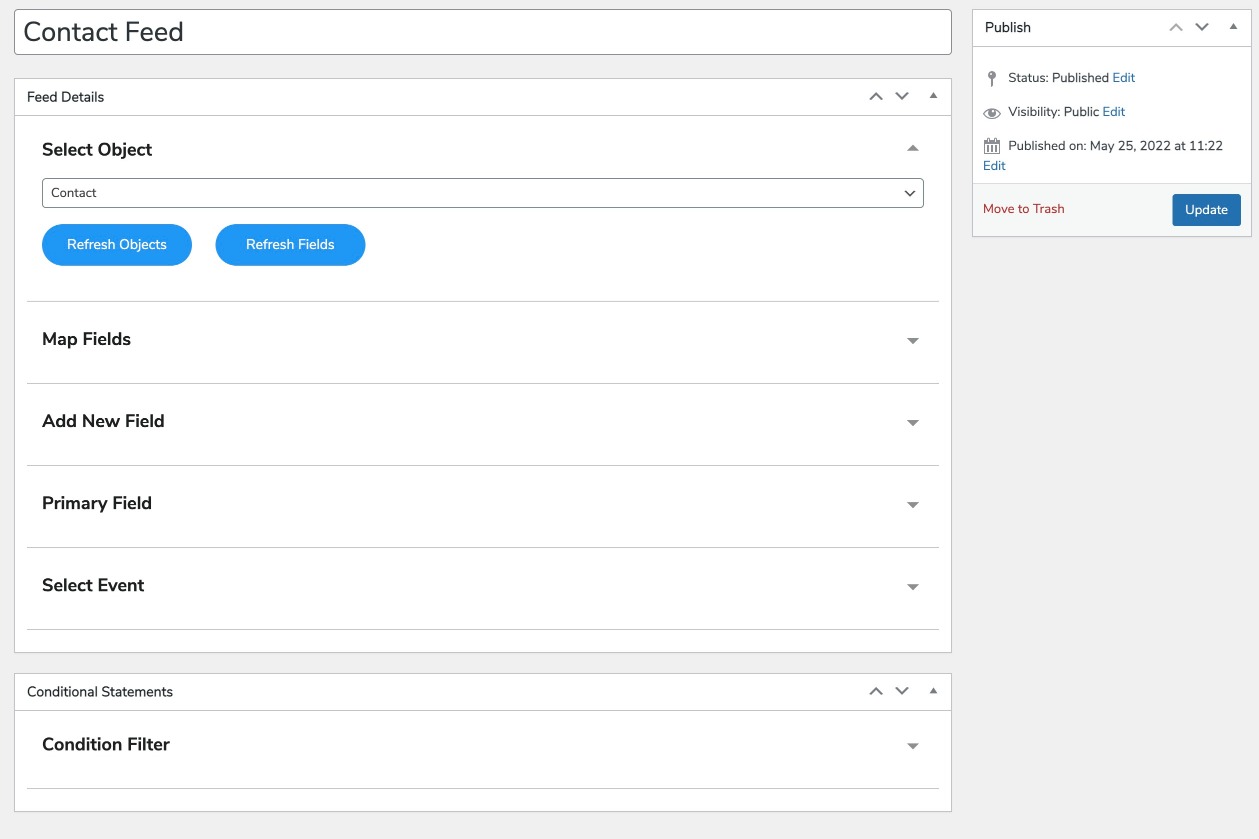
5.2 Contact Feed
↑ Back to top- Go to WP Swings→ Feeds→ Contact Feed→ Edit in your admin dashboard.
- Contact feed is associated with the “Contact” object in your Salesforce dashboard. This will assist you to map all the relevant contact fields in the WooCommerce store over your Salesforce account.
- The default mapped fields in this feed are Account ID, Last Name, First Name, Other Street, Other City, Other State/ Province, Other Zip/Postal Code, Other Country, Mailing Street, Mailing City, Mailing State/ Province, Mailing Zip/ Postal Code, Mailing Country, Business Phone, Mobile Phone, Home Phone, Email, and Contact Description.
- You can also fetch the order edit URL, order sub-total, and order number in order values
- You can map more fields by clicking the Add New Field option described in the section above.
- The default Primary Field for this Contact feed is Email. You can edit this field as per your requirements.
- The default Selected Event is ‘After Account Feed’ in this feed.
- You can also use the Condition Filter as per your requirements.
- Click on the Update button to save your changes in the default feed.
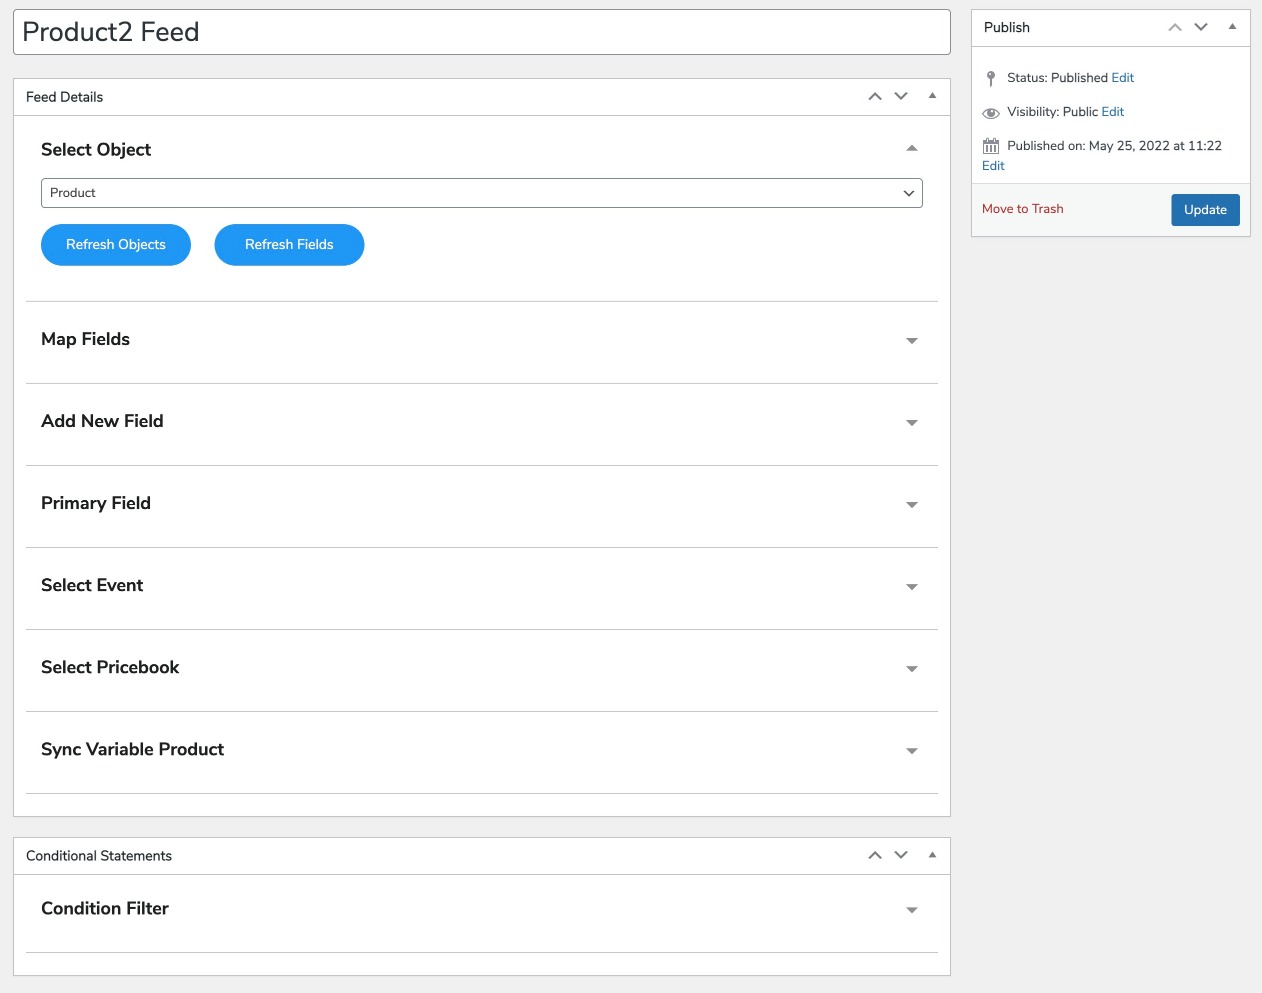
5.3 Product2 Feed
↑ Back to top- Go to WP Swings→ Feeds→ Product2 Feed→ Edit in your admin dashboard.
- Contact feed is associated with the “Product” object in your Salesforce dashboard. This will assist you to map all the relevant product fields in the WooCommerce store over your Salesforce account.
- The default mapped fields in this feed are: Product Name, Product Code, Product Description, Display URL, and Product SKU
- You can map more fields by clicking on the Add New Field option as described in the section above.
- The default Primary Field for this Product2 feed is Product Name. You can edit this field as per your requirements.
- The default Selected Event is ‘Product Updated/Created’ in this feed.
- Select Pricebook from the dropdown list of created passbooks in your Salesforce dashboard. You can also create your price books in this field by simply clicking on the New Pricebook button. Click on Refresh Pricebooks to sync the new price books created in your Salesforce dashboard.
- Under the Sync Variable Product, tick the given checkbox. This setting will immediately sync all the variable products on your WooCommerce store over Salesforce.
- You can also use the Condition Filter as per your requirements.
- Click on the Update button to save your changes in the default feed.
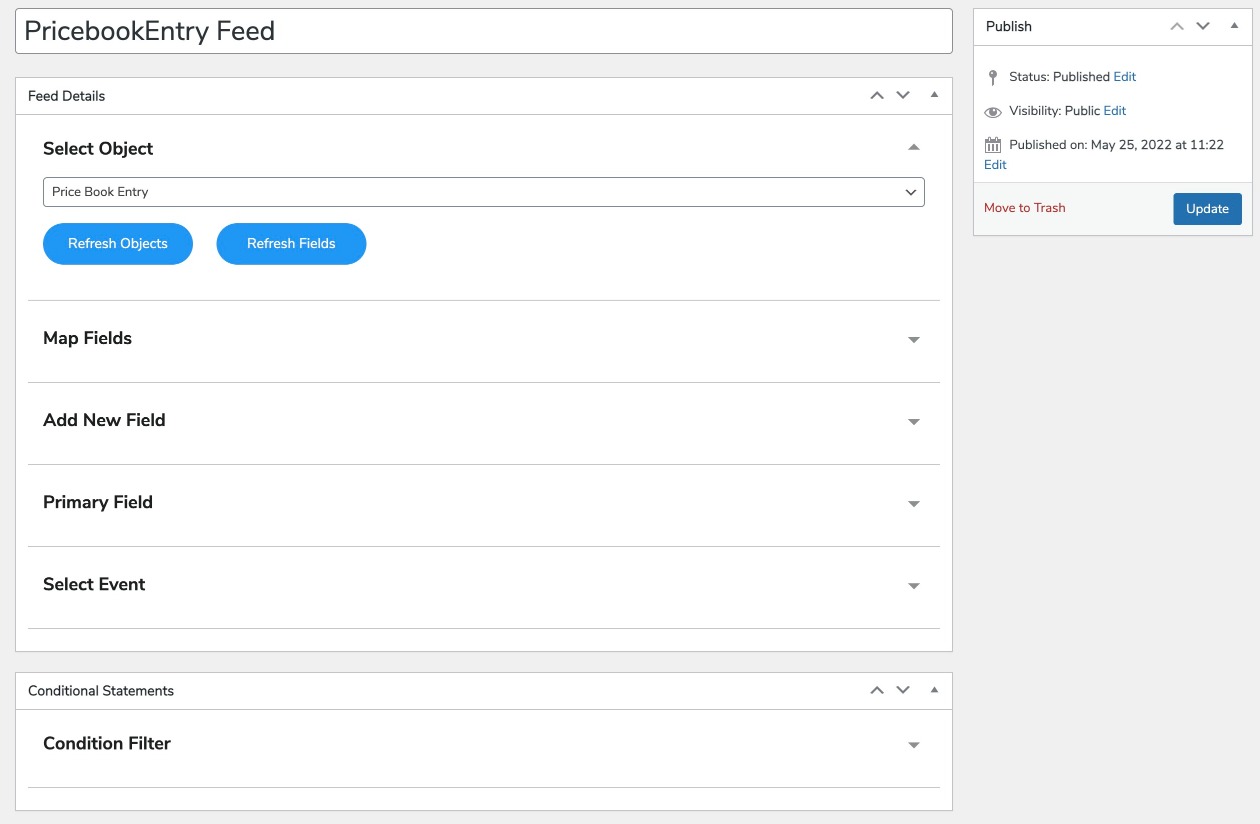
5.4 PricebookEntry Feed
↑ Back to top- Go to WP Swings→ Feeds→ PricebookEntry Feed→ Edit in your admin dashboard.
- The pricebookEntry feed is associated with the “Price Book Entry” object in your Salesforce dashboard. This will assist you to map all the relevant Price Book Entry fields in the WooCommerce store over your Salesforce account.
- The default mapped fields in this feed are Product ID, List Price, and Active.
- You can map more fields by clicking on the Add New Field option as described in the section above.
- The default Primary Field for this PricebookEntry feed is List Price. You can edit this field as per your requirements.
- The default Selected Event is ‘After Product2 Feed’ in this feed.
- You can also use the Condition Filter as per your requirements.
- Click on the Update button to save your changes in the default feed.
5.5 Opportunity Feed
↑ Back to top- Go to WP Swings→ Feeds→ Opportunity Feed→ Edit in your admin dashboard.
- Opportunity feed is associated with the “Opportunity” object in your Salesforce dashboard. This will assist you to map all the relevant Opportunity fields in the WooCommerce store over your Salesforce account.
- The default mapped fields in this feed are Order Notes Account ID, Name, Description, Stage, Amount, and Close Date.
- You can also fetch the order edit URL, order sub-total, and order number in order values
Note: Do not forget to tick the checkbox to allow stage mapping with woo order statuses to use the Order Status Mapping as described in the steps ahead.
- You can map more fields by clicking on the Add New Field option as described in the section above.
- The default Primary Field for this Opportunity feed is Name. You can edit this field as per your requirements.
- The default Selected Event is ‘Order Status Change’ in this feed.
- Use the setting—Order Status Mapping to map the WooCommerce order status with the opportunity stage in your Salesforce dashboard.
- You can also use the Condition Filter as per your requirements.
- Click on the Update button to save your changes in the default feed.

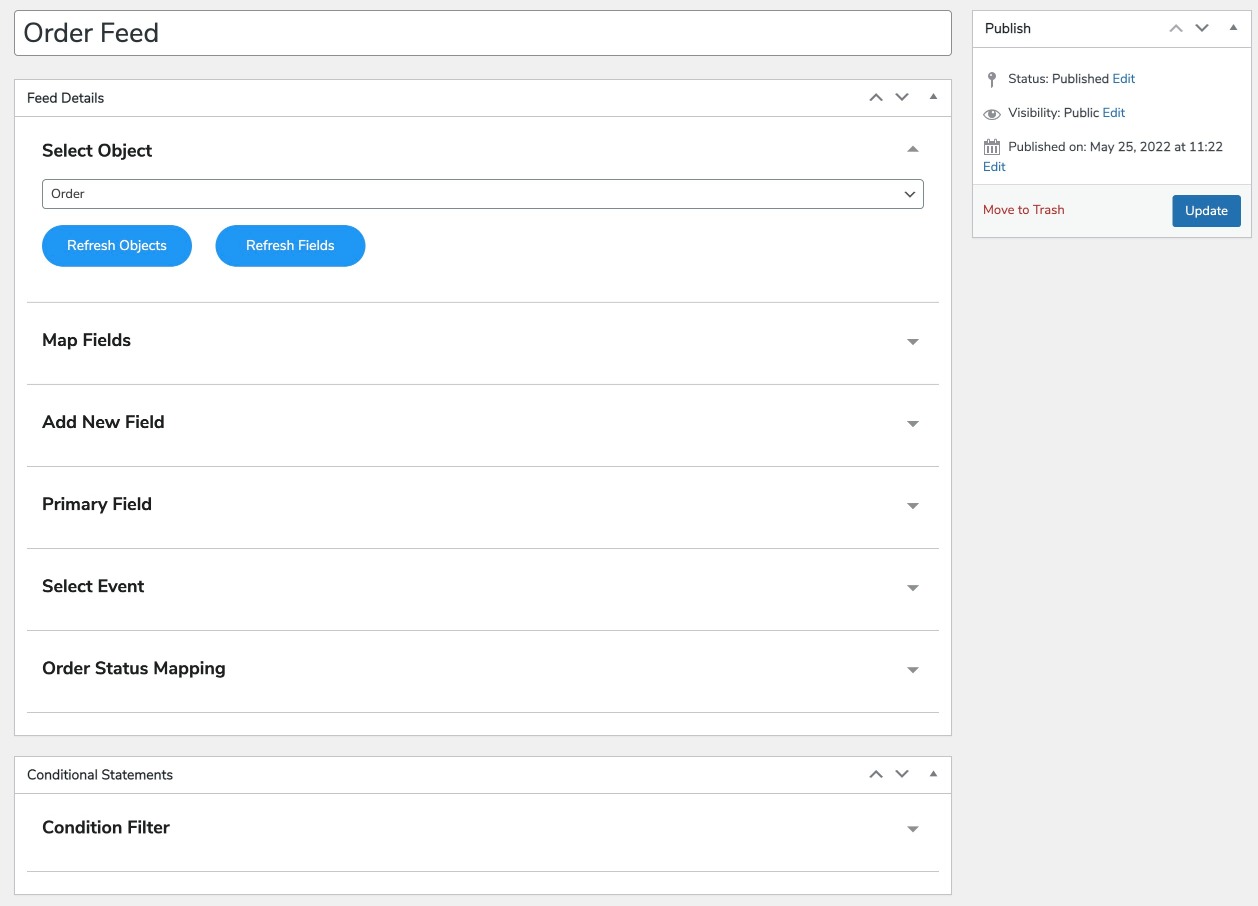
5.6 Order Feed
↑ Back to top- Go to WP Swings→ Feeds→ Order Feed→ Edit in your admin dashboard.
- Order feed is associated with the “Order” object in your Salesforce dashboard. This will assist you to map all the relevant Order fields in the WooCommerce store over your Salesforce account.
- The default mapped fields in this feed are Order Notes Account ID, Order Start Date, Status, Description, Billing Street, Billing City, Billing State/Province, Billing Zip/Postal Code, Billing Country, Shipping Street, Shipping City, Shipping State/Province, Shipping Zip/Postal Code, Shipping Country, Order Name, Bill to Contact ID, and Ship to Contact ID Stage.
- You can also fetch the order edit URL, order sub-total, and order number in order values
Note: Do not forget to tick the checkbox to allow stage mapping with woo order statuses to use the Order Status Mapping as described in the steps ahead.
- You can map more fields by clicking on the Add New Field option as described in the section above.
- The default Primary Field for this Order feed is Order Name. You can edit this field as per your requirements.
- The default Selected Event is ‘After Opportunity Feed’ in this feed.
- Use the setting—Order Status Mapping to map the WooCommerce order status with the Salesforce order status in your dashboard.
- You can also use the Condition Filter as per your requirements.
- Click on the Update button to save your changes in the default feed.
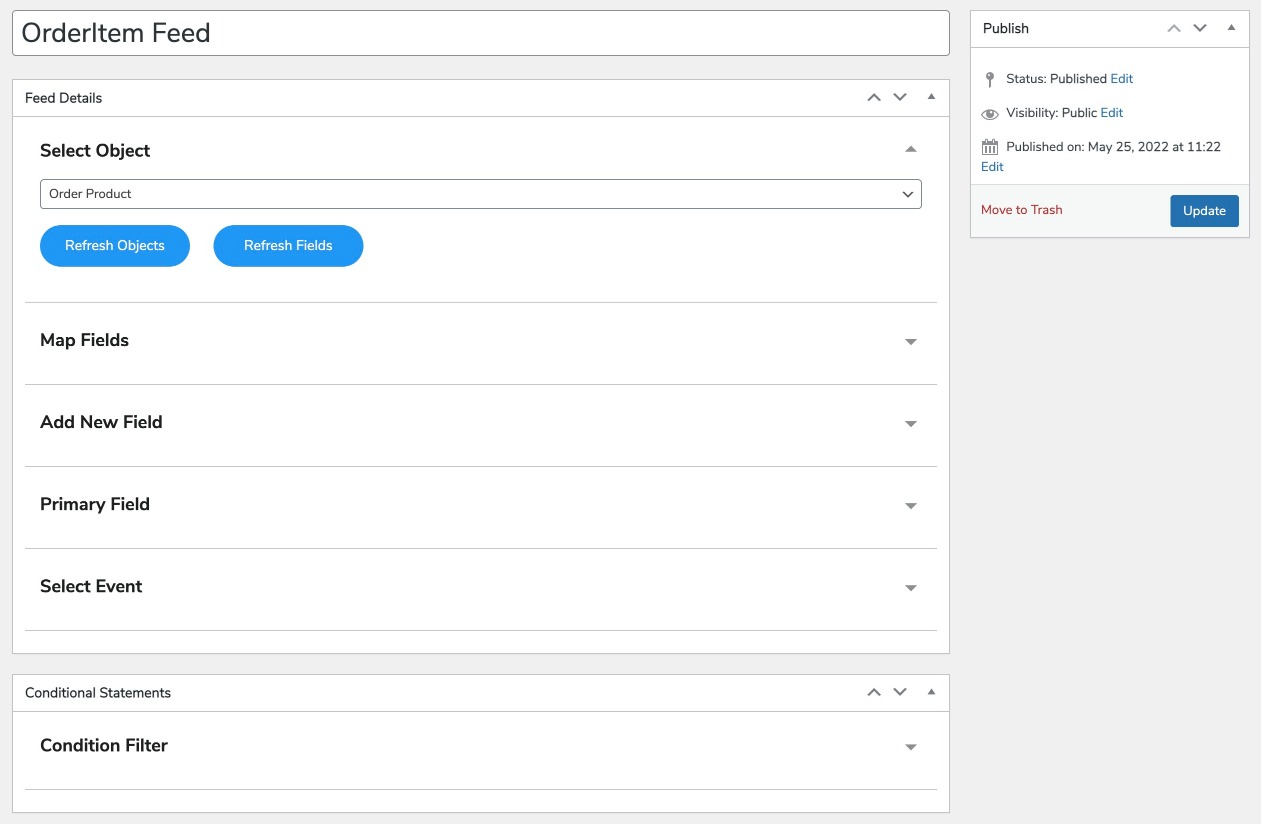
5.7 OrderItem Feed
↑ Back to top- Go to WP Swings→ Feeds→ OrderItem Feed→ Edit in your admin dashboard.
- OrderItem feed is associated with the “Order Product” object. This will assist you to map all the relevant Order Product fields in the WooCommerce store over your Salesforce account.
- The default mapped fields in this feed are Order ID, Pricebook Entry ID, Quantity, and, Unit Price.
- You can map more fields by clicking on the Add New Field option as described in the section above.
- The default Primary Field for this OrderItem feed can be either quantity or unit price.
- The default Selected Event is ‘After Opportunity Feed’ in this feed.
- You can also use the Condition Filter as per your requirements.
- Click on the Update button to save your changes in the default feed.
IMPORTANT NOTE:
- Contact Feed will run only if Account Feed will run first.
- Order Feed is dependent on the Account Feed and Contact Feed. Therefore, Account and Contact feeds need to run before the Order feed.
- Order Item Feed is dependent on the Account Feed, Contact Feed, Order Feed, and Pricebook Feed. Therefore, in order to activate the OrderItem feed, make sure to activate all the parent feeds in advance.
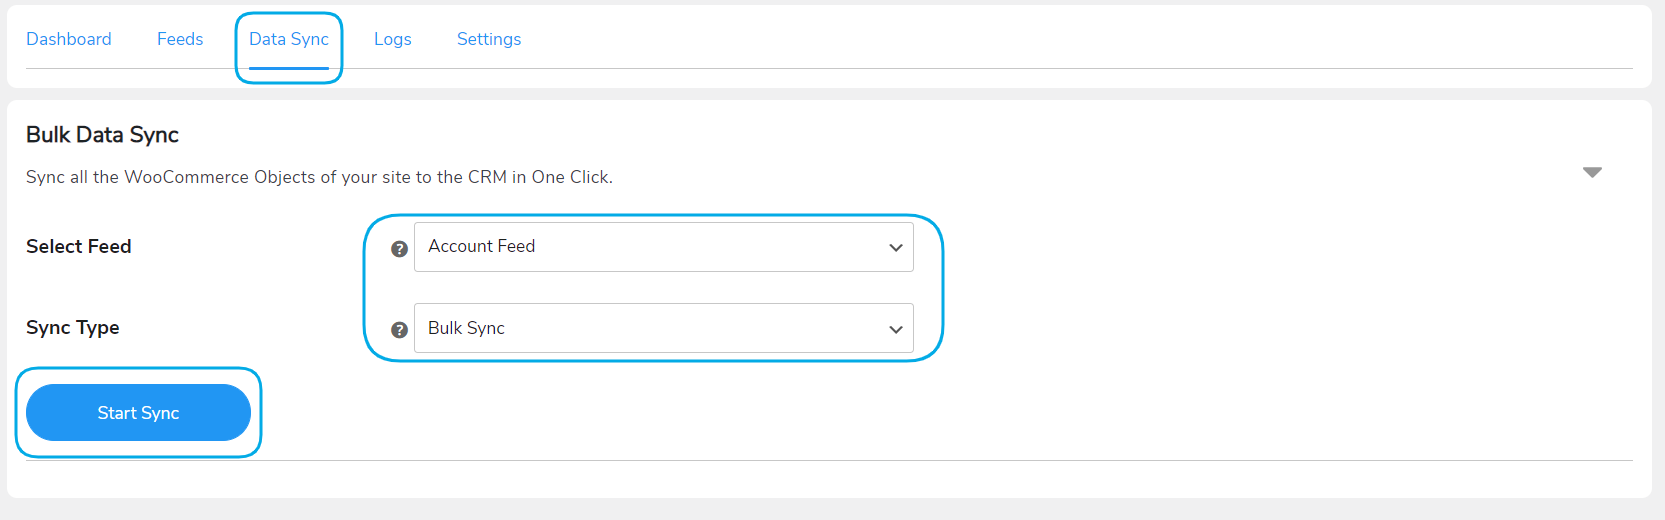
Data Sync With Salesforce CRM Integration
↑ Back to topThe data sync tab helps you with your WooCommerce data synchronization. This Salesforce-WooCommerce integration plugin provides 2 ways to sync your data –
- Bulk Data Sync – This sync option allows you to sync all the data of a particular object.
- One-Click Data Sync – This sync option allows you to sync only the newly added data or the one that failed to sync earlier.
NOTE:
- You can now sync custom feeds using bulk sync or manual sync.
- With the salesforce website integration, admins can utilize the already existing account as the plugin now uses the existing account instead of creating a new one to sync data in case of Manual sync, Bulk Sync, Instant sync, Background Sync, and One-click sync.
Logs
↑ Back to topThe Logs tab displays the details of your WooCommerce data synced with Salesforce CRM Integration. It also displays the requests and responses in case of faults in data sync. The data available in logs are –
- Feed
- Woo Object (WooCommerce Object)
- Woo Object Id
- Salesforce Object
- Salesforce Object Id
- Time of Sync
You can also filter the logs with errors using the filter provided in the latest version of the Salesforce WooCommerce plugin.

Map Billing and Shipping Country Name
↑ Back to topIn addition to mapping the country codes, you can now also map according to billing and shipping county names. This latest feature of the WooCommerce Salesforce integration plugin will let you sync the data with more accuracy.
Map Billing and Shipping State Name
↑ Back to topThe billing and shipping state names may now be easily mapped across Salesforce via the Orders Feed; thanks to the most recent upgrade to this WooCommerce Salesforce Connector plugin
Map Product Tags and Sub-categories
↑ Back to topFor smooth and error-free syncing, we have also added product tags and sub-categories for mapping to the Product Feed of this WooCommerce Salesforce Connector plugin as per the customer’s requirements.
Settings
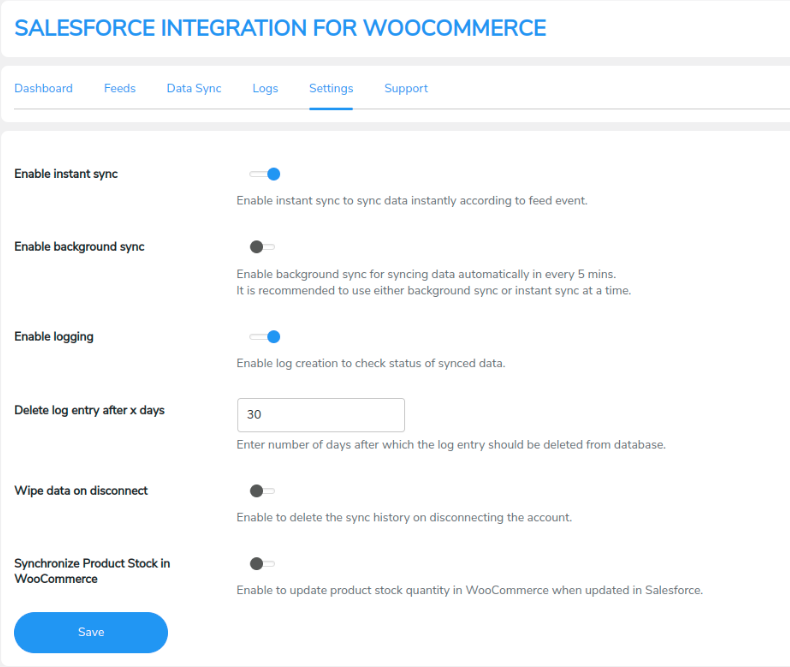
↑ Back to topThe settings tab of Salesforce Integration for WooCommerce plugin includes 3 major options:
- Enable Instant Sync: Toggle the button to enable this setting. This setting allows you to sync WooCommerce data instantly to Salesforce CRM. If you disable this option, you’ll need to sync the data manually from the Data Sync tab.
Note: Follow these steps to manually sync your WooCommerce data over Salesforce
- Go to WooCommerce→ Orders.
- In the right sidebar section, find the Salesforce Manual Sync option
- Select the desired feed you want to run and click on the Sync Manually button. You will find the synced IDs listed below. You can click on these IDs to directly reach the synced entry in your Salesforce dashboard.
- Enable background sync: Use the toggle button to enable background syncing. It is recommended that you use only one- instant sync or background sync at once. This option will allow you to sync your entries every 5 minutes irrespective of the payment gateway used for your WooCommerce orders.
- Enable Logging: Toggle this button to the right and enable the setting to save the data sync logs. If you disable this setting, no logs will be saved.
- Delete Logs After x Days: This setting allows you to select the number of days you want to store the error logs. For example, if you select 30 days, the logs will be stored for 30 days and will be auto-deleted after that.
- Wipe data on disconnect: You can enable this option to delete the sync history once the connection is disconnected.
- Synchronize Product Stock in WooCommerce: This setting allows merchants to sync the product stock from Salesforce to WooCommerce by just enabling the feature, after enabling you’ll want to enter the API name. Users can find the API name by going to the “feeds” section and selecting the particular feed which you are using to determine the stock quantity. Search under the “Map Field” section to find the desired field and the API name. Then, he must enter the API name of the field which you are using to store the stock value. After this, every 5 minutes a cron will run which will update your product stock quantity (if there are any changes).
Salesforce CRM Integration Compatibilities
↑ Back to top1. Compatibility with WooCommerce Memberships:
↑ Back to topFor this compatibility to work, the admin must install the WooCommerce Memberships after installing and trying to introduce different plans for your customers.
With this compatibility update, users can determine the field value for different types of memberships and other information related to it. Like which kind of membership plan, the plan id, the date, and other related information
This is how the different options will look,
2. Compatibility with Multisite
↑ Back to topThe Salesforce CRM connector is now compatible with multisite. After the compatibility, the plugin will work seamlessly with the sub-domains. The admin will be able to not only sync data but also create log tables (as per the requirements).
The admin can sync data and effortlessly create log tables on different sub-domains, and the plugin also works efficiently on all domains.
FAQs
↑ Back to topQ1. Can we sync the data with Salesforce Integration for WooCommerce plugin?
Yes, we have given two options for this: Bulk sync and One-click Sync which you can choose according to your need.
Q2. What is the difference between Bulk sync and One-click Sync?
Bulk Sync: Syncs all the data of a particular object.
One-click Sync: Syncs only the newly added data or the one that failed to sync earlier.
Q3. I don’t want to sync all the data automatically, what options can we opt for?
We have given the option of Manually syncing data so that you can choose the manual option too.
Q4. Can we check sync error logs with this plugin?
Yes, there is an option in the backend where you can check all your logs.
Q5. Can the logs be deleted automatically after some days?
Yes, you can set the number of days you want to store the logs. They’ll be deleted after the set days.
Q6. We want to delete some data from the plugin, is this possible?
Yes, with this Salesforce plugin, you can delete plugin data as you want.
Q7. Does your solution sync orders with the existing account on Salesforce?
Yes, Our plugin now syncs the orders for those accounts which already exist in Salesforce CRM which will remove duplicate account creation during the order sync from WooCommerce to Salesforce.
Q8. Can we sync the order notes data to Salesforce?
Yes, In our latest update(1.1.4) we have provided this feature that now clients can sync order notes data as well over salesforce.