
1.Overview
WooCommerce Ultimate Gift Card allows the merchant to create, sell, and redeem multiple gift card types of products on their WooCommerce store.
Features of WooCommerce Ultimate Gift Card:
(1) Gift Card Product: A separate gift card type product is created in WooCommerce and the merchant can create as many products as he wants.
(2) Gift Card Template: You can create a gift card product and assign suitable Gift Card Templates from the product edit page.
(3) Price Variation: There are many types of the pricing system for Gift Card products as given below:
- Fixed Price
- Selected Price
- Range Price
- User Price
- Variable Price
(4) QR Code / BAR Code Feature: The QR Code/BAR Code is used over here for providing security.
- ECC (Error Correction Capability) Level: This compensates for dirt, damage, or fuzziness of the BAR Code. Valid values are “L” (low ECC), “M”, “Q”, and “H” (highest ECC). A high ECC level adds more redundancy while using more space.
- Size: Enable QR Code after selecting the ECC level to set the size of the QR Code.
- Margin: Set the QR Code margin over here.
- Code Type: You can use BARCode code types in various places for various purposes.
- Enable BAR Code with Coupon Code: The ultimate gift card will display the coupon code and Barcode together.
(5) Automatic Coupon Code Generation: When the gift card order is marked complete, the gift card coupon code is generated automatically and sent to the mail to which the gift card is sent.
(6) Exclude Sale Items: The merchant can prevent the gift card discounts from applying to the sales items.
(7) Exclude Categories: The admin can exclude categories from gift card discount applicability. If any excluded category product is available on the cart, the gift card discount doesn’t apply.
(8) Exclude Product: The merchant can also exclude a selected product from the gift card discount. If any excluded product is available on the cart, the gift card discount doesn’t apply.
(9) Multiple Usability: A user can spend the whole Gift card amount in multiple times.
(10) Expiry Date: The admin can set after how many days the gift card coupon is expired.
(11) Cart Total Range: The admin can set a minimum and maximum cart total amount for applying the gift card discount.
(12) Individual Use: The merchant can determine whether the gift card coupon is usable for a single user or multiple users.
(13) Email Notification: A gift card template is sent to the user to which gift card is sent. The gift card email template depends on the gift product.
(14) Gift Card Scheduling: The customers can select the date of sending the gift card to the recipients. They can also send the scheduled Gift Card on the current day.
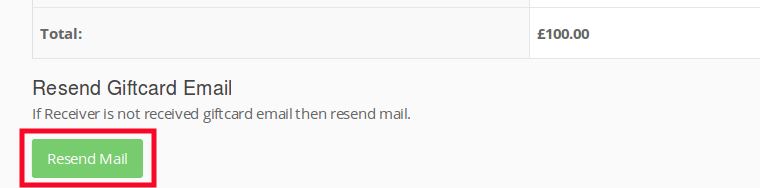
(15) Resend Email: If, for some reason, the gift card mail is not sent to the user, then an option to resend the gift card email is available.
(16) Export Online Gift Card Coupons Details: The admin can export the Gift Card Coupon Details generated from the orders in a CSV file.
(17) Import/Export Offline Gift Card Details: Admin can export the offline gift card coupon details from the Export Coupon Tab section. Also, they can import the Gift Card coupon details into the offline gift card table from the Offline Gift Card Section.
(18) Resend Gift Card by adding more amount to the coupon: Admin can resend the unused Gift Card Coupons to the recipients by updating their value. They can select multiple gift card coupons and assign a similar amount to all coupons.
(19) Date Formatting: The merchant can set the date format they want to display on the front end. The expiry date in the Gift Card Template will be in the set date format.
(20) Gift Card Message Length: The merchant can set the Gift card message length. By default, the message length is 300.
(21) Downloadable Gift Card: Admin can download the gift card pdf and send it to the buyer or receiver, and the buyer can also download the gift card.
(22) Browse image for Gift Card: Customer can also set their customizable gift card image.
(23) Shipping Feature: The shipping feature is used for gift card shipping to the recipient’s address. It is for the admin and the buyer.
- Coupons: After enabling the shipping feature, you can use the coupon for gift card shipping and tax.
(24) Disable Category Feature: The admin can assign more than one category to the Gift Card product.
(25) Coupon Mail Setting: The user will get notified on their email upon each usage of the coupon amount. The users can also verify their remaining coupon amount.
(26) Other Setting: In this setting, the sender has three delivery options to send their gift card email to the recipient.
(27) Delivery Method: The sender has three delivery options to send their gift card email to the recipient.
(28) Discount Feature: The admin can set the minimum and maximum discount amounts. It has two discount types; Fixed and Percentage. Admin can also enable the discount setting per product-wise.
(29) Gift Card PDF: Customers will get an email along with a PDF attachment. You can choose an A3/A4 size for the gift card PDF.
(30) Exclude Product Feature: When products are assigned any gift card (Per Product Setting), the generated coupon will not apply to the assigned product and the category.
(31) Shipping Class : You can add a shipping class and apply it to gift card products
(32) Thank you gift coupon Feature: The merchant would be able to send Thank You gift coupons to their regular customers who have placed the required number of orders for that coupon.
(33) Validation may turn On or Off: Both merchants and customers can select from multiple Gift Cards templates.
(34) Multiple templates for the customer: From now onwards, the merchant can select multiple templates for Gift Card and customer would be able to choose from them.
(35) To Name Field for “Mail to Recipient Option”: Any customer who wants to send a Gift Card to their friend via the mail to recipient option can fill in their friend’s email id along with the name.
(36) Recipients Email Editing: The admin can edit the recipient’s email address. Afterward, they have to resend it once.
(37) Tax Calculation: In this version, we provide the tax calculation for Gift Card Products.
(38) Gift Card Coupon Filter: From now on Gift Cards can be easily filtered by the provided setting, You may easily filter-out the Online/Offline/Imported Gift Cards among all of them.
(39) Email for Ship Your Card Delivery method: From now on email id can be changeable by Merchant easily, Whatever Email id has been filled in the given textbox, the Mail will get sent on that Id.
(40) The number of E-Gift Cards: The number of digital Gift Cards depends on the number of quantities mentioned.
(41) WPML/Translation: The system is fully compatible with WPML Plugin and we also come with multiple languages supported .po and .mo files like for Germany, France, Spanish, and English.
(42) Customizable Gift Card: Your customer can easily customize their Gift Card template. You can provide predefined images and upload more for your customers. It also lets customers upload their Gift Card images and make changes in real-time.
2.Installation
1. Automatic Installation
Automatic installation is the easiest option as WordPress handles the file transfers itself and you don’t need to leave your web browser.
Steps are as follows :
(i) Download the zip folder of the plugin WooCommerce Ultimate Gift Card.
(ii) Once downloaded install the WooCommerce Ultimate Gift Card plugin through browsing and activate it.
2. Manual Installation
The manual installation of the plugin is another option to install the plugin to your WordPress-environment. The manual installation method involves downloading our WooCommerce Ultimate Gift Card Extension and uploading it to your webserver via your favorite FTP application.
Steps are as follows :
(i) Upload the WooCommerce Ultimate Gift Card folder to the /wp-content/plugins/ directory.
(ii) Activate the WooCommerce Ultimate Gift Card plugin through the ‘Plugins’ menu in WordPress.
3.Create Gift Card Templates & Products
Gift Cards Templates:
After activation of the plugin WooCommerce Gift Card, a custom post type “Gift Cards” is created. From here Merchant can create as many Gift Card Templates as he wants.
WooCommerce Gift Card plugin already provides some gift card templates, which are automatically created on plugin activation and it will help the merchant to create new gift cards.
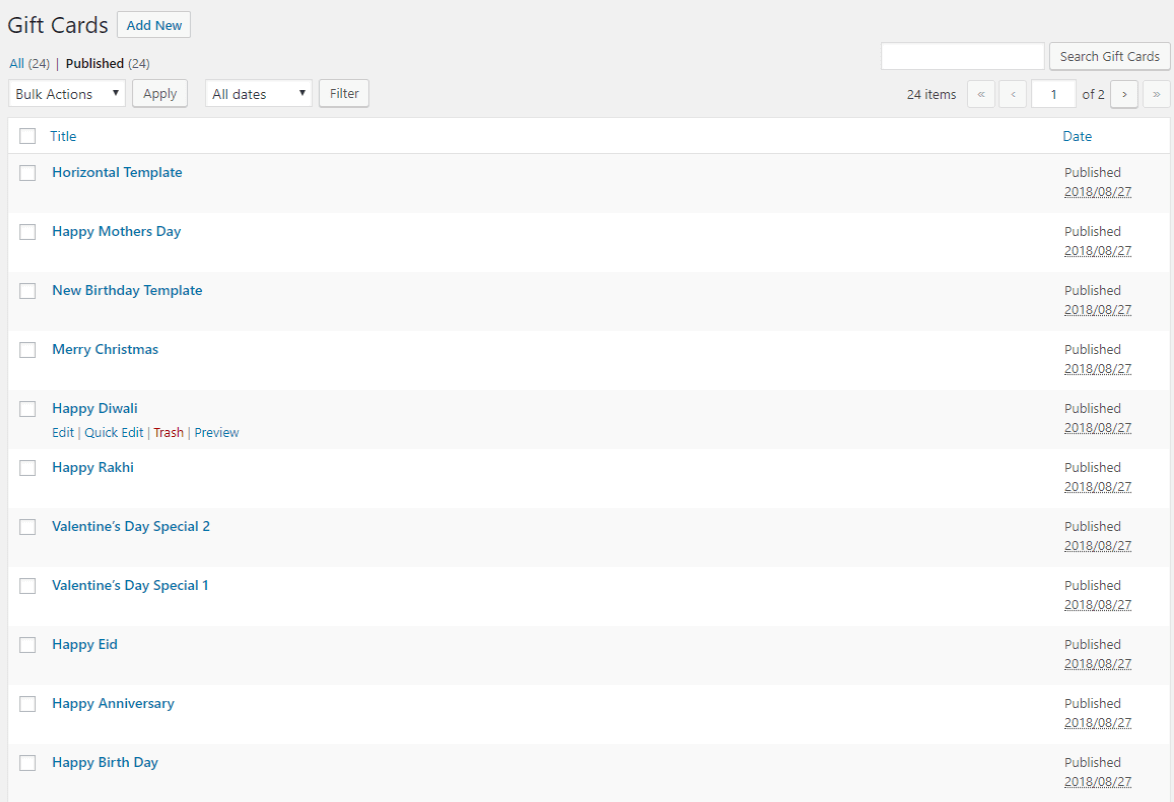
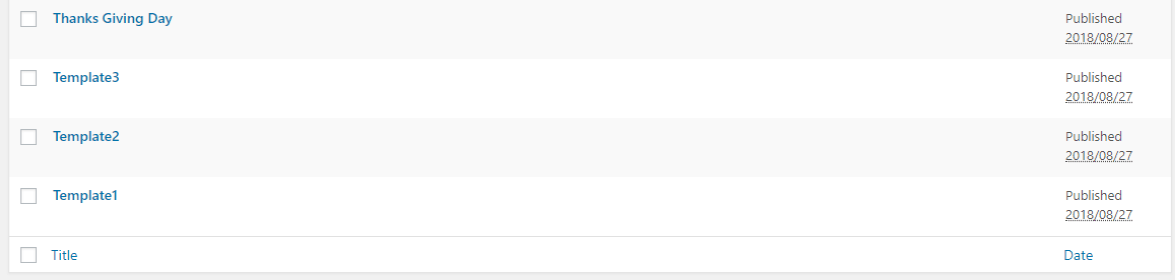
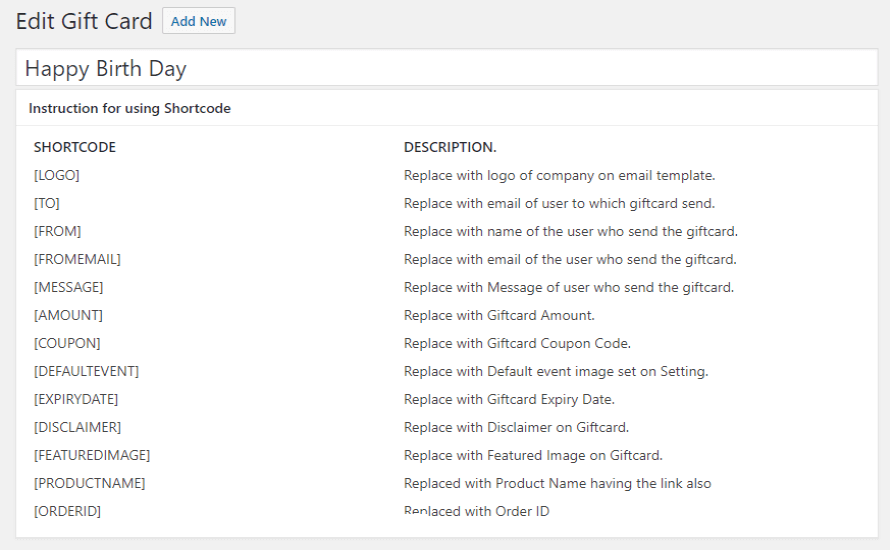
To create a new Gift Card Template navigate to the sidebar and click on Gift Cards > Add New. Here you can design your template by using custom CSS. HTML and you can also use the shortcode.
Gift Card Products :
A separate gift card type product is created in WooCommerce. You can create as many products as you require.
To create a new product, go to the sidebar and click on Products > Add New.
(1) For creating a new Gift card, select a Gift Card as a product type and set up the product name, description, image, and other details required for a product.

(2) Here Merchant can select a different type of pricing for Gift Card products.
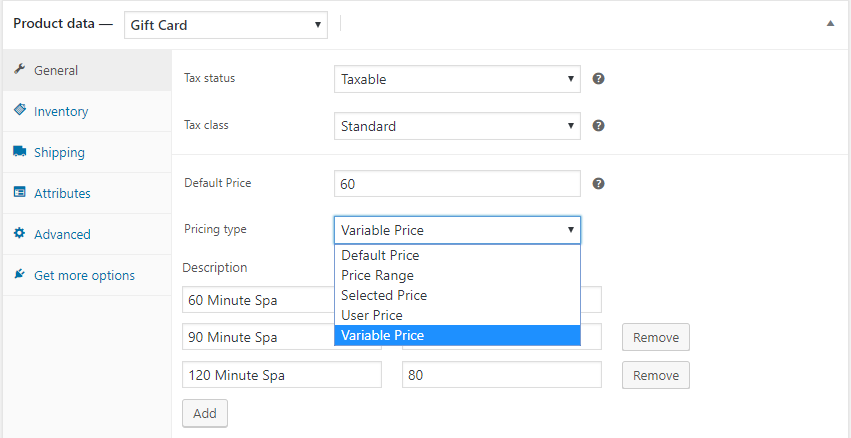
- Fixed Price
- Selected Price
- Range Price
- User Price
- Variable Price
- Fixed Price (Default Price):

On the product detail, page Fixed Price Gift Card product is shown as:

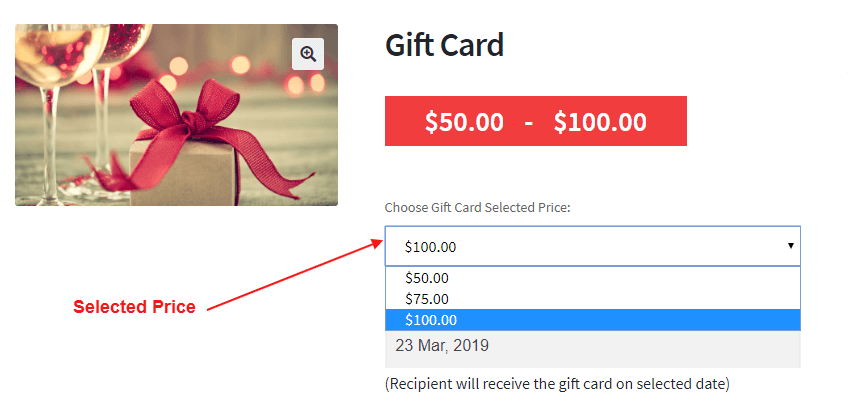
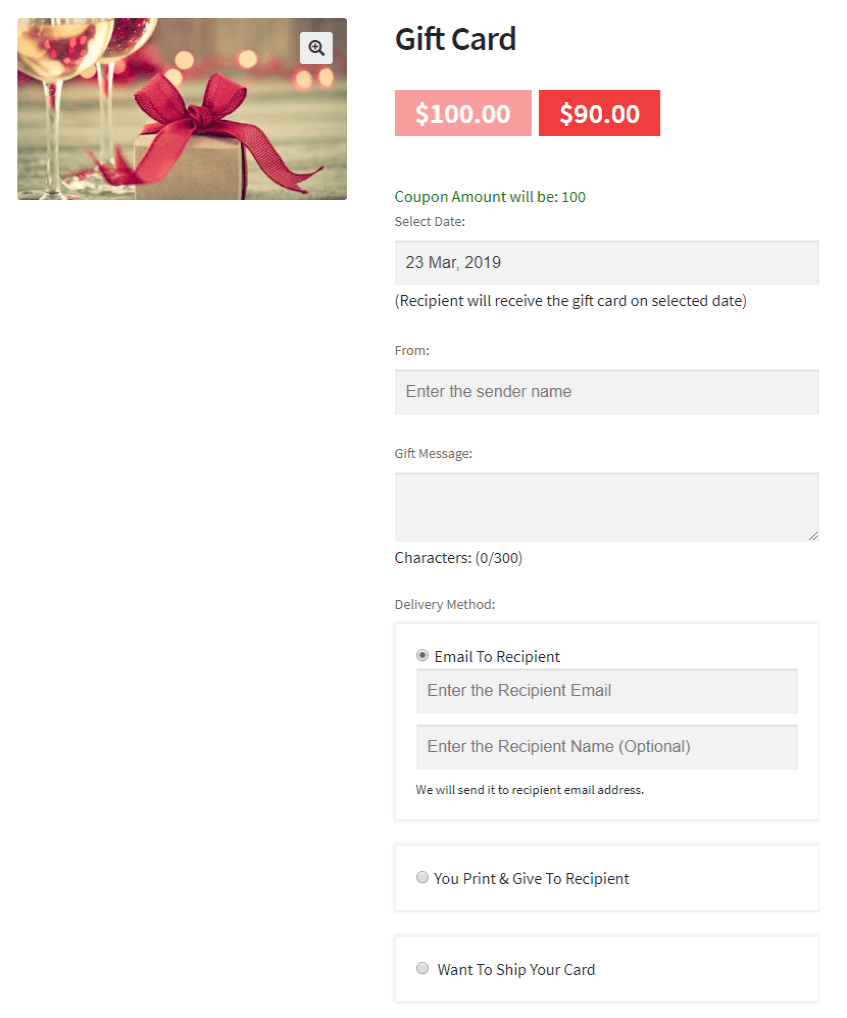
- Selected Price:

On the product detail, page Selected Price Gift Card product is shown as:
- Price Range:
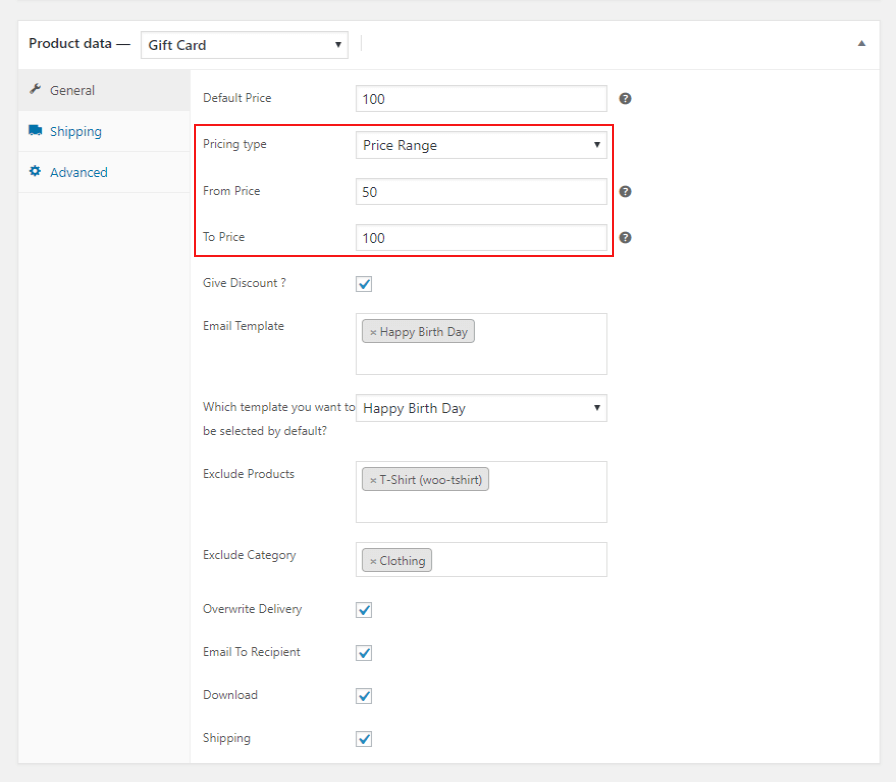
On the product detail, page Price Range Gift Card product is shown as:

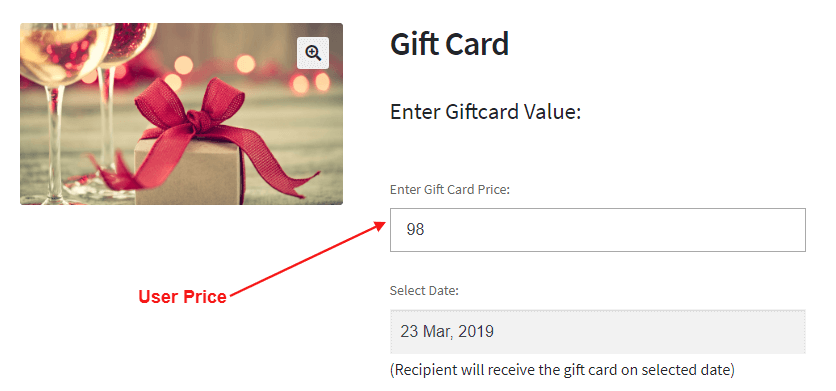
- User Price:
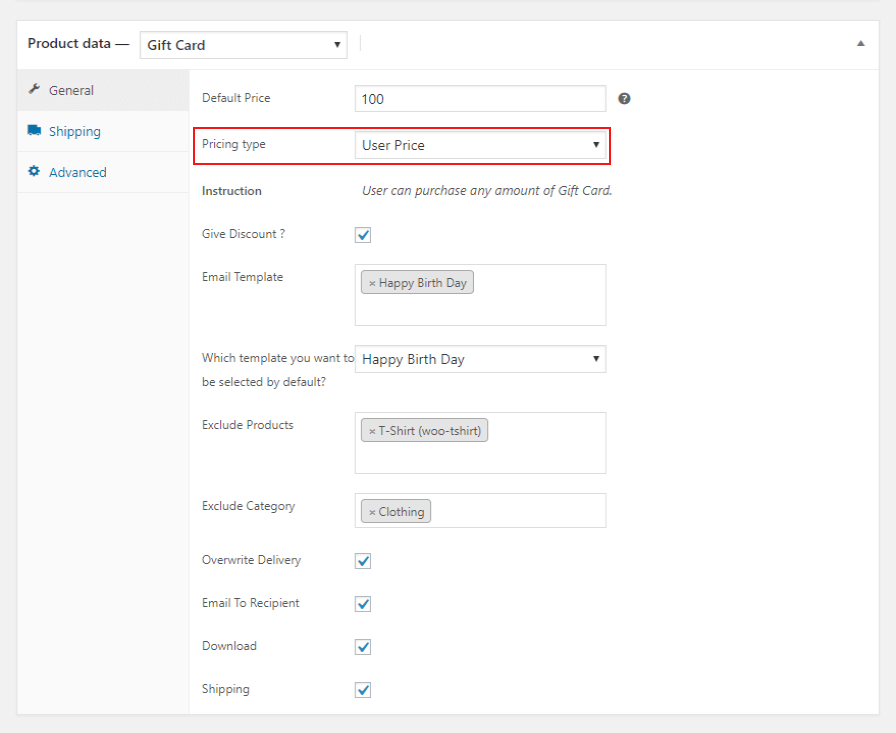
On the product detail page, the User Price Gift Card product is shown as:
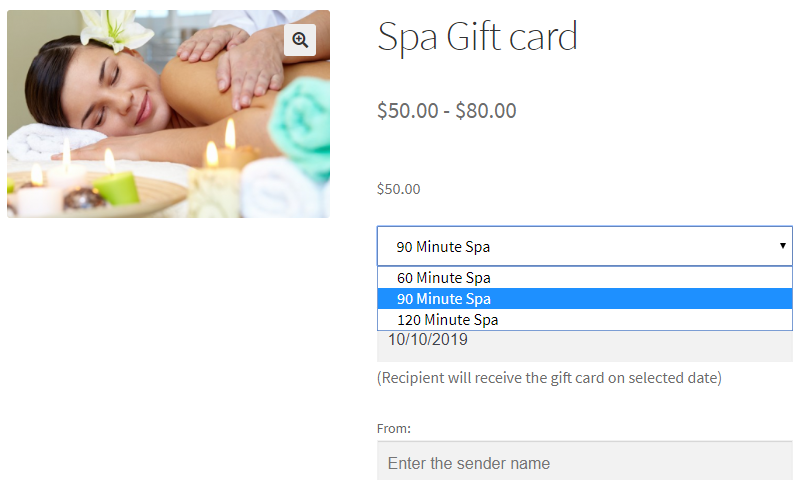
- Variable Price:
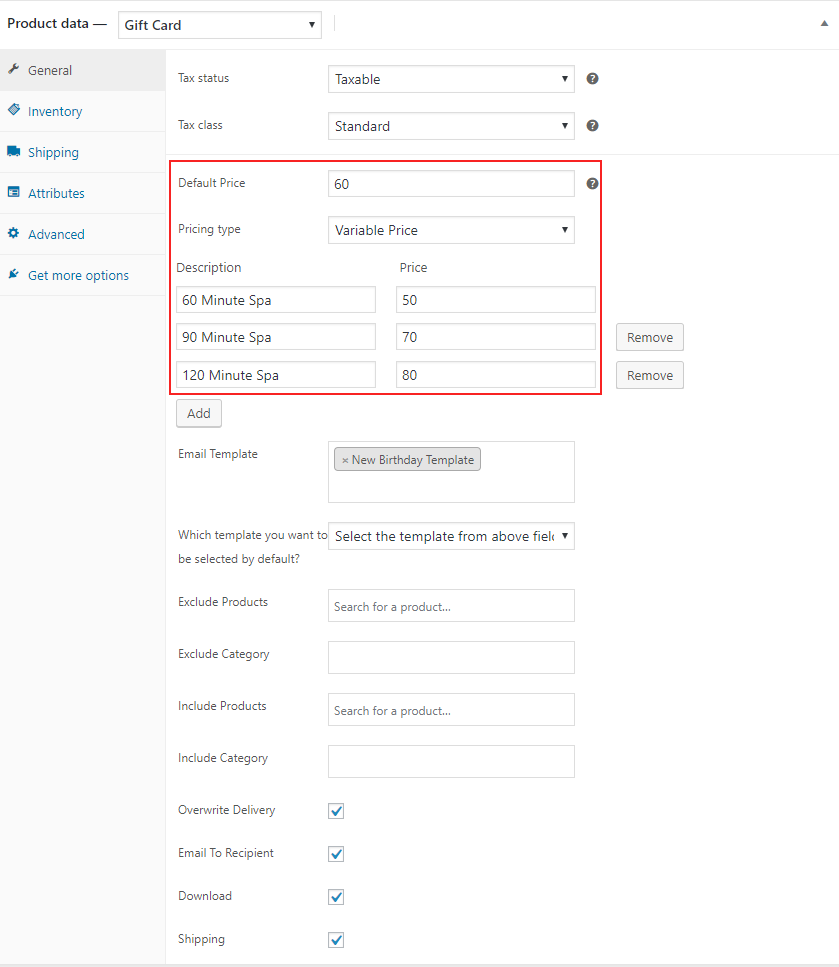
On the product detail page, Variable Price of the Gift Card product is shown as:
(3) Give Discount: Enable discount on Gift Card Products.
(4) Select Email Template: Select Email Template or multiple Email Templates.
(5) Select the Default Template: If you use multiple Email Templates, you can choose a default template.
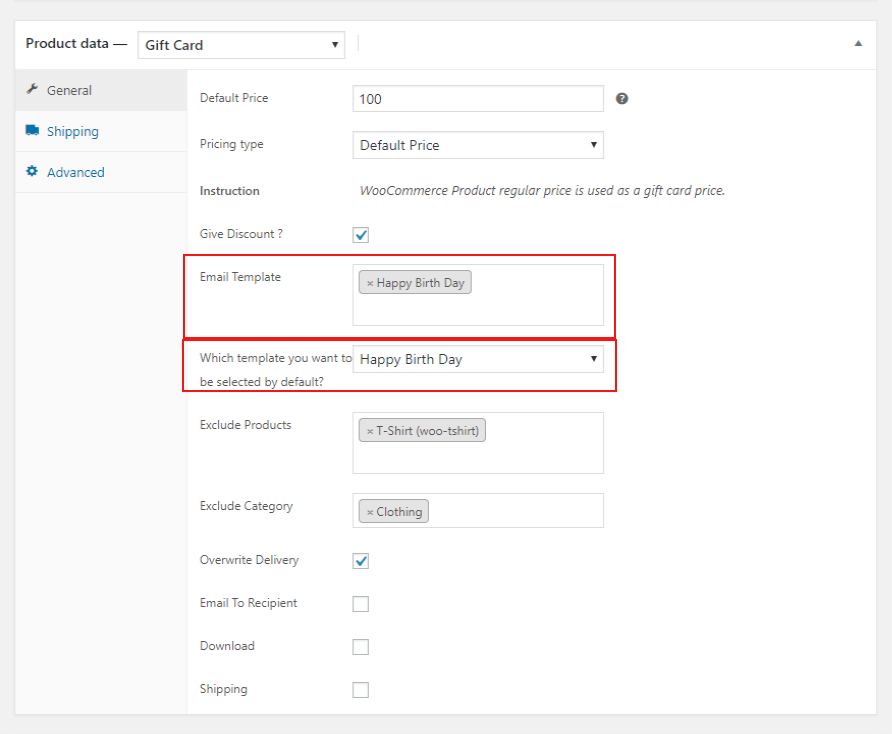
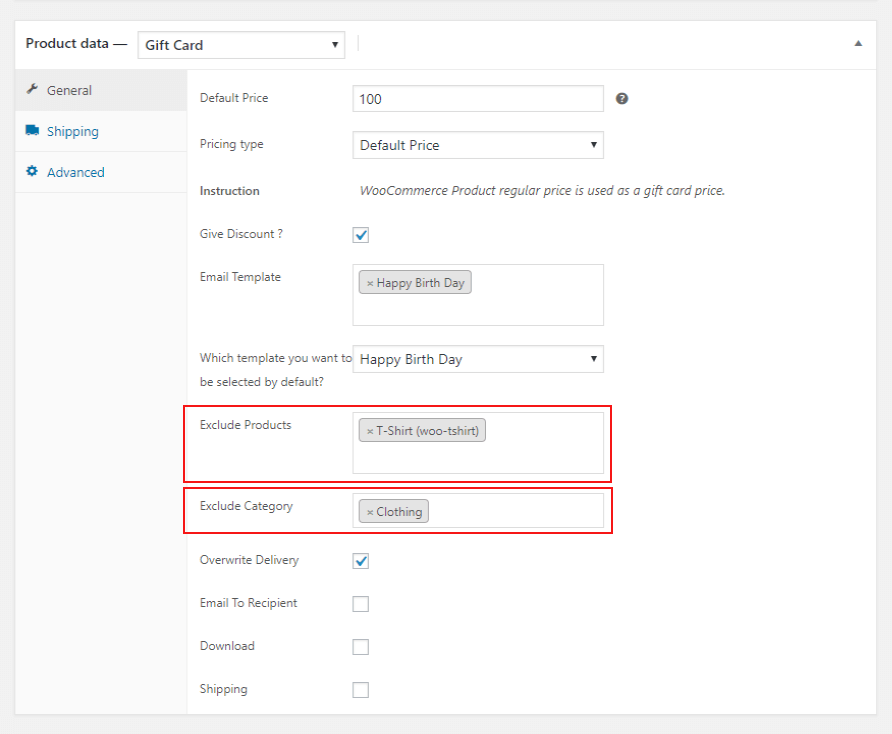
(6) Exclude Product: The merchant can also exclude a selected product from the Gift Card discount. When any excluded product is available on the cart, then the Gift Card discount is not applied.
(7) Exclude Categories: The merchant can exclude categories to which he doesn’t want a Gift Card discount. When any excluded category product is available on the cart, then the Gift Card discount is not applied.
(8) Overwrite Delivery: In this setting, set per product delivery methods for a product your customer used to send their Gift Card email to their recipient.
And the last click on the ‘Publish‘, your Gift Card product is successfully created.
Now your customer can easily purchase the Gift card from your shop.
Scheduling of Gift Card:
The customer can also schedule the time to send the gift card email to their recipient. If the schedule is left blank, the email is instantly after placing the order successfully.

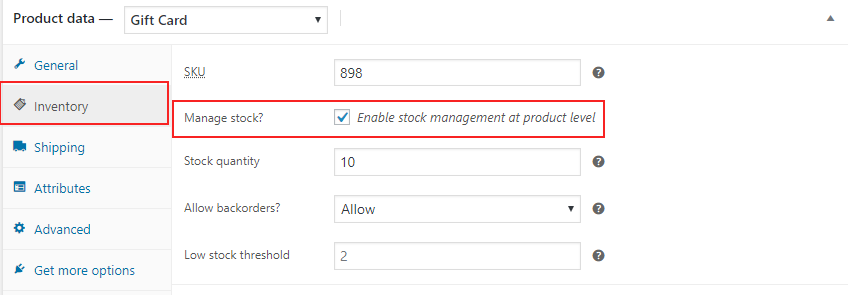
Inventory: The admin can manage the inventory of gift card products.
4.General Setting
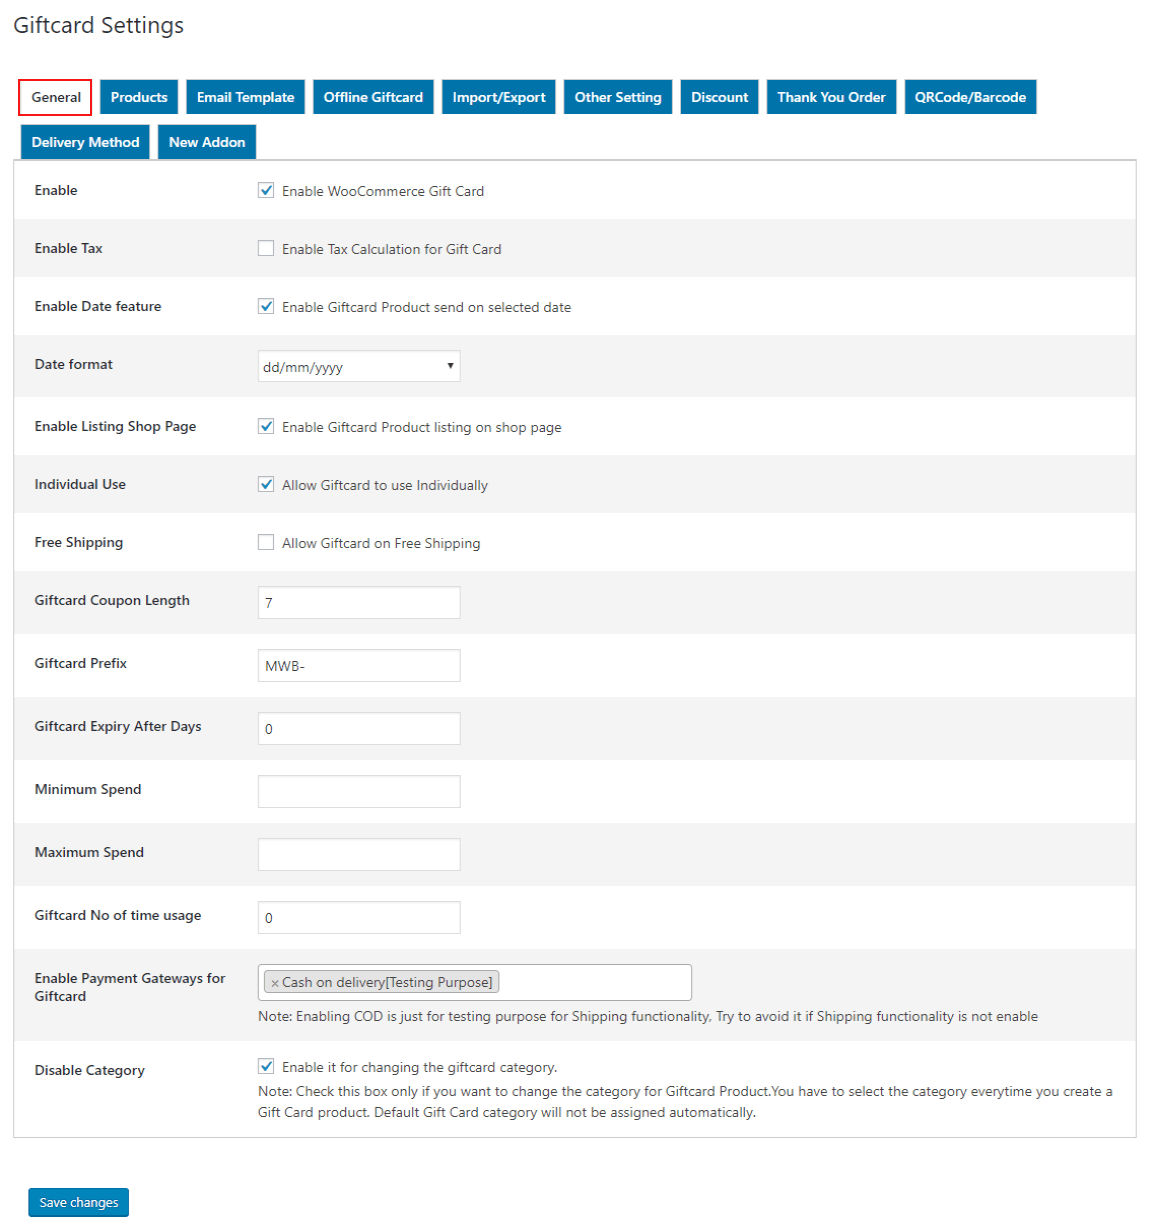
- Enable: Check this box to enable the WooCommerce Ultimate Gift Card plugin.
- Enable Tax: Check this box to enable the tax on Gift Card products.
- Enable Date Feature: Check this box to allow the Gift Card products to send to the receiver on the selected date.
- Date Format: Select the date format you want to show on the Gift Card.
- Enable Listing Shop Page: Check this box to allow the listing of Gift Card products on the shop page.
- Individual Use: Enable this setting to restrict the Gift Card coupon from being used in conjunction with other Coupons or Gift Cards.
- Free Shipping: Check this box to enable free shipping for the Gift Card products.
- Giftcard Coupon Length: Enter Giftcard coupon length. The minimum length of the coupon is 5.
- Giftcard Prefix: Enter the Gift Card prefix for the coupon code.
- Giftcard Expiry After Days: Enter a valid number on which a purchased Gift Card will expire. Keep the value 0 for no expiry date and 1 for one-day expiry after order completion.
- Minimum Spend: Set the minimum spend of a Gift Card.
- Maximum Spend: Set the maximum spend of a Gift Card.
- Giftcard Number of Time Usage: Set the number of times a user can use the Gift Card before the Giftcard goes empty.
- Enable Payment Gateway For Giftcard: Choose a different payment gateway method for Gift Card Products. Otherwise, default payment gateways will work
- Disable category: Check this box if you want to change the category for Gift Card products. You must select the category every time you create a Gift Card product. The Default Gift Card category will not be assigned automatically.
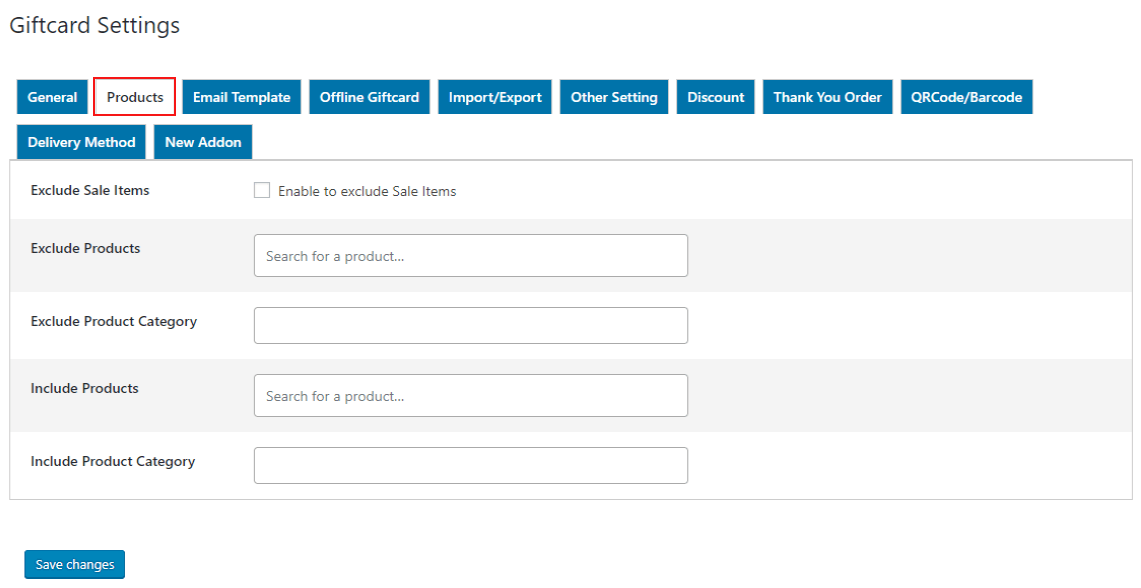
5.Products Setting
You can include and exclude the product categories for the Gift Cards.
-
- Exclude Sale Items: Check this box to make the Gift Card Coupon not apply to the sale items.
- Excludes Products: You can also exclude a selected product from the Gift Card discount. If any excluded product is available in the cart, the gift card discount will not apply.
- Exclude Product Category: You can exclude categories that you don’t want the gift card discounts to apply to. If any excluded category product is available in the cart, the gift card discount will not apply.
- Include Products: Select products on which the Gift Card coupons will apply.
- Include Product Category: Gift Card coupons will apply to the selected products’ categories.
You can also exclude the products and categories for the specific product. Go to the product edit page and click on the ‘Product data’ section. You can exclude the products and categories from the gift card products.
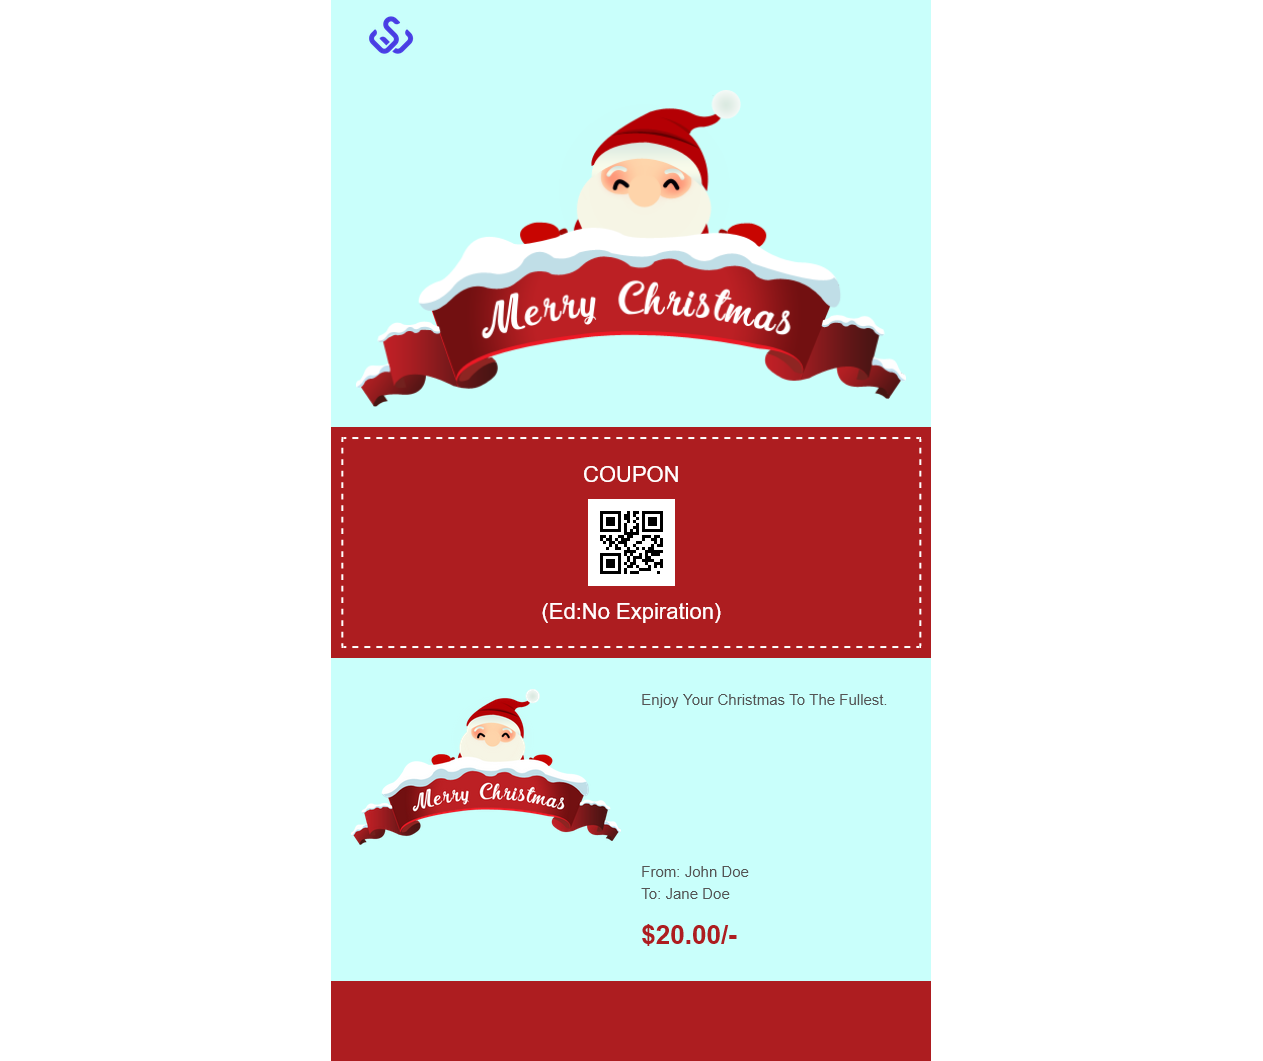
6.Email Template Setting
An email template is sent to the user to notify them about their Gift Card, Gift Card Coupon, etc. The merchant can manage their email templates with the following settings.
6.1.Manage Template
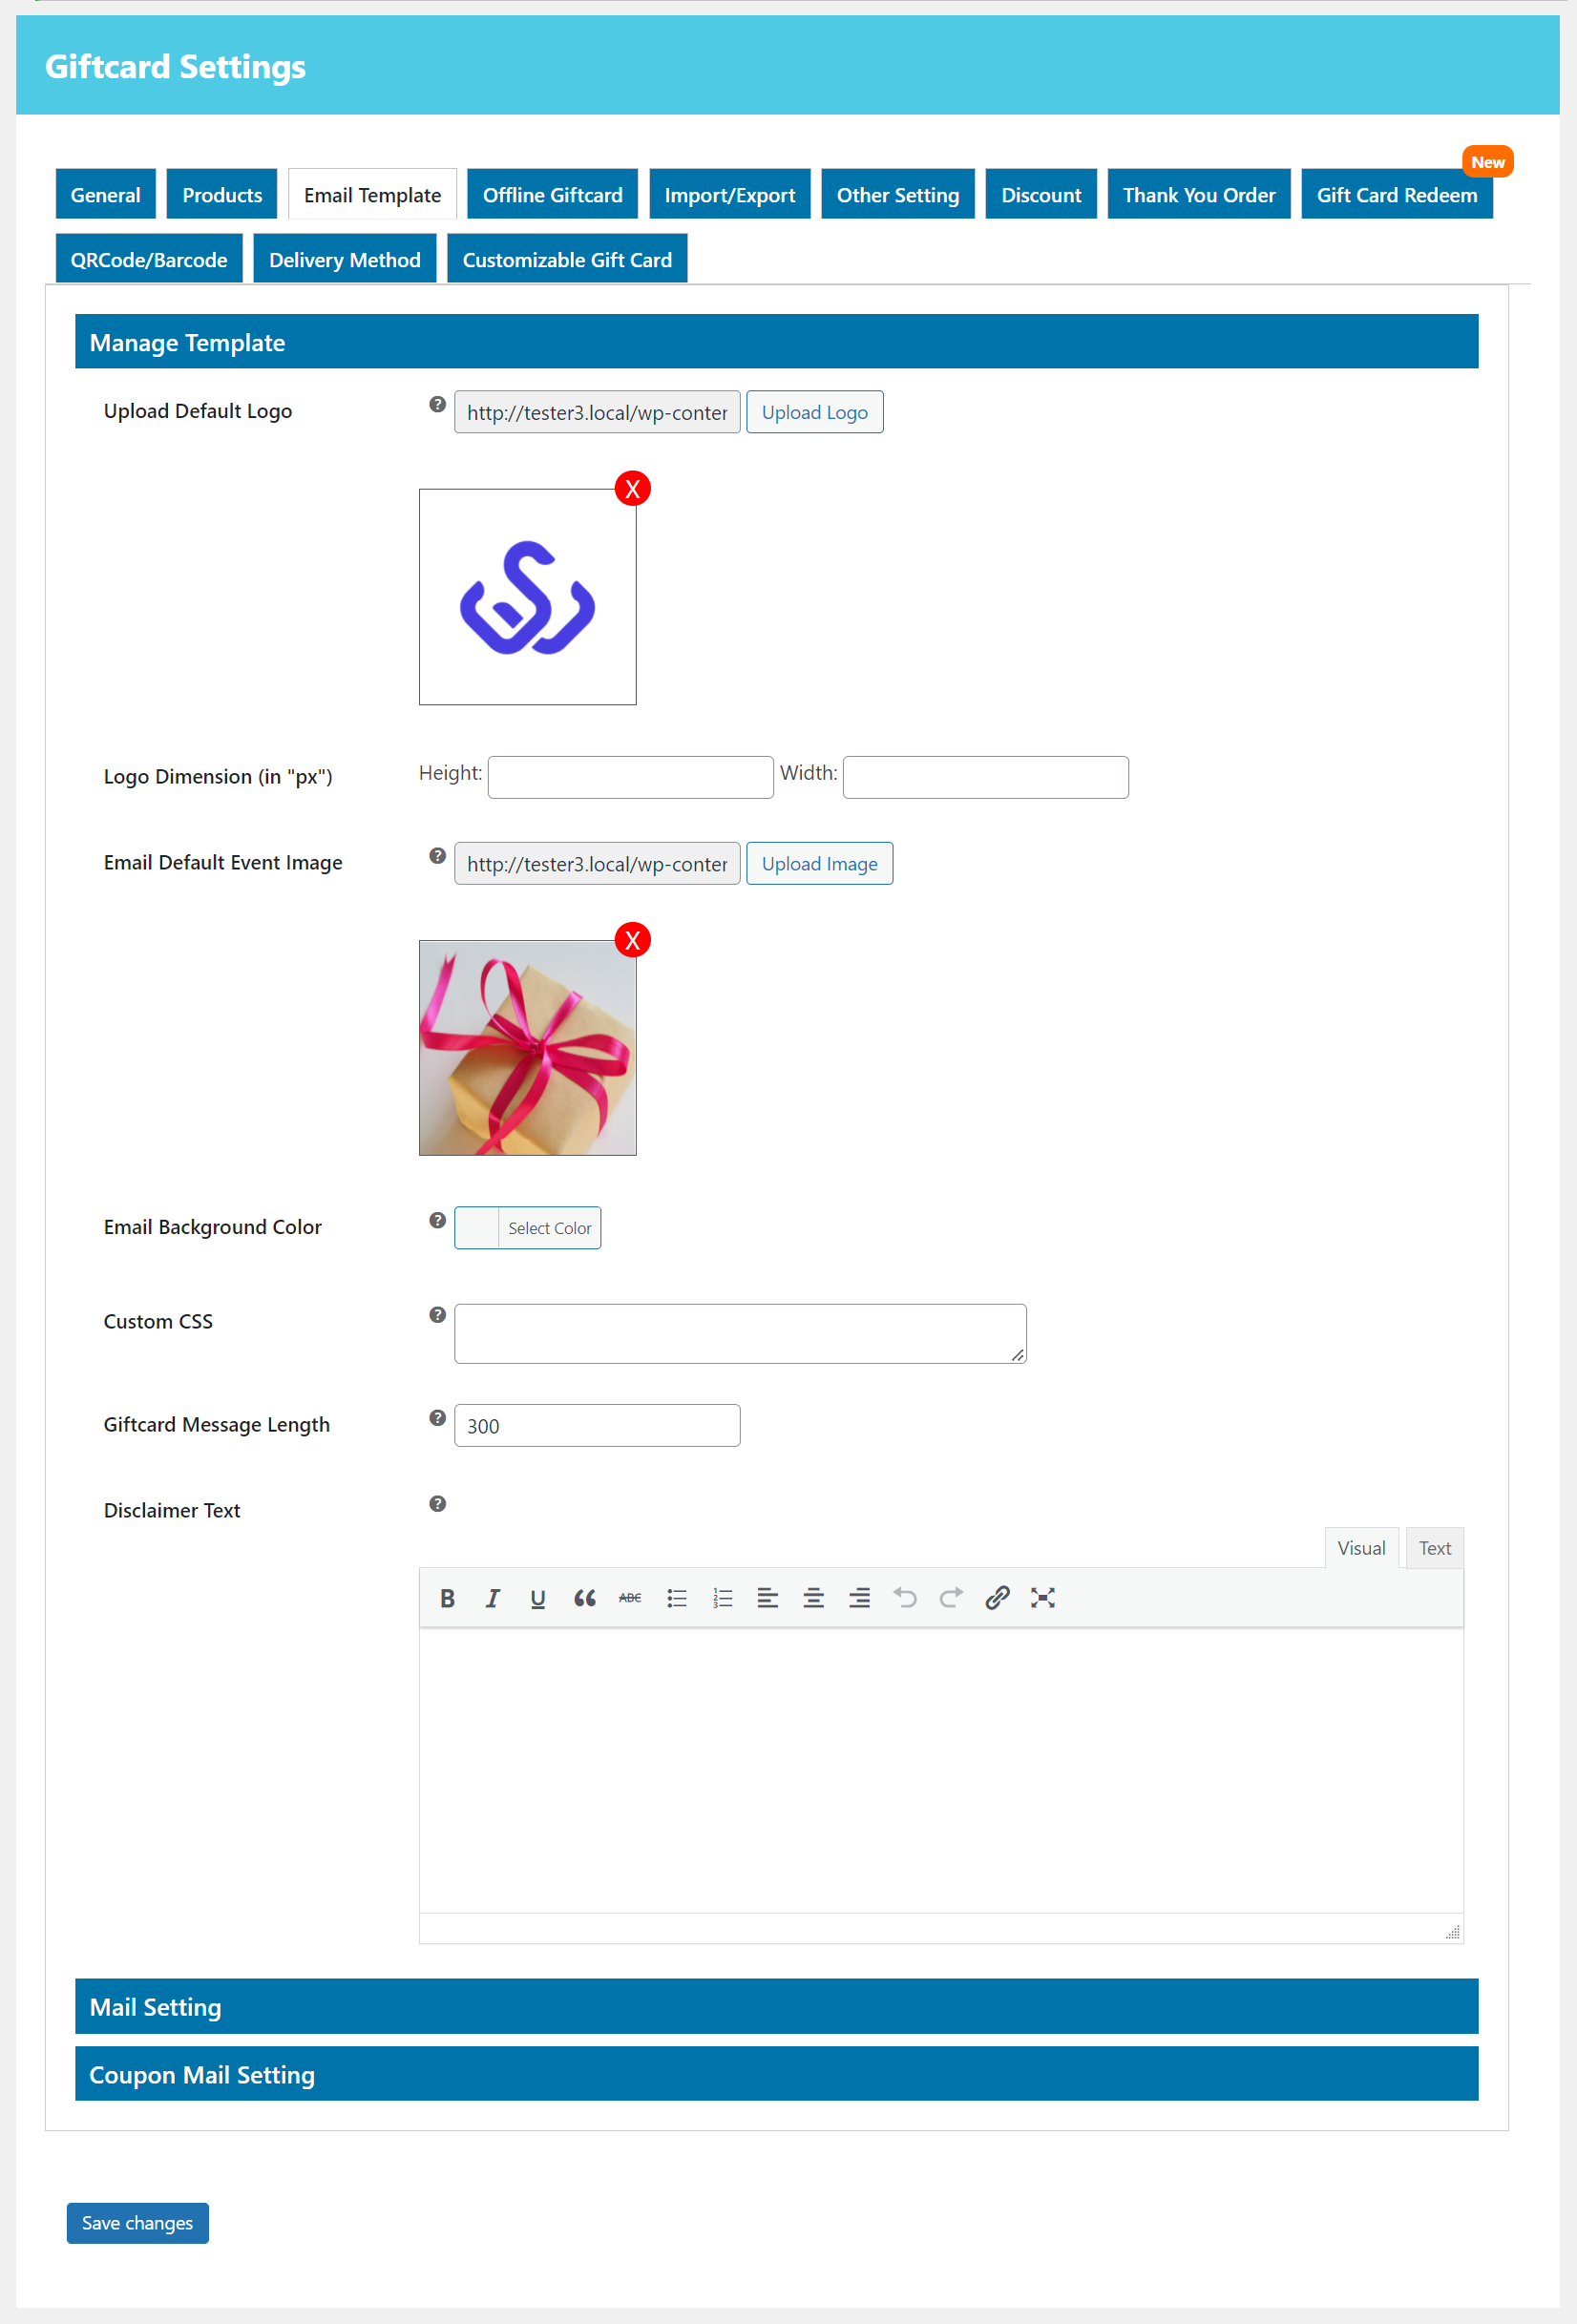
In this section, you can design your email template.
- Upload Default Logo: Upload the image you want to use as the logo on the email template.
- Logo Dimension (in “px”): Set the logo size in pixels.
- Email Default Event Image: Upload the image you want to use as the default event/occasion logo.
- Email Background Color: Merchants can change the background color of the email template.
- Custom CSS: Write the custom CSS for the Email template.
- Giftcard Message Length: The merchant can set the gift card message length. The Default length of the Gift card message is 300. Also, the customers to check the current count of the message characters.
- Disclaimer Text: You can change the disclaimer text for the email template.
Here you can see the frontend email template.

6.2.Left Coupon Amount Mail Setting
Disable Coupon Amount Notification Email: By default, your users will get email notifications for the remaining amount after gift coupon usage. But you can disable this notification feature for the users.
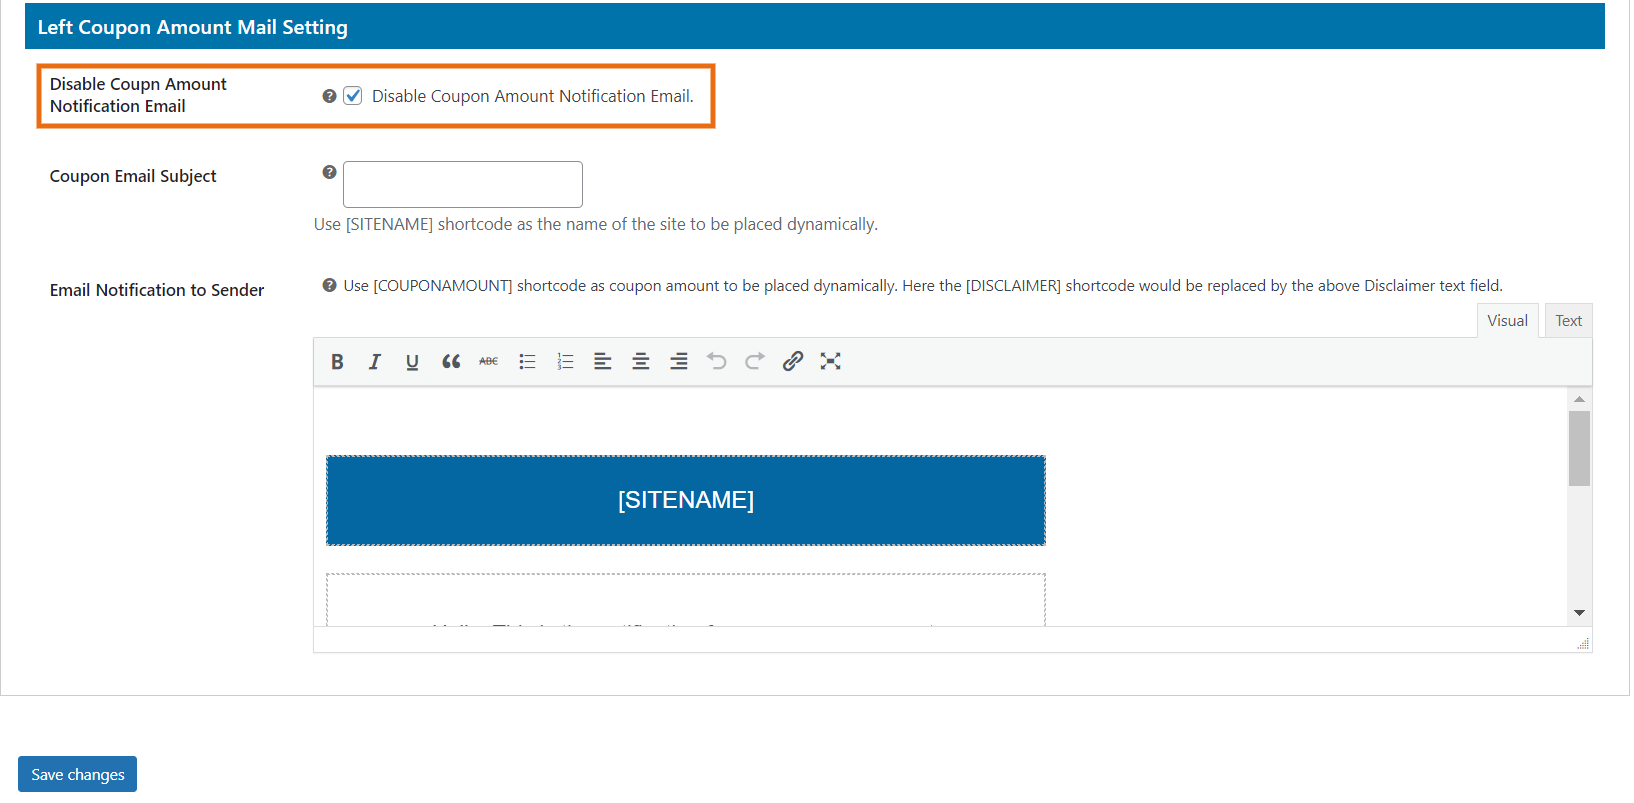
- Coupon Email Subject: Write the subject of the coupon mail. Use [SITENAME] shortcode to place the site’s name dynamically.
- Email Notification to Sender: Write a message to the buyer acknowledging that the gift card has been sent successfully. You may use the shortcode [TO] for placing the Recipient Email dynamically.
6.3.Coupon Mail Setting
The user will get email notifications for each coupon amount usage. And the user can also check the amount left on their coupons.
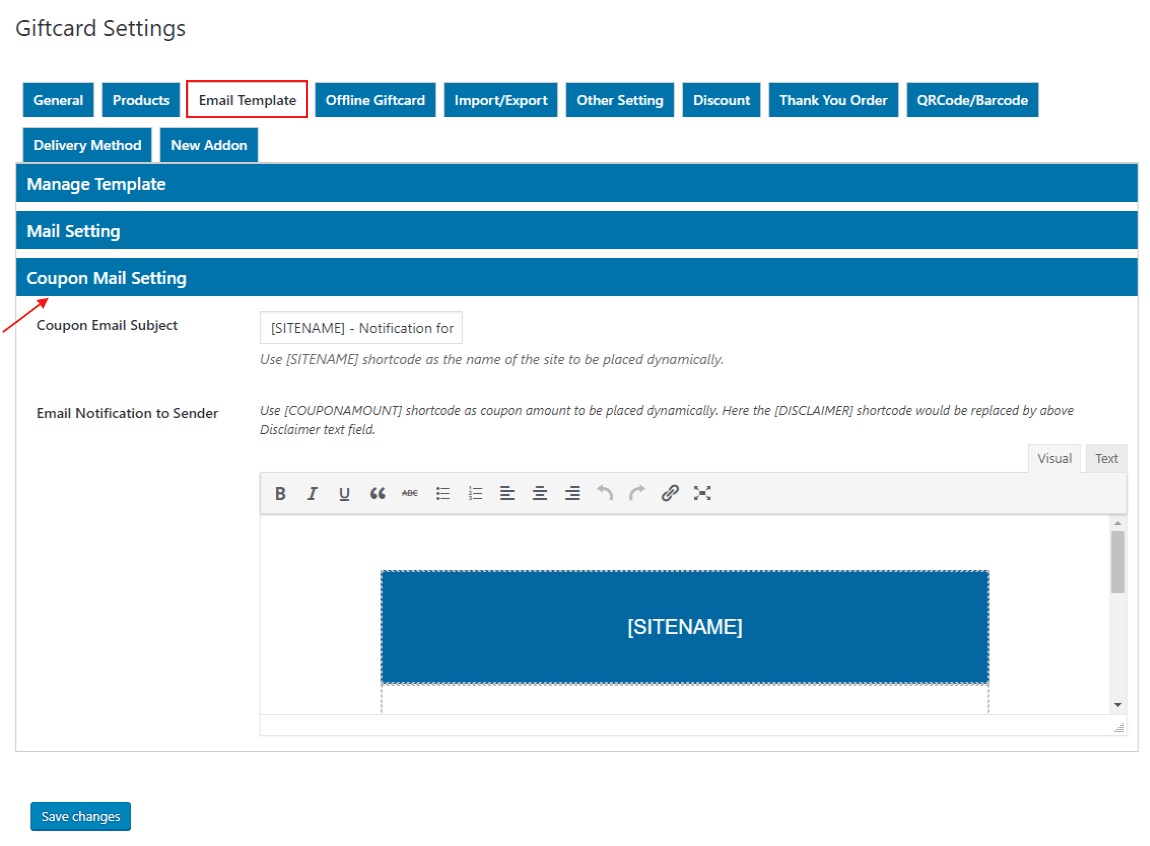
- Coupon Email Subject: Write the subject of the coupon mail. Use [SITENAME] shortcode to place the site’s name dynamically.
- Email Notification to Sender: Write the message to notify the user about their coupon amount. Use [COUPONAMOUNT] shortcode to place the coupon amount dynamically. Also, the above Disclaimer text field will replace the [DISCLAIMER] shortcode.
7.Offline Giftcard Setting
Import Offline Coupons:
Through this section, the admin can import Offline Coupons.
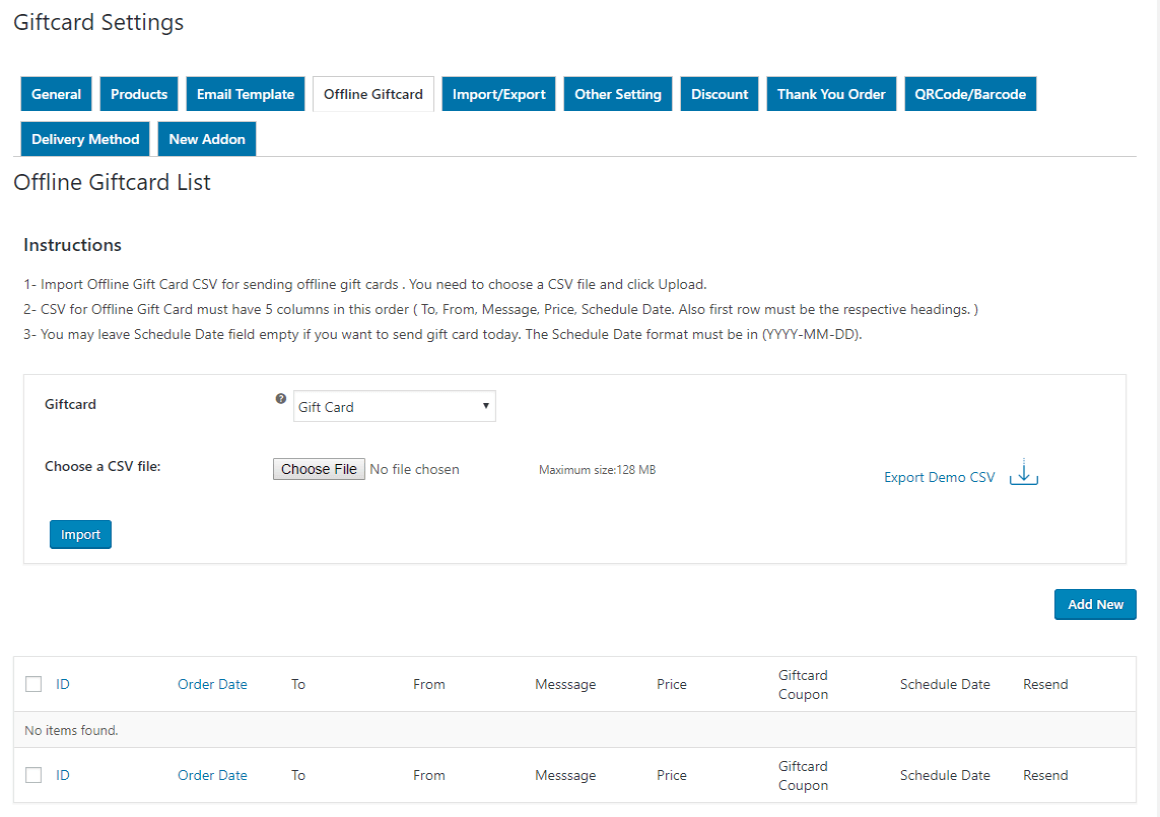
Offline Giftcard List:
Through this section, The Merchant can create gift cards from the dashboard as per user request and send it to the recipient.
The merchant can also export the CSV of Gift Cards.
To create a new Gift Card click on the ‘Add New‘ tab, a popup window will be displayed. Here you can fill out all the details of the gift card.
After successfully created a giftcard clicking on the ‘Preview‘ button to view the Gift Card and last click on the ‘Save & Send‘ button.
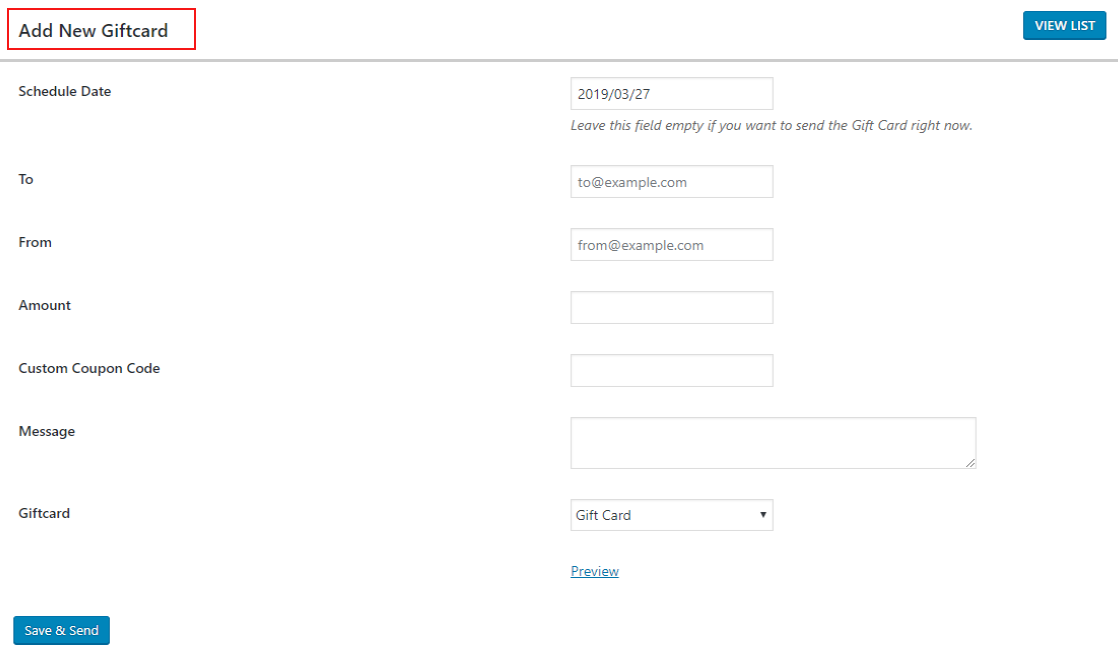
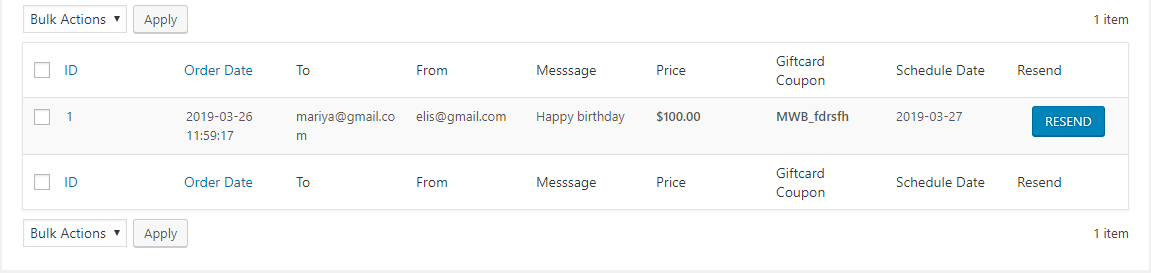
You can view detail of all shipped giftcard by clicking on the ‘View List‘ tab.
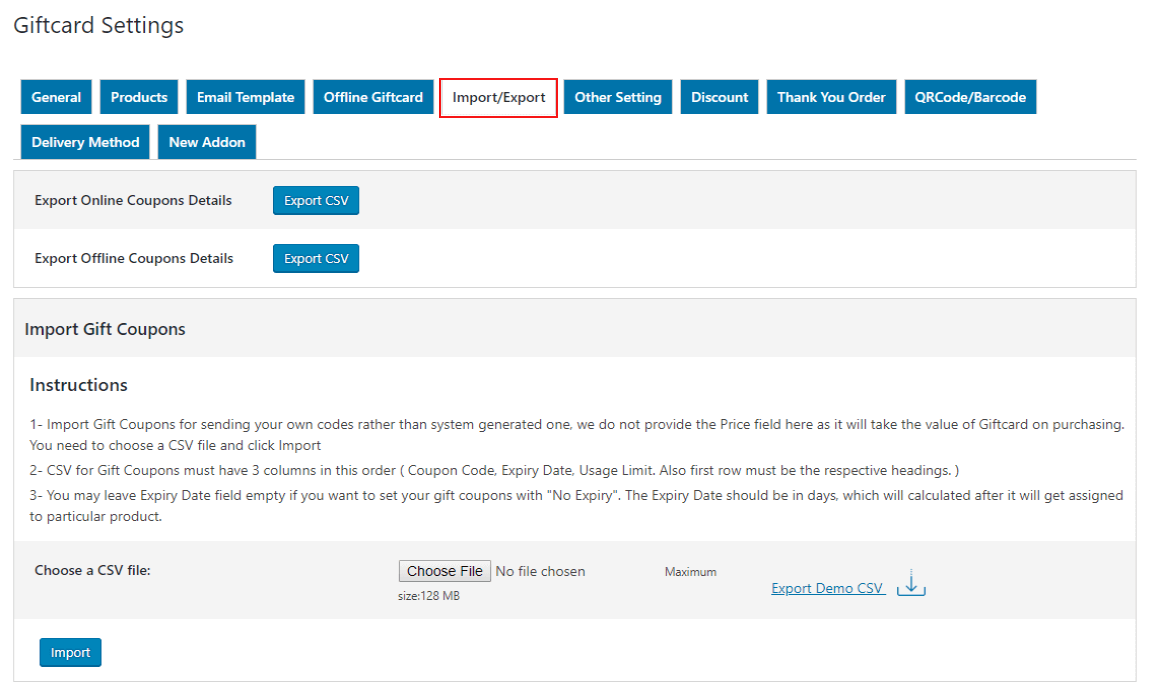
8.Import/Export Setting
Import Gift Coupons:
Through this section, you can import Gift Coupons.
9.Other Setting
In this setting, we provide some extra options i.e. BCC, Enable/Disable some option that the user needs to change.
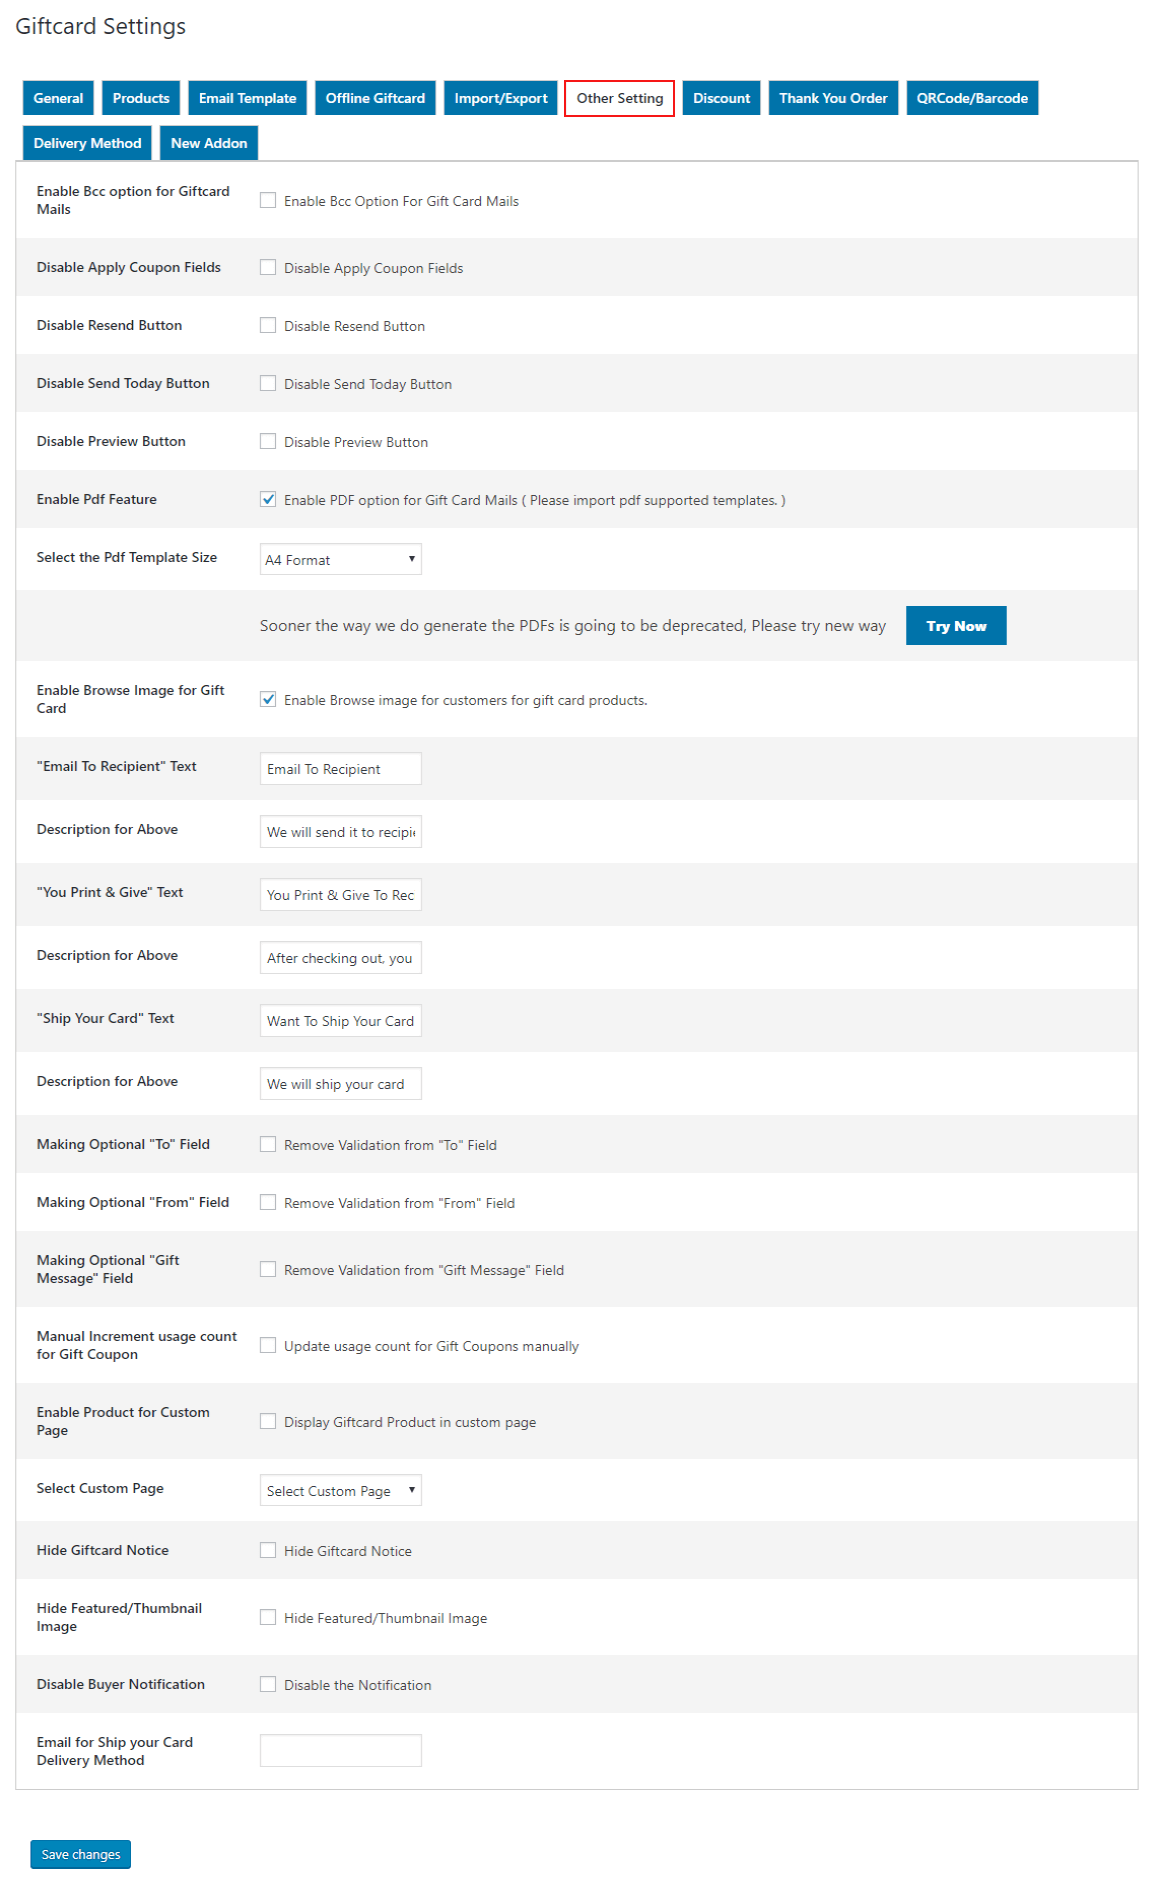
- Enable Bcc option for Giftcard Mails: Admin can enable the BCC feature for gift card mails. BCC (Blind Carbon Copy) is a copy of an email message sent to a recipient whose email address does not appear (as a recipient) in the message.
- Disable Apply Coupon Fields: Admin can disable the apply coupon field which is applied to each order amount.
- Disable Resend Button: Resend button is used to resend the gift card product mail to the recipient. Admin can disable the resend button option.
The user can also resend the email to the receiver to which he wants to send gift cards.
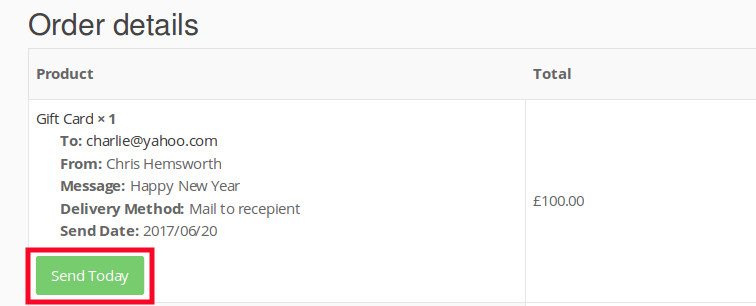
- Disable Send Today Button: Send Today button is used for sending the gift card Admin can disable the send today button option.
The customers can select the date they wanted the gift card to be sent to the recipients. Customers can also send the scheduled Gift Card on the current day through the order details section.
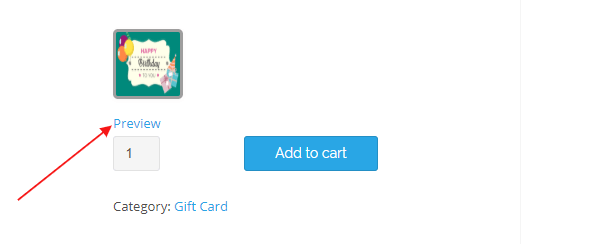
- Disable Preview Button: Preview Button is for the sender that he/she views their gift card template before sending the recipient. Admin can disable the preview button as they need.
- Enable Pdf Feature: After enabling this feature customers will get an email along with a PDF attachment.

- Select the Pdf Template Size: After enabling this feature customer will get a Giftcard email along with the attached pdf.

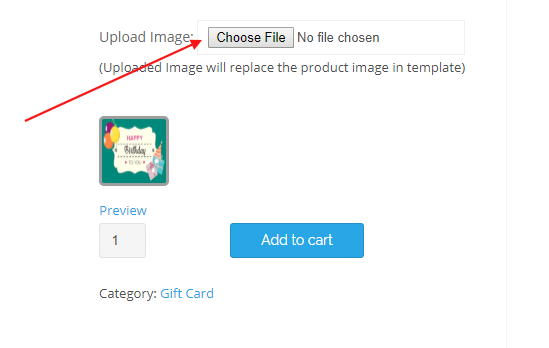
- Enable Browse Image for Gift Card: After enabling this feature customers will browse the image for Gift Card Product.
Here you can change the text for the email template as:
- Text for the ‘Email To Recipient‘ section.
- Enter the description will display below the ‘Email To Recipient’ option.
- Text for the ‘You Print & Give’ section.
- The description will display below the ‘You Print & Give’ option.
- Text for the ‘Ship Your Card’ section.
- The description will display below the ‘Ship Your Card’ option.
- Making Optional ‘To’ Field: Check this box to remove the validation from the ‘To’ field.
- Making Optional ‘From’ Field: Check this box to remove the validation from the ‘From’ field.
- Making Optional ‘Gift Message’ Field: Check this box to remove the validation from the ‘Gift Message’ field.
- Manual Increment usage count for Gift Coupon: Check this box to allow manual increment usage of Gift Coupon.
- Enable Product for Custom Page: Check this box to display the Gift Card product on the custom page.
- Select Custom Page: Select pages where you want to display the Gift Card Product with the shortcode product_page id =”xyz”
- Hide Giftcard Notice: check this box if you want to hide the Gift Card notice from the product page.
- Hide Featured/Thumbnail Image: Check this box if you want to hide the features images from the product page.
- Disable Buyer Notification: Check this box if you want to disable the notification to the buyer about there Gift Card has been sent.
- Email for Ship your Card Delivery Method: Enter a mail where you want to mail the gift card when the customer chooses the delivery method id ‘Ship your card’. by default mail send to the admin.
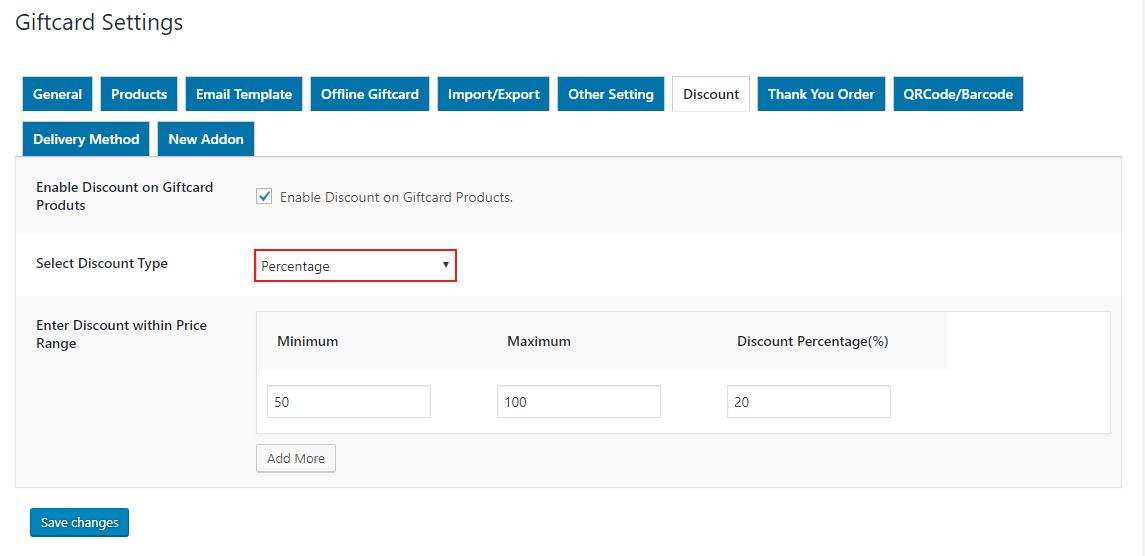
10.Discount Setting
Here merchants can enable the discount amount on Gift Card products.
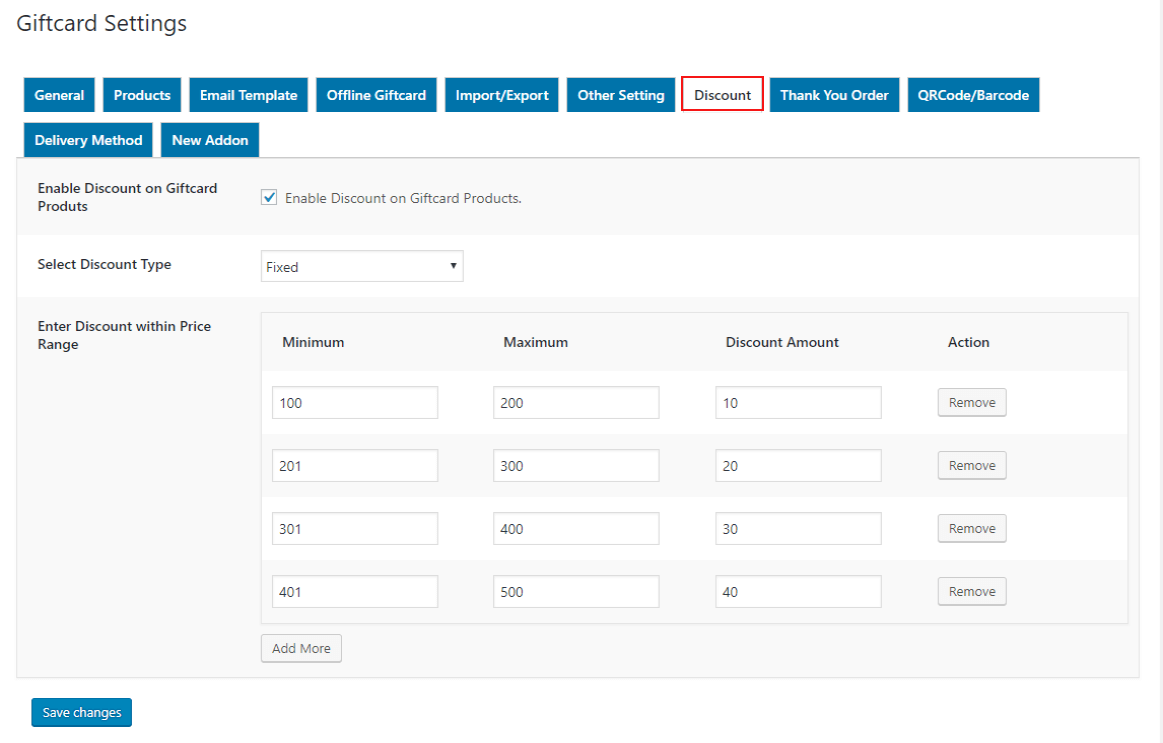
- Enable Discount on Giftcard Products: Check this box to enable the discount on Giftcard Products.
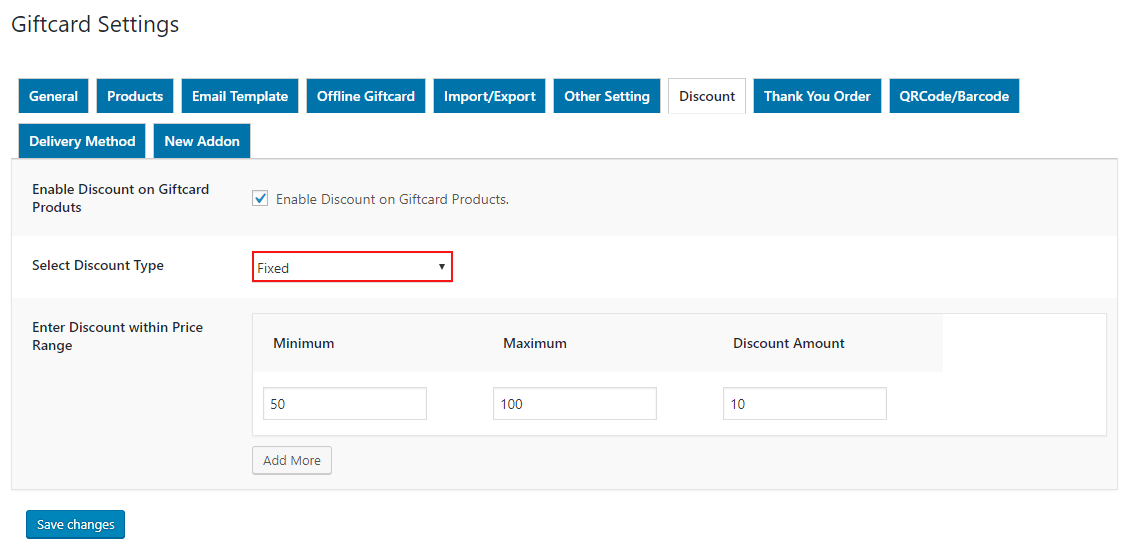
- Select Discount Type: Choose the discount type for giftcard products either fixed or percentage.
- Enter Discount within Price Range: Enter discount within the maximum, minimum price range, and discount amount.
Select Discount Type is Fixed: Select discount type is fixed from the dropdown.
Set the Discount Amount with Price Range: After selecting the discount type, set the discount amount with the price range.
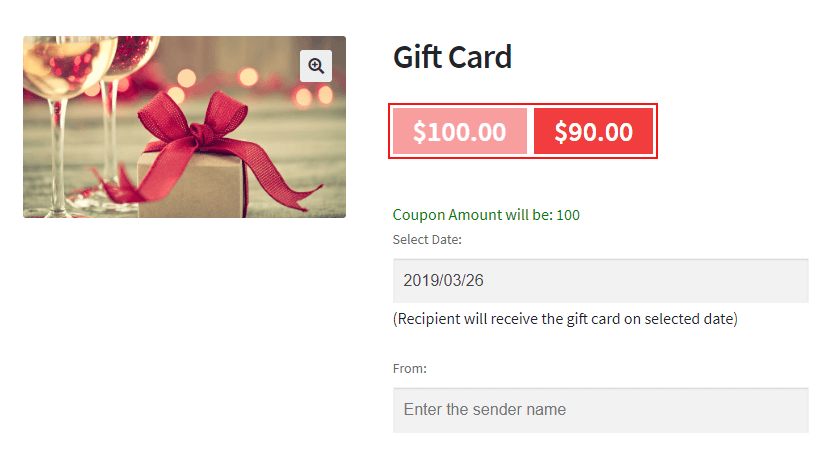
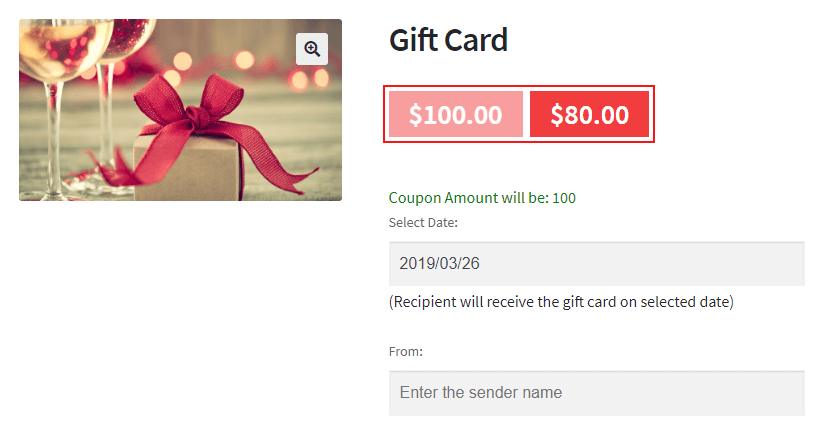
See the discount amount on the frontend.
Select Discount Type is Percentage: Select discount type is percentage from the dropdown.
Set the Discount Amount with Price Range: After selecting the discount type, set the discount amount with the price range.
See the discount amount on the frontend.
11.Thank You Order Setting
The merchant would be able to send Thank You gift coupon to their regular customers, who have placed the required number of orders for that coupon.

- Want to give ThankYou Gift coupon to your customers: Check this box to enable gift coupons for those customers they had placed orders on your site.
- Select the Order Status: Set the status when the Thank you giftcard coupon would be sent.
- Number of Orders, after which the thankyou giftcard would send: Enter the order number after that you want to give the giftcard coupon to your customer.
- ThankYou Coupon Expiry: Enter the number of days for coupon expiry. Keep value 1 for one-day expiry after generating the coupon keep value 0 for no expiry.
- Select ThankYou Gift Coupon Type: Choose the thank you coupon type. It either fixed or percentage.
- Enter a Thankyou Message for your customers: This message will print inside the Thank You template. You may use shortcodes [COUPONCODE], [COUPONAMOUNT] and [COUPONEXPIRY].
- Enter Coupon Amount within Order Range: Enter the thank you coupon amount with the price range.
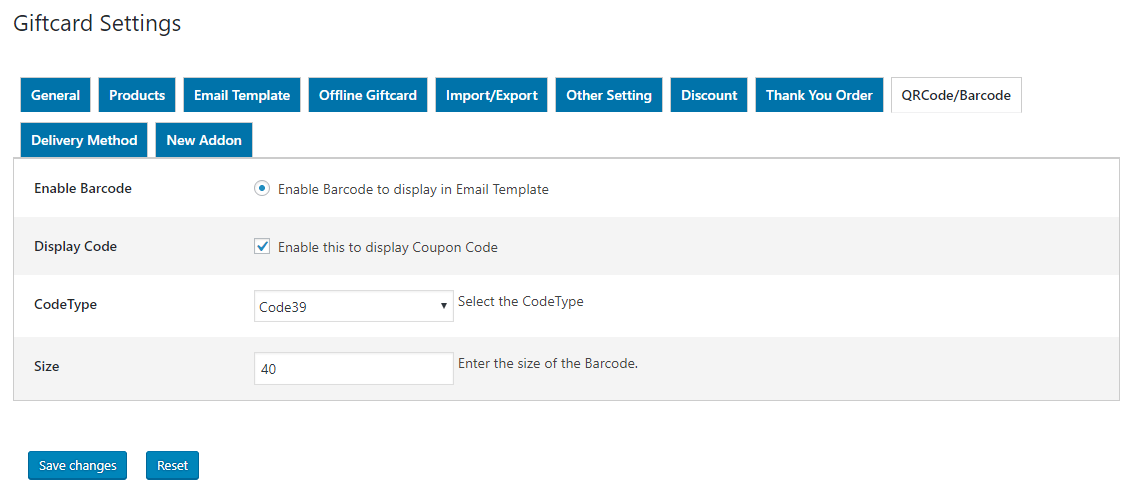
12.QRCode/BARCode Setting
The QR Code/BAR Code is used over the Gift Card for providing the security.
Enable Barcode Setting:
- Enable Barcode: If the user wants to generate their BAR Code with the Coupon code so here we give the option for the merchant to allow your user to generate their BAR Code with the Coupon Code.
- Display Code: Check this box to display the coupon code below the Barcode.
- CodeType: We have given some code type use for BAR Code, which is going to be used in different places for a different purpose.
- Size: set the size of the barcode.
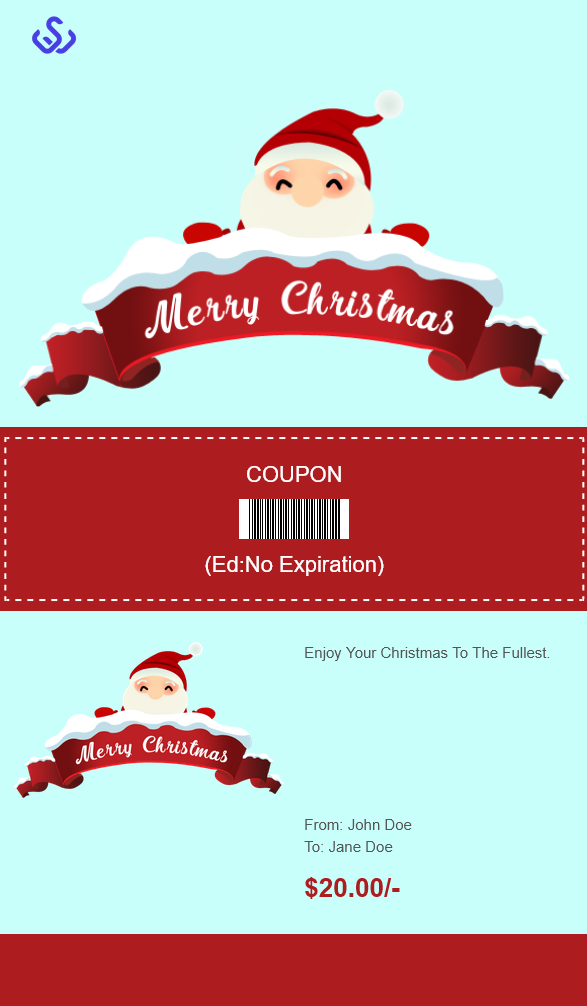
You can see the Barcode on the frontend
Enable QRCode Setting:
- Enable QRCode:
- ECC Level: This compensates for dirt, damage, or fuzziness of the BAR Code. Valid values are “L” (low ECC), “M”, “Q”, “H” (highest ECC). A high ECC level adds more redundancy at the cost of using more space.
- Size: Option to enable QR Code after selecting the ECC level to select the size of the QR Code.
- Margin: Set the QR Code margin over here.

You can see the QR Code on the frontend.
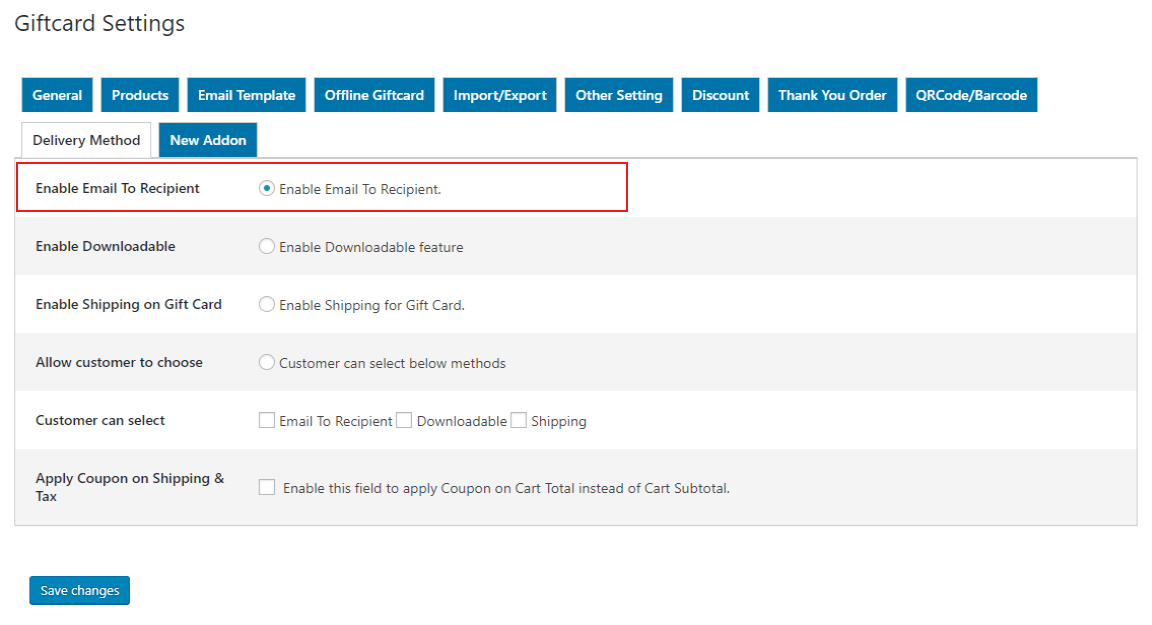
13.Delivery Method Setting
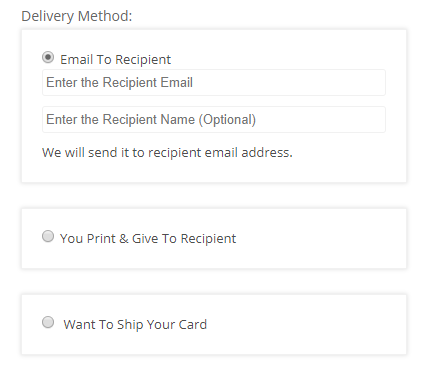
In this setting, we provide three delivery options to the buyer that he send their gift card email to the recipient.
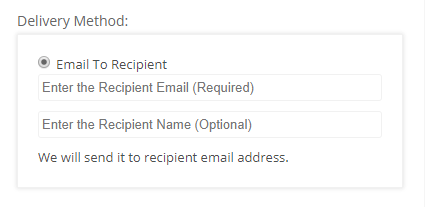
- Enable Email To Recipient:
Email to recipient feature is used for sends the gift card via email only to the recipient.
On the frontend, you can see the normal delivery method to send the Gift Card.
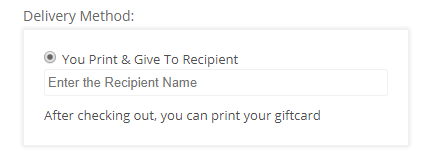
- Enable Downloadable:
In this feature, the gift card email is sent back to the buyer. The buyer will download the email and send it to the recipient with the needed method.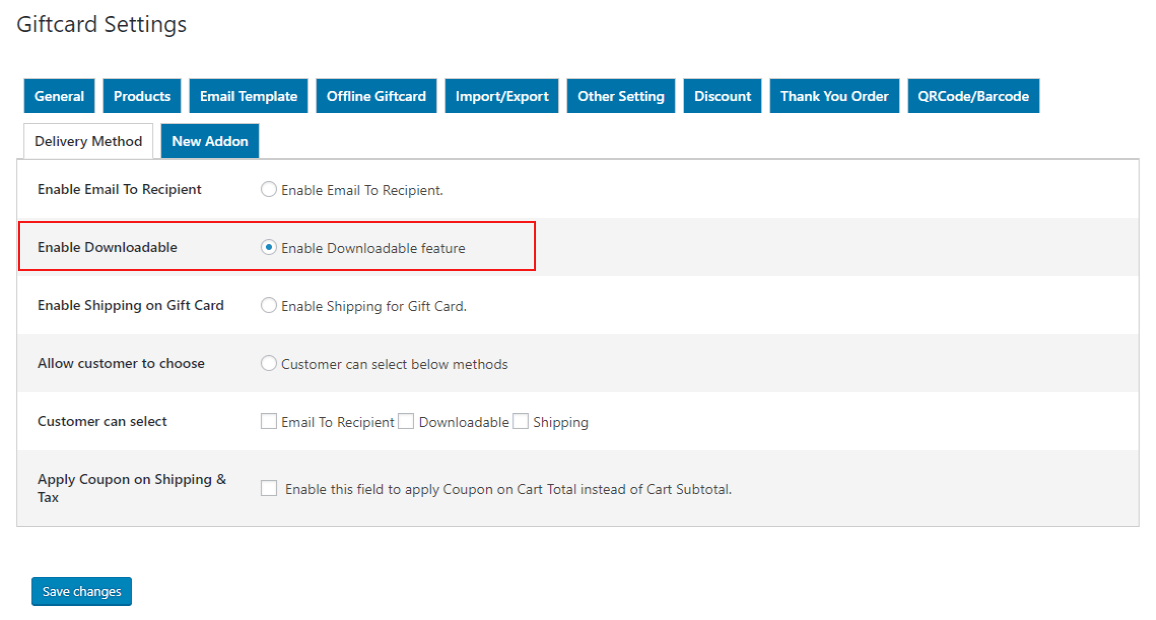
On the frontend, you can see the option of print your giftcard.
-
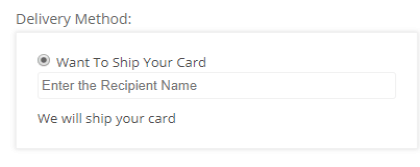
- Enable Shipping on Gift Card:
In this feature gift card email is sent to the admin and the admin will deliver the gift card to the shipping address of the recipient.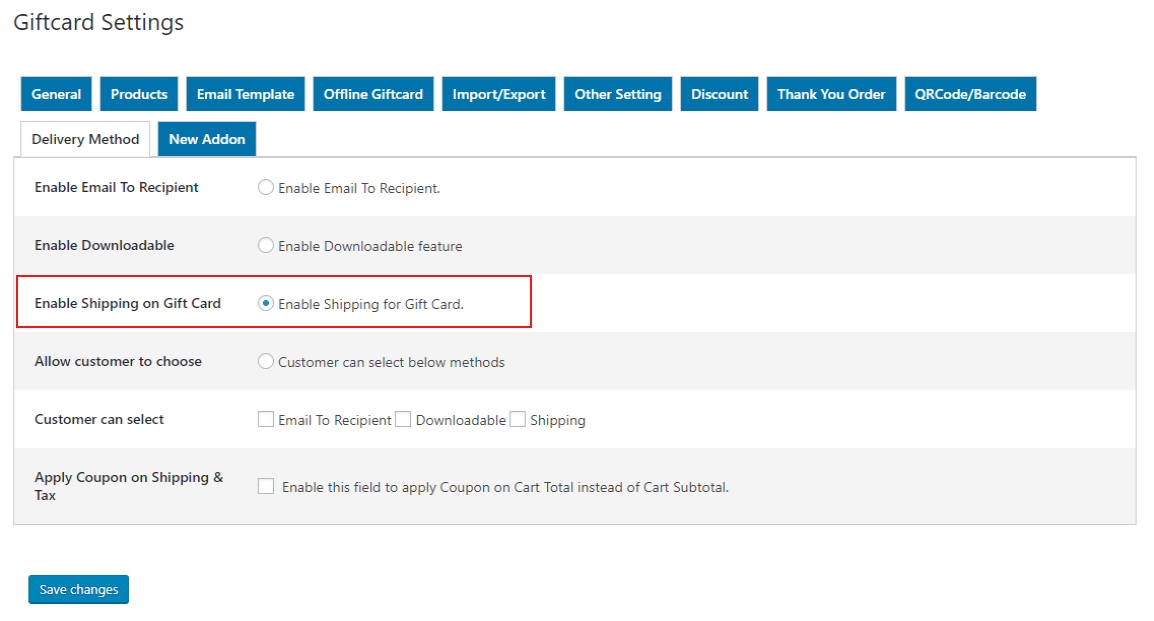
After enabling this setting you can see the shipping option on the giftcard.
- Enable Shipping on Gift Card:
- Allow Customer to choose:
The customer can choose the method for gift card delivery i.e; Email to Recipient, Downloadable, and Shipping.
(i) Customer can select: From this section enable the delivery methods for the customers.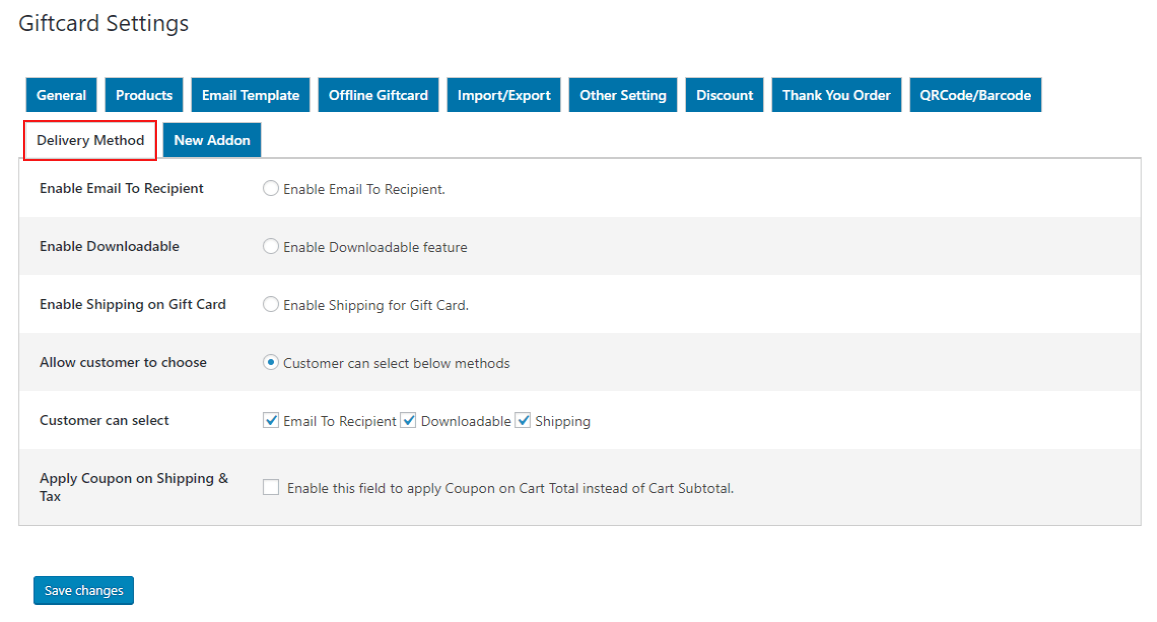
After enabling this feature you can allow the customer to select the delivery methods within three delivery methods for the Gift Card products.
- Apply Coupon On Shipping & Tax:
In this feature, the user can also apply their coupon for shipping and tax i.e, the Total amount of Gift Card product. - You can overwrite delivery methods via per product setting:
This setting allows you to set the per-product delivery methods.
Goto ‘Product edit page‘ and click on ‘product data‘ section, here you can see the ‘Overwrite Delivery‘ setting. Enable this setting and select the delivery methods for the specific product.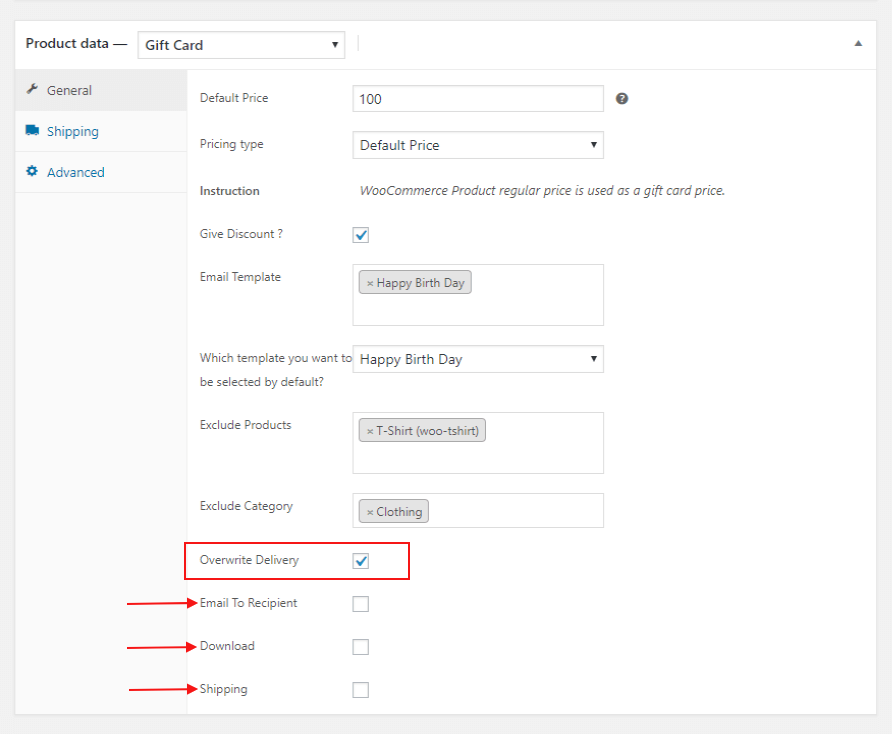
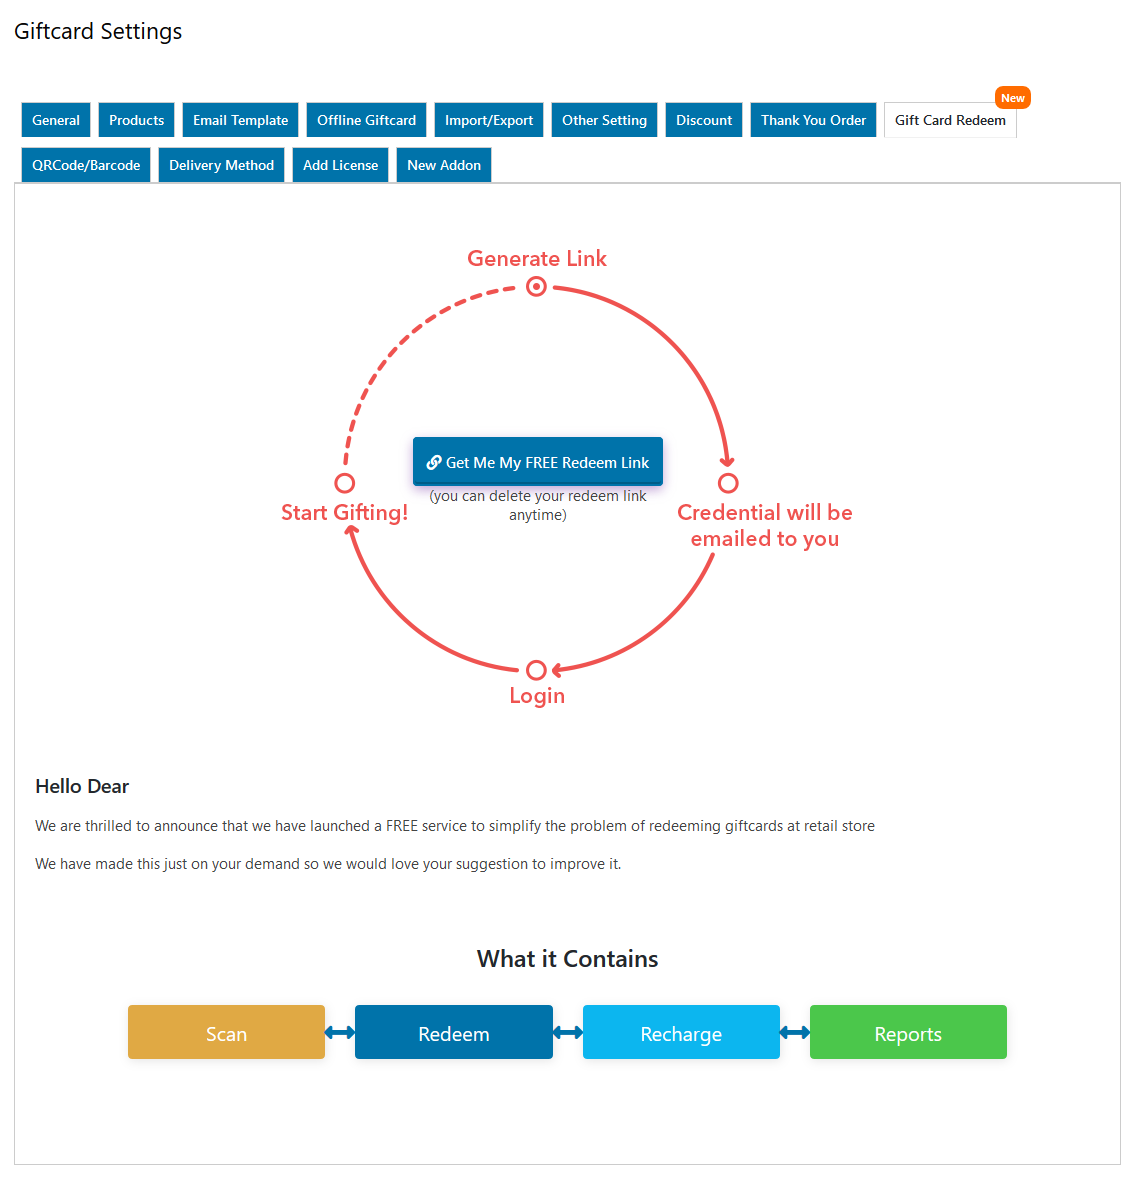
14.Gift Card Portal: Scan, Fetch, Redeem, & Recharge
Your ultimate gift card plugin is equipped with a gifting portal to help you scale your WooCommerce card business. The frontend panel allows you to redeem, recharge, scan, and fetch details of gift cards. It works on online, offline, and hybrid businesses.
To use the Giftcard Redeem Link on the web-store follow these steps.
Step 1: First click on the “Get Me My FREE Redeem Link“.
Step 2: Now a popup window will be displayed on your dashboard, here enter your Email Id, Name, and then click on the “Generate Link” tab.
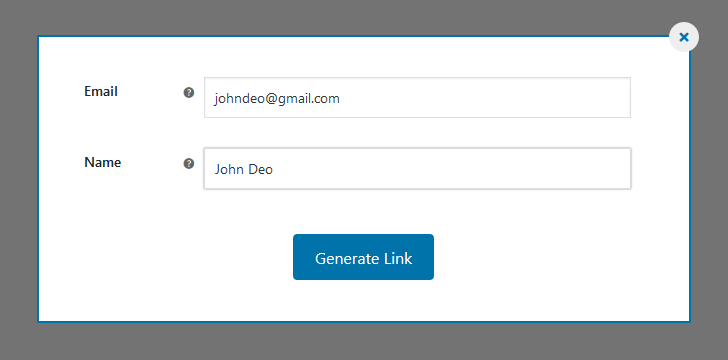
Step 3: After clicking on the “Generate Link“, your Gift Card Redeem Link and Embedded link will be displayed on your panel with walkthrough steps and the login details will be sent to the given email id.
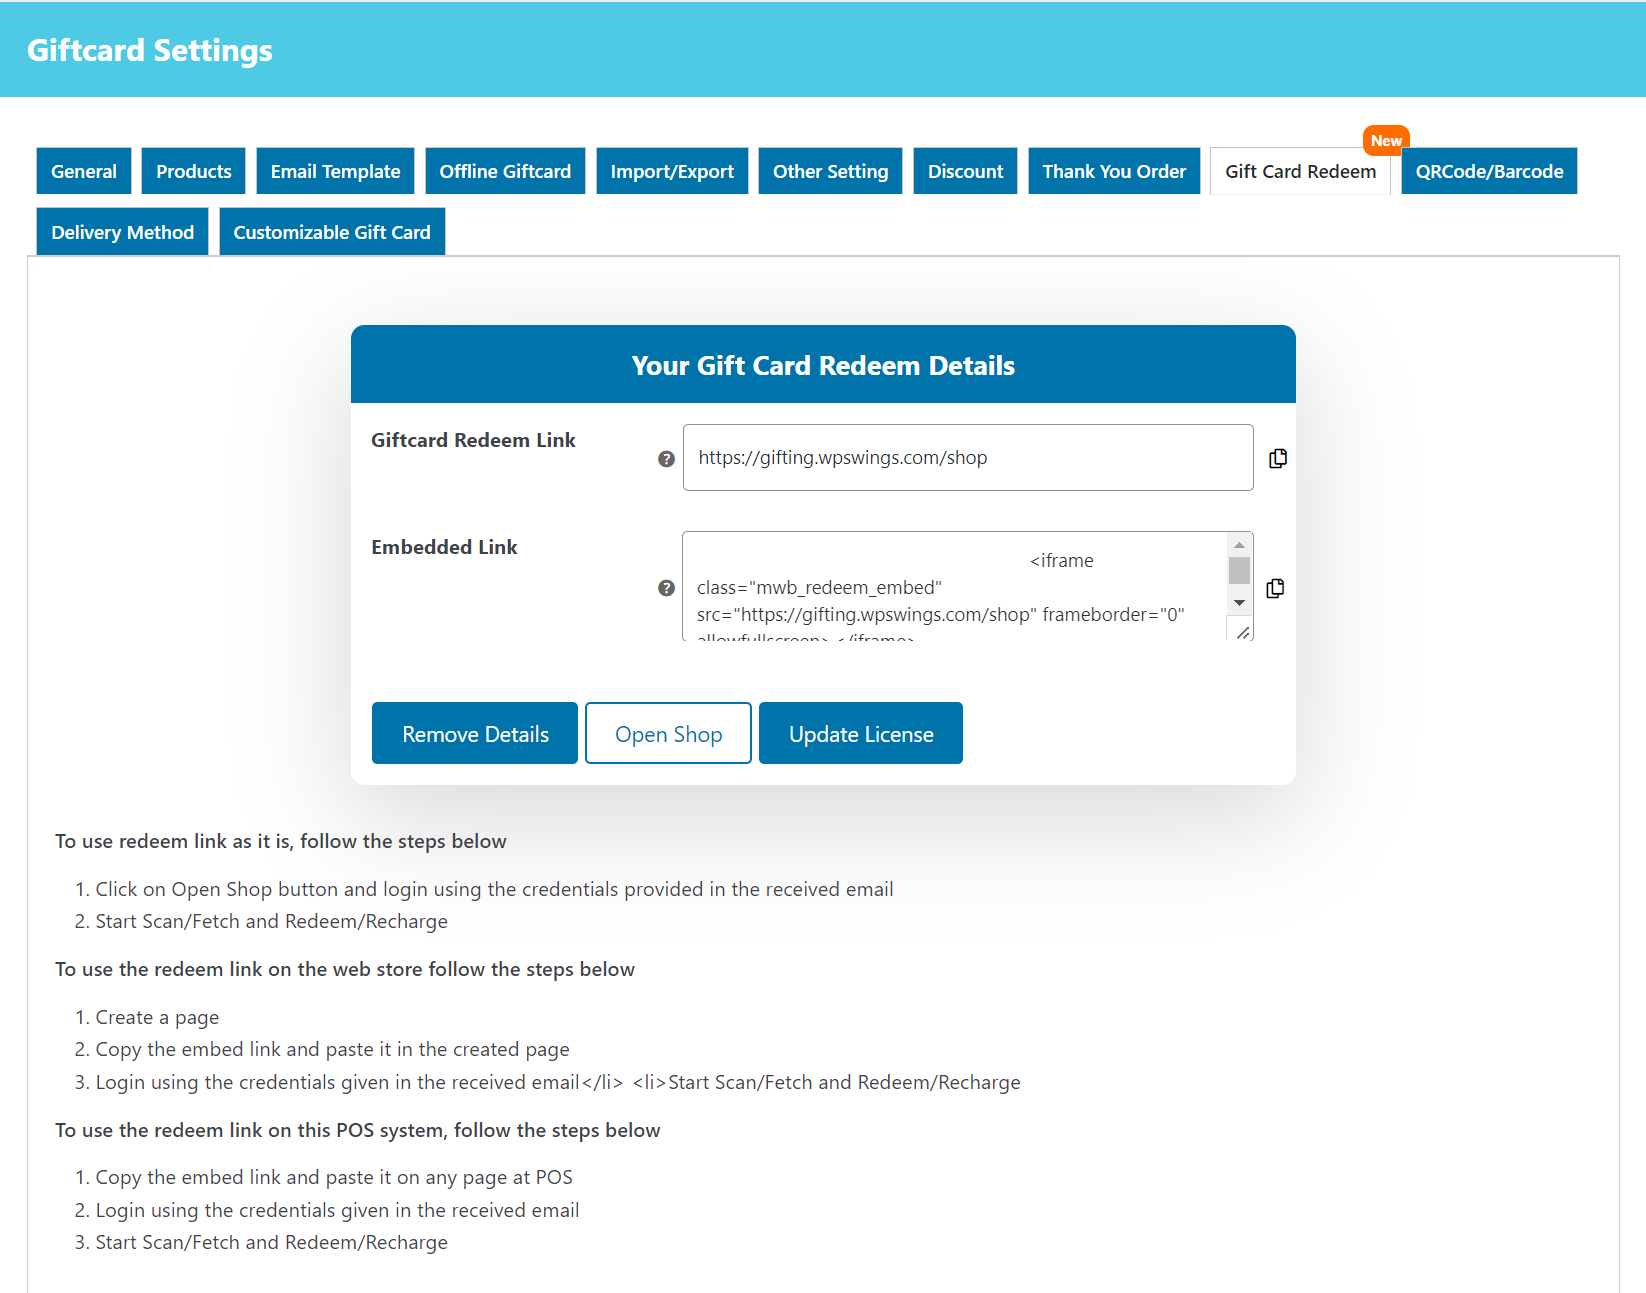
Step 4: Now Copy the Giftcard Redeem link or Embedded code to log in your web-store of gifting.wpswings.com by using the credentials given in the received email. To use the embedded code first you have to create a Page and then paste the embedded code on it.
Step 5: After successful login with the dashboard, you will get the shop page of the web-store. Here you can see all transactions of Giftcard vouchers.
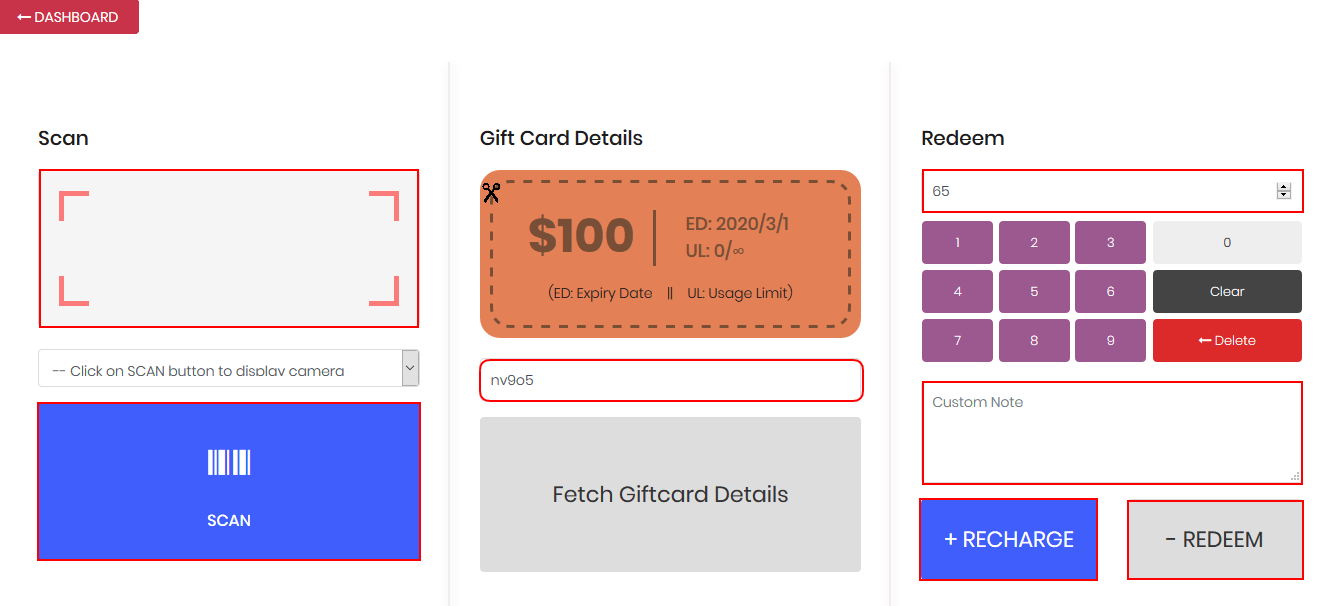
Step 6: Now go to the “DASHBOARD“, here you can start Scan/Fetch and Redeem/Recharge the giftcard coupon. You can scan or enter the coupon code to fetch the detail of the Giftcard and you can also redeem/recharge the Giftcard coupon easily.
The dashboard distributed into 3 sections.
- Scan: Click on the scan button you can scan the Gift Card Coupon details.
- Gift Card Details: Enter the gift card coupon code to display details such as the amount, expiry date, usage limits of the Gift Card Coupon, etc.
- Redeem: Here you can enter the number of amounts to Redeem the value from the Gift Card Coupon and Add the value to the Gift Card Coupon.
To use the redeem link on this POS system, follow the steps below
- Copy the embed link and paste it on any page at POS.
- Login using the credentials given in the received email.
- Start Scan/Fetch and Redeem/Recharge.
Gifting Portal Settings
The WP Swings gifting portal is an exclusive service of our plugin that allows merchants like you to efficiently manage their gift card program.
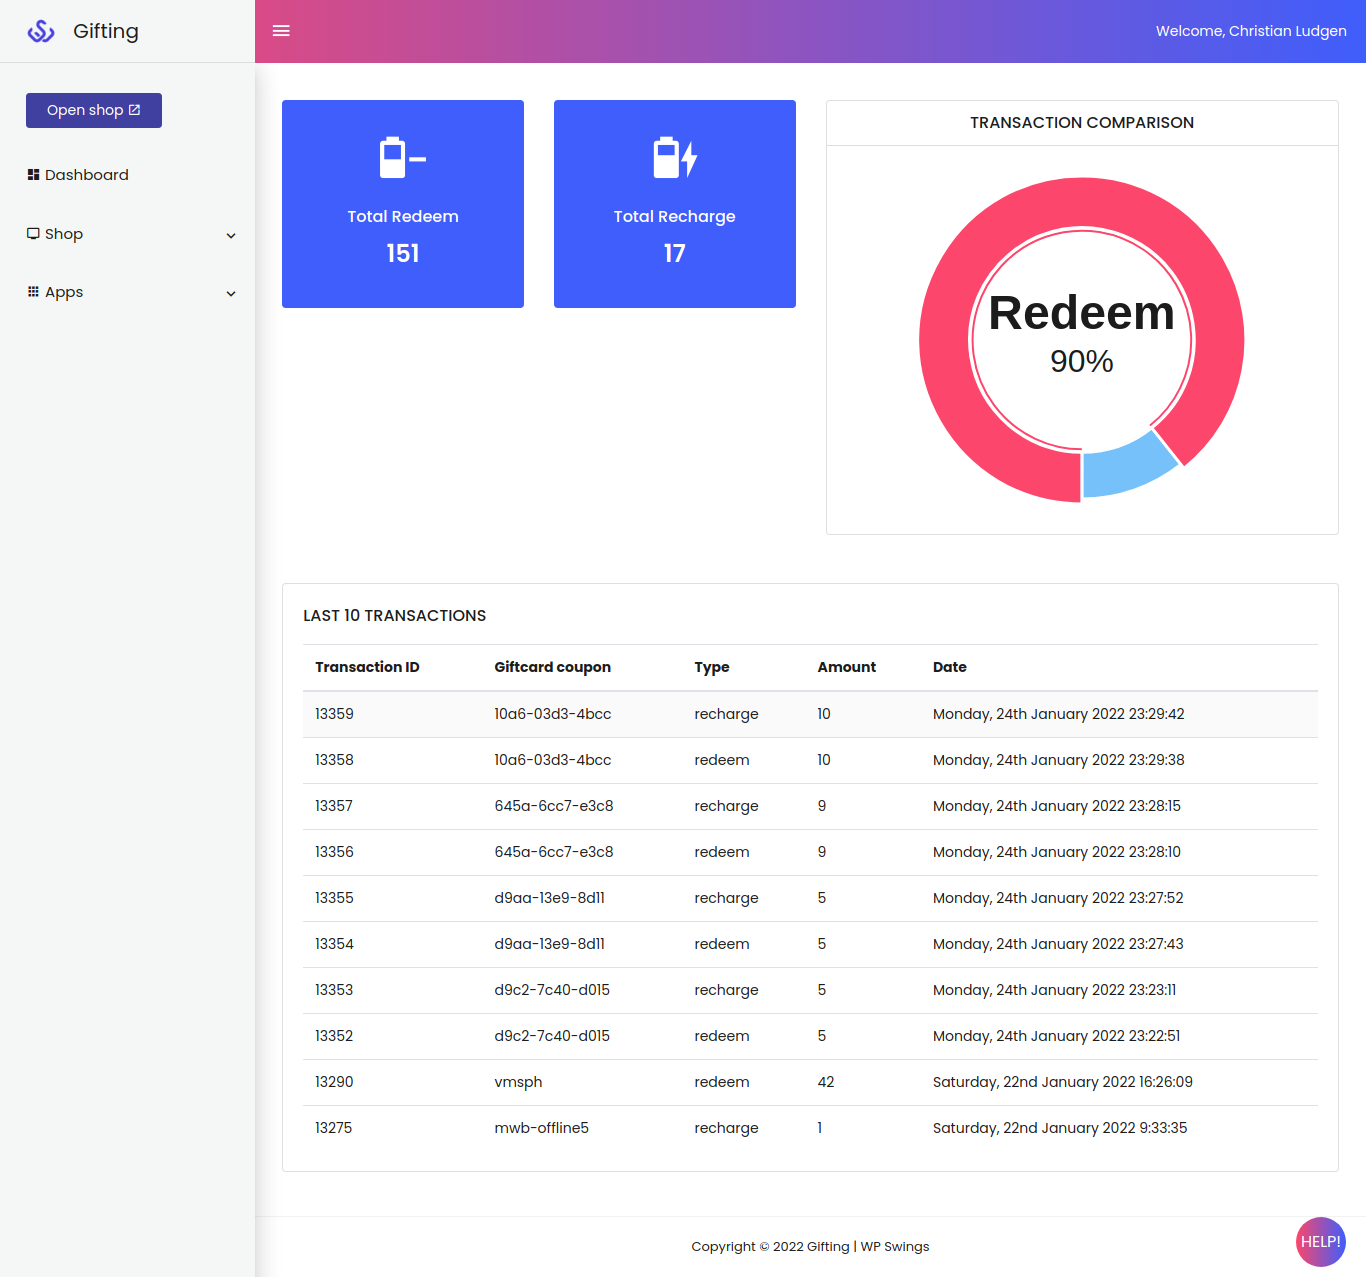
1. Dashboard
The dashboard shows an overview of the gift portal usage with Total Redeem, Total Recharge, and Transaction Comparison data. You can access the Dashboard from the admin menu on the left panel.
2. Shop Tab
The shop settings tab allows you to configure gift card usage, view reports, give access control to your employees, and change the gifting portal language.
2.1. Gift Card Settings
The gift card settings tab allows you to set the usage limit and expiry date of recharged gift cards Plus, you can customize the working currency of the gifting portal.
- Currency
- Expiry Days After Recharge
- Usage Limit After Recharge
Enter the required details and Submit your changes. These settings will apply globally to all your recharged gift cards. So,
2.2 Recharge Report
You can generate gift card recharge reports according to Date Range, Store, & Employee. The Recharge Report Table will show the filtered data. In the SEARCH, enter the following details:
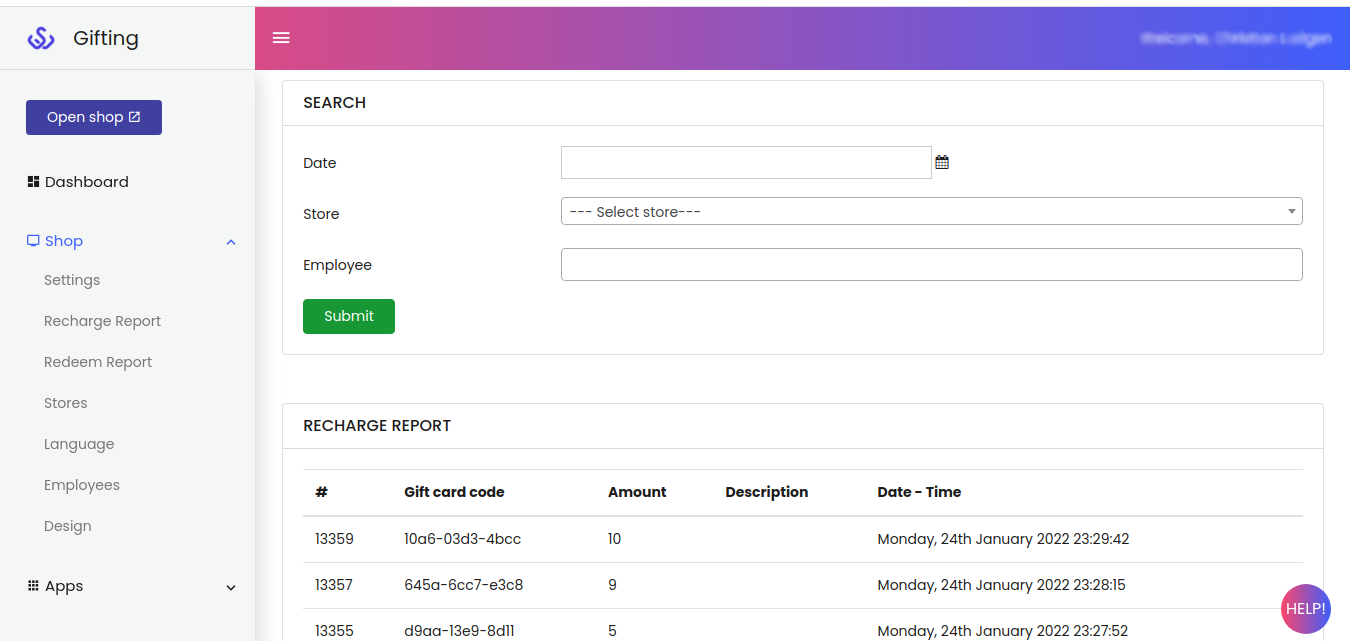
- Set a Date Range for the gift card recharge report.
- Choose one of the registered Stores.
- Select the Employee.
At last, click on the Submit button to produce the report.
2.3. Redeem Report
The Redeem Report table shows all data related to gift card redemption. You can filter the report according to Date Range, Store, & Employee. To do so, follow these steps:
- Go to the SEARCH section.
- Select a Date Range for the report.
- Select the relevant Store.
- Choose the Employee that redeemed the gift cards for the selected store.
And click on the Submit button to generate the report.
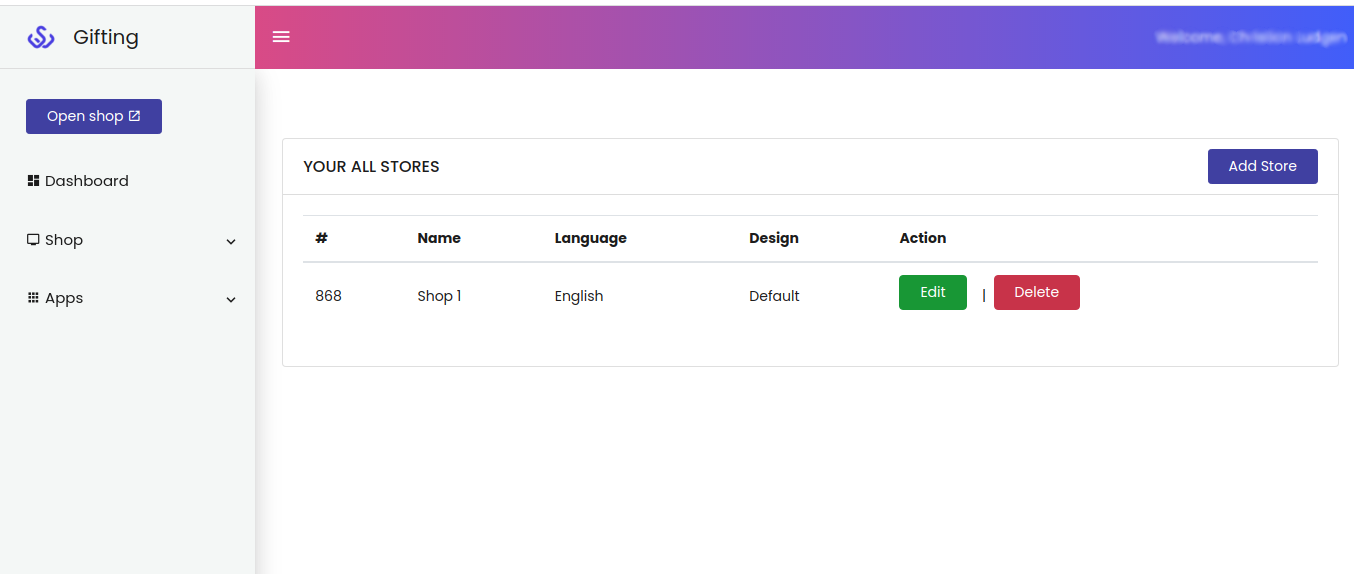
2.4. Stores
The stores you’ve registered on the gifting portal appear in the Store tab. From there, you can Edit, Delete, or Add New stores.
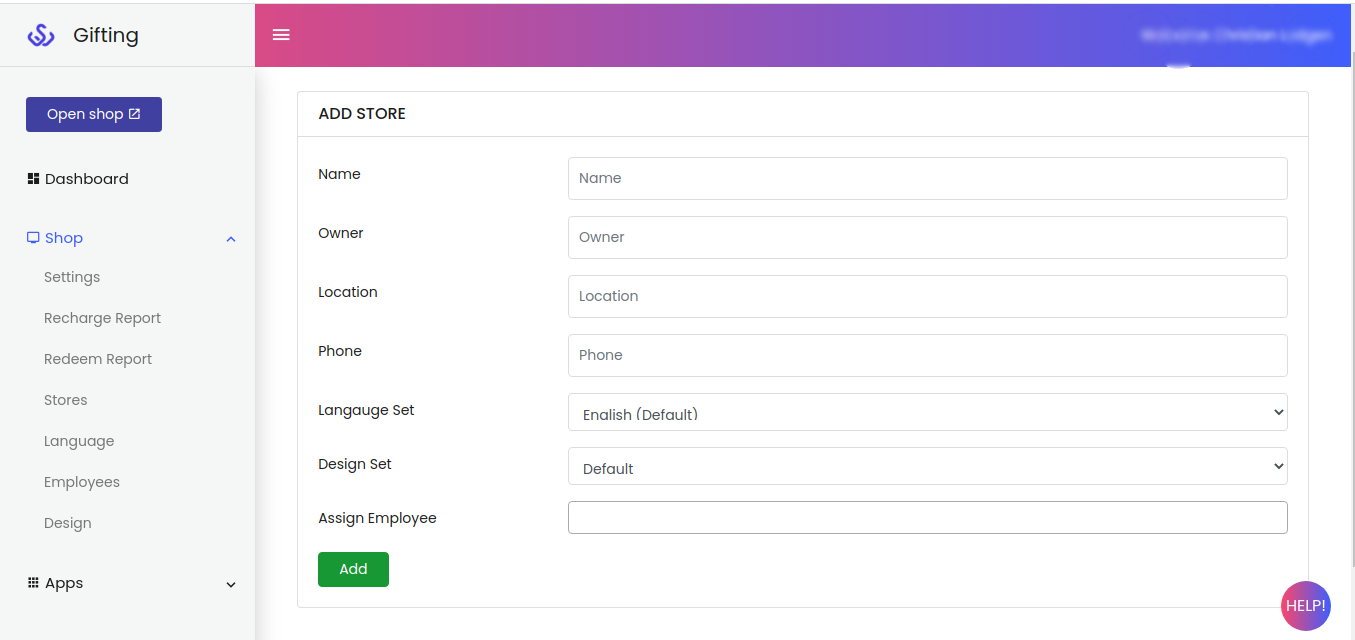
To edit the details of an existing store, follow these steps:
- Click on the edit button.
- You can edit the following details: Name, Owner, Location, Phone, Language Set, Design Set, and Assign Employee.
3. Click on Update Button to save your changes.
To delete a store, follow these steps:
- Go to the Action Column of YOUR ALL STORES table.
- Click on the Delete button and confirm.
To add a new store:
- Click on Add Store button.
- Enter the relevant data in the fields.
- Lastly, hit the Add button.
Language
You can translate all strings of the WP Swings gifting portal from the language tab.
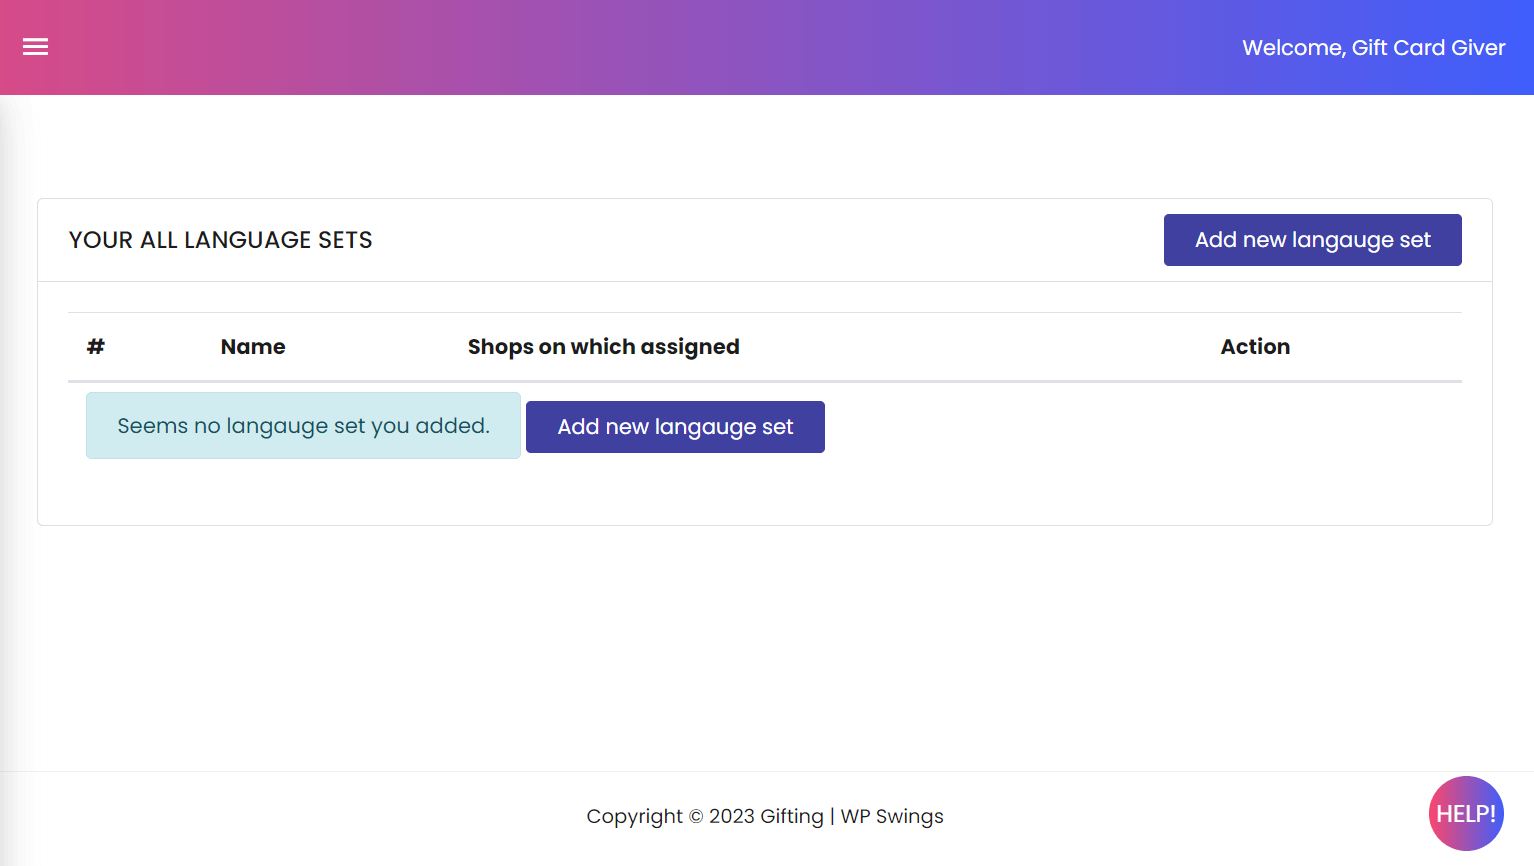
It allows you completely customize and translate textual elements to your preferred language. Follow these steps for string translation:
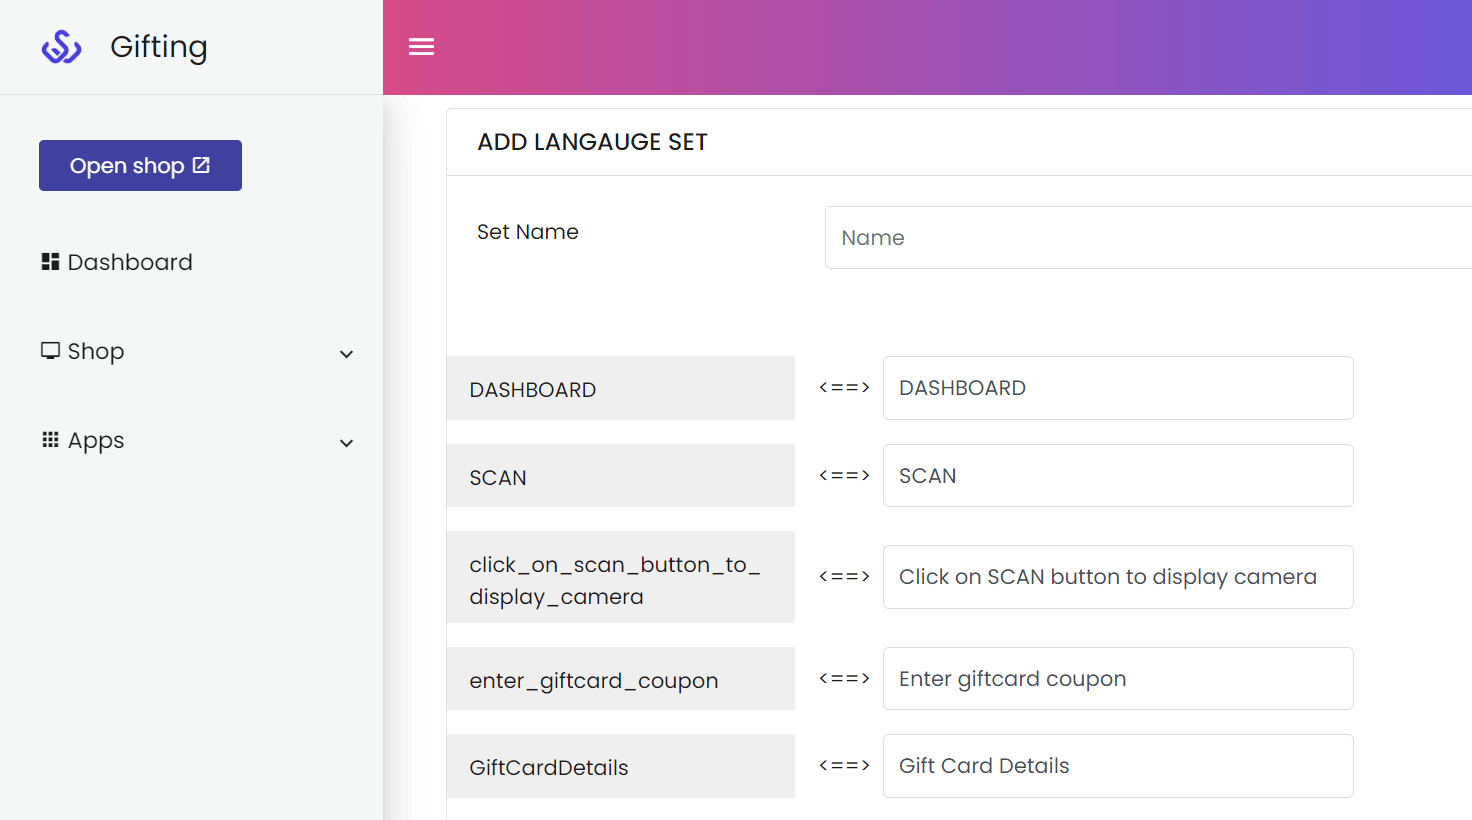
- Open the Language tab from the admin menu.
- Click on the Add New Language Set.
- You can enter the Language set name.
- Next, enter the translation in the text box opposite the strings.
- Finalize your language set by hitting the Add button.
Employees
The Employees tab has the list of individual(s) that manage your gifting portal. You can add or remove employees and implement passwords for each of them. Thus, adding a layer of security to ensure authorized access only.
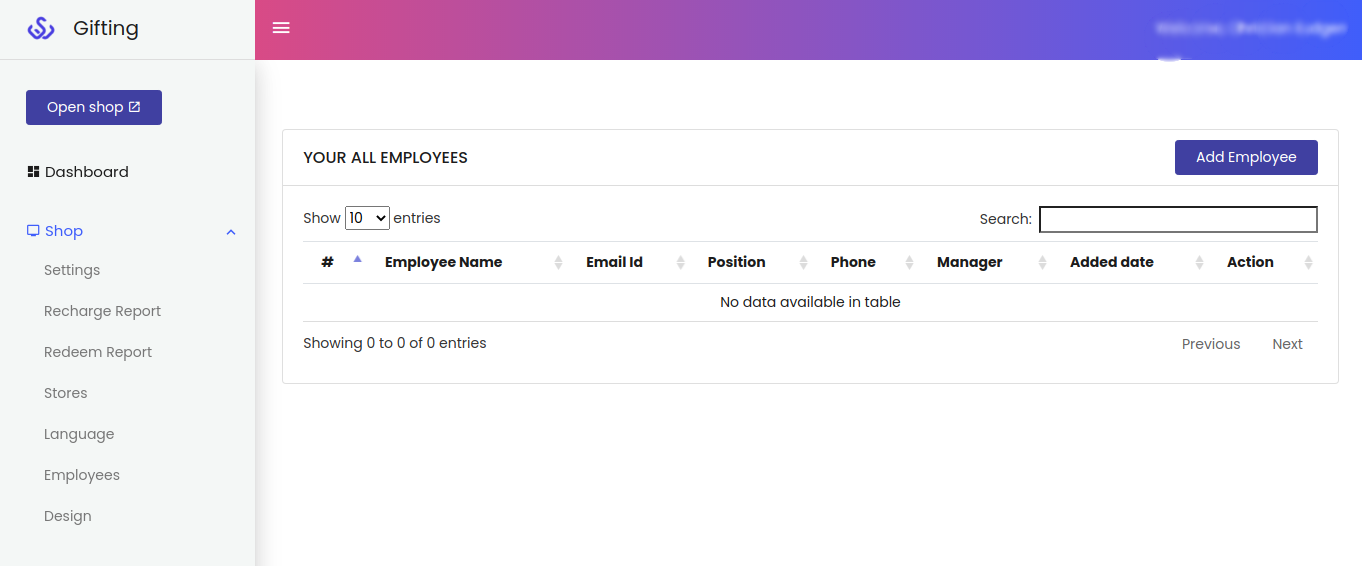
The Employee table has the following columns: Serial No., Employee Name, Email ID, Position Phone, Manager, Added Date, and Action.
Follow these steps to add a new employee:
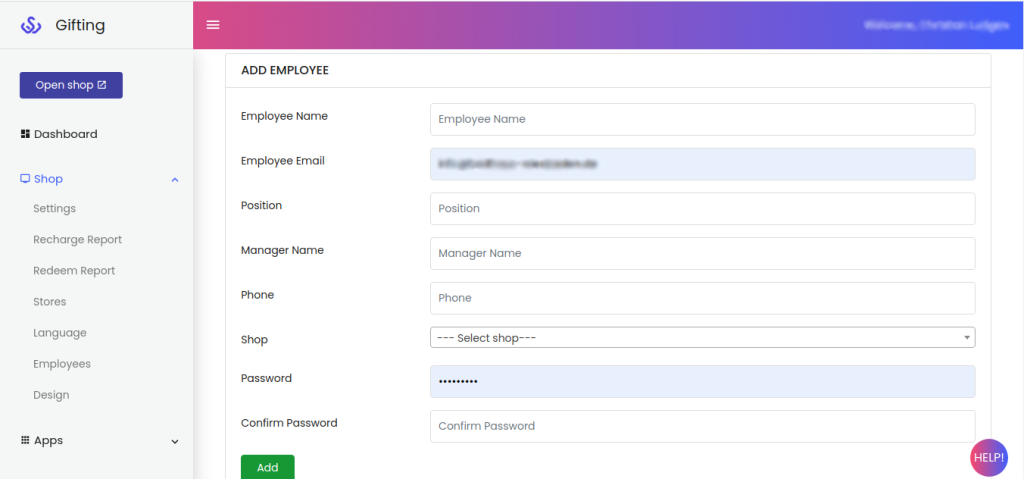
- Click on the Add Employee button.
- Enter the following details: Employee Name, Email, Position, Manager Name, Phone, Shop, Password, and Confirm Password.
At last, click the Add button to give access to the new employee.
15.Compatibility with Price Based on Country for WooCommerce plugin
From now, this plugin provides the compatibility with Price Based on Country for WooCommerce plugin. Through this, your customers bought a gift card in their own currency, it will get converted in your base currency according to the country of the customers.
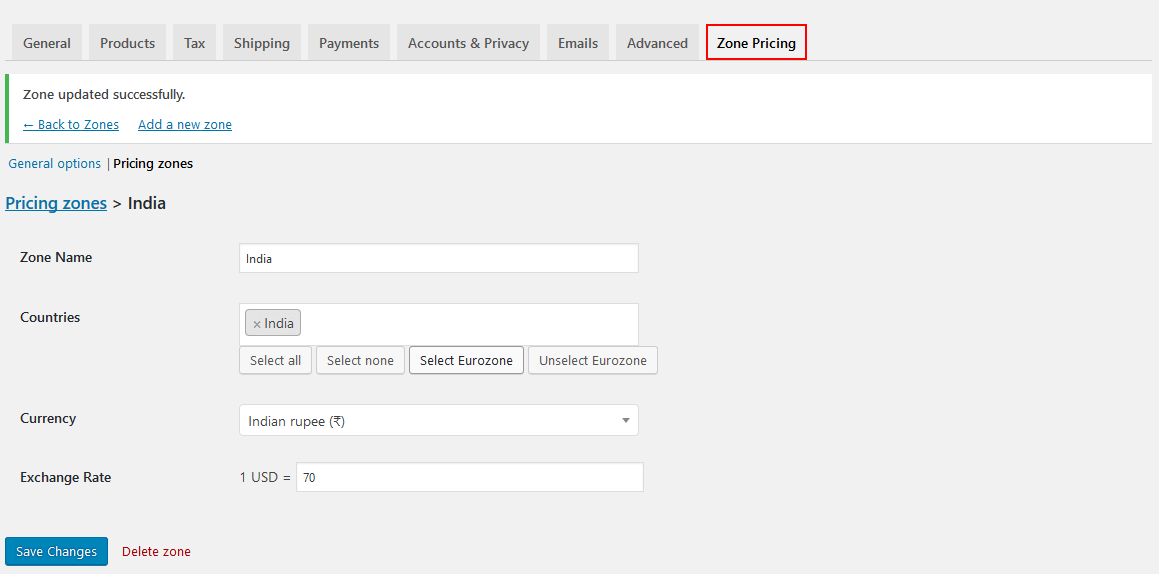
- Zone Name: Select your zone name.
- Countries: Select countries in which you want to convert your currency.
- Currency: Select your currency type in which you want to convert currency.
- Exchange Rate: Here you can enter the exchange rate of the selected currency.
16.Compatibility with WooCommerce Currency Switcher
WooCommerce Ultimate Gift Card is compatible with the WooCommerce Currency Switcher Plugin (Free & Pro). With this compatibility, you can convert the currency of your WooCommerce store to any of the existing currencies in the world, and the same will apply to the gift cards plugin.
Your users can make gift card purchases in their local currency, and WOOCS will convert it into your store’s base currency.
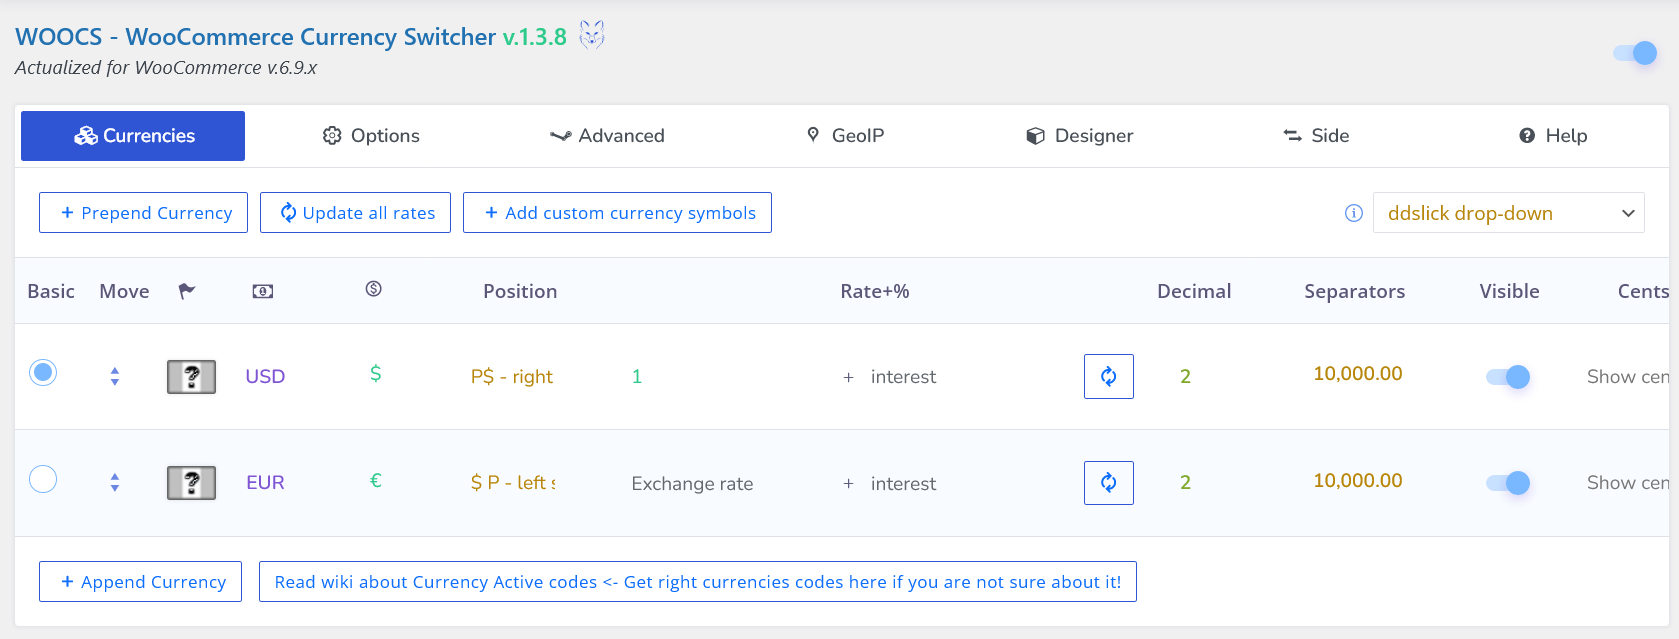
Go to WooCommerce > Settings > Currency and choose the currency you want to apply to your store.
17.FAQs
How to add Gift Card Product?
Add a new WooCommerce Product, change the product type to the Gift Card Product, enter the default price and select the pricing type. After entering the price of selected pricing type you may need to Publish the product. That’s it your WooCoomerce Gift Card Product is ready to sell.
Where do I change Gift Card Subject of the recipient?
Please go to the Gift Card Manager Setting page and select the Email Template Tab Section. At the bottom, you can see the mail setting toggle bar. There you may change the Gift Card Subject to the recipient.
From where i can modify the email template?
We have provided a custom post type Gift Cards under the dashboard where we have provided 16 custom templates. You can use them or even add your own template.
Is Shipping Charges applicable on Gift Card?
If any Gift card Product is purchased through a Shipping method (one of the Delivery Methods) only then the shipping charges would be applied. Only admin will receive the gift card mail so that he can ship it to the customer.